

")
I don’t know how else to describe this except, if you like COOL things: THIS IS FOR YOU!
I am SUPER proud/amped/excited to share all this with you! This is a post to bookmark!
I mean REALLY COOL! Your yard is an oasis of deliciousness. It’s Spring. Let’s do this!
In this post you will find recipes I made and love for both WILD VIOLET AND DANDELION JELLY! Yes, you read that right, and let me tell you…it is DIVINE…like for real. Then, I’ve got a FREE CROCHET PATTERN for the jar topper and the flowers!
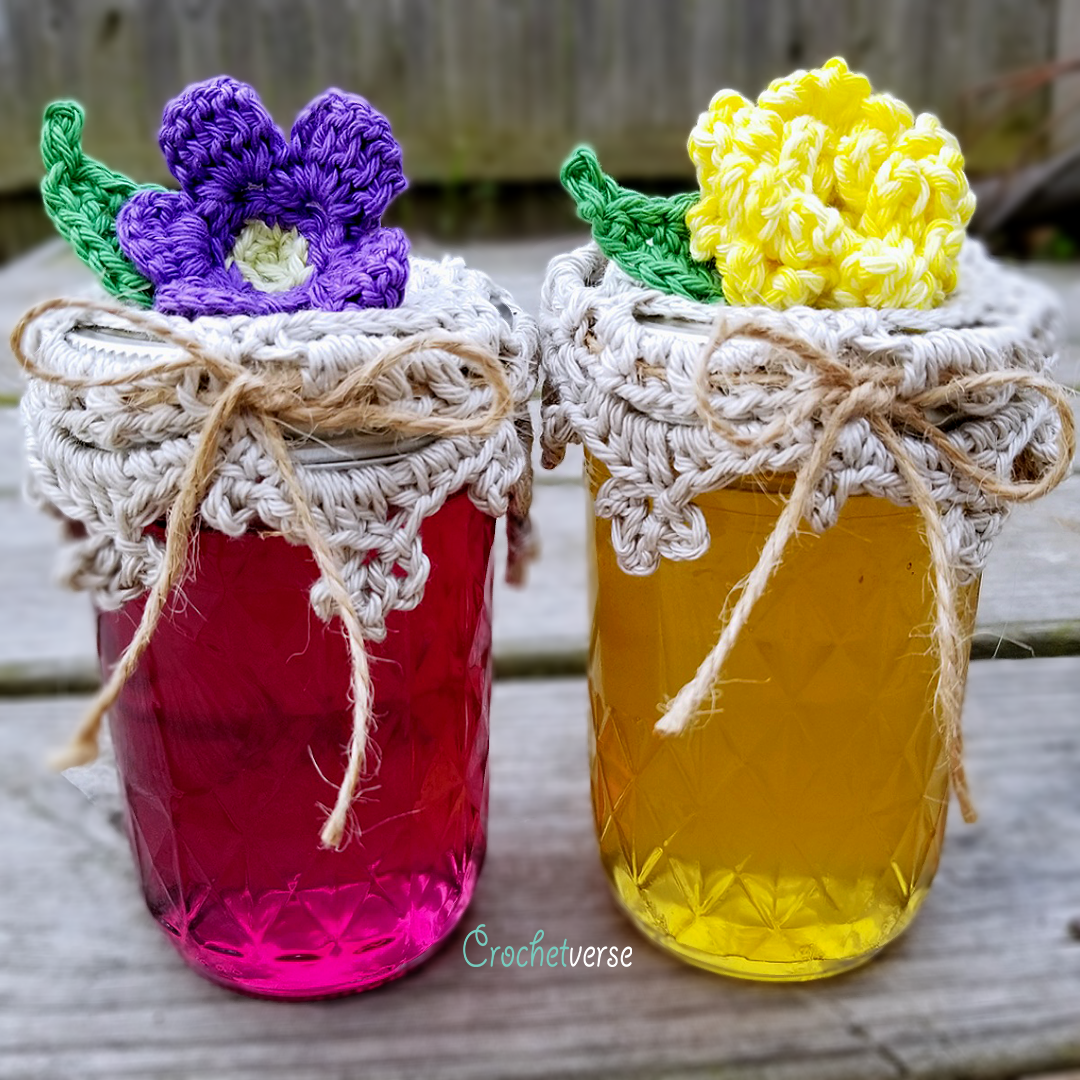
Imagine the PERFECT mild honey with an undertone of lemon tea. The violet is the same BUT with a hint of grape!
If you’re looking to impress with your Earth momma or poppa amazingness, you will want to BOOKMARK this post! Let’s go!
First up: The recipes (If you want to to crochet first, head down towards the bottom for the patterns!)
IMPORTANT HEAD’S UP!!! SAFETY! Only pick your flowers from a yard that you are SURE has not been sprayed with pesticides or fertilizer.
The process is very similar for both, follow along with the ingredients for the one you desire to make!
DANDELION JELLY: (Made (6) 12oz Jelly Jars)
Ingredients:
- (2) cups packed/washed dandelion petals ONLY
- (4 1/2) cups granulated sugar
- (2) tbs freshly squeezed lemon juice
- (3) cups boiling water
- (1) cup water (used later)
- (1) box pectin for LOW SUGAR recipes (my box was pink)
- (1/2) tsp of real butter (I use this to defoam my jelly)
- jar to steep in (I’ve used a large Ball canning jar)
- supplies to can (Ball Jars, canning pot, lids, rings, jar lifter, funnel. I used (6) 12oz quilted jelly jars by Ball)
WILD VIOLET JELLY: (Made (6) 12oz Jelly Jars)
Ingredients:
- (2) cups violet petals, not packed
- (4 1/2) cups granulated sugar
- (2) tbs freshly squeezed lemon juice
- (3) cups boiling water
- (1/2) cup water (used later)
- (1) box pecting for LOW SUGAR recipes (my box was pink)
- (1/2) tsp real butter (I use this to defoam my jelly0
- jar to steep in (I used a large Ball canning jar)
- supplies to can (Ball jars, canning pot, lids, rings, jar lifter, funnel. I used (6) 12oz quilted jelly jars by Ball)
Process:
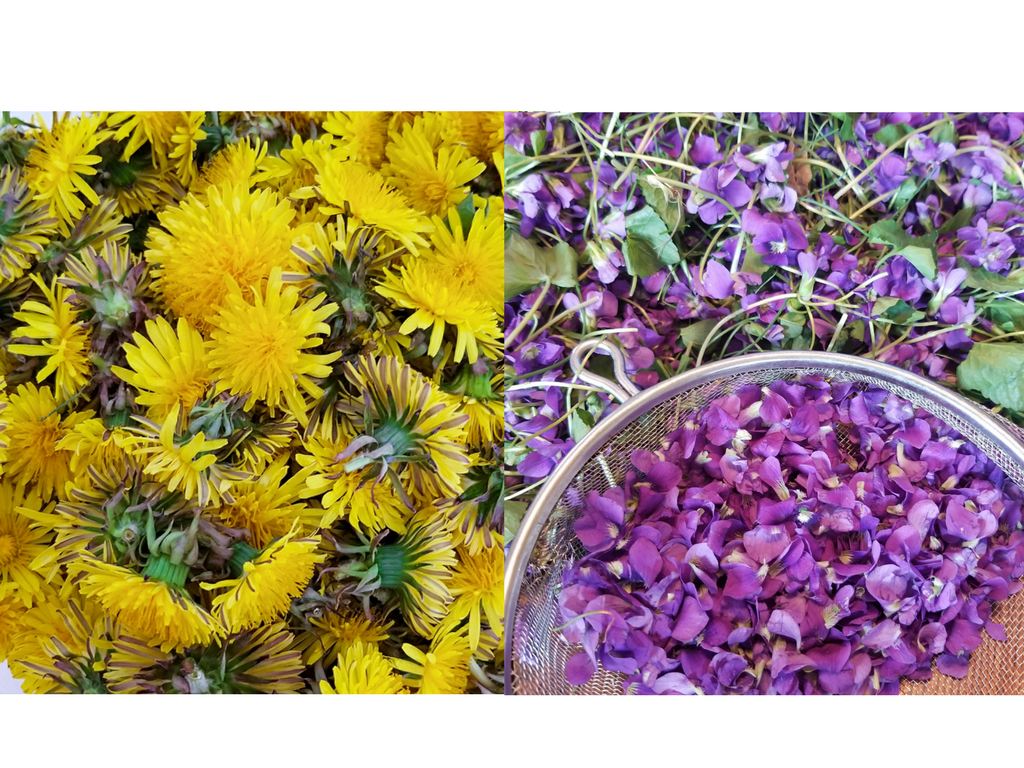
- GATHER AND PROCESS: Head out to your yard and pick your flowers. For dandelions, I picked the flower tops only and gathered just about (8) cups of them to yield the petals I needed. For the violets, I picked flowers and stems and gathered about 10 cups of them to yield the petals I needed. Settle in, sit down, and get comfy: Now we process them. For the dandelions, you will want to pinch the green base under the petals firmly, then twist and roll. The petals will splay out and be easy to remove. The “fuzz” at the base of the petals is OK, the green parts are not. For the violets, I picked the petals off only and filled my (1) cup measuring cup up twice, NOT packed. I put them into a strainer on a paper plate so they’d be ready to wash when I was done. You want NO GREEN (the outermost petals have like a little “stripe” on them and that is ok, just no green parts) as it will make your jelly bitter.
2. WASH: Thoroughly wash the petals VERY well. I turned them out onto a paper towel to drain. Then SQUEEZE all the water out of them and measure out 2 cups packed for the dandelions. For the violets, I had them premeasured so that was not needed.
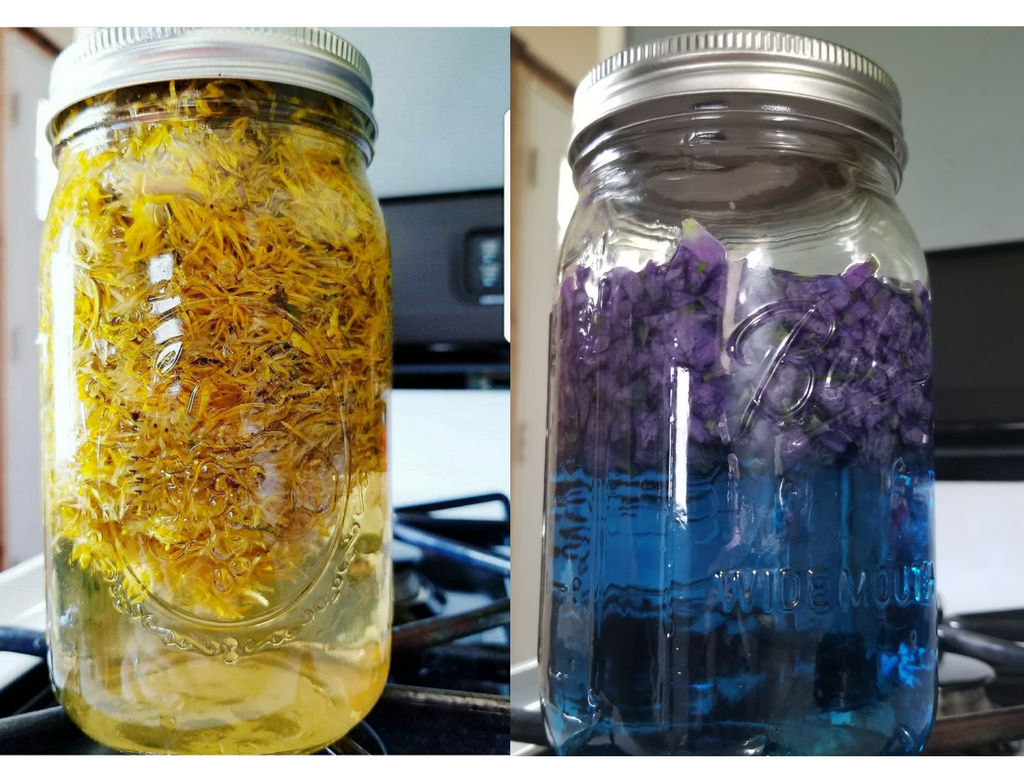
3. STEEP: Bring (3) cups of water to a rolling boil (you want it HOT). Add the measured petals to a heat safe jar. Pour the boiling water into the jar. I let mine sit on the counter until it got to room temp, then refrigerated over night. Total steep time was about 24 hours. I shook the jar here and there as well.
4. PREP THE JARS AND CANNING POT: If you’ve never canned before do a little research on this while you are waiting for your steep’s magic to happen. A quick run down is this: I use the quilted jelly jars by Ball, you will wash all jars, lids, and wax lids. The lids and rings go into a small pot and remain heated on a low simmer. Do not boil the rings and lids, you will mess up the wax and they may not seal properly. The jars get washed and I place them in a large canning pot (also by Ball) and those come to a boil and remain in the water until ready to use.
4. STRAIN AND COOK: I lined my strainer with a regular coffee filter and strained out the liquid gold from the steep. Pour that into a pot. For the dandelion, add in the (1) additional cup of water. For the wild violet, add in (1/2) cup of additional water. Add the (2) tbs of freshly squeezed lemon juice. I strained this too so no pulp would get into my jelly. While whisking constantly, add the box of pectin into the pot. Bring that to a boil. Now, add in all the sugar and whisk that in as well. Bring that to a boil and once boiling, boil for (2) minutes. Turn off heat and remove pot from heat. Add the tiny bit of butter and you will see the foam kind of gather together. Take a spoon and skim that off the top. (Not crucial but makes for a prettier end product).
5. FILL JARS AND PROCESS: Cleanliness is KEY to safe canning. Wash hands, do not touch jars with hands, etc. Remove all jars from the canning pot and line them up on heat proof surface (I use a folded towel). Ladle the jelly into each jar. I fill to just under where the grooves start to screw on the lid. If there are a lot of bubbles you can run a clean knife around to pop them. With a clean damp cloth, wipe the top clean especially where the wax lid seats itself so you get a good seal. Place a wax lid on each jar. Screw a ring onto each jar. Remember again, cleanliness. No licking the spoons, lol. Place the jars in the hot water bath in the canning pot and boil process for 11 minutes.
5. REMOVE, WAIT, ENJOY: Once processed, remove from the water bath and place them on a the folded towel and let them SIT until cool. I waited about 2 days for mine. You will hear some popping as the jars seal. When you press on the lids once cooled, they should not move up and down. This is indication they sealed properly. Don’t worry if once doesn’t seal, simply refrigerate and use that first.
It is seriously so good! Now…let’s CROCHET:
CROCHET JAR LID TOPPER for a REGULAR MOUTH (not wide): (US Terms)
- about 25 yards fingering weight cotton (Scheepjes Catona shown and can be bought at loveknitting.com) in Oatmeal color
- 5 yards green fingering weight cotton in green for the leaf
- 10 yards purple and 5 yards very light yellow for the violet
- 15 yards each light yellow and yellow for the dandelion
- Size F(3.75mm) crochet hook for the topper and leaf
- Size C(2.75mm) crochet hook for the violet and dandelion
- small amount of raffia ribbon or twine for tying on jar
- tapestry needle, scissors, stitch marker
Topper: (Work your chains loosely)
With F hook and oatmeal yarn, make a magic ring:
Do not turn at all. Join only when told specifically. Mark rounds to keep track.
Rnd 1: ch 1, make 6 sc in the ring. (6)
Rnd 2: 2 sc in each sc around. (12)
Rnd 3: (sc in nxt sc, 2 sc in nxt sc) six times total, sl st to 1st sc made. (18)
Rnd 4: ch 1, 2 sc in same st, ch 2, skip nxt 2 sc, (2 sc in nxt sc, ch 2, skip nxt 2 sc) FIVE times total, sl st to 1st sc made.
Rnd 5: ch 1, 2 sc in same st, 2 sc in nxt st, ch 2, (2 sc in each of nxt 2 sc, ch 2) FIVE times total, sl st to 1st sc made.
Rnd 6: ch 1, sc in same st and nxt 3 sts, ch 2, (sc in nxt 4 sc, ch 2) FIVE times total, sl st to 1st sc made.
Rnd 7: ch 1, sc in same st and nxt 3 sts, ch 3, (sc in nxt 4 sc, ch 3) FIVE times total, sl st to 1st sc made.
Rnd 8: ch 1, sc dec over same and nxt sc, sc dec over nxt 2 sc, ch 6, *(sc dec over nxt 2 sc) twice, ch 6, repeat from *, FOUR times more, sl st to 1st sc made.
Rnd 9: ch 1, hdc dec over same and nxt st, ch 1, (hdc in ch-6 sp, ch 1) FIVE times, *hdc dec over nxt 2 sc, ch 1, (hdc in ch-6 sp, ch 1) FIVE times, repeat from * FOUR times more, sl st to 1st st made.
Rnd 10: ch 1, sc in same st, ch 6, *sk the nxt hdcs and chs made in the ch-6 sp and then sc in the nxt hdc dec between the “scallops”, ch 6 , repeat from * 4 times more, sl st to 1st sc made.
Rnd 11: ch 1, sc in same st, ch 3, sl st in 3rd ch from hook (picot made), (2 sc, 2 hdc, dc, <ch 3, sl st in 3rd ch from hook> three times triple picot made, dc, 2 hdc, 2 sc) all in the nxt ch-6 sp, *sc in nxt sc between ch-6 loops, ch 3, sl st in 3rd st from hook, (2 sc , 2 hdc, dc, <ch 3, sl st in 3rd ch from hook> three times triple picot made, dc, 2 hdc, 2 sc) all in the nxt ch- 6 sp, repeat from * FOUR times more, sl st to 1st sc made, cut yarn.
Weave in ends. Block if desired. Weave raffia or twine through the hdc/ch-1 sts of round 9. Stretch over jar lid and tie in a bow to secure.
Leaf:
With green and F hook, chain 5:
Rnd 1: sc in 2nd ch from hook and nxt ch, hdc in nxt ch, 7 dc in last ch, working in remaining free loops on opposite side of ch, hdc in nxt st, sc in nxt 2 sts, ch 3, sl st in 3rd ch from hook, sl st to 1st sc made, cut yarn.
Weave ends, sew to top of jar topper.
Dandelion:
Do not turn.
Holding the light yellow and yellow DOUBLE strand working as one with the C hook, make a magic ring:
Rnd 1: ch 1, make 8 sc in ring, do not join.
Rnd 2: (scBLO, ch 6, scBLO, ch 6) in each st around, sl st to 1st scBLO made. (16 scblo and 16 ch-6 loops)
Rnd 3: working in the the remaining front loops and keeping the ch-6 loops from rnd 2 towards the back as you work, repeat round 2 but work in the FRONT LOOPS around, sl st to 1st sc made, cut yarn.
Weave in ends, sew to jar topper.
Violet:
With lightest yellow and C hook, make magic ring:
Rnd 1: make 5 sc in ring, do not join. (5)
Rnd 2: 2 scBLO in each st around, sl st to 1st scblo made, cut yarn. (10)
Rnd 3: join violet with a sl st in any BACK LOOP around, ch 1, sl st in the same st and nxt st, ch 2, skip nxt st, *sl st in nxt 2 sts, ch 2, skip nxt st, repeat from * four times more, sl st to 1st sl st made.
Rnd 4: TURN, sl st to 1st ch-2 sp, (ch 3, 4 tc, ch 3, sl st into same ch-2 sp, sl st into the nxt ch-2 sp) ALL in each ch-2 sp around, on last repeat you will sl st into the 1st ch-2 sp you worked, cut yarn. (5 petals)
Weave in all ends, sew to jar topper.
Much Love and Yarn,,
Stephanie Pokorny (Crochetverse)
The information and photos in this posting are the sole copyrighted property of Crochetverse©2018. Please do not copy and paste any of the information contained within either electronically, verbally, or written in part or in whole. Instead, please share the DIRECT LINK to this posting only, and if you do, I thank you for sharing. You of course may sell anything you make from this pattern that you have made with your own two hands, no contract labor or mass productions are permitted. I need your visits to keep me around creating! Please never screenshot or copy and paste the info within, instead share the link so I may entertain your friends as well! If you credit Crochetverse as the designer that is greatly appreciated!

How much pectin was in your box of pectin, please? I really want to try this, thank you!
Hi! I think I got you on a post on FB, BUT if not it is 1.75oz/49 gram box. Thanks!
Comments are closed.