

")
Ain’t love grand??? I sure think so. Ain’t crochet a close second? Duh.
Well, I’ve decided to combine the two and give you this quick free pattern for an adorable headband/earwarmer. Double strand for the headband portion, this will keep the cold off your ears and the warmth in your heart!
From my heart to your head, I give you the……
“LoveSTRUCK” Earwarmer <3
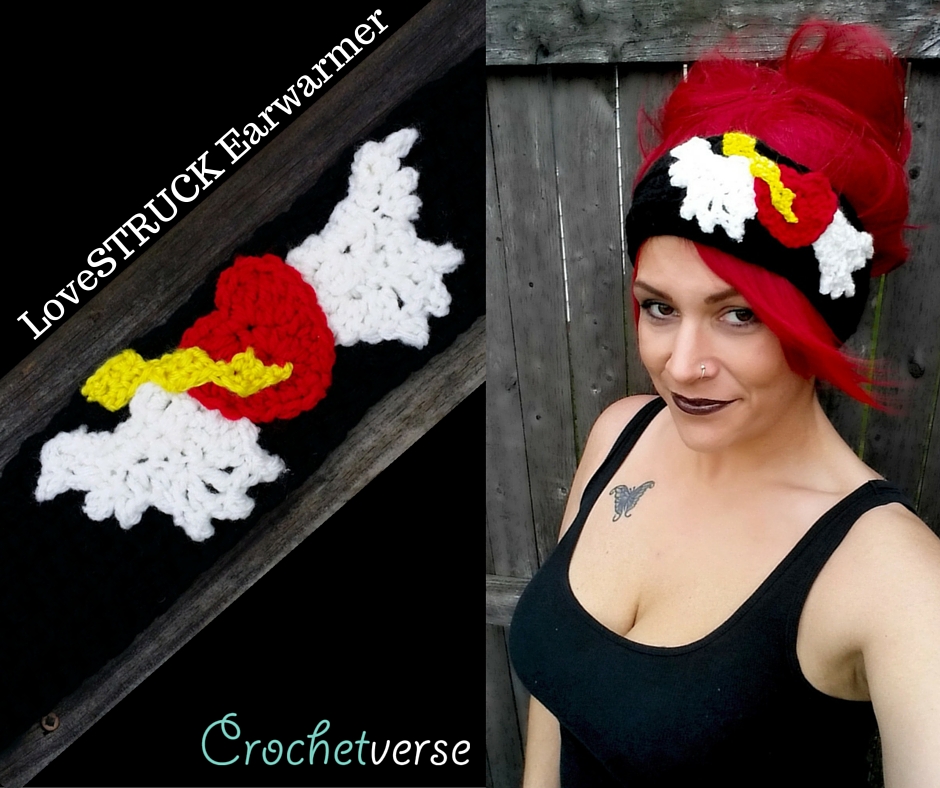
Here is your pattern, loves:
“LoveStruck” Headband/Earwarmer
Materials:
– worsted weight yarn in the following amounts and color:
-30 yards each of white, red, yello
-150 yards of black
– size G (4.0mm) crochet hook
– size H (5.0mm) crochet hook
– size J (6.0mm) crochet hook
– (1) 1” button
– tapestry needle to weave in ends and scissors
Size:
Sized for the average adult woman head
Gauge:
With yarn held double strand and a J hook:
5 rows x 8 sts = 3” x 3”
Adjust hook as needed to obtain gauge as the item is wearable.
If you have too many stitches in your swatch, your gauge is tight, go up in hook size.
If you have too few stitches in your swatch, your gauge is loose, go down in hook size.
Finished Dimensions:
Main headband measures 3” x 23” (you want this length so it can be buttoned for wear)
Special Stitches:
Picot: Chain 3, sl st in the 3rd chain from the hook.
Instructions:
Main headband:
With J hook and black yarn held DOUBLE stranded, chain 57:
***Ch 1 does NOT count as a stitch throughout the work.
Row 1: hdc in 3rd chain from hook and each remaining chain across. (56)
Row 2: ch 1, turn, hdc in 1st st and in each st across. (56)
Row 3: ch 1, turn, hdc in 1st 2 sts, ch 1, sk next st, hdc in each remaining chain across.
Row 4: ch 1, turn, hdc in 1st st and in each st until the ch-1 space is reached, hdc in the nxt ch, hdc in the last 2 hdc. (56)
Row 5: ch 1, turn, hdc in 1st st and in each st across, tie off.
Appliques: *ALL ARE DONE WITH SINGLE STRAND OF YARN!
Heart
With H hook and red, make magic circle:
Rnd 1: ch 1, (does not count as a st), 10 hdc in ring, join to 1st hdc made. (10)
Rnd 2: ch1, sc in 1st st and nxt, (hdc,dc) in nxt st, (dc,tc) in nxt st, (2 tc, dc, hdc, sc) all in nxt st, (sc, hdc, dc, 2tc) in nxt st, (tc,dc) in nxt st, (dc,hdc) in nxt st, sc in last 2 sts, sl st to 1st sc made, tie off, leaving a long tail to stitch to hat.
Wing: (make 2)
With H hook and white, make magic circle:
Row 1: ch 3 (counts as 1st dc), (5 dc, hdc, sc) in ring, pull tightly to close.
Row 2: (See Special Sts for Picot) ch 4, turn (sc, hdc, picot, sc) in 2nd ch from hook, (sl st, picot) in nxt ch, (sl st, picot) in nxt ch , hdc in nxt 2 sts, (dc, picot) three times all in nxt st, 2 dc in nxt st, 2 dc in nxt st, hdc nxt 2 sts, sc in top of beg ch-3, working around the POSTS of the stitches down the side of the wing work 3 sc around the post of the beg ch-3, 1 sc in the ring loop, 3 sc around the post of the nxt st, then sc in the nxt 2 remaining loops of the ch-4 at the beginning, sl st to the 1st sc made, tie off. , tie off leaving a long tail to stitch to hat. Ch
Bolt:
With G hook and yellow, ch 4:
Row 1: sc in 2nd ch from hook and next 2 chs. (3)
Row 2: ch 1, turn, sc in same and each st across, ch 4, turn.
Row 3: sc in 2nd ch from hook and nxt 2 chs, ch 1, turn. (3)
Row 4: sc in each sc across, ch 3, turn.
Row 5: sc in 2nd ch from hook and nxt ch, ch 1, turn. (2)
Row 6: sc in each st across, ch 2 and tie off leaving tail to stitch to headband. (2 sc)
Assembly and Finishing:
- Stitch the button on the right side of the headband about ½” in from the short edge and centered on the side opposite the ch-1 button hole created in row 3.
- ONE wing will be with the with the front of row 1 up, and ONE will be with the back of row 1 up, so that they are a mirror image of each other when stitched on. Dry fit the 2 wings and heart on the headband. I placed the headband on my head to determine where I wanted them, then pinned them in place. I chose to have them off center more to the side of my head. You want the wings close enough so that the heart slightly overlaps the edges of them when it is stitched on.
- Using the end tails from each wing and using the photo as a guide, stitch them into your chosen spot on the headband. I stitch shallow, meaning I only grab the top portion of the stitches of the headband as I work. This way, the back side is clean and not a mess of stitches and the appliques are secure.
To me, is the make or break part of a project. Stitch carefully, stitch so those picots are stretched nicely to enhance the wing look, try to make one wing look like the other. Take your time to do them the best you can J
- Stitch the heart on so that it slightly overlaps the wings, then stitch the lightening bolt on that, creating a cohesive piece.
- Weave in all ends. Block if desired.
Crochetverse/Stephanie Pokorny 2016©- Please feel free to share the link to this pattern, share the watermarked photos, and pin on Pinterest. Please do NOT copy and paste any part of this pattern and post the info elsewhere, the pattern may not be sold. You may sell any items you make from the pattern, that you create with your own two hands. No farming out of labor or mass productions. If you’d be so kind, please credit Crochetverse as the designer when selling. Thank you!
Please share the love back! Like and post your new goods on our FACEBOOK PAGE HERE!
Check us for tons of patterns on RAVELRY HERE! and ETSY HERE!
Of course, we have an INSTAGRAM HERE!
Much love and yarn,
Stephanie
