

")
So nice to see you again! Welcome to Part 2 of the Garden Party Jacket CAL
If you’ve missed the “The Info & Supply” post, you can find that: HERE
If you’ve missed “Part 1: Gauge & Squares/Pt.1”, you can find that: HERE
Enormous thanks and gratitude once again to the incredible translators and the CAL – Crochet A Long Group for their diligent work and amazing support. Below are the links for each alternate language. Simply click on your chosen language to be taken to the blog posting for this week!
CLICK ON THE LANGUAGE OF YOUR CHOICE TO BE TAKEN TO THAT POSTING:
Now, Let’s begin:
There are two steps this week:
Step 1: Squares Part 2
Step 2: Blocking
STEP 1: SQUARES PART 2
We will finish off creating our squares this week. The garment uses (3) sizes of squares in it’s construction: SMALL, MEDIUM, and LARGE. There are a total of (13) squares needed for the jacket. Last week, we knocked out 8 of those when we made the SMALL squares. This week, we will make (4) MEDIUM squares and (1) LARGE square.
The medium and large squares are simply a continuation of rounds of the small square you are now familiar with from Part 1 of the CAL.
For that reason, I will only post the simple written version of the pattern this week. Should you need a refresher or want to refer back to some photos, visit Part 1 HERE. The rounds are IDENTICAL, and the photos there are exactly the same as your work should appear for the medium and large squares as you work.
This week won’t have lots of pretty photos, but we will be creating the real “meat” of the garment, so the beauty will actually be right in your own hands!!
Keep in mind the pattern format, all information is given as shown below:
XXS/XS (S/M, L/XL, 2X/3X, 4X/5X)
Be sure you work the pattern using the information located in the position marked above for YOUR chosen size. You may want to go through and CIRCLE all the instructions that are specific to your size to eliminate possible errors 🙂
HOLD UP! WAIT A MINUTE!! Let’s talk about GAUGE again! Now that you are an old pro at it, I MUST INSIST we discuss how it will apply to the MEDIUM and LARGE squares. IT IS IMPERATIVE!
The garment is created as a mathematical puzzle of pieces that are assembled into the jacket. Due to this, you may NOT fix gauge issues by tearing out a round or two until it measures right. Why, you ask? When we seam them together, the entire piece MUST match stitch for stitch for it to assemble properly. So, the stitch count must remain as directed in the pattern.
Through additional testing, it was discovered that as the squares grow larger with more rounds, they become looser for two reasons. Firstly, your tension will most likely loosen as you work because you become familiar with the pattern. Secondly, the nature of the stitch pattern is that it becomes looser as the rounds grow larger.
For this reason, you MUST pay attention to the goal width for the square for your chosen size! Each square will have a chart telling you what width to aim for. You *MAY* need to change your hook size to achieve the correct width. The variation in hook sizes used by the testers to achieve gauge was remarkable: from an F all the way to an I, and we all came out with the same gauge. Tension varies WILDLY from one crocheter to the next!
LET’S BEGIN NOW FOR THE MEDIUM SQUARES:
THESE ARE HOOK RECOMMENDATIONS ONLY, YOU WILL NEED TO ADJUST TO ACHIEVE THE PROPER DIMENSIONS FOR YOUR SIZE SQUARE.
*USE WHATEVER HOOK SIZE GETS YOU THE PROPER WIDTH, USING THE BELOW AS A STARTING POINT* RECOMMENDATIONS ONLY!!!! For the MEDIUM SQUARE:
XXS/XS: DO NOT change hook size from what you used on the SMALL squares.
S/M: Go down ONE hook size from what you used on the SMALL squares.
L/XL-5X: Go down TWO or THREE hook sizes from what you used on the SMALL squares.
DO NOT BE AFRAID TO USE TWO HOOKS WITHIN THE SAME SQUARE! Just mark where you changed to you can repeat that for the remaining MEDIUM squares.
The chart below shows the width to achieve for your MEDIUM square for your size:
| Garment Size | Medium Square Width Goal (inches) |
| XXS/XS | 7” |
| S/M | 8.5” |
| L/XL | 9” |
| 2X/3X | 10″ |
| 4X/5X | 11” |
HINT: If you are working one of the larger sizes: When the pattern tells you to stop for a certain size, you may check your square at that point using the chart even if you will continue to work rounds to work your size. This is a mid-way check that may save some frogging (tearing out) of rounds, if you know earlier on you are too large or too small in gauge.
Now for the pattern for MEDIUM SQUARES: Check Gauge AFTER EACH ONE!
Special Stitches: (most popcorns, include a ch-1 as the last step, please note, this one does NOT)
Beginning Popcorn (beg pop): chain 3 (counts as a dc), make 4 dc in the same space, remove hook from loop on the hook. Insert hook from front to back in the top of the beg ch-3, pull the dropped loop through the chain to complete the popcorn.
Popcorn (pop): make 5 dc in the indicated stitch, remove hook from the loop on the hook. Insert hook from front to back under the 2 bars (as normal) of the 1st dc made of the group, pull the dropped loop through the 1st dc to complete the popcorn.
Instructions: (Leave 6″ beginning and end tails throughout)
*Note: Stitch counts are given as the number of 3dc groups on one side. To count this: include the (1) 3dc group of the corner on the side, the 3dc groups in between, and the last 3dc group of the next corner on the same side.
Should you choose fewer colors: simply carry on by slip stitching to the correct spot in the pattern for the next round, as opposed to tying off and rejoining your new yarn.
Should you choose more colors: tie off as you choose, and rejoin your new yarn with a slip stitch in the correct spot for the next round.
Don’t forget to refer to the “TIps & Tricks” Blog Post HERE! to assist you in meeting gauge!
Medium Square: (Make 4) Do not turn rounds.
With AC (accent color), ch 4, sl st to 1st ch made to form a ring:
Rnd 1: ch 1 (does not count as stitch) 12 hdc in ring, sl st to 1st hdc made. (12)
Rnd 2: beg pop (*see special sts) in the same stitch as the join, ch 1, *pop (*see special stitches) in the nxt st, ch 1, repeat from * 10 x more, sl st to closing stitch on top of beginning popcorn. (12 popcorns, 12 ch-1 sps)
Rnd 3: sl st into next ch-1 sp, ch 3 (counts as dc), (2 dc, ch 1, 3 dc, ch 1) in the same ch-1 sp, 3 dc in the nxt ch-1 sp, ch 1, 3 dc in the nxt ch-1 sp, ch 1, *(3 dc, ch 1, 3 dc, ch 1) in the nxt ch-1 sp, 3 dc in the nxt ch-1 sp, ch 1, 3 dc in the nxt ch-1 sp, ch 1, repeat from *, 2 times more, sl st to top of beg ch-3, tie off.
Rnd 4: join MC (main color) with a sl st in any ch-1 space of any corner, ch 3 (counts as dc) (2 dc, ch 1, 3 dc, ch 1) in the same sp, (3 dc, ch 1) in each ch-1 sp until next corner is reached, *(3 dc, ch 1, 3 dc, ch 1) in the nxt corner space, (3 dc, ch 1) in each ch-1 sp until next corner is reached, repeat from * around until 1st corner is reached and sl st to the top of the beg ch-3.
Rnd 5: sl st across next 2 dc and into ch-1 space at the corner, ch 3 (counts as dc) (2 dc, ch 1, 3 dc, ch 1) in the same sp, (3 dc, ch 1) in each ch-1 sp until next corner is reached, *(3 dc, ch 1, 3 dc, ch 1) in the nxt corner space, (3 dc, ch 1) in each ch -1 sp until next corner is reached, repeat from * around until 1st corner is reached and sl st to the top of the beg ch-3.
*Note, the larger sizes will be slightly different from the measurements shown as the larger sizes are slightly tighter in gauge. When you are 1/4 done with the rounds, be sure you are 1/4 of your goal measurement, 1/2 way done, be sure you are 1/2 way to your goal measurement and so on*
Rnd 6-7: repeat round 5, tie off for XXS/XS, do not tie off and continue for all other sizes. (8 groups of 3dc on each side, and must measure 7″ for XXS/XS)
Rnd 8-9: repeat round 5, tie off for S/M, do not tie off and continue for all other sizes. (10 groups of 3dc on each side, and must measure 8.5″ for S/M)
Rnd 10-11: repeat round 5, tie off for L/XL, do not tie off and continue for remaining size. (12 groups of 3dc on each side, and must measure 9″ for L/XL)
Rnd 12-13: repeat round 5, tie off for 2X/3X. (14 groups of 3dc on each side, and must measure 10″ for 2X/3X)
Rnd 14-15: repeat round 5, tie off for 4X/5X. (16 groups of 3dc on each side, and must measure 11″ for 4X/5X)
**Pause when you finish each square and be certain you have achieved the correct width for your square. It’s better to have to frog just one as opposed to all four 🙂
When all 4 are completed and measure correctly, move on to the LARGE square.
LARGE SQUARE:
THESE ARE HOOK RECOMMENDATIONS ONLY, YOU WILL NEED TO ADJUST TO ACHIEVE THE PROPER DIMENSIONS FOR YOUR SIZE SQUARE.
*USE WHATEVER HOOK SIZE GETS YOU THE PROPER WIDTH, USING THE BELOW AS A STARTING POINT* RECOMMENDATIONS ONLY!!!! For the LARGE SQUARE:
XXS/XS: DO NOT change hook size from what you used on the SMALL squares.
S/M: Go down ONE hook size from what you used on the SMALL squares.
L/XL-5X: Go down TWO or THREE hook sizes from what you used on the SMALL squares.
DO NOT BE AFRAID TO USE TWO HOOKS WITHIN THE SAME SQUARE!
The below chart shows the goal width for the LARGE square for each size AFTER ALL ROUNDS ARE COMPLETE, INCLUDING THE 3 EDGE ROUNDS:
| Garment Size | Large Square Width Goal (inches) |
| XXS/XS | 15 ½” |
| S/M | 17” |
| L/XL | 18” |
| 2X/3X | 19” |
| 4X/5X | 20” |
MID-WAY CHECKPOINTS:
As the above chart is for measurements AFTER the edge rounds, you CANNOT use the chart midway through to check against smaller sizes width’s as you reach their stopping point, like you did for the MEDIUM square.
INSTEAD, I will include “PLUS SIZE CHECKPOINTS for 2x/3x and 4x/5x” in the directions which are directed for the PLUS SIZES! You do not have to be EXACT at these points. BUT if you are way off, you *may* want to consider a hook size change for a few rounds to make sure it doesn’t become too large. You must complete all the rounds for your size, but you can use these check points in hopes to discover earlier, rather than later, if you are having a gauge issue.
Now for the pattern for the LARGE square: (Make 1) Do not turn rounds.
With AC, ch 4, sl st to 1st ch made to form a ring:
Rnd 1: ch 1 (does not count as stitch) 12 hdc in ring, sl st to 1st hdc made. (12)
Rnd 2: beg pop (*see special sts) in the same stitch as the join, ch 1, *pop (*see special stitches) in the nxt st, ch 1, repeat from * 10 x more, sl st to closing stitch on top of beginning popcorn. (12 popcorns, 12 ch-1 sps)
Rnd 3: sl st into next ch-1 sp, ch 3 (counts as dc), (2 dc, ch 1, 3 dc, ch 1) in the same ch-1 sp, 3 dc in the nxt ch-1 sp, ch 1, 3 dc in the nxt ch-1 sp, ch 1, *(3 dc, ch 1, 3 dc, ch 1) in the nxt ch-1 sp, 3 dc in the nxt ch-1 sp, ch 1, 3 dc in the nxt ch-1 sp, ch 1, repeat from *, 2 times more, sl st to top of beg ch-3.
Rnd 4: sl st across next 2 dc and into the nxt ch-1 sp, ch 3 (counts as dc) (2 dc, ch 1, 3 dc, ch 1) in the same sp, (3 dc, ch 1) in each ch-1 sp until next corner is reached, *(3 dc, ch 1, 3 dc, ch 1) in the nxt corner space, (3 dc, ch 1) in each ch-1 sp until next corner is reached, repeat from * around until 1st corner is reached and sl st to the top of the beg ch-3.
***For the other sizes, when you are 1/4 through the # of rounds in your square, be sure you are 1/4 to your goal measurement, adjust hook if needed. When you are 1/2 way though the # of rounds, be sure you are 1/2 way to your goal measurement and so on***
Rnd 5-12: repeat round 4, tie off and continue to EDGE ROUNDS for XXS/XS, continue for all other sizes. (*PLUS SIZE CHECKPOINT: After round 7 is complete, your width should be about 6.5″ for plus sizes, adjust if needed and carry on to complete all rounds for your size)
Rnd 13-16: repeat round 4, tie off and continue to EDGE ROUNDS for S/M, continue for all other sizes. (*PLUS SIZE CHECKPOINT: After round 15 is complete, your width should be about 11″, adjust if needed and carry on to complete all rounds for your size)
Rnd 17-20: repeat round 4, tie off and continue to EDGE ROUNDS for L/XL, continue for all other sizes. (*PLUS SIZE CHECKPOINT: After round 19 is complete, your width should be about 17″, adjust if needed and carry on to complete all rounds for your size)
Rnd 21-24: repeat round 4, tie off and continue to EDGE ROUNDS for 2X/3X, continue for remaining size. (*PLUS SIZE CHECKPOINT: After round 23 is complete, your width should be about 18″, adjust if needed and carry on to complete all rounds for your size)
Rnd 25-28: repeat round 4, tie off and continue to EDGE ROUNDS for 4X/5X. (*PLUS SIZE CHECKPOINT: After round 27 is complete, your width should be about 19″, adjust if needed and carry on to complete all rounds for your size)
EDGE ROUNDS:
Rnd 1: join MC in the ch-1 sp at any corner, ch 3 (counts as dc) (2 dc, ch 1, 3 dc, ch 1) in the same sp, (3 dc, ch 1) in each ch-1 sp until next corner is reached, *(3 dc, ch 1, 3 dc, ch 1) in the nxt corner space, (3 dc, ch 1) in each ch-1 sp until next corner is reached, repeat from * around until 1st corner is reached and sl st to the top of the beg ch-3.
Rnd 2: sl st across next 2 dc and into nxt ch-1 sp, ch 3 (counts as dc) (2 dc, ch 1, 3 dc, ch 1) in the same sp, (3 dc, ch 1) in each ch-1 sp until next corner is reached, *(3 dc, ch 1, 3 dc, ch 1) in the nxt corner space, (3 dc, ch 1) in each ch-1 sp until next corner is reached, repeat from * around until 1st corner is reached and sl st to the top of the beg ch-3.
Rnd 3: repeat round 2, tie off for all sizes.
# of 3dc groups on one side by size:
XXS/XS: 16, S/M: 20, L/XL: 24, 2X/3X: 28, 4X/5X: 32
Be certain you have made gauge on this square as well. You *may* need to go down a hook size. If you are close to the correct width, you may choose to go down a hook size for just the last few rounds to “tighten” it up. This will probably involve a little trial and error 🙂
By George, you’ve done it! If all your squares are done and measure correctly, pick up your hand and reach around your neck and pat yourself on the back…maybe throw in a little massage too! Yahooo! Step back and look at all the pretty colors in that pile! Simply gorgeous, I am sure. I literally cannot wait to see all the color combos you fellow creative humans choose!
Step 2: Weaving in Ends & Blocking
This, like gauge, is often seen as a dreaded task in crochet. But let me tell you, it is certainly not and quite easy! To me, the difference between a good crocheted item and a great crocheted item, is proper careful finishing.
Have you ever made an item, and when you were done, compared it to the photo you saw on the pattern and kind of wondered why yours didn’t look quite the same? I’m going to venture to bet, it’s finishing and blocking that made the difference! So let’s get to it so you can have the most professional and impeccable finished garment you can!
First, we must WEAVE IN ALL OUR ENDS. Everyone has different methods, and this is certainly ok. But, I am going to tell you how I do it and why I urge you to try this way for at least this jacket.
Remember how I stated I estimated yardage generously? A main reason is this: I asked that you leave a minimum of 6″ tails for each of your beginnings and tie offs.
WHY, you ask? This is an item you will wear, probably often. (or I certainly hope!) You are a human who moves in magical ways. Your garment will be stretched, tugged, and pulled about as you go through your day. If you fail to weave in ends and seam motifs very securely, your garment will wear out and not look crisp for as long as it could. You spent a lot of time making it, so let’s finish it right!
With your tapestry needle, take each tail and actually sew it INSIDE the stitches back and forth, up and down, changing directions about 3 times. I try to run my needle WITHIN the plies of the actual yarn to secure them even further. Work until you have a couple inches of tail left only. Now where your yarn emerges from the work, gently tug that tail to ever so slightly pucker your work. Snip it while holding it taught. Release the tail and smooth the work back out. VOILA! The little end gets “sucked” inside the stitches never to be seen again. Repeat with all remaining tails 🙂
Now for blocking: The method I will describe is safe for MOST fibers, as it involves no machine washing, soaps, or heat. Obviously, you should test it on ONE square only and make sure you have desirable results before doing all of them.
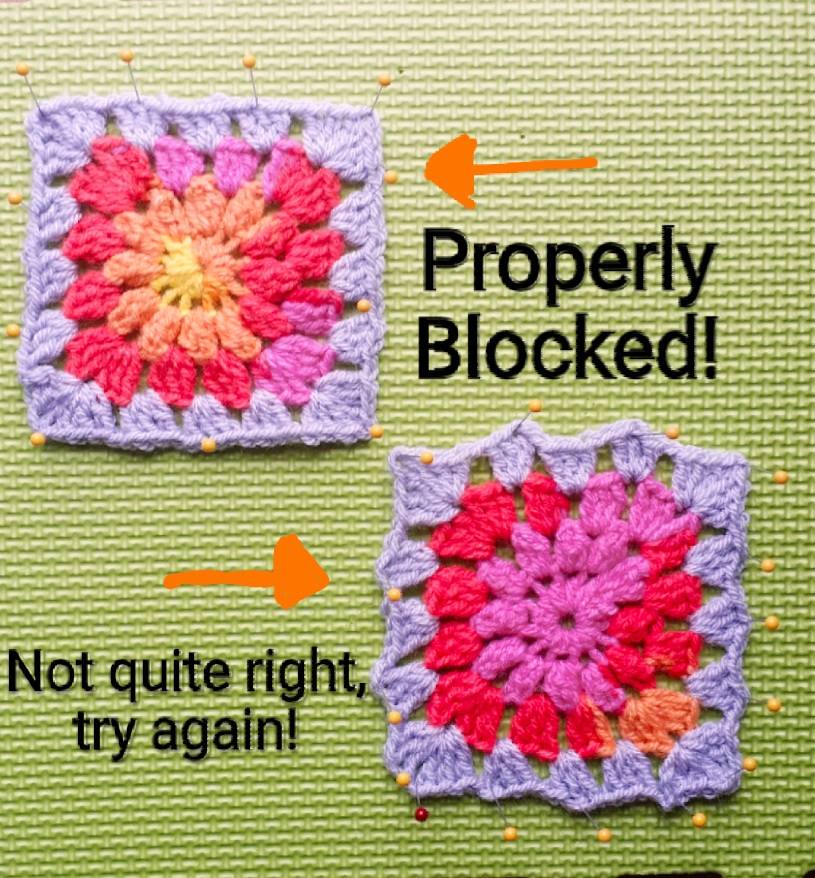
You will need:
- NON RUSTING Steel Pins (since water is used, if you do not make sure they don’t rust, you could end up with rust stains on your items as they dry! Boooo!)
- something to pin your squares out on: either foam mats, folded towels, an ironing board with towels underneath the cover, or any other flat surface you can safely get damp and pin to
- your squares, ends all securely woven in
- Gather your squares and head to your sink. Set the water temperature to COOL and thoroughly wet all the squares. Don’t be afraid, it will be ok!
- Remove the excess water from your squares by SQUEEZING ONLY. Do NOT wring or twist them at all. If they remain very damp after a squeeze, place them on a towel and roll the towel up tightly, with the squares inside, to remove even more excess water.
- Now, using the pins and your blocking surface, pin each square out. You will have to smooth gently, but do NOT over stretch. The main goal is to achieve nice straight edges and crisp corners. Pin the corners, as well as a few times along each edge. Make sure you don’t create peaks or waves as you pin the sides. Gentle smoothing, shaping, and pinning into place is all you need. Do this for all the squares. If you tug too hard, the stretchy nature of the fabric may make them too large, just smooth and pin.
- LEAVE them to dry completely. If I’m ansty, I sometimes direct a fan on them. I generally leave them undisturbed overnight.
- Remove all the pins, and check out how nice and even they are. This is going to make a world of difference in ease when we stitch them together next week!
Be sure you store your squares stacked nice and flat until next week!
That’s it! Part 2 is complete. Next week, we will begin to see our garment come together! That is always the most exciting part for me! Until next time…..
Much Love & Yarn,
Stephanie
*****ARE YOU READY FOR PART 3? CLICK HERE! *****
Much Love & Credit Given to the Test Team: Nichole Chapel, Jamie Cowley, Janean Craig, Tammii Crosland, Maggie Diaz, Katherine Popowski, Amber Sarita, & Heather Sutton
The information and photos in this posting are the sole copyrighted property of Crochetverse©2016. Please do not copy and paste any of the information contained within either electronically, verbally, or written in part or in whole. Instead, please share the DIRECT LINK to this posting only, and if you do, I thank you for sharing. You of course may sell anything you make from this pattern that you have made with your own two hands, no contract labor or mass productions are permitted. If you credit Crochetverse as the designer when you sell, that is greatly appreciated. Thank you so much for respecting the hard work that goes into patterns, so that we may all remain creative 🙂

Dear ,
Part two is iT also in Dutch language.
I can’t find iT.
Thanks greetz Katleen
Yes, our Dutch translator has had a little delay, but it will be posted soon! Hoping later today or tomorrow!
I will wait patiently… ?
Will you be also leaving this a pdf in English at the end of the CAL, it’s very difficult for us older folks to sit at the computer and crochet! 🙂
Hi Jane, It will remain on the blog only at this point. I’m sorry it is a bit difficult for you. A suggestion to help: maybe try to Copy and paste into a document and then print it. Thank you for asking 🙂
Bonsoir, je ne trouve pas la traduction en français de la partie 3. Pourriez-vous m’indiquer où je peux la trouver. Grand merci d’avance.
Our French translator was met with some health issues so they are a bit delayed, I am sorry and it will be posted as soon as it becomes available 🙂
Is the pattern going to be available for download?
No, It will remain available once the CAL is over, but it will be posted on the blog only. Thank you!
Comments are closed.