

")
It seems like all the school have a Dr. Seuss Week and .. why wouldn’t they?!
His books, imagination, and drawings are amazing and fun and everything a kid could love! (and adult! haah!)
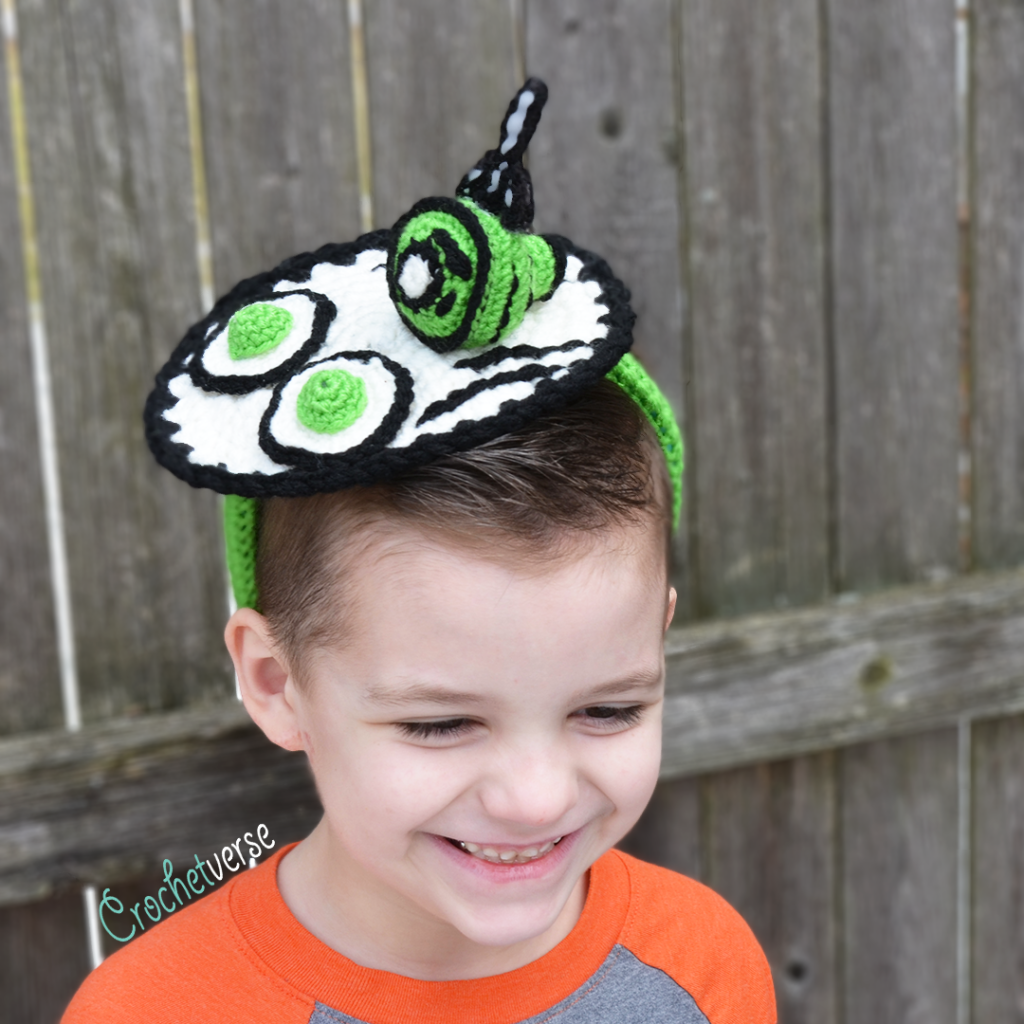
I created this Green Eggs and Ham Headband for my son for his week. It is the cutest little thing and I hope you enjoy making them!
Please don’t ever copy and paste this pattern to share. Instead share the link to my page here. I need you amazing folk to visit me so I can keep offering FREE patterns! Let me know if you need help or find an error ever at [email protected] or on my Facebook Page! While you are there, follow me and like it. That way you won’t miss out on anything!
Materials:
– worsted weight yarn in the following amounts and colors
– 50 yards white (Red Heart Super Saver Aran)
– 50 yards green (Red Heart Super Saver Spring Green)
– 25 yards black (Red Heart Super Saver Black)
– size H (5mm) crochet hook
– size I (5.5mm) crochet hook
– size E (3.5mm) crochet hook
– ½” headband
– glue gun and glue sticks if you want to use them to attach (I did)
– tapestry needle, scissors, tape measure, small amount of stuffing
Gauge:
Part of pattern. I crochet VERY tightly. You may need to drop a hook size or two to meet my gauge.
Rounds 1-3 of platter = 2 ¼” diameter
Sized For:
One size fits all
Instructions:
Platter:
With double strand white and I hook, make magic ring, ch 1:
Do not join. Do not turn. Unless specifically instructed.
Rnd 1: 8 sc in ring. (8)
Rnd 2: 2 sc in each sc around. (16)
Rnd 3: (sc in nxt sc, 2 sc in nxt sc) eight times total. (24)
PAUSE CHECK GAUGE:
Your circle should measure 2 ¼” in diameter.
If yours is LARGER, your tension is looser than mine. Go DOWN a hook size and try again.
If yours is SMALLER, your tension is tighter than mine. Go UP a hook size and try again.
Rnd 4: hdc in nxt 3 sts, 3 hdc in nxt st, hdc in nxt 3 sts, sc in nxt 3 sts, hdc in nxt 3 sts, 3 hdc in nxt st, hdc in nxt 2 sts, 2 hdc in nxt st, sc in nxt st, 2 sc in nxt st, sc in nxt 5 sts. (30)
Rnd 5: sc in nxt st, 2 sc in nxt st, hdc in nxt 2 sts, 2 hdc in nxt st, hdc in nxt 2 sts, (hdc, sc) in nxt st, 2 sc in nxt st, sc in nxt 4 sts, 2 sc in nxt st, sc in nxt 2 sts, (sc, hdc) in nxt st, hdc in nxt 2 sts, 2 hdc in nxt st, hdc in nxt 2 sts, 2 sc in nxt st, sc in nxt 3 sts, 2 sc in nxt st, sc in last 3 sts. (39)
Rnd 6: sc in nxt 4 sts, hdc in nxt 2 sts, 2 hdc in nxt st, hdc in nxt st, 2 hdc in nxt st, hdc in nxt 2 sts, sc in nxt 7 sts, 2 sc in nxt st, sc in nxt 4 sts, hdc in nxt 2 sts, 2 hdc in nxt st, hdc in nxt 3 sts, 2 hdc in nxt st, sc in last 9 sts. (44)
Rnd 7: sc in nxt 5 sts, (sc, hdc) in nxt st, hdc in nxt 2 sts, 2 hdc in nxt st, hdc in nxt st, 2 hdc in nxt st, hdc in nxt st, 2 sc in nxt st, sc in nxt 10 sts, (sc, hdc) in nxt st, hdc in nxt 4 sts, 2 hdc in nxt st, hdc in nxt 2 sts, 2 hdc in nxt st, hdc in nxt 3 sts, (hdc, sc) in nxt st, sc in last 8 sts. (52)
Rnd 8: sc in nxt st, hdc in nxt 4 sts, 2 hdc in nxt st, hdc in nxt 3 sts, 2 hdc in nxt st, hdc in nxt 2 sts, 2 hdc in nxt st, hdc in nxt st, 2 hdc in nxt st, hdc in nxt 3 sts, sc in nxt 9 sts, sl st to nxt st, leave rem sts unworked, cut yarn.
Join double strand black yarn with I hook in the st AFTER the sl st close of round 8.
Rnd 9: ch 2, sk nxt st, sc in nxt st, (ch 1, sk nxt sc, sc in nxt st) four times, ch 2, sk nxt st, sc in nxt st, (ch 1, sk nxt st, sc in nxt st) three times, ch 2, sk nxt st, sc in nxt st, (ch 1, sk nxt st, sc in nxt st) six times, ch 2, sk nxt st, sc in nxt st, ch 1, sk nxt st, sc in nxt st, (ch 2, sk nxt st, sc in nxt st) three times (ch 1, sk nxt st, sc in nxt st) three times, ch 2, sk nxt st, sc in nxt st, (ch 1, sk nxt st, sc in nxt st) twice, ch 2, sl st to 1st ch made on the round, cut yarn.
With a single strand of black yarn and I hook and to mimic the illustration lines as shown in the book, surface crochet lines as shown on this image. I keep the working yarn on the underside of the work and loosely slip stitch bringing the yarn through the piece and to the top side as I work. (see this video by Repeat Crafter Me here to learn that: https://www.youtube.com/watch?v=HmXuTlnnzMQ )
Weave in all ends to this point.
Eggs (Make 2):
With single strand white and E hook, make magic ring, ch 1:
Do not turn. Do not join. Unless specifically instructed.
Rnd 1: 6 sc in ring. (6)
Rnd 2: 2 sc in each sc around. (12)
Rnd 3: (sc in nxt st, 2 sc in nxt st) eight times. (18)
Rnd 4: sc in nxt st, hdc in nxt st, (hdc, dc) in nxt st, (dc, hdc) in nxt st, sc in nxt st, (sc, hdc, dc) all in nxt st, hdc in nxt st, sc in nxt 2 sts, (hdc, dc) in nxt st, 2 dc in nxt st, (hdc, sc) in nxt st, sc in nxt st, hdc in nxt st, 2 dc in nxt st, hdc in nxt st, sc in last 2 sts, sl st to 1st st made cut yarn.
Rnd 5: join a single strand of black in the BACK LOOP ONLY of any st around with the right side facing up and E hook, ch 1, sl st LOOSELY in the back loop only of each st around, sl st to 1st ch made cut yarn.
Yolk (Make 2):
With single strand green yarn and E hook, make magic ring, ch 1:
Do not turn or join unless instructed.
Rnd 1: 6 sc in ring. (6)
Rnd 2: 2 sc in each sc around. (12)
Rnd 3: sc in each sc around, sl st to 1st sc made, cut yarn, leaving tail to sew to egg base. (12)
Using hot glue or tail end of yolk sew to center of egg base.
Using hot glue or tail end of egg, sew that to the platter using the photo as a guide.
Ham:
With single strand white and E hook, make magic ring, ch 1:
Do not turn or join unless instructed.
Rnd 1: 6 sc in ring, sl st to FRONT LOOP ONLY of 1st sc made, cut yarn. (6)
Rnd 2: join single strand black to any BACK LOOP ONLY around, ch 1, 2 scblo in same st as ch-1 and scblo in nxt st, (2 scblo in nxt st, scblo in nxt st) twice, sl st to front loop only of 1st st made, cut yarn. (9)
Rnd 3: join single strand green to any BACK LOOP ONLY around, ch 1, 2 scblo in each st around. (18)
Rnd 4: (sc in nxt st, 2 sc in nxt st) nine times. (27)
Rnd 5: (sc in nxt 2 sts, 2 sc in nxt st) nine times. (36)
Rnd 6: scblo in each st around. (36)
DO NOT CUT YARN, BUT DROP GREEN for a moment.
Black Lines:
Join a single strand of black in the remaining front loop from round 6, loosely sl st in each front loop around, sl st to 1st st made, cut yarn.
Using the same technique as on the platter, slip stitch 3 lines on the front face of the ham around the bone. I did not weave in any of these ends. Instead I pulled them to the back of the piece and tucked them inside as the piece was made.
Rnd 7: pick back up the green yarn and sc in each st around. (36)
Rnd 8: (sc in nxt 4 sts, sc dec over nxt 2 sts) six times total (30)
Rnd 9: (sc in nxt 3 sts, sc dec over nxt 2 sts) six times. (24)
Rnd 10: (sc in nxt 2 sts, sc dec over nxt 2 sts) six times. (18)
Rnd 11: (sc in nxt st, sc dec over nxt 2 sts) six times. (12)
Rnd 12-15: sc in each sc around. (12)
STUFF HAM.
Rnd 16: (sc dec over the nxt 2 BACK LOOPS ONLY) six times, sl st to 1st st made, cut yarn, use tail to sew any rem hole closed.
Rnd 17: join a single strand of black in the rem front loops from round 16, ch 1, sl st loosely in each rem loop around, sl st to 1st st made, cut yarn.
You can sew a few lines around the ham with black yarn and needle as desired using photo as a guide.
Weave in any remaining ends. Sew or hot glue the ham to the platter between the lines your surface crocheted onto it.
Fork(Make 2):
1: With single strand of black and E hook, ch 8, working in the hump on the back of the ch throughout the piece, sl st in the 1st ch from the hook and nxt 7 chs, ch 5, sl st in 1st ch from hook and nxt 4 chs, sl st in the last ch again in the beg ch-8, ch 4, sl st in the 1st ch from hook and nxt 3 chs, sl st again in the last ch of the beg ch-8, ch 5, sl st in the 1st ch from the hook and nxt 4 chs, sl st in the last ch of the beg ch-8 and cut yarn.
On one half of the fork, using white yarn and needle, stitch accent marks along the length using the photo as a guide. Weave in ends on both halves. Match the 2nd fork to the 1st fork and either hot glue (recommended adds stability so it stands up) or sew the halfs together wrong side of the sewn half facing in. Using black yarn and needle, or again the hot glue, stitch the fork to the ham at the tip of each fork tine.
Headband:
With green yarn single strand and H hook, chain 55:
Row 1: sc in 2nd ch from hook and each rem ch across. (54)
Row 2-5: ch 1, turn, sc in each st across. Cut yarn after row 5 leaving 30” tail to sew to headband.
Using the tail and keeping the seam on the underside of the headband, whip stitch the 1st and last row together to cover the headband.
If your headband is wider or longer, add a few stitches or a row as needed to cover without stretching too tightly.
Place on head and pin the platter offset in position using the photo as a guide. Sew or hot glue the platter into place.
Follow me on any of my social media to stay in touch, I would love to have you! Much love and yarn, Stephanie Pokorny (Crochetverse)
The information and photos in this posting are the sole copyrighted property of Crochetverse©2019. Please do not copy and paste any of the information contained within either electronically, verbally, or written in part or in whole. Instead, please share the DIRECT LINK to this posting only, and if you do, I thank you for sharing. You of course may sell anything you make from this pattern that you have made with your own two hands, no contract labor or mass productions are permitted. I need your visits to keep me around creating! Please never screenshot or copy and paste the info within, instead share the link so I may entertain your friends as well! If you credit Crochetverse as the designer that is greatly appreciated!

[…] Green Eggs and Ham Headband by Crochetverse […]
Comments are closed.