


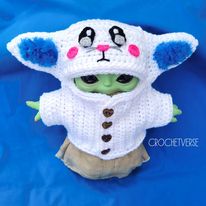
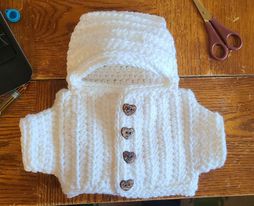
My son is absolutely OBSESSED with his Baby Yoda doll. This is the 11″ soft body doll that is found in most stores. This is the link to Walmart where we got him, but it is everywhere: https://bit.ly/3tNmlmI
We are a costuming and cosplay family and so he kept asking me to create sweaters for him because he wanted to be sure he wasn’t cold. How sweet is that?! So, you know this momma did.
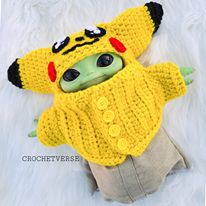
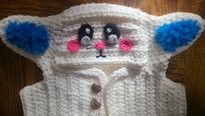
The pattern below is for the basic sweater, the customizations to make it the bunny, but then YOU can add anything you want to make it any character or design you like! As you can see a few color changes and small additions, and I did Pikachu! This will fit various stuffies and dolls of similar size as well!
This free pattern is brought to you by my Stephanie Pokorny of Crochetverse. It may never be copied and sold or offered elsewhere. It may not be videotaped making it and posted anywhere. No additional permissions besides personal use are granted. Thank you for respecting the work that goes into offering free patterns so I may continue to do so. In addition, there is no pdf to download, your visits to my blog allow me to keep the proverbial “lights on” so I can keep bringing you more!
Contact me, tag me, ask me anything on my social medias:
Join my support group on Facebook for quickest help and so you don’t miss a thing! Search for “Crochetverse Community”
*FOR PERSONAL USE ONLY. NO VIDEOS OF PATTERN MAKING PERMITTED. NO COPY/PASTE SELLING OR FREE ALLOWED*
Materials:
YARN HELD DOUBLE STRAND FOR ENTIRE COAT
– 200 yards thicker worsted weight yarn like Red Heart Super Saver or Caron One Pound in main color and small amounts for your desired customizations (Bunny is Caron One Pound white, Lion Brand Go For Faux blue, Red Heart Super Saver in black, pink, white, and gray) (Pikachu is Red Heart Super Saver in yellow for main color, red, black, white for accents)
– Size I(5.5mm) crochet hook -OR- size needed to obtain gauge
– tapestry needle, tape measure, scissors, stitch marker
– (4) ½” to ¾” buttons and coordinating thread and sewing needle to sew them on
Abbreviations (US Terms):
bb back bump (on reverse of beg ch)
ch chain
hdc half double crochet
nxt next
rem remaining
sk skip
slst slip stitch
st stitch
Instructions (US Terms):
Do not turn or join rounds unless instructed. Mark rounds with a st marker, verify count, then move marker to next round.
Ch 1’s do not count as a st unless noted.
ENTIRE coat made with yarn held DOUBLE strand and H hook unless noted otherwise.
Main Coat Body:
Ch 17:
Row 1: hdc in 2nd bb from hook and each rem bb across. (16)
Row 2-5: ch 1(does not count as a st here and throughout), hdc in same st and each rem st across. (16)
CHECK GAUGE: You piece should now measure 2.5” tall by just under 5.5” wide. I am TIGHT crocheter, give it a quick measure to be sure your jacket will actually fit when done. If yours is smaller it means you need to go up a hook and try again. If it is larger it means you need to go down a hook and try again.
Row 6-9: ch 1, turn, hdc in same st and each st across. (16)
Row 10: ch 1, turn, hdc in same st and nxt st, ch 11, sk nxt 11 sts, hdc in last 3 sts. (5hdc/11ch)
Row 11: ch 1, turn, hdc in same st and nxt 2 sts, hdc each of (NOT around the ch, IN) the nxt 11 chs, hdc in last 2 sts. (16)
Row 12-31: ch 1, turn, hdc in same st and in each st across. (16)
Row 32: ch 1, turn, hdc in same st and nxt st, ch 11, sk nxt 11 sts, hdc in each of last 3 sts. (5hdc/11ch)
Row 33: ch 1, turn, hdc in same st and nxt 2 sts, hdc in each of the 11 chs, hdc in last 2 sts. (16)
Row 34-40: ch 1, turn, hdc in same st and each rem st across. (16)
Row 41: *create buttonholes* ch 1, turn, sc in same st and nxt st, (ch 1, sk nxt st, sc inxt 3 sts) three times, ch 1, sk nxt st, sc in last st.
Row 42: ch 1, turn, sc in each st and ch-1 sp across, cut yarn. (16)
Sleeves:
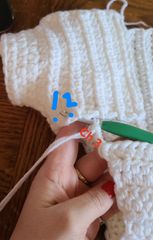
Position the piece so it is long ways with the buttonholes furthest from you and right side of last row made facing up, join yarn with slst in the 1st st right on the side of the armhole closer to you. See hook in photo below, left larger scale, right close up.
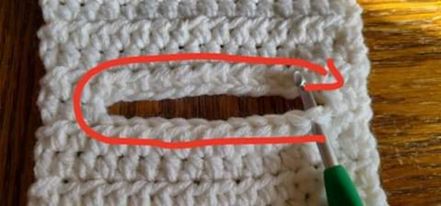
Rnd 1: Working in the direction of the red arrow in the photo above, ch 1, hdc in same st and next 10 sts, sc in the end of the row at the end, sc in nxt 11 sts (it is rem chains from the ch-11), sc in last end of row. (24)
Rnd 2: (hdc in nxt 4 sts, hdcdec over nxt 2 sts) four times total. (20)
Rnd 3: hdc in each st around. (20)
Rnd 4: hdc in each st around, slst to 1st st made. (20)
Rnd 5: ch 1, sc in the 3rd loop of each hdc around, slst to 1st st made, cut yarn. 3rd Loop of hdc: Fold the prev round toward you, the 3rd loop is the horizontal strand just below the “v” of the st on the back side.
Again position the piece so the last button hold row made of the main sweater body is furthest from you with sleeve just made facing up, join yarn in same spot as 1st sleeve then repeat Rounds 1-5 for 2nd sleeve.
Begin Hood:
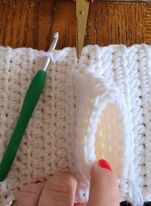
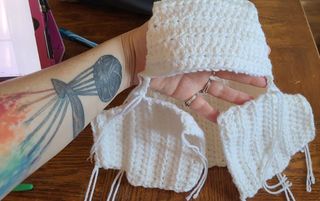
Position the piece so the sleeves are facing up. When we created the sleeves openings with the ch-11, one edge had 3hdc and one edge had 2hdc, rotate so the side with 3hdc at the edge is furthest from you. Join yarn with a slst in the end of THIRD row left of the left most edge of the sleeve.
In the image, the hook is where to join and the scissor tips are at the row to start counting left from.
Row 1: ch 1, hdc in same row end, hdc in each of nxt 15 row ends. (16)
Row 2-4: ch 1, turn, hdc in each st across. (16)
Row 5: ch 1, turn, hdcdec over same and nxt st, hdc in nxt 12 sts, hdcdec over last 2 sts. (14)
Row 6-15: ch 1, turn, hdc in each st across. (14)
Row 16: ch 1, turn, 2hdc in same st, hdc in nxt 12 sts, 2hdc in last st. (16)
Row 17: ch 1, turn, 2hdc in same st, hdc in nxt 14 sts, 2hdc in last st. (18)
Row 18-19: ch 1, turn, hdc in each st across. (18)
Row 20: ch 1, turn, 2hdc in same st, hdc in nxt 16 sts, 2hdc in last st. (20)
Row 21: ch 1, turn, 2hdc in same st, hdc in nxt 18 sts, 2hdc in last st, do not cut yarn. (22)
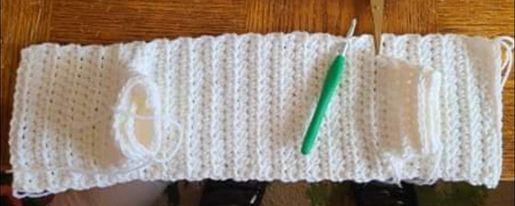
Close hood and edge jacket:
Position the piece so the last row made is closest to you and the sleeves are facing down and on the underside of the work:
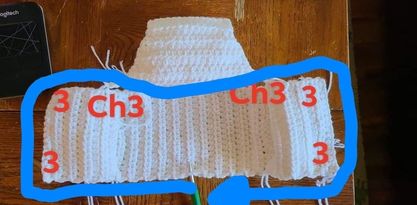
Chain 3, fold the left side of the jacket over to center as if wearing it and join the end of the chain with a slst to the second row end RIGHT of the edge of the sleeve opening. Left image is larger scale. Right image is close up. The red writing shows the ch-3, the blue shows the 1st and 2nd row (to which you will join the end of the ch-3 to), cut yarn.
Join yarn with a slst to the opposite end of row 21 from the ch-3 just made, ch 3, then join with a slst in the same way as the other side of the hood to the 2nd row end to left from the sleeve, cut yarn. The hood is now closed down and attached to the front chest area.
Position the jacket as shown in the image, join yarn with a slst in the center of the bottom back from the underside to the side showing. I am showing it to you this way so you can see the path of the outline, but the back of the jacket and hood will face you as you work and the right side of the stitches will be facing the outside/sleeve side of the jacket as you work.
Rnd 1: ch 1, hdc in same end of row and each end of row and stitch around the opening shown with the blue arrow. Work 3 hdc in each corner (shown with red 3 in image) and work an hdc in each of the 3 chains on either side of the hood. Order to work is: along long bottom edge of coat, up short side of coat, in each of the 3 chains, across the hood opening that goes around face, down nxt 3 chains, down next short edge of jacket and across remaining long bottom edge of coat, once around, slst to 1st st made. Exact number count is not required.
Rnd 2: ch 1, sc 3rd loop of each hdc around working 2sc in the 3rd loop of each corner st (the center hdc of the 3hdc grouping from last round), sl st to 1st st made and cut yarn.
Weave in all ends to this point.
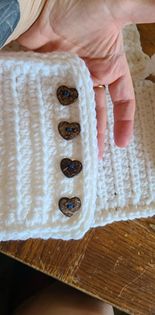
Sew on the buttons:
Sew the 4 buttons on the front of the chest side opposite the buttonholes. I fold the edges over to meet up to visualize proper button placement. They get sew just inside the edge rounds. They will be tight to start when you button but I prefer this so they don’t get too loose with repeated use.
For placement of facial features, see these images throughout:

Ears:
With the right side of the jacket facing out, join yarn with a slst in any st or row end around the circular opening created by tacking it down with the ch-3.
Rnd 1: ch 1, hdc in same st or row end, hdc in each st, row end, and chain around. (30)
Rnd 2: (hdc in nxt 4 sts, hdcdec over nxt 2 sts) five times total. (25)
Rnd 3: hdc in each st around. (25)
Rnd 4: (hdc in nxt 3 sts, hdcdec over nxt 2 sts) five times total. (20)
Rnd 5-8: hdc in each st around. (20)
Rnd 9: (hdc in nxt 2 sts, hdcdec ove nxt 2 sts) five times total. (15)
Rnd 10: hdc in each st around. (15)
Rnd 11: (hdc in nxt st, hdcdec over nxt 2 sts) five times total. (10)
Rnd 12: hdcdec over nxt 2 sts a total of 7 times, cut yarn use tail to sew any rem hole shut.
Repeat 2nd ear exactly the same.
Weave in any ends.
BUNNY ADDITIONS:
I hot glued these on.
Inner Ear (Make 2):
With single strand Lion Brand Go For Faux in Dori and H hook, chain 4:
Row 1: sc in 2nd ch from hook and nxt 2 chs. (3)
Row 2-3: ch 1, turn, sc in each st across. (3)
Row 4: ch 1, turn, scdec over 1st 2 sts, sc in last st. (2)
Row 5: ch 1, turn, sc in each st. (2)
Row 5: ch 1, turn, scdec the 2 sts together, ch 1, cut yarn. (1)
Tail:
With single strand fur and H hook, make a magic ring:
Rnd 1: make 8 sc in the ring. (8)
Rnd 2: (sc in nxt st, 2sc in nxt st) four times total. (12)
Rnd 3: sc in each st around, cut yarn. (12)
Eyes (Make 2):
Black Base:
With double strand black and H hook, chain 4:
Rnd 1: hdc in 2nd bb from hook, sc in nxt bb, 3hdc in last bb, working up opposite side of the ch, sc in nxt ch, 2hdc in last ch, sl st to 1st st made, cut yarn, leave tail if you want to sew.
Gray Accent:
With single strand gray and F hook, make a magic ring:
Rnd 1: (2sc,hdc,2sc) in the ring, pull tail to close, cut yarn.
Sew the gray on the bottom edge with the flat side of the piece aligned with the perimeter of the black eye. Using a tapestry needle and yarn, sew a white dot on each eye both to the inner edge.
Sew/glue the eyes on the hood front slightly tilted inwards.
Cheeks (Make 2):
With single strand pink and F hook, make magic ring:
Rnd 1: 5sc in ring, pull tail to close. (5)
Rnd 2: 2sc in each st around, slst to 1st st, cut yarn. (10)
Sew/glue the cheeks just outside and below each eye.
Nose:
With single strand pink and F hook, make magic ring:
Row 1: sc in 2nd bb from hook, hdc in nxt bb, sc in last bb, cut yarn.
Sew/glue the nose to the face. With a strand of black yarn and needle, sew a line below the nose and an upside down “v” at the bottom of the line.
With a strand of gray yarn and needle, sew on whiskers.
Please tag, post, share, contact me to show off your work at my social medias @Crochetverse!
The information and photos in this posting are the sole copyrighted property of Crochetverse©2021. Please do not copy and paste any of the information contained within either electronically, verbally, or written in part or in whole. Instead, please share the DIRECT LINK to this posting only, and if you do, I thank you for sharing. You of course may sell anything you make from this pattern that you have made with your own two hands, no contract labor or mass productions are permitted. I need your visits to keep me around creating! Please never screenshot or copy and paste the info within, instead share the link so I may entertain your friends as well! If you credit Crochetverse as the designer that is greatly appreciated!
