

")
Hello! Thank you for visiting me today! I, like so many of you, have fallen in LOVE with the look of the waistcoat stitch, aka, the split single crochet.
Done just like a normal single crochet, but the hook gets inserted just a tad different (see video link below).
The result? An amazing fabric that looks knit, is super thick and cozy, and even resembles little hearts, too!
There have been a ton of adorable one for Valentine’s Day, so I decided to skip ahead one holiday and hit you up with a St. Patrick’s Day version and do it in SUPER BULKY YARN!
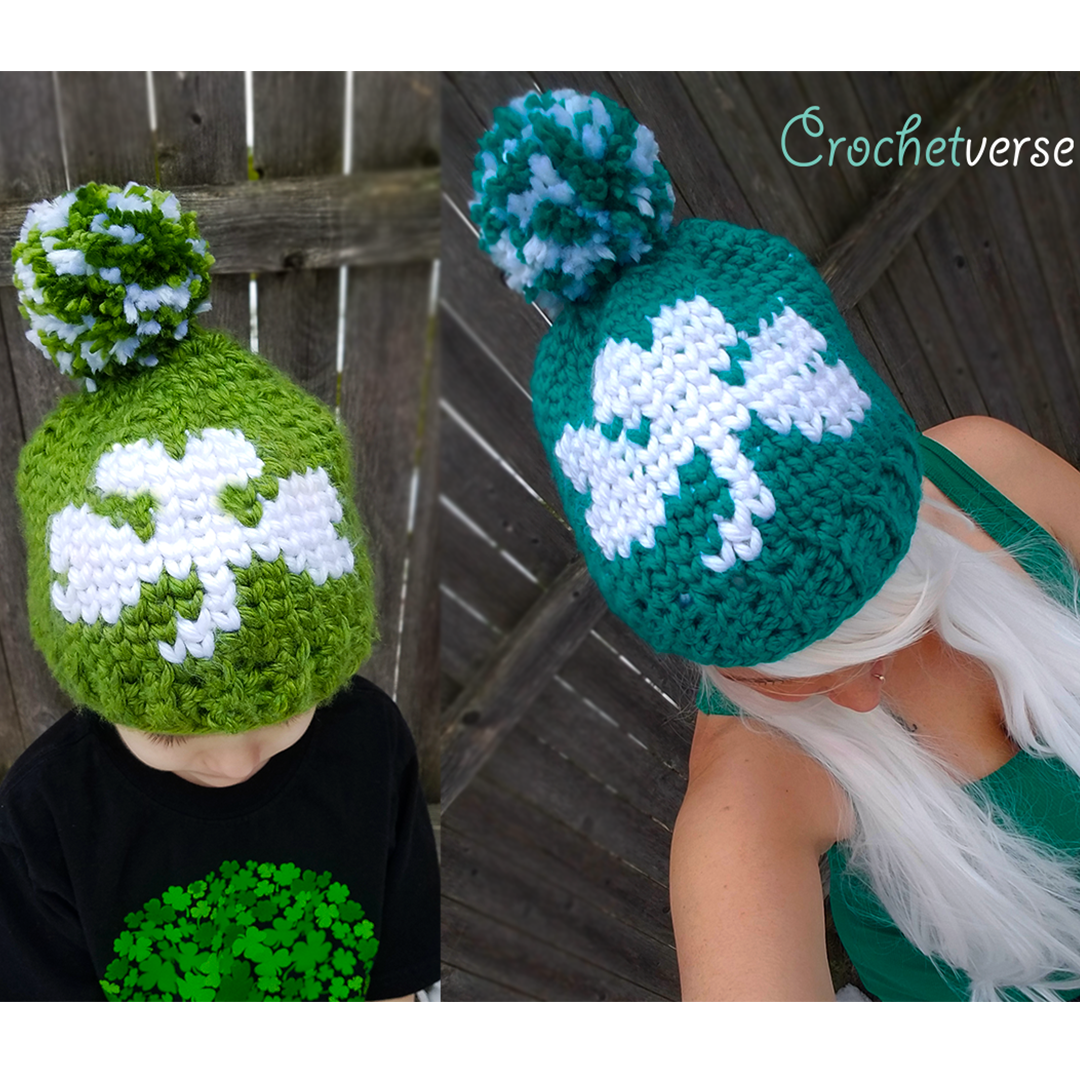
CHUNKY WAISTCOAT is where it’s at for super warm cuteness!
Please post your projects on my Facebook page HERE!
Offered to you in an adult and a child version. I have an average sized adult head and the little man you see here is an average 4 year old, and he has some wiggle room in his version.
Materials:
– 125 yards super bulky yarn (category 6) in green
(Shown: Darker Green Hat/ 1 Ball Bernat Softee Chunky in Emerald Green; Lighter Green Hat/ 2 Balls Hometown USA in Oklahoma City Green)
– 50 yards super bulky yarn (category 6) in white
(Shown: 1 Ball Hometown USA in New York White)
– Size M/N (9.0) mm crochet hook -OR- size needed to obtain gauge
– Stitch marker
– 3” Clover pom pom maker, or method preferred to make pomp oms
– scissors, tapestry needle for ends, measuring tape
NOTE ABOUT YARN: Both the Bernat and the Hometown are marked super bulky 6, but I find the Bernat to be a little smaller than the Hometown and creates a more flexible finished fabric.
NOTE ABOUT SSC OR WAISTCOAT STITCH: This stitch creates a firm and quite thick fabric when worked. If you live in a climate where it is really warm, this hat *might* be too hot for you.
NOT SURE HOW TO DO THIS STITCH? Check out this video (not mine, but how I learned!) https://www.youtube.com/watch?v=dbTOPEA-91Y
Sized for:
Child: to fit average head circumference of about 20”
Adult: to fit average head circumference of about 22”
Gauge:
12 ssc rows = 4” tall
8 ssc stitches = 4” wide
WARNING! You need to work deliberately loose with this stitch. It works up quite thick in the super bulky yarn, so you really need to be conscientious of working loosely!
Instructions:
Given as Child (Adult): To make the child; use the numbers outside the parenthesis. To make the adult; use the numbers inside the parenthesis. Go through and circle your counts to eliminate confusion if needed. After the brim, the instructions are separated out, so continue to the set for your hat size.
With green, chain 3(4):
Row 1: sc in 2nd ch from hook and nxt 1(2) chs. 2(3)
Row 2: ch 1, turn scblo (single crochet BACK LOOP ONLY) in each st across.
Row 3- 36(40): repeat row 2, do not tie off.
Let’s pause for a GAUGE CHECK: At this point my piece measures (It is SUPER stretchy, so as not to have it be overly bulgy at the end, it is a a few inches shorter and will be stretched to fit the first wearing)
– 1 ½” tall and 19” long for the adult version.
– 1” tall and 17” long for the child version.
PLEASE ADJUST HOOK SIZE to meet above measurements. If you are off your hat will be too large or too small.
Match Row 1 to Row 40 and sl st across through BOTH thicknesses to close the brim into a ring.
We will now switch to rounds for the remainder of the hat. Do NOT turn rounds, each round is joined. Mark the 1st st of each rounds with a marker so you do not lose count.
PLEASE READ: This is NOT done as you might have done in previous split sc/waistcoat stitch projects:
NORMALLY, you carry the unused color along with your stitches even when it is not being used and crochet around inside the piece as you work. This way, when you need the color again, you simply drop the current color and pick up the new one.
BUT, WE WILL NOT DO THAT FOR THIS PIECE:
Here is why: When translating this technique to the bulky yarn, especially when using the high contrast of the green and white, the carry yarn was VERY visible and I just didn’t care for it. In addition, the carry technique results in a stiff fabric even with worsted yarn, and that was very amplified to the point where the hat was so stiff it wasn’t really comfy to me if I carried throughout the piece.
If I had a design that was very intensive, I would just deal with those little “peeks” of color in the stitches. BUT, since the image on the hat is very simple, and only 11 rows tall; I chose to NOT carry my yarn and attach the white right before it was needed.
I DID carry across the shamrock motif! The green behind the white and the white behind the green across the motif only, that was not a problem for me. After that row across the motif, I cut the white yarn and rejoined it when I began the motif on the next round. This left me with a few more ends to weave in on the inside, but for me it was absolutely the best choice.
Color Change Method: You will switch colors at the final yarn over/pull through of the stitch that comes just PRIOR to the one needing the new color. For example if you see a round written as “11 green ssc, 4 white ssc”, you will change to white at the final yarn over pull through of the 11th green stitch.
To Mark Rounds: After the 1st round, I placed a bobby pin around the post of the 1st ssc of each round, as opposed to in the top bars. I found if I placed it in the top bars, I kept second guessing which post belonged to which ssc.
CHILD: (Please see above for the brim to start, then head back here!)
Rnd 1: ch 1, (sc in the end of each of the nxt 8 rows, 2 sc around the nxt row end) repeat FOUR times total, sl st to the 1st made. (40)
Rnd 2: ch 1, 19 ssc green, 2 ssc white, 19 ssc green, sl st to 1st ssc made. (40)
Rnd 3: ch 1, 18 ssc green, 2 ssc white, 20 ssc green, sl st to 1st ssc made. (40)
Rnd 4: ch 1, 12 ssc green, 3 ssc white, 3 ssc green, 1 ssc white, 3 ssc green, 3 ssc white, 15 ssc green, sl st to 1st ssc made. (40)
Rnd 5: ch 1, 12 ssc green, 4 ssc white, 2 ssc green, 1 ssc white, 2 ssc green, 4 ssc white, 15 ssc green, sl st to 1st ssc made. (40)
Rnd 6: ch 1, 12 ssc green, 5 ssc white, 1 ssc green, 1 ssc white, 1 ssc green, 5 ssc white, 15 ssc green, sl st to 1st ssc made. (40)
Rnd 7: ch 1, 13 ssc green, 11 ssc white, 16 ssc green, sl st to 1st ssc made. (40)
Rnd 8: ch 1, 12 ssc green, 13 ssc white, 15 ssc green, sl st to 1st ssc made. (40)
Rnd 9: ch 1, 12 ssc green, 4 ssc white, 1 ssc green, 3 ssc white, 1 ssc green, 4 ssc white, 15 ssc green, sl st to 1st ssc made. (40)
Rnd 10: ch 1, 12 ssc green, 3 ssc white, 2 ssc green, 3 ssc white, 2 ssc green, 3 ssc white, 15 ssc green, sl st to 1st ssc made. (40)
Rnd 11: ch 1, 15 ssc green, 7 ssc white, 18 ssc green, sl st to 1st ssc made. (40)
Rnd 12: repeat round 11.
Rnd 13: ch 1, 15 ssc green, 3 ssc white, 1 ssc green, 3 ssc white, 1 ssc green, sl st to 1st ssc made. White will not be used anymore. (40)
Rnd 14: ch 1, (ssc in nxt 2 ssc, ssc decrease over nxt 2 ssc) repeat TEN times total, sl st to 1st ssc made. (30)
Rnd 15: ch 1, (ssc in nxt ssc, ssc decrease over nxt 2 ssc) repeat TEN times total, sl st to 1st ssc made. (20)
Rnd 16: ch 1, ssc in each ssc around, sl st to 1st ssc made. (20)
Rnd 17: ch 1, (ssc in nxt 2 ssc, ssc decrease over nxt 2 ssc) repeat FIVE times total, sl st to 1st ssc made. (15)
STOP HERE FOR A MESSY BUN HAT!
Rnd 18: ch 1, ssc in each ssc around, sl st to 1st ssc made. (15)
Rnd 20: ch 1, (ssc in nxt ssc, ssc dec over nxt 2 ssc) repeat FIVE times total, sl st to 1st ssc made. (10)
Rnd 21: ch 1, (ssc dec over nxt 2 ssc) repeat FIVE times total, sl st to 1st ssc made, tie off, use tail to seam any remaining hole close. (5)
GIVE THE HAT A FIRM TUG AROUND TO STRETCH AND ALIGN STITCHES. The stitches relax after this and make the hat more flexible I think.
EDGE BRIM OPENING:
Join green yarn w a sl st in the end of any row near the back around the brim opening with the right side facing out:
Rnd 1: ch 1, sc in same row end and each row end around, sl st to 1st sc made. (36)
Rnd 2: do not turn, sl st (not too tightly) in each sc around, sl st to 1st sl st made, tie off. (36)
ADULT: (Please see above for the brim to start, then head back here!)
Rnd 1: ch 1, (sc in the end of each of the nxt 9 rows, 2 sc around the nxt row end) repeat FOUR times total, sl st to the 1st made. (44)
Rnd 2: ch 1, 21 ssc green, 2 ssc white, 21 ssc green, sl st to 1st ssc made. (44)
Rnd 3: ch 1, 20 ssc green, 2 ssc white, 22 ssc green, sl st to 1st ssc made. (44)
Rnd 4: ch 1, 14 ssc green, 3 ssc white, 3 ssc green, 1 ssc white, 3 ssc green, 3 ssc white, 17 ssc green, sl st to 1st ssc made. (44)
Rnd 5: ch 1, 14 ssc green, 4 ssc white, 2 ssc green, 1 ssc white, 2 ssc green, 4 ssc white, 17 ssc green, sl st to 1st ssc made. (44)
Rnd 6: ch 1, 14 ssc green, 5 ssc white, 1 ssc green, 1 ssc white, 1 ssc green, ssc white, 17 ssc green, sl st to 1st ssc made. (44)
Rnd 7: ch 1, 15 ssc green, 11 ssc white, 18 ssc green, sl st to 1st ssc made. (44)
Rnd 8: ch 1, 14 ssc green, 13 ssc white, 17 ssc green, sl st to 1st ssc made. (44)
Rnd 9: ch 1, 14 ssc green, 4 ssc white, 1 ssc green, 3 ssc white, 1 ssc green, 4 ssc white, 17 ssc green, sl st to 1st ssc made. (44)
Rnd 10: ch 1, 14 ssc green, 3 ssc white, 2 ssc green, 3 ssc white, 2 ssc green, 3 ssc white, 17 ssc green, sl st to 1st ssc made. (44)
Rnd 11: ch 1, 17 ssc green, 7 ssc white, 20 ssc green, sl st to 1st ssc made. (44)
Rnd 12: repeat round 11.
Rnd 13: ch 1, 17 ssc green, 3 ssc white, 1 ssc green, 3 ssc white, 20 ssc green, sl st to 1st ssc made. White will not be used anymore. (44)
Rnd 14: ch 1, (ssc in nxt 2 ssc, ssc decrease over nxt 2 ssc) repeat ELEVEN times total, sl st to 1st ssc made. (33)
Rnd 15: ch 1, (ssc in nxt ssc, ssc decrease over nxt 2 ssc) repeat ELEVEN times total, sl st to 1st ssc made. (22)
Rnd 16: ch 1, ssc in each ssc around, sl st to 1st ssc made. (22)
Rnd 17: ch 1, ssc in 1st 2 ssc, (ssc in nxt 3 ssc, ssc decrease over nxt 2 ssc) repeat FOUR times total, sl st to 1st ssc made. (18)
STOP HERE FOR A MESSY BUN HAT!
Rnd 18: ch 1, ssc in each ssc around, sl st to 1st ssc made. (18)
Rnd 19: ch 1, (ssc in nxt 4 ssc, ssc decrease over nxt 2 ssc) repeat THREE times total, sl st to 1st ssc made. (15)
Rnd 20: ch 1, (ssc in nxt ssc, ssc dec over nxt 2 ssc) repeat FIVE times total, sl st to 1st ssc made. (10)
Rnd 21: ch 1, (ssc dec over nxt 2 ssc) repeat FIVE times total, sl st to 1st ssc made, tie off, use tail to seam any remaining hole close. (5)
GIVE THE HAT A FIRM TUG AROUND TO STRETCH AND ALIGN STITCHES. The stitches relax after this and make the hat more flexible I think.
EDGE BRIM OPENING:
Join green yarn w a sl st in the end of any row near the back around the brim opening with the right side facing out:
Rnd 1: ch 1, sc in same row end and each row end around, sl st to 1st sc made. (40)
Rnd 2: do not turn, sl st (not too tightly) in each sc around, sl st to 1st sl st made, tie off. (40)
Finishing:
- Using combo of both colors, create about 3” diameter pom pom using the method you prefer. Trim it up so it is even and round. Using the tails of the pom pom, secure it to the top of the hat at the last 2 rounds.
- Weave in all ends. Try to keep the white ends woven towards the middle of the shamrock; white ends woven into white stitches, green ends woven into green stitches as you are able.
STITCH KEY:
sl st slip stitch ssc split single crochet
ch chain st stitch
nxt next sc single crochet
scblo single crochet back loop only
Please post projects and questions to any of the social media sites below, and/or email me at
Much Love and Yarn,
Stephanie
Follow on Facebook Here! http://www.facebook.com/crochetverse
Follow on Instagram Here! Handle Name: Crochetverse
Follow on Ravelry Here! Shop Name: Crochetverse
Follow on Pinterest Here! Handle Name: Crochetverse
Follow on YouTube Here! Channel Name: Crochetverse
Follow on Twitter Here! Handle Name: Crochetverse
Follow on Etsy Here! Shop Name: Crochetverse
The information and photos in this posting are the sole copyrighted property of Crochetverse©2016. Please do not copy and paste any of the information contained within either electronically, verbally, or written in part or in whole. Instead, please share the DIRECT LINK to this posting only, and if you do, I thank you for sharing. You of course may sell anything you make from this pattern that you have made with your own two hands; no contract labor or mass productions are permitted. If you credit Crochetverse as the designer, that is greatly appreciated!

Thank you So Much for this awesome hat ? I have shared with Crochet Graph Lobby ??
Thank you!
[…] St. Patrick’s Day Crochet Shamrock Hat – CrochetVerse A hat crocheted using bulky yarn and the waistcoast stitch. This is one of my […]
[…] St. Patrick’s Day Crochet Shamrock Hat […]
Comments are closed.