


So, It’s late August…that means end of summer, back to school, and…if you’re obsessed like myself…HALLOWEEN TIME! Ha! Not actually, but it MOST definitely means time to start getting ready!
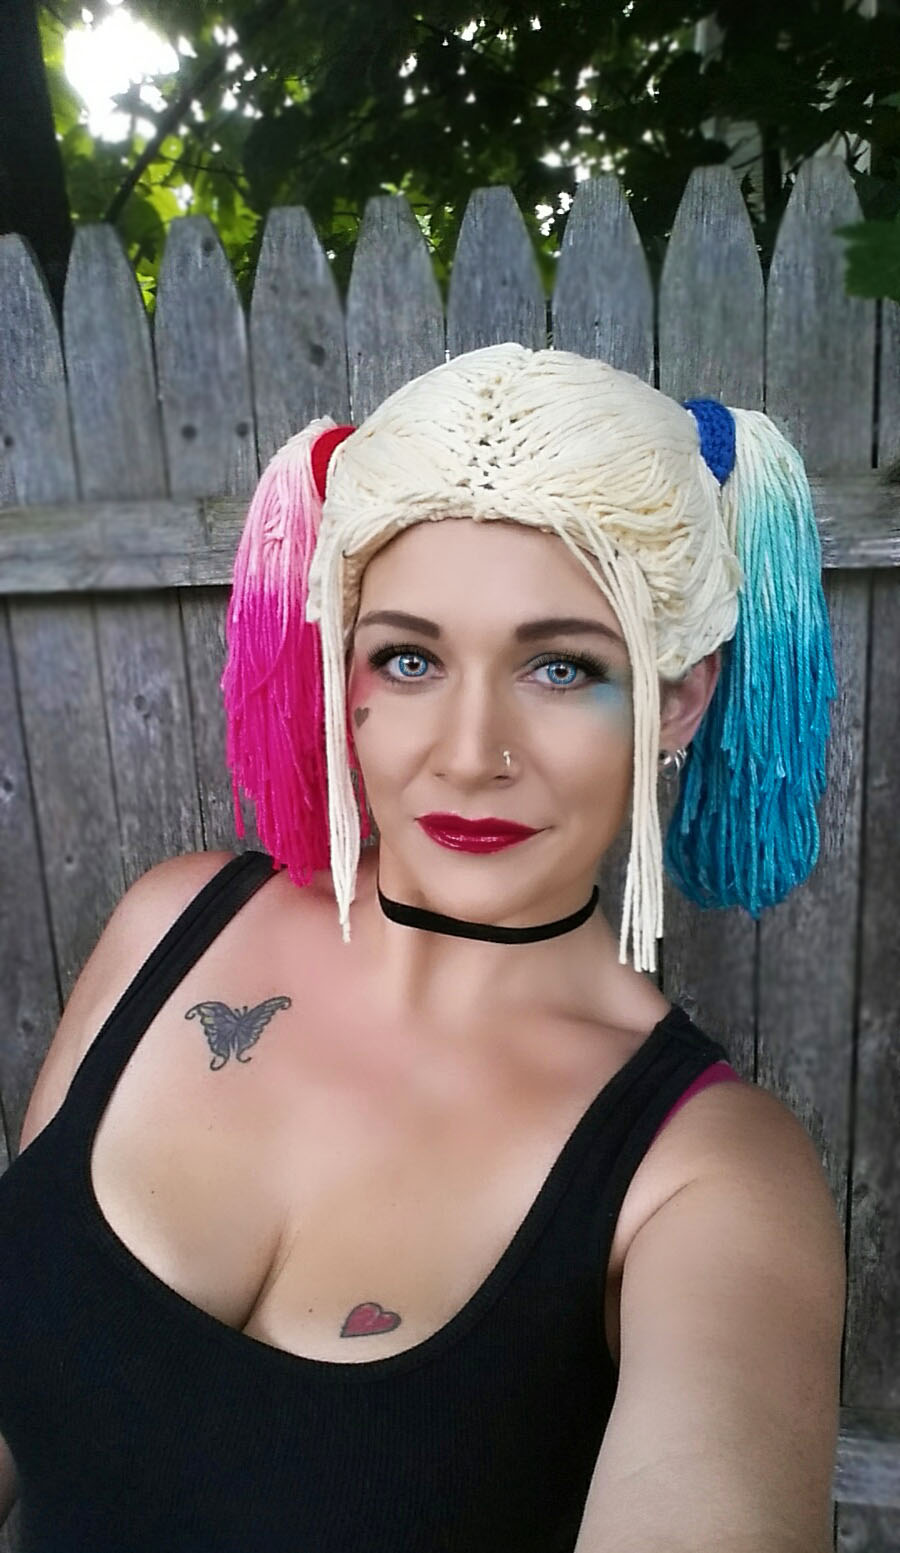
Of course one could buy their costumes, but oh no…NOT ME…I must MAKE THEM ALL! So, starting early, I decided to dabble into crochet wig hats! Today I have a pattern/tutorial for you on this HARLEY QUINN WIG, it just seemed to lend itself to crochet so well, I just had to do it! So, let me show you how to do one of your own! Did it for UNDER 10 BUCKS TOO!
The Materials: (It’s a low cost project, my total was under 10 bucks!)
– (3) 4oz Peaches & Crème cotton in Cream, MUST BE 100% COTTON or dye won’t take
(Yarn Sub: any creamy ivory or pale yellow worsted weight 100% cotton, approx. 700 yards) Don’t pick a yellow, her hair is really almost white as opposed to yellow!
– 25-30 yards worsted weight yarn in red and blue, can be any fiber content
– (1) jar each of Wilton gel food coloring in Rose and Sky Blue
– small amount of regular table salt and (2) containers that can be filled with the dye (I used two glass ball jars, but it is food dye so it is not poisonous but it does stain)
– tapestry needle, scissors
– size H (5.0mm) crochet hook or size needed to obtain gauge
– size G (4.25mm) crochet hook or one size smaller than what you need to obtain gauge
Overview:
First, we will create the base or hat-like portion of the wig. Next, we will add the hair and style it and add the red and blue pony tail holders. Finally, we will dip dye each pony tail to achieve that faded look!
Size:
One size fits more teen to adult
Gauge:
Rounds 1-6 when laid flat measured 4.5” across or just a HAIR under that
Instructions: (CHECK YOU GAUGE AFTER ROUND 6, Be sure you match or your hat might not fit!)
THE WIG/HAT BASE:
With the pale yellow, make a magic ring:
Rnd 1: ch 1 (does not count as a st here or throughout the piece), 8 hdc in the ring, sl st to the 1st hdc made, pull tail gently to close ring. (8)
Rnd 2: ch 1, 2 hdcblo (half double crochet in the BACK LOOP ONLY *the one towards the back of the work or furthest from you*) in each hdc around, sl st to the BACK LOOP ONLY of the 1st hdcblo made. (16)
Rnd 3: ch 1, hdcblo in the same st, 2 hdcblo in the nxt st, *hdcblo in the nxt st, 2 hdcblo in the nxt st, repeat from *, around, sl st to the back loop only of the 1st hdcblo made. (24)
Rnd 4: ch 1, hdcblo in the same st and the nxt, 2 hdcblo in the nxt st, *hdcblo in the nxt 2 sts, 2 hdcblo in the nxt st, repeat from *, around, sl st to the back loop only of the 1st hdcblo made. (32)
Rnd 5: ch 1, hdcblo in the same st and nxt 2 sts, 2 hdcblo in the nxt st, *hdcblo in the nxt 3 sts, 2 hdcblo in the nxt st, repeat from *, around, sl st to the BLO of the 1st hdcblo made. (40)
Rnd 6: ch 1, hdcblo in the same st and nxt 3 sts, 2 hdcblo in the nxt st, *hdcblo in the nxt 4 sts, 2 hdcblo in the nxt st, repeat from *, around, sl st to the BLO of the 1st hdcblo made. (48)
Rnd 7: ch 1, hdcblo in the same st and nxt 4 sts, 2 hdcblo in the nxt st, *hdcblo in the nxt 5 sts, 2 hdcblo in the nxt st, repeat from * around, sl st to the BLO of the 1st hdcblo made. (56)
Rnd 8: ch 1, hdcblo in the same st and nxt 5 sts, 2 hdcblo in the nxt st, *hdcblo in the nxt 6 sts, 2 hdcblo in the nxt st, repeat from *, around, sl st to the BLO of the 1st hdcblo made. (64)
Rnd 9: ch 1, hdcblo in the same st and nxt 6 sts, 2 hdcblo in the nxt st, *hdcblo in the nxt 7 sts, 2 hdcblo in the nxt st, repeat from *, around, sl st to the BLO of the 1st hdcblo made. (72)
Rnd 10: ch 1, hdcblo in the same st and nxt 7 sts, 2 hdcblo in the nxt st, *hdcblo in the nxt 8 sts, 2 hdcblo in the nxt st, repeat from *, around, sl st to the BLO of the 1st hdcblo made. (80)
Rnd 11-18: ch 1, hdcblo in the same st and in each st around, sl st to the 1st hdcblo made. (80)
Rnd 19: *SWITCH TO G HOOK (or one size smaller than what you used to meet gauge), sl st in each BLO around sl st to the BLO of the 1st sl st made, tie off. (80)
When you 1st put it on, round 19 is going to feel tight, roll with it though. Read below as to why!
TIP: SLIP STITCH TIGHTLY on round 19. I’ve chosen cotton for the wig hat for two reasons: 1. Cotton is breathable and you don’t want to be super duper hot -AND- 2. Cotton will accept the food dye well.
BUT cotton STRETCHES, as it has very little to no natural elasticity. If you slip stitch tightly, you will *BIND* the end to keep the wig hat from stretching too much. (Though you cannot eliminate it completely, I do feel this is still the best fiber for the project!)
PONY TAIL BASES: (Make 2)
We will create two small rings which will be attached to either side of the hat (detailed below). My first attempt at this hat was super frustrating because I could not get the pony tails even. By stitching these rings on before adding the fringe, we can use them as a guide for pony placement and thickness later on!
With the H hook (or hook you used to meet gauge on the main hat)
Ch 18:
Rnd 1: ch 1 (does not count as st) 18 hdc in the same ch and in each ch around, sl st to top of 1st hdc made, leave 16” tail for seaming to wig hat base.
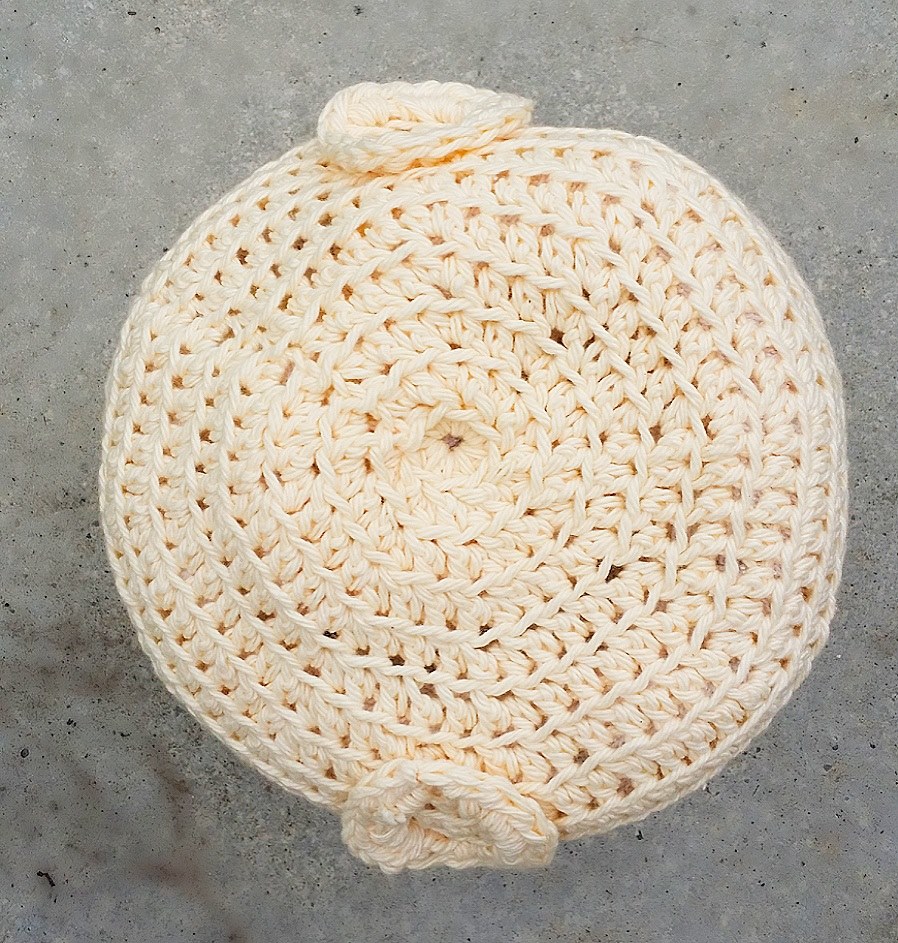
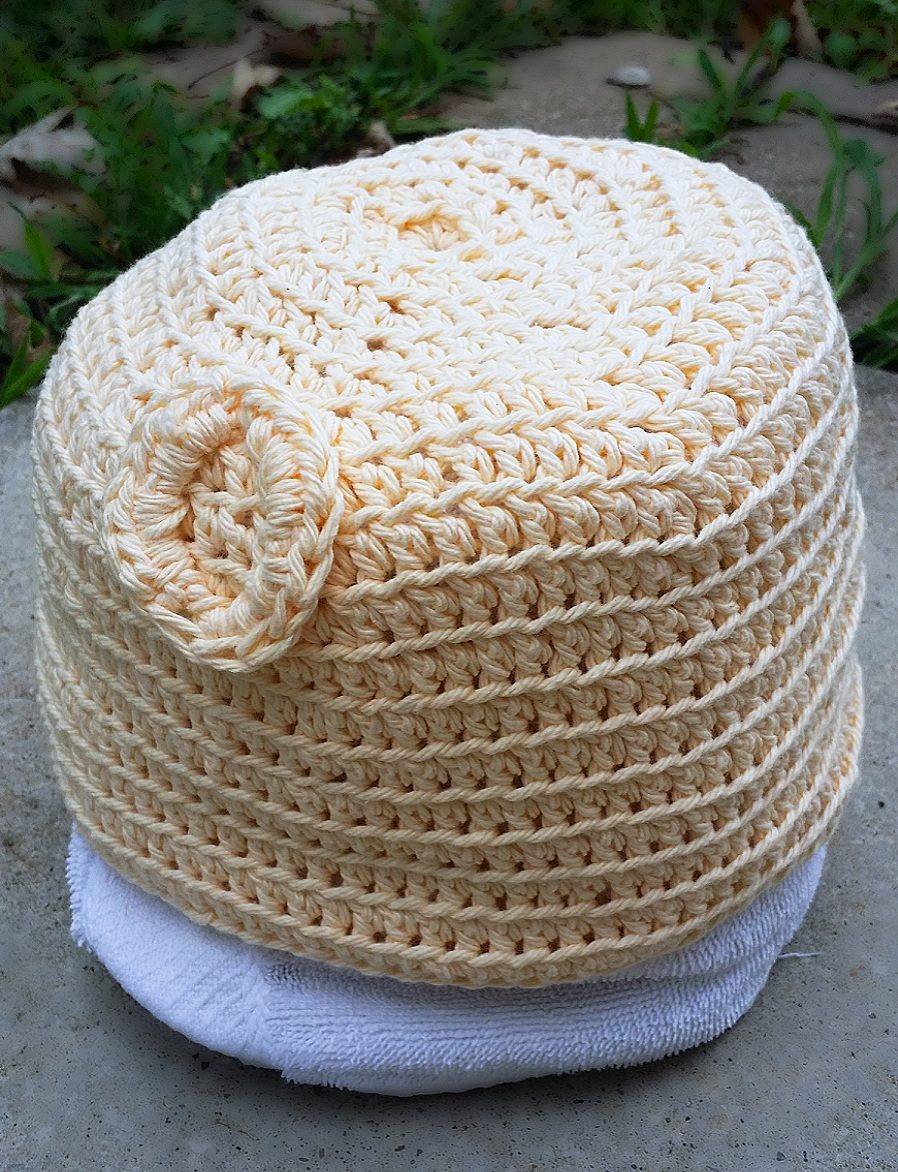
STITCH THEM TO THE BASE:
Now, I don’t know if I should be embarrassed or not, but my head is clearly the same size as a folded up bath towel! (I’m not talking the super nice plush ones, I have four kids, nice towels are a thing of the past! HAHA)
So, take that towel (be sure it’s a cheap one dye might get on it and stain it!) or a head form if you have one.
Weave in the shorter start tail and then use the long tail to seam the remaining unworked loops from the beginning chain to the hat.
Stitch the rings so that:
- The top of the ring is lined up with the 6th row of ridges from the top
- The bottom of the ring is at the 10th row of ridges
- From side to side at the center, it covers 8 sts wide
- They are evenly spaced when looking down at the hat from the top and front
Here are some images to assist in placement:
THE FRINGE HAIR : THE METHOD
- Cut a piece of yarn 30” long.
- Fold it in half.
- Insert your hook from top of hat to bottom through the back loop only of any stitch on the last round made.
- Drape the looped middle of the long strand around the hook and pull through the stitch in the wig base.
- Pull both ends through the loop on the hook and tug firmly to secure.
THE FRINGE HAIR : THE PLACEMENT
- Every free loop remaining on Rounds 17 & 18
- Every free loop remaining on Rounds 1-5
- Draw an imaginary Mohawk on the hat base centered between the pony tail guides from front middle to back middle. Fringe 4 stitch on either side of this imaginary line, so you have a full Mohawk of fringe that is centered and 8 sts wide.
THE FRINGE HAIR: THE STYLING
This part takes some finesse and playing around. I messed with it for quite a while until I was happy with it. Here are my tips:
Cut a strand of yarn about 24” long and set it aside for a moment.
Begin by parting the hair down the middle as evenly as possible. Take the strands from the side you will NOT do first and gather all the hair strands and loosely tie them to the side so they don’t interfere as you work.
- The hair on the TOP of the hat will be laid across the top of the hat, be sure to comb your fingers through it so it lays flat and isn’t tangled too badly (You will not be able to avoid every little kink). Gather it with your hand so it sits on the TOP half of the pony tail guide ring.
- Holding the top hair in place, I began to gather the hair that is on the bottom two rounds of the hat, gather it so that it is evenly spread and covers as much of the hat base as possible (some showing through is OK!) and pull them up so they are in the position of the pony tail ring guide. Do not pull it tightly so that you “cinch” up the hat rounds. You don’t want to do that. I did that at first and had to take it back out and start over!
- While holding all that in place, take the hair strands from the “Mohawk” portion and side sweep them across the forehead to cover more of the hat base.
- NOW, use yarn strand and wrap it around the hair and knot to secure, wrap it again, and knot again, then one more time.
- Repeat all this for the other pony tail, really trying to be sure you are keeping them even in position.
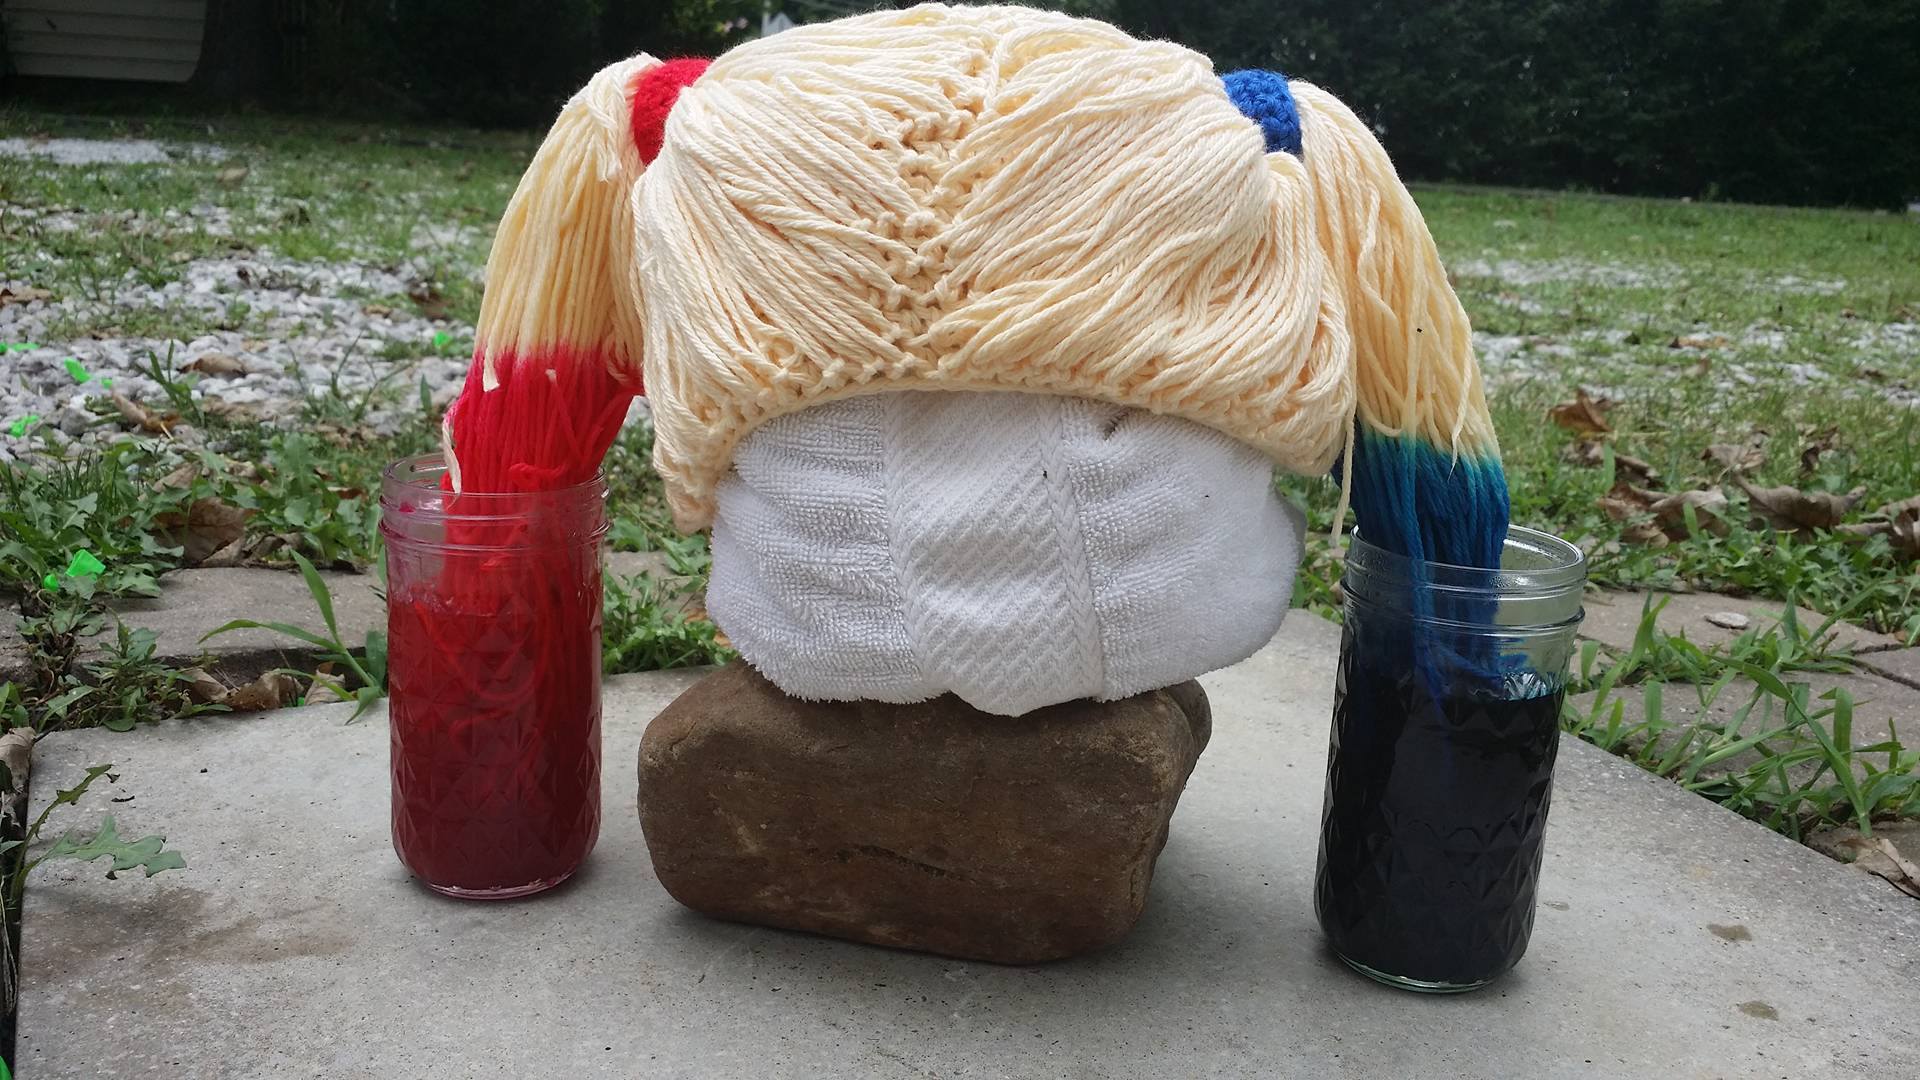
THE DIP DYEING:
The RIGHT Pony is ROSE. The LEFT pony is AQUA. Determine which pony is your left and right.
- On the stove boil about 4 cups of plain water mixed with about 2 TBS of regular salt (this helps to SET THE DYE).
- Take both the dye containers, put all the rose dye in one and all the aqua dye in the other.
- Pour half of the boiling salted water in each cup and stir well.
- PAUSE: YOU MUST TAKE YOUR TIME HERE. If you do not, the dye will get on the parts you don’t want and you’ll be pretty irritated I’d guess. GO SLOW AND BE CAREFUL THE DYE STAINS!
- Dampen each pony tail about 75% of the way in cool PLAIN water so the dye takes evenly, squeezing out the excess.
- Dip the RIGHT pony in the ROSE dye about 50% of the way up. Dip the LEFT pony in the AQUA dye about 50% of the way up. BE SURE YOU DON’T SPLASH OR LET THE PONY TAIL TOUCH THE MAIN HAT or it will become dyed and we don’t want that! I HELD IT UPSIDE DOWN TO DIP. You might want to wear gloves, my hands are totally pink and blue bow. DO NOT dip too deep! The dye will RISE up further as the pony sits.
- I let it sit for about 2 minutes (NOT MUCH WAS NEEDED!) I then rinsed the one until the water ran clear and repeated it for the second one. REMOVE IT CAREFULLY so you don’t bump the dye on the main hat.
- I hung the hat UPSIDE DOWN TO DRY so the pony tails would touch the main hat and transfer the dye.
- Once it was completely dry (I hung it in front of a fan because….IMPATIENCE, Yo!), I made the pony tail holders as directed next.
- So, there were a few spots that I managed to get on the hat even though I tried really hard. Guess what I did?! Cut em off (BE CAREFUL YOU ONLY CUT THE FRINGE and not the hat) and carried on with life <3
THE PONY WRAPS:
With a G hook and the red yarn, ch 19:
Row 1: sc in the 2nd chain from the hook and each remaining chain. (18)
Row 2-3: ch 1, turn, sc in each sc across, tie off leaving 12” tail to seam closed on pony tail.
*Now, wrap it around the rose colored pony tail and seam shut in the back, weaving in the ends as well.
NOW REPEAT for the blue wrap in the same manner as above.
THE FRINGE – FACE FRAMING:
I did the face framing strand last as they are free hanging and I didn’t want to accidentally dye them.
- Using the same method, I fringed the center 10 stitches of the last row of the hat in the front.
- I split them so 5 would sit to the left and 5 would sit to the right and using a separate strand of yarn I stitched them so they layed about 2” across the hat before they hung so they wouldn’t de directly in my eyes.
THE FINAL HAIRCUT:
Lastly, I took scissors and gave her a little haircut. I evened my pony tails and slightly tapered the ends more pointed. I also cut the face framing pieces at angles so everything appeared as much like real hair as I was able to.
That’s it!
I’d love to see you all dolled up! Hit me up on my Facebook page linked below and show me!
Much Love and Yarn,
Stephanie
The information and photos in this posting are the sole copyrighted property of Crochetverse©2016. Please do not copy and paste any of the information contained within either electronically, verbally, or written in part or in whole. Instead, please share the DIRECT LINK to this posting only, and if you do, I thank you for sharing. You of course may sell anything you make from this pattern that you have made with your own two hands, no contract labor or mass productions are permitted. If you credit Crochetverse as the designer, that is greatly appreciated!

I love the look of this pattern even though my partner said why on earth would I want to make it. Jeez! He’s so conservative at times!
Hahah! I am lucky in that my husband is super into what I do, but I know what you mean! It’s ok, I am sure he would love it once you are done! Thank you and if you decide to make it and have questions, just message me on the Facebook page “Crochetverse” 🙂
Comments are closed.