

")
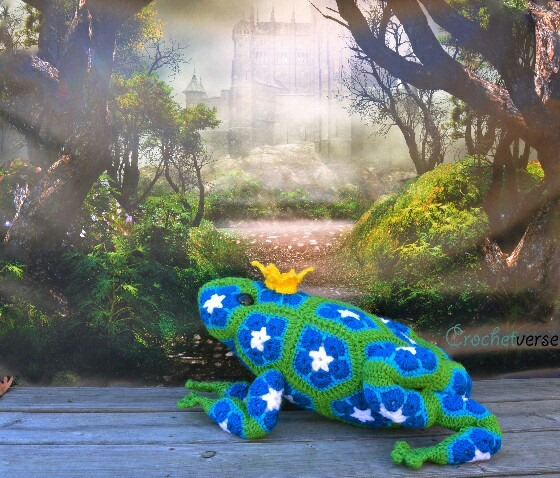
I am super pleased with the results of my frog made using Heidi Bears pattern. Along the way, I came up with some tricks and wanted to share with you regarding his toes and the stuffing process! Read on….
You see, I’m one of those….a planner. I live for events and the planning that goes along with them. I may or may not have missed my calling of party planning.
In any case, I purchased the yarn for this project MONTHS ago, and promptly placed it in my stash cabinet. I knew it had an EVENTUAL purpose, so that totally justified buying it. (Doesn’t say much for the other tubs and tubs I have, but….too darn bad!)
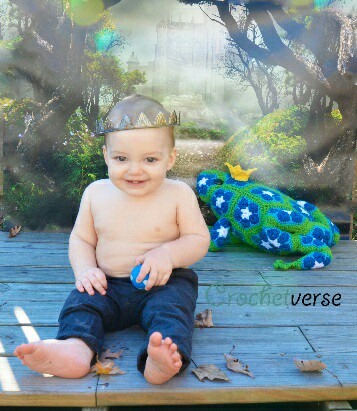
My youngest son and last baby is turning ONE! So, of course I’ve spent the last 364 days planning for it. The theme was Fairy Tale and Frog Prince, so this pattern fit in perfectly, don’t you agree?! Please like my FACEBOOK PAGE HERE and tell me what you think!
The frog pattern is by Heidi Bears, and can be found IN HER SHOP HERE!. She creates gorgeous amigurimi toys by using an African Flower Motif. The pattern was extremely well written, and almost had too much information, lol, she really went above and beyond to be sure nothing was left to guessing! Her example was made using lace weight yarn, and me being the GO BIG OR GO HOME kinda gal, chose worsted weigh yarn.
Specifically, Vanna’s Choice for this one.
I used a G hook, and near every bit of the following skeins: (2) Fern, (2) Sapphire, (1) White, and (1) Aqua.
It was fun and easy to create, the only part I (like everyone else I’m sure) didn’t like was all those ends, but alas, that is a necessary evil to motif crochet.
Her pattern called for knitting I-cord for the toes, knitting is great and all, I just have no skill, needles, or desire….so, I altered it a bit and did crochet toes! You needed 3 for each foot, 2 small and 1 large. Here is what I did to crochet them:
All were made holding the yarn double stranded with the G hook:
Large Toe: Chain 13
Row 1: Sc in 2nd chain from hook and next 10 chains, in the last ch, make 4 hdc, sl st to the remaining loop of that chain you just made the 4 hdc in. I then knotted the beginning and ending tails together and wove in the ends.
Small Toe: Chain 11
Row 1: Sc in 2nd chain from hook and next 8 chains, in the last ch, make 4 hdc, sl st to the remaining loop of that chain you just made the 4 hdc in, knot together the tails to round out the toe, and weave in the tails.
VOILA! That easy, I then just proceeded with her instructions as normal.
The other small adjustment I made was to line my body before stuffing. I noticed that there are some decent sized spaces remaining in the motifs, and that cannot be avoided. Since this was a toy for my little one, who has little tiny prying fingers, I took an old pair of tights I had (they just HAPPENED to be green!) and cut a leg off. I knotted one end shut, and began to stuff it with the Polyfil. Once it had a little shape, I inserted it into the frog’s body…SERIOUS surgery here….and continued to stuff, mold, and manipulate until the body was the right shape and stuffed up. IT TOOK A WHOLE BAG! He is HUGE! Then, I knotted the other end of the tights and seamed up the body. It worked like magic!
I highly recommend her patterns, very well done, and a pleasure to make!
If you’d like to show off any of your creations head over to my FACEBOOK PAGE HERE!
