


We meet again, this time with a little less work. We are going to tidy up and take this shawl to the NEXT level. Up this week, EDGE and BLOCK!
If you missed the Info/Supply/Gauge post, you can find that here: https://crochetverse.com/lattice-rose-info-supply/
If you missed Week 1 & 2: Main Shawl – Start & Middle, you can find that here: https://crochetverse.com/lattice-rose-week-1-2/
If you missed Week 3: Main Shawl – Finish, you can find that here: https://crochetverse.com/lattice-rose-week-3/
And, here again, is your amazing available translations:
LATTICE ROSE WEEK 4: AFRIKAANS
Since it was left entirely up to you to choose your color, let’s pause for a moment and address that.
Your first cake was just worked from beginning to end. The second cake, we need to “UNLOCK”.
The cakes of Wolltraum have a varied number of colors in each cake. Mine was listed as FOUR colors. Others have 3, 5, and even a few have six.
The adornment of our shawl body is going to require some planning and decisions and the only way to get to “know” your specific yarn color choice, is to do a little task.
THIS TASK TOOK ME 27 MINUTES J I timed myself so you would have an idea of what it took and see that it is not that long and really will allow you to UNLOCK the colors in your yarn color.
SO, let’s do it!
Before we begin stitching this week, we will SEPARATE EACH GRADIENT in the second cake.
Understand that each colorway is different and may produce more or less balls than mine!
Examples:
Colorway Eleni produced 9 balls during unlocking:
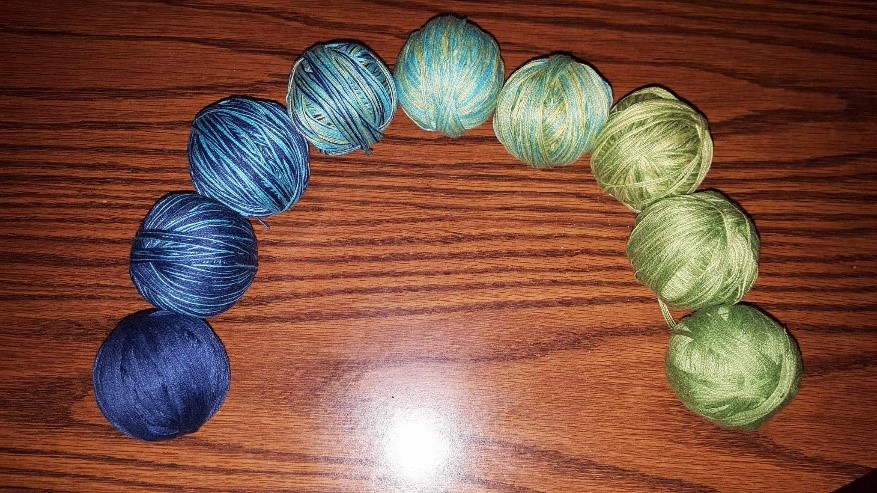
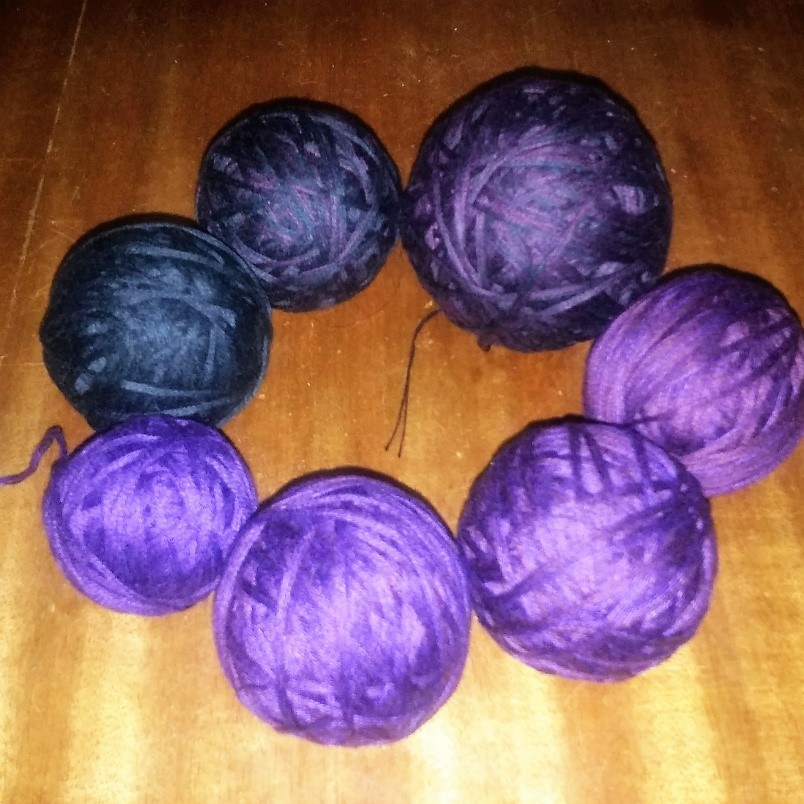
Colorway Black Magic Woman produced 7 balls during unlocking:
Rest assured, your total yardage is the same for all colors. It is just divided differently.
CHALLENGE PHOTO TIME!: After you have separated it out and can see just how beautiful it is, take a photo of what you unlocked within your ball and post it to the CAL Crochet A Long and Crochetverse Facebook page! I would love to see…. mostly for my own personal gain…so I can know which color I need to order next! HAHA!! (But really.)
To do this:
- Begin at either end of the cake: start to roll into a small ball. You can wrap it around a toilet paper tube or anything you choose to do when you normally wind into balls or cakes. I just made small balls.
- Watch for the little knot which indicates your gradient is changing: at which point, cut the yarn at the knot and begin winding a new ball with the next section of gradient.
- Repeat the process for each gradient change.
- I then placed each ball in a baggie and numbered them as they came off the ball: though it was quite easy to place them in order especially after I worked through them on my 1st cake.
In my cake (Colorway: Ice Cream) that was listed as FOUR colors, I ended up having NINE gradient changes!
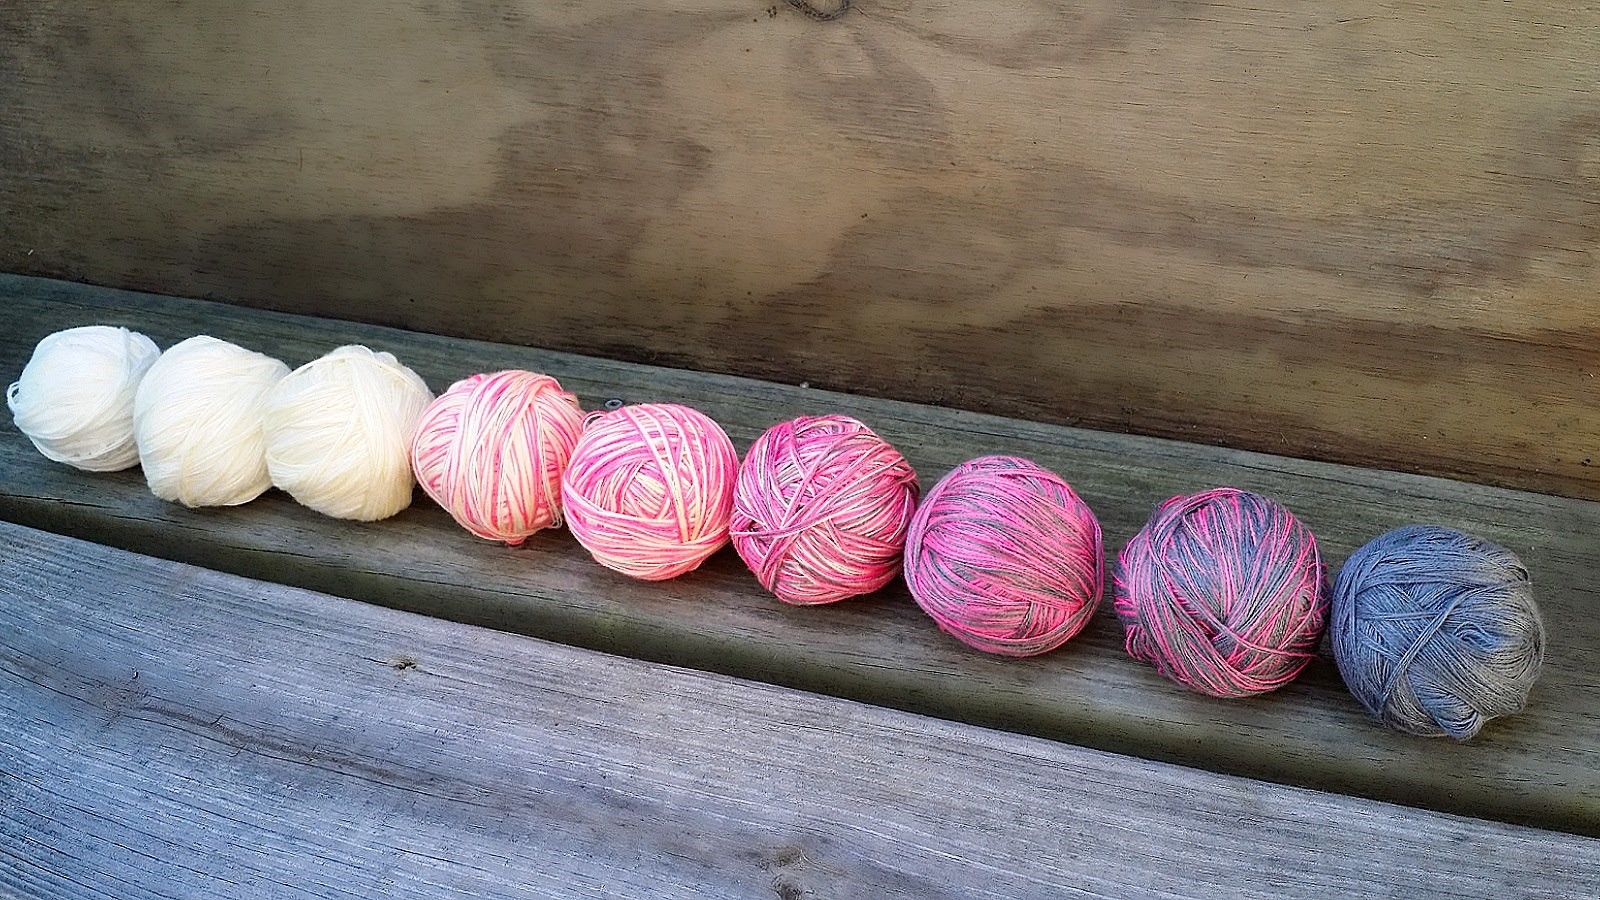
Here is a quick overview so you can best plan, you will want to decide WHICH ball to use where based on what YOUR ball contained: COUNTING FROM LEFT (WHITE) to RIGHT (GRAY)
Balls 1-3: Were used to create the leaves and flowers that border the bottom edge (row 1) of the shawl.
Balls 4-5: Were held aside to create more flowers as desired once completed
Ball 6: Was used to create the arm hole edging rounds through round 6
Balls 7-8: Were held together to create rounds 7-8 of the armhole edging, and the remainder was used to create the Closure
Ball 9: Was used to assist in the edging of the main shawl body
What was left over was just set aside. I have not employed every last yard of the yarn to account for small changes in gauge and adding more flowers or the optional border as desired at the end.
Now, that we see what we have in our 2nd cake, we will begin to stitch:
EDGE ROUNDS: This is a ROUND, NOT a row. We will now work ALL the way around the rectangle we’ve created to border it.
*You will begin the edge with the SAME color as you just finished up with on your main shawl body*
So, grab that unlocked little gradient ball and begin: (For me it was the dark gray)
Round 1: DO NOT turn from previous round. The round is broken down into steps so it’s easier to follow:
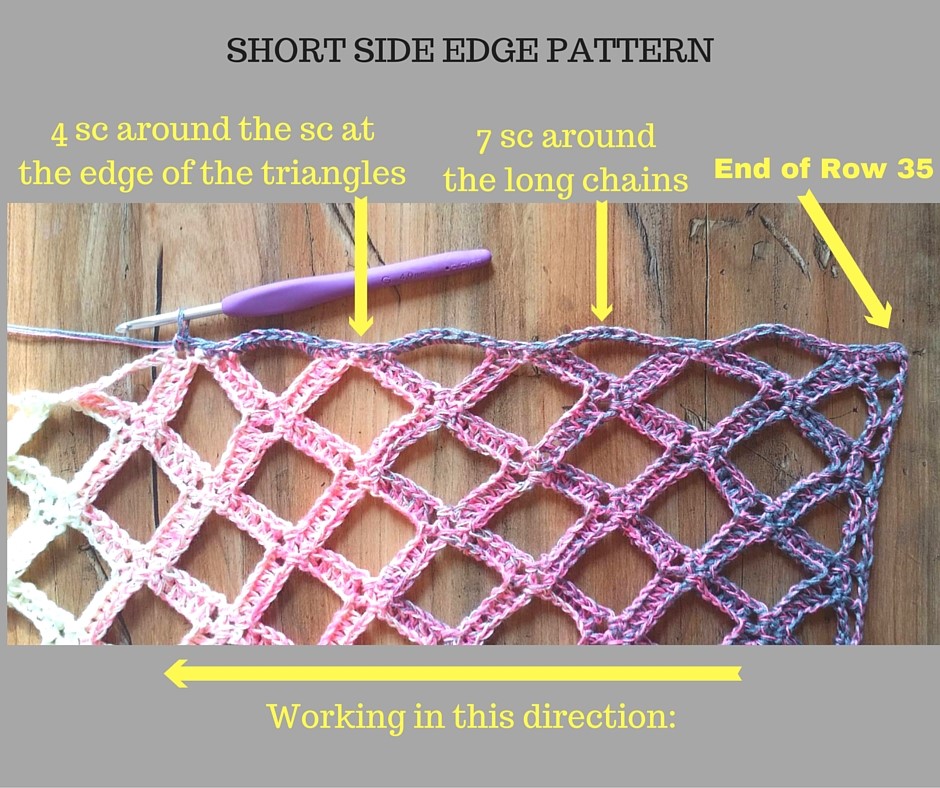
Down the 1st short edge side: Ch 1, working around the post of the dc at the end of the row, make 2 sc in the space, *sc in the side of the nxt sc, sc in the space between the just worked and next sc, sc in around the post of the nxt sc, *work 7 sc AROUND (not in) the nxt long chain space up the side, work a sc around the side of each of the nxt 4 sc at the edge of the side V point, repeat from * until you are just BEFORE working the last long ch space, work 7 sc in the last long chain space, work 2 sc around the 2 sc at the side of the last V edge, work 5 sc in the space created at the corner by the beginning chains.
Across the Bottom Edge of the Shawl (Row 1 of the piece): work 1 sc in the remaining free loop of each dc (from the beginning chain) and work 2 sc IN each ch-2 space across the bottom, work until you are at the last ch space at the corner, work 5 sc in the space
Back Up the Opposite Short Edge: *sc in the side of the nxt sc, sc in the space between the just worked and next sc, sc in around the post of the nxt sc, *work 7 sc in the SPACE created by the quintuple stitch, sc around the side of each of the nxt 4 sc at the edge of the side V point, repeat from * until you are just BEFORE working around the last quintuple stitch, work 7 sc in the space around the stitch, work 2 sc around the 2 sc at the side of the last V edge, work 5 sc in the space created at the corner by the beginning chains.
Across the Top Edge of the Shawl (Row 35 of the piece): work as for the bottom edge, sc in the last dc and sl st to the top of the 1st sc made.
Rnd 2: Do not turn. Ch 1, sc in the same st, now reverse sc alllllll the way around the piece in the BACK LOOP ONLY (this is the loop that sits furthest to the back side from you when the right side of the work is facing you) of each sc around, work 2 reverse sc in the BACK LOOP only of each corner stitch, sl st to the 1st sc made, tie off.
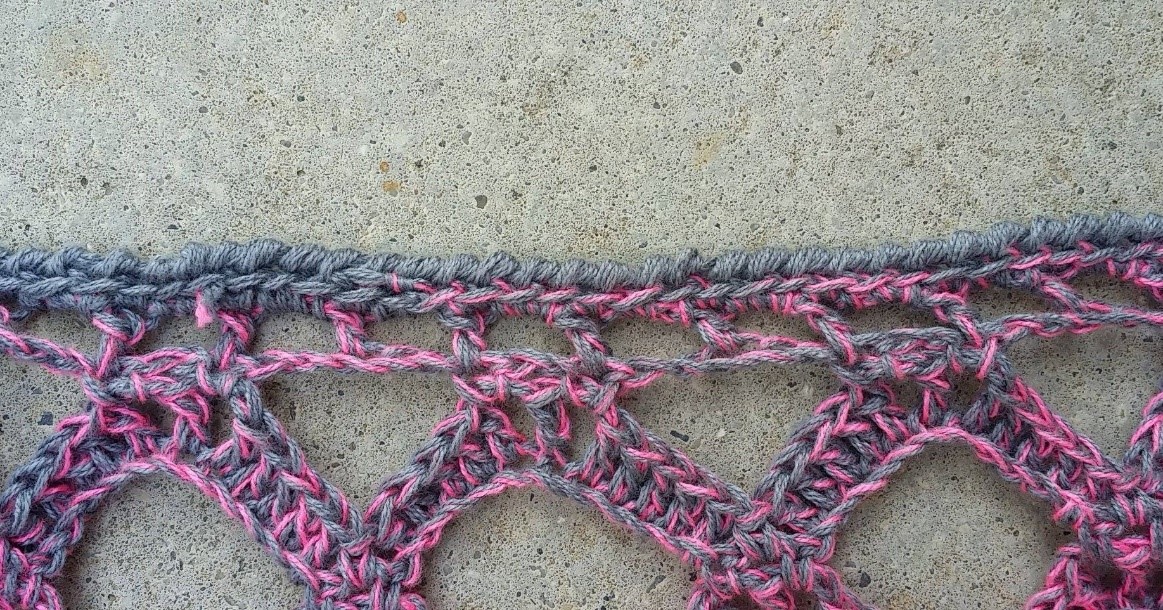
*PLEASE don’t hate me lol! It looks so pretty in the back loop! It creates a little ridge that just adds that “special touch” J Look here at this picture for proof! 😉 Ohh La!
EDGE ARMHOLE OPENINGS:
FIRST UP: Choose your gradient ball. I went with one of the gradients that was surrounding the gradient that fell on my main shawl body as I worked that naturally, it is the pink/ivory for me. You choose which ball looks good to you.
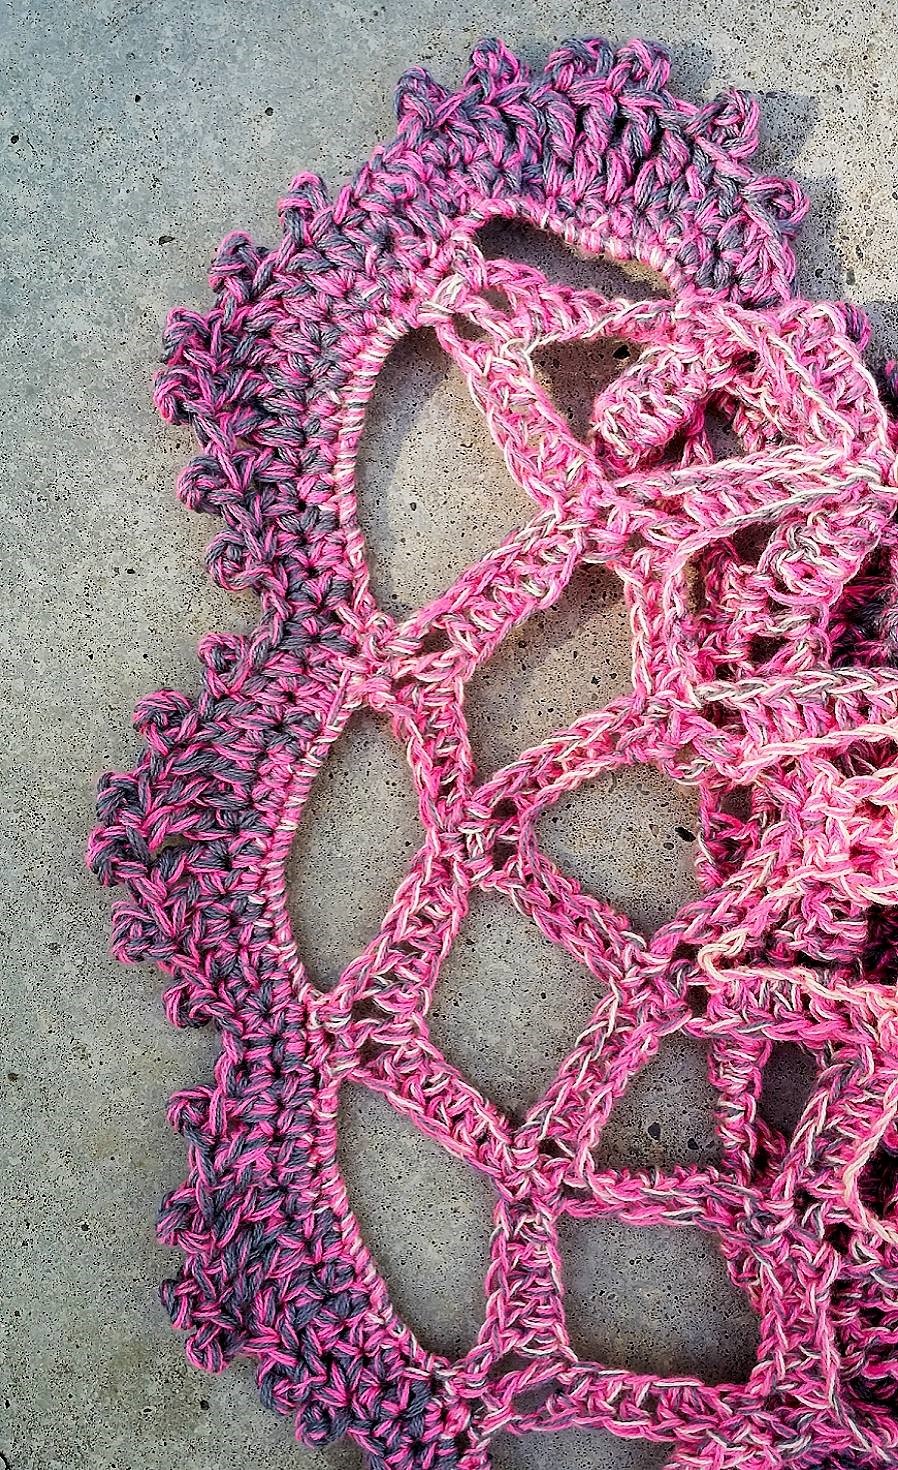
I am showing you the arm process in the DARK GRAY so it is easier to see, but as you see in the completed photo I have done my actual garment in the gradient change that fell near the arm opening.
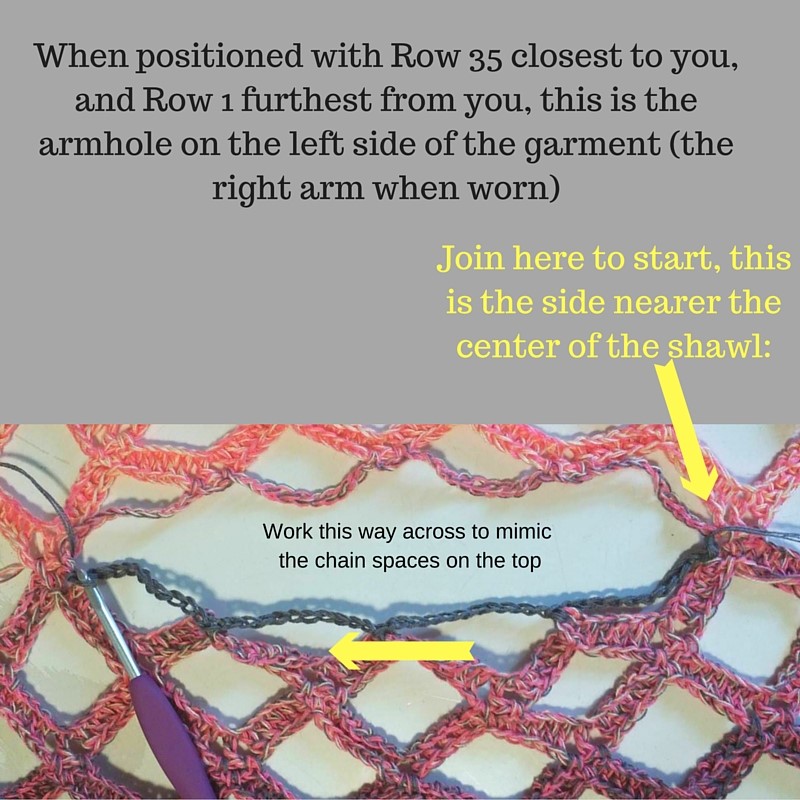
Position the garment so the right side is facing up and the last row of the main shawl (row 35) is closest to you and row 1 of the main shawl is furthest from you (basically upside down) *Begin with the armhole on the LEFT (when worn this is actually the right arm, don’t get confused J)
Note in the image below that when we split off into the armholes: one side has the ch-11 between the triangle tips and the top side does not. First, we will even that up.
LEFT side armhole: (when positioned as described above)
Round 1: (PARTIAL ROUND)
Join yarn with a sl st in the 2nd sc at the top of the triangle on the right edge of the opening, *ch 11, (sc, ch 2, sc) in the remaining free loop of the sl st at the bottom point of the nxt triangle (created when you worked across the ch-47 in row 25), repeat from *, TWO times more, ch 11, then sl st in the sc in that is in the 1st ch-2 space of the triangle at the opposite side of the armhole.
Round 2: Do not turn ANY ROUNDS for the armhole. Ch 1, sc in the same st, *dc in the 1st 5 chs of the nxt ch-11, ch 2, dc in the nxt ch, ch 2, dc in the last 5 chs of the same ch-11, sc in the nxt ch-2 sp, repeat from * TWO times more, dc in the 1st 5 chs of the nxt ch-11 , ch 2, dc in the nxt ch, ch 2, dc in the last 5 chs of the same ch-11, sc in the sl st at the inner corner of the arm opening, **dc in the 1st 5 chs of the nxt ch-11, ch 2, dc in the nxt ch, ch 2, dc in the last 5 chs of the same ch-11, sc in the nxt ch-2 space, repeat from ** TWO times more, dc in the 1st 5 chs of the nxt ch-11, ch 2, dc in the nxt ch, ch 2, dc in the last 5 chs of the same ch-11, sc in the sl st at the corner.
Round 3: sl st across the 1st 5 dc (not too tightly), sl st into the 1st ch 2 sp, ch 1, sc in the same sp, ch 2, sc in the next ch-2 sp, ch 11, *sc in the nxt ch-2 sp, ch 2, sc in the nxt ch-2 sp, ch 11, repeat from * SIX times more, sl st to the 1st sc made.
Round 4: sl st to the ch-2 sp, ch 1, *sc in the same ch-2 sp, dc in the 1st 5 chs of the nxt ch-11, ch 2, dc in the nxt ch, ch 2, dc in the last 5 chs of the same ch-11, repeat from *, SEVEN times more, sl st to the 1st sc made.
Round 5: Repeat round 3.
Round 6: sl st to the 1st ch-2 sp, ch 1, *2 sc in the ch-2 space, 12 sc in the SPACE of the nxt ch-11 (not the actual chains), repeat from * around, sl st to 1st sc made, tie off. (112 sc around)
Round 7: HERE I used balls 7-8 held DOUBLE STRANDED together (using the SAME HOOK size) to “bell” the opening. With right side facing, join the double strand yarn in any 2nd sc made in a ch-2 sp, ch 1 (does not count as a st), sc in the same st and in each stitch around, sl st to top of 1st sc made. (112)
TIP: I made one in the Wolltraum and just worked round 7 as stated. I made one in solid and worked all of round 7 in the BACK LOOPS ONLY. You can choose either here based on your preference!
Round 8: ch 1, sc in the same st, hdc in the nxt st, hdc in the nxt st, picot (ch 3, sl st in the FRONT bars of the st at the base of the ch-3 as done previously), dc in the nxt st, dc/picot in the nxt st, tc in the next st, tc/picot in the nxt 2 sts, tc in the nxt st, dc/picot in the nxt st, dc in the nxt st, hdc/picot in the nxt st, hdc in the nxt st, sc in the nxt st, *sc in the nxt st, hdc in the nxt st, hdc/picot in the nxt st, dc in the nxt st, dc/picot in the nxt st, tc in the nxt st, tc/picot in the nxt st, tc/picot in the nxt st, tc in the nxt st, dc/picot in the nxt st, dc in the nxt st, hdc/picot in the nxt st, hdc in the nxt st, sc in the nxt st, repeat from *, SEVEN times more, sl st to the 1st sc made, tie off.
This image shows the completed armhole edge:
RIGHT side arm hole: (when positioned as described above, again when worn, it is actually the left armhole)
Round 1-8: Complete exactly as Rounds 1-8 of other armhole.
BLOCKING:
There are no two ways about it. Due to the nature of the stitch and yarn, you MUST block your item. I will make it quick and painless, and I promise you it will be worth it!
To start: Weave in all ends to this point. Try to weave the tail into a section that has the same color gradient so it blends perfectly!
Now for blocking: The method I will describe is safe for MOST fibers, as it involves no machine washing, soaps, or heat. Obviously, you should test it on a small swatch of your yarn choice and make sure you have desirable results before blocking the entire project.
You will need:
- NON RUSTING Steel Pins (since water is used, if you do not make sure they don’t rust, you could end up with rust stains on your items as they dry! Boooo!)
- something to pin out on: either foam mats, folded towels, an ironing board with towels underneath the cover, or any other flat surface you can safely get damp and pin to
- your shawl, ends all securely woven in
- Grab your shawl and head to your sink. Set the water temperature to COOL and thoroughly wet the garment. Don’t be afraid, it will be ok!
- Remove the excess water from it by SQUEEZING ONLY. Do NOT wring or twist it at all. If it remains very damp after a squeeze, place it on a towel and roll the towel up tightly, with the shawl inside, to remove even more excess water.
- Now, using the pins and your blocking surface, pin the shawl out. You will have to smooth gently, but do NOT over stretch. The main goal is to achieve nice straight edges and crisp corners. Pin the corners, as well as along each edge. Make sure you don’t create peaks or waves as you pin the sides. Gentle smoothing, shaping, and pinning into place is all you need. Do this for all the squares. If you tug too hard, the stretchy nature of the fabric may make them too large, just smooth and pin.
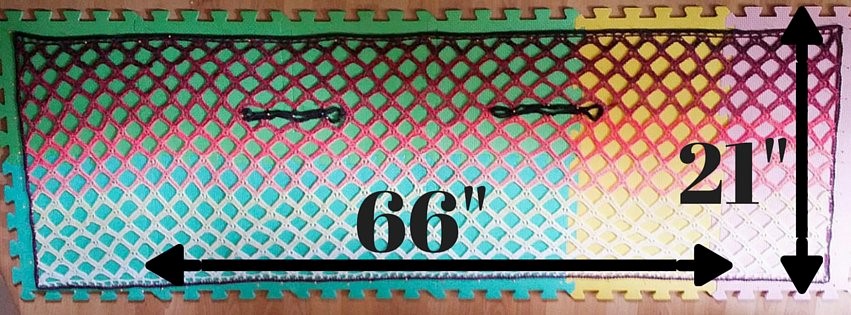
GOAL BLOCKING MEASUREMENT: Approx 21” tall x 66” wide
- LEAVE it to dry completely. If I’m antsy, I sometimes direct a fan on it. I generally leave it to block undisturbed overnight. (This image was prior to adding the arm treatment in case you are wondering where the frilly beauty is!)
US measurements goal: 66” x 21”
Trust me…when you this lovely yarn creation is dry and you unpin it, you will see why blocking is so needed. It takes your work from pretty to WOW (and super professional looking too!)
Join me next week when we will begin to create the motifs in:
Week 5: Irish Crochet Motifs – Part 1
Until next time……
Much Love & Yarn,
Stephanie
The information and photos in this posting are the sole copyrighted property of Crochetverse©2016. Please do not copy and paste any of the information contained within either electronically, verbally, or written in part or in whole. Instead, please share the DIRECT LINK to this posting only, and if you do, I thank you for sharing. You of course may sell anything you make from this pattern that you have made with your own two hands, no contract labor or mass productions are permitted. If you credit Crochetverse as the designer that is greatly appreciated!
