


HERE WE GO NOW, HERE WE GO NOW! (Said in my best “old skool” rap voice!)
SO EXCITED!!
WELCOME TO WEEK ONE & TWO: MAIN SHAWL – START & MIDDLE!!
Because the pattern stitch is a repeating pattern, we have decided to create the bulk of the shawl right away, BUT give TWO weeks for the task!
What does this mean for you?
You will receive ONE set of instructions here in week one, but you will have TWO weeks to complete the task. There will NOT be any additional work posted for Week Two. You will simply carry on and finish what was assigned in Week One.
So, let’s begin!
I would guess by now, you have your yarn in hand and have pawed and played with it far more than you care to admit. Well, the anticipation is over and we are READY TO START!
Seeing all your colors as they arrived to you has made my Wolltraum Wish List a mile long!
Gather all those beautiful items and the hook you determined YOU will need to meet gauge and let’s review a little bit about materials, and give you a second chance to check gauge if you missed it the first time around!
If you missed the “Info/Supply/Gauge”, you can find that here: https://crochetverse.com/lattice-rose-info-supply/
English is only available here on the site, you may copy and paste if you need to print so you can work on the go!
Here are each of your translations available: (THANK YOU TRANSLATORS!)
Get your stitchin’ fingers ready, here we go!
Have questions?? Be sure you join the CAL Crochet A Long group on Facebook so that you may tap into the amazing fellowship of crocheters who are always willing to help with questions! Don’t be afraid to ask anything!
Find that group here: https://www.facebook.com/groups/668646249929007/
Please also join the Crochetverse Facebook page and share your work, the more love we spread with beautiful pictures and works, the more people we can help learn about this beautiful project.
You can find that here: https://www.facebook.com/crochetverse/
MATERIALS:
– Size G (4.0mm) crochet hook OR SIZE NEEDED TO OBTAIN GAUGE
*Note: This yarn is loosely plied. I HIGHLY recommend you use a nice high quality hook like a Clover Amour (which you will see in my photos). The metal finish is SO smooth and will greatly reduce the nature of the yarn to split and just about eliminate drag as you work. Trust me, the Clover Amour changed my crochet life, not even joking one bit!
– Scissors, tapestry needle
– Non-rusting steel pins for blocking
– Foam mats or another surface suitable for pinning to for blocking (I use interlocking puzzle floor mats designed for children, I got a surface 6-foot x 6 foot for under 25 dollars!)
-1660 yards 4-ply yarn (FINGERING weight)
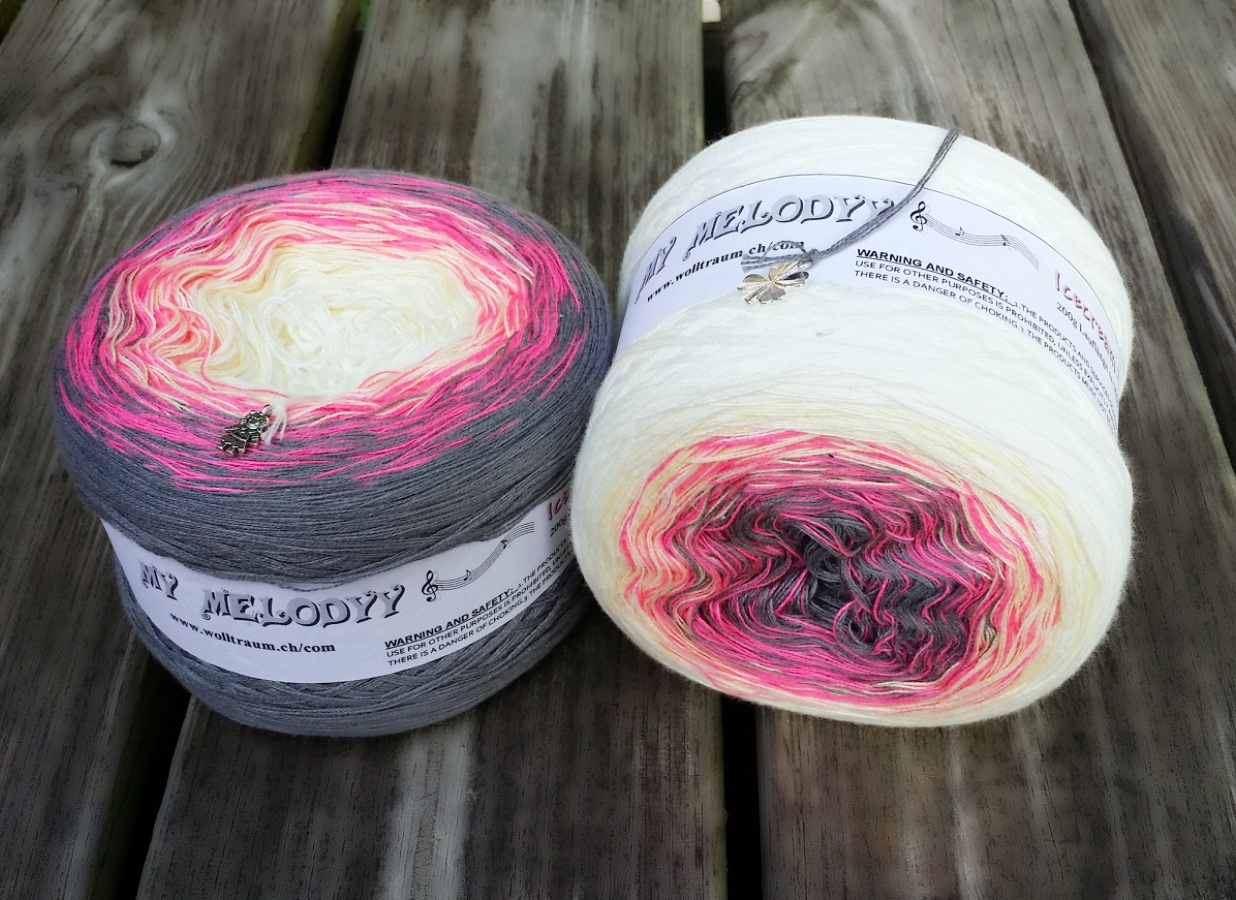
SHOWN: (2) 200g/7oz balls Wolltraum 4-ply – 50% acrylic 50% cotton COLOR: Ice Cream
It is available WORLDWIDE! Visit the Info/Supply post linked above for all the specific links for your country! Here are some details:
- There is NO right or wrong way to work the cake, from the inside or the outside are both fine. I prefer to work from the center of the cakes (the term used when the yarn is wrapped in the manner it arrives to you.) You will have the option on what color you would like in the center of the ball to be available to work first in the color sequence. I requested one ball wrapped in one direction, and my 2nd ball wrapped opposite. Therefore, I was able to work from the center of the ball as I prefer. Not a huge deal, but a little something to make your day nicer.
- Will you stop and take a look at those cute little charms that come on each cake?! I got a 4 leaf clover and a little girl. Every ball has one and it is attached to the center piece of the yarn to make it even easier to find when you start! What can you do with this little treat? Pop it on a charm bracelet, slide it over a hoop earring as a little dangle, attach it to a small lobster clasp jewelry finding and VOILA! you have yourself a stitch marker!
Now, let’s get into the details:
SIZING:
This is a one size fits most up to 2X garment, it is very drapey and free fitting.
The shawl is identical for all the sizes with one exception: The distance across the back between the arm hole openings. When we reach this point in the pattern, you will choose:
MISSES: To fit XS- L (Crossback approx 18″)
PLUS: To fit XL – 2X (Crossback approx 24″)
PLEASE NOTE! You may find that this will fit larger than 2X, I was conservative in sizing! Please visit the Info & Supply Post linked above to measure yourself and determine if you think this will fit you in a manner you like 🙂
FINISHED DIMENSIONS:
The main body of the wrap is approximately 21” x 66” after blocking, exclusive of the floral additions.
GAUGE: (In case you missed it before!)
Here’s the deal with gauge. I TOTALLY understand that no one likes to do it. BUT trust me, even amongst my test group we generally vary 2-3 hook sizes. We are all different and that’s great, but if you don’t adjust to match my gauge, you ARE going to run out of yarn, and your color changes won’t be similar to mine. This is gorgeous luxury yarn, if you are going to buy it and spend your precious time with me (THANK YOU FOR DOING SO!) please be sure your gauge is the same as mine so that your amazing hand work is exactly as you hope <3
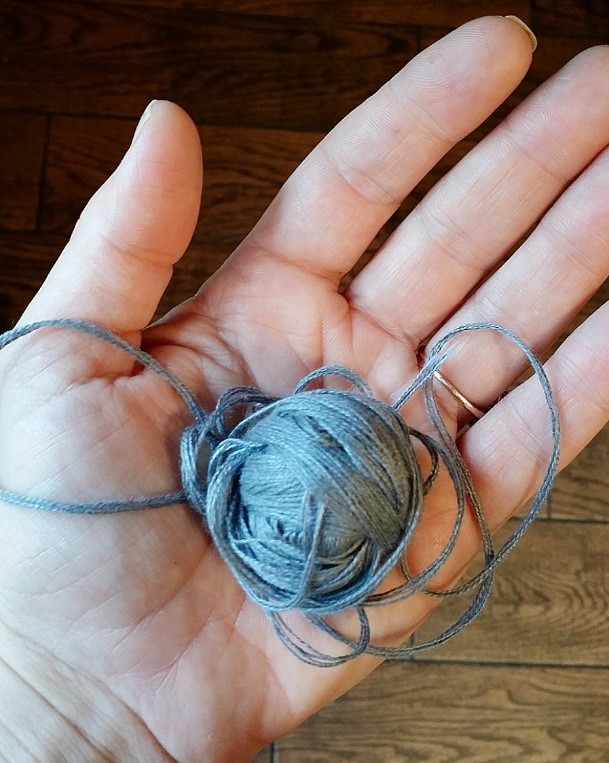
Here is how much yarn I have left from the main shawl body, so if you are off on gauge, you will run out and be sad!
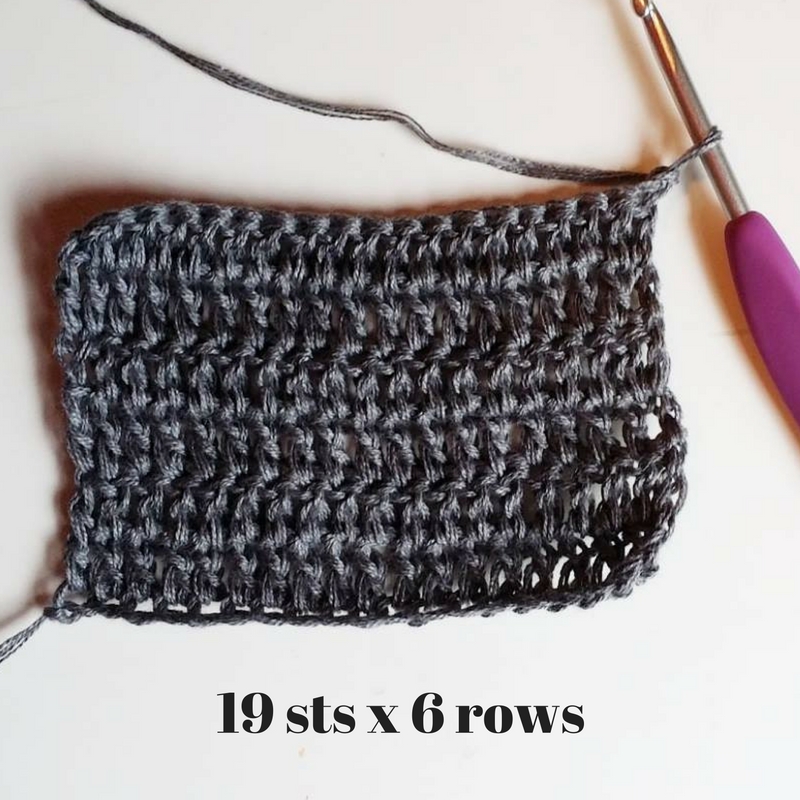
Swatch Pattern for Gauge Test: (Goal is 2.5” tall x 3.75” wide)
This is only for a test. Once you determine the hook size needed to match my gauge, you will frog (unravel) this swatch and begin your project with the yarn. You may find it easier to work your swatch from the OUTSIDE of a cake as it will be easier to unravel and wind it back up that way, but either is acceptable!
With G hook and the yarn you plan to use for the project, ch 20:
Row 1: dc in the 3rd ch from the hook (skipped chains count as dc) and each remaining chain across. (19)
Row 2-6: ch 2 (counts as the 1st dc), turn, dc in each rem dc across. (19)
IF YOU HAVE LESS STITCHES in the measurement: Your gauge is LOOSER than mine, choose the next hook size SMALLER and try again.
IF YOU HAVE MORE STITCHES in the measurement: Your gauge is TIGHTER than mine, choose the next hook size LARGER and try again.
Once you have the correct hook size so our gauges match: frog the swatch, pat yourself on the back, and begin the shawl!
DESIGN OVERVIEW:
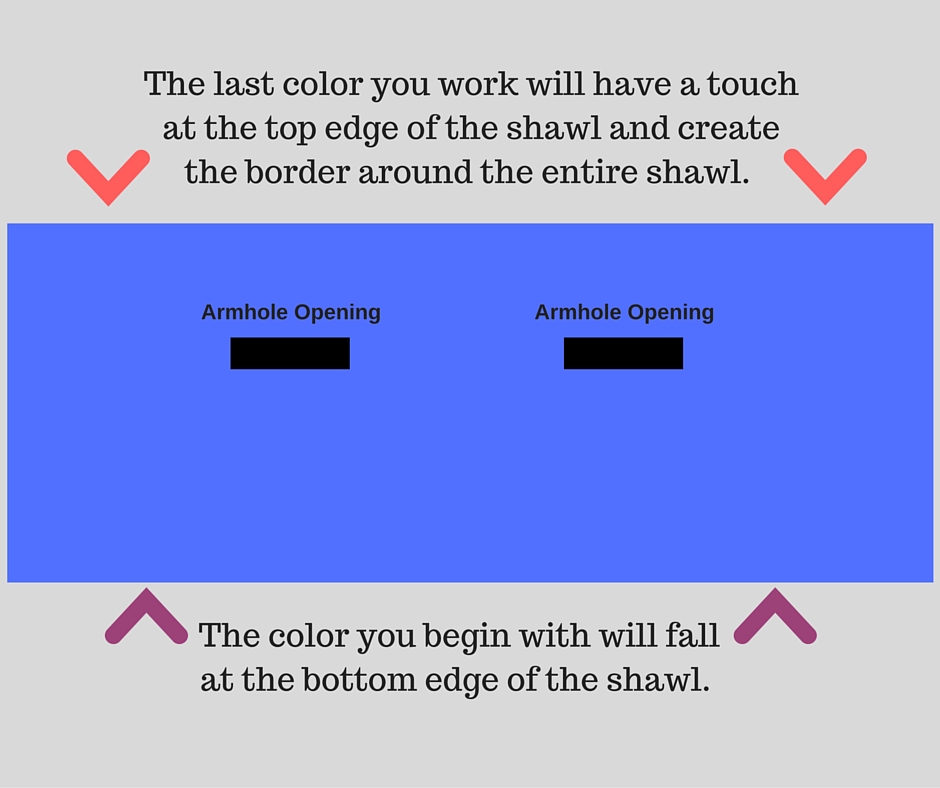
First, we will create the main body of the wrap using the lattice look stitch. It will be created lengthwise from the bottom to the top. At a set point, we will split the work to create the arm holes, then rejoin to finish off. Then, we will create our Irish crochet inspired embellishments and stitch them on.
INSTRUCTIONS:
Take a moment here to decide how you would like your colors to fall on your creation. As an example, I have 4 colors in my ball: white, vanilla, strawberry, and gray. (YUM! No wonder it’s named ICE CREAM!) I chose to have the GRAY AT THE TOP edge of my shawl and the WHITE AT THE BOTTOM edge of my shawl. Therefore, I will begin working with the WHITE end of my yarn and it will be on the bottom edge of my finished shawl. The gray, the last color I will use, will end up on the top. Choose which color you would like on the bottom of the shawl and BEGIN WITH THAT COLOR. Refer to the image below for further clarification:
PATTERN START:
DO YOU CHAIN TIGHTLY?!?! It is imperative that you do not chain too tightly so as to bind the stretch of the fabric. If you tend to chain on the tighter side, GO UP ONE HOOK SIZE from whatever you are using to meet gauge for the BEGINNING CHAIN ONLY. Then switch back to the other hook for the remainder of the shawl body. Be cognizant of not chaining overly tight throughout the project as well.
TIP: Place a stitch marker, bobby pin, or scrap piece of yarn every 25 chains as you work. That way, if you lose count, you simply can return to your last marked point instead of starting over! Long chains can be tricky, especially if you have an Army of small humans running around like me!
Stitch Key:
ch(s): chain(s) sk: skip
dc: double crochet sp(s): space(s)
nxt: next st(s): stitch(es)
sc: single crochet
Once we establish our pattern, it will repeat over and over to create the stitch pattern of the shawl.
Stitch counts will be given in “chain spaces” and “triangle tips” (the point at the top of each triangle as you work)
TIP: When you come to your first color change in the yarn ball, you will reach a small knot where the new color is tied in. This is the manufacturing process required to make this gorgeous yarn. It is secure and some people choose to just work and leave the knot in the work. I prefer to simply cut the knot from the yarn and rejoin as you would if you were joining a new ball of yarn.
With the color you’d like to appear at the bottom edge of your main shawl body, chain 279:
Row 1: Dc in 9th ch from hook (counts as all the stitches top & bottom for the 1st space), *ch 2, sk 2 chs, dc in nxt ch, repeat to end. (91 ch-2 sps)
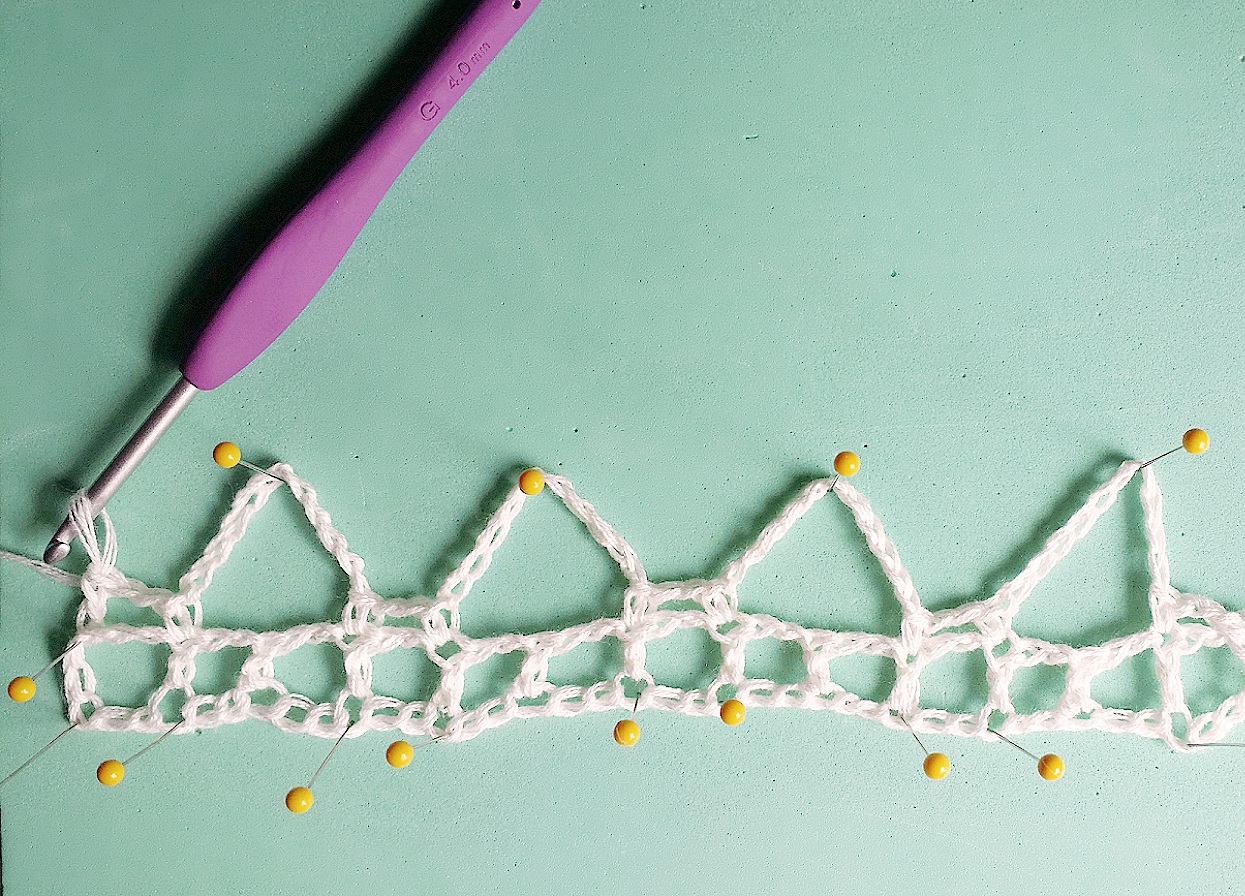
Row 2: Ch 1, turn, sc in same st, ch 2, sc in nxt dc, *ch 11, sk nxt (ch-2, dc, ch-2), sc in nxt dc, ch 2, sk the nxt ch-2, sc in the next dc, repeat from * across until you have 3 spaces remaining, (2) ch-2 spaces and the one created by the ch-9 from the prior row, ch 11, sk the nxt (ch-2, dc, ch -2) and sc in the nxt dc, ch 2, sc in 5th ch of beg ch-9. (30 ch-11 loops)
The image below shows the end of the row where you are working into the 5th ch of the ch-9. It also shows the ch-11 loops, separated each by a ch-2 loop.
Row 3: Ch 1, turn, sc in same st, sk the ch-2 & sc, dc in the 1st 5 chs of the ch-11 loop, ch 2, dc in nxt ch, ch 2, dc in last 5 chs of the same ch-11 loop, sc in the nxt ch-2 sp, *dc in the 1st 5 chs of the nxt ch-11 loop, ch 2, dc in nxt, ch 2, dc in last 5 chs of the same ch-11 loop, sc in the nxt ch-2 sp, repeat from *, until you have one ch-11 loop remaining, dc in 1st 5 chs of the ch-11 loop, ch 2, dc in nxt ch, ch 2, dc in the last 5 chs of the ch-11 loop, sk the last ch-2, sc in last sc of the row. (30 triangle tips created)
TIP: The 1st ch of each ch-11 group gets tightened as you work, be sure you are actually working into the 1st ch of each ch-11 and not skipping it.
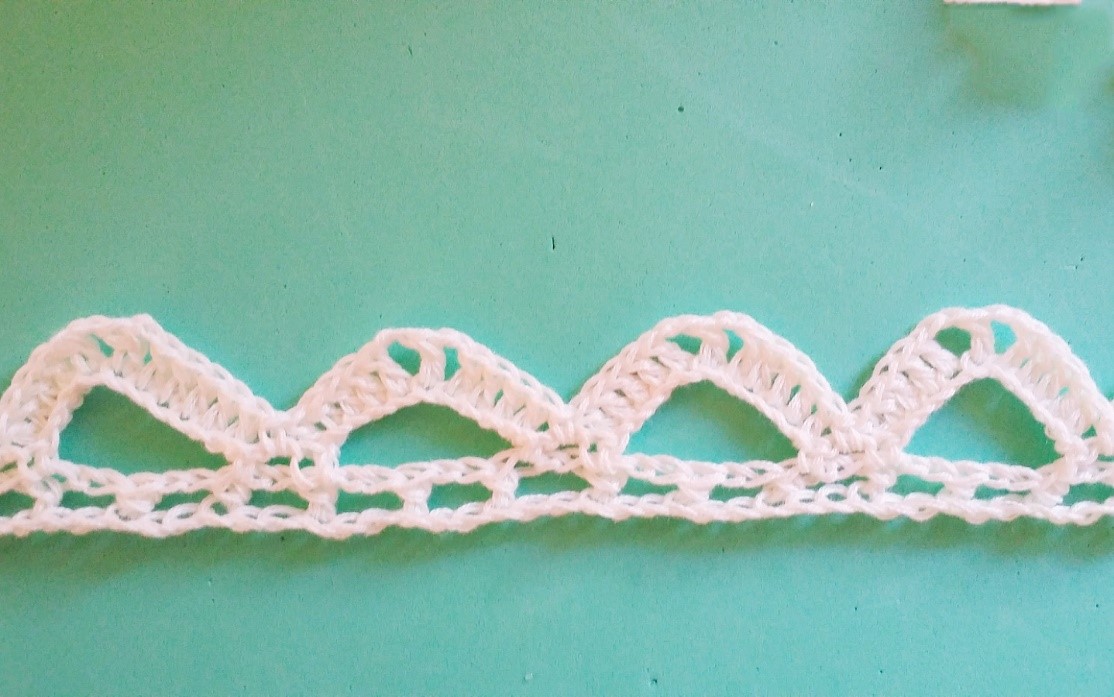
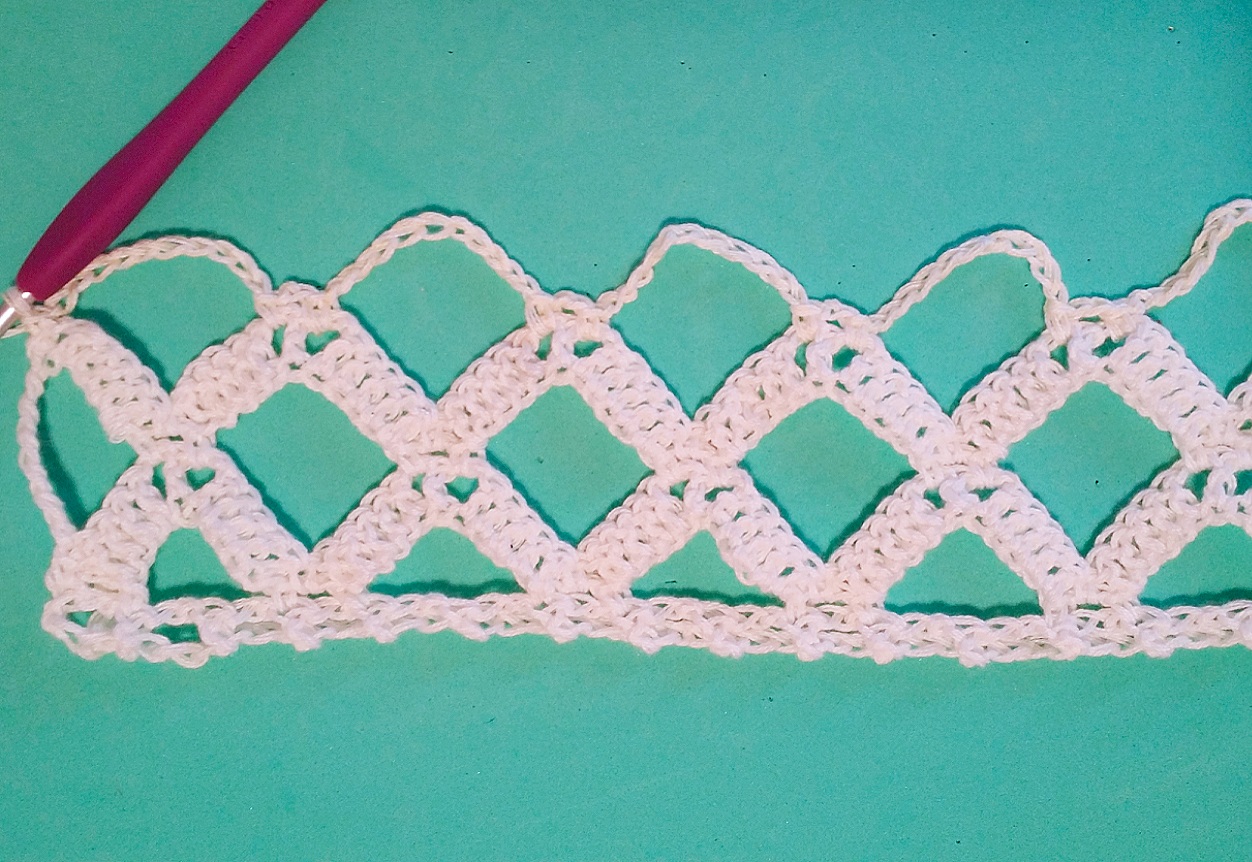
The image below shows what your work will look like after Row 3 is complete:
Row 4: Ch 13, turn, sc in the 1st ch-2 space (at the tip of the triangle), ch 2, sc in the nxt ch-2 sp at the tip of the same triangle, *ch 11, sc in 1st ch-2 sp on the nxt triangle tip, ch 2, sc in the nxt ch-2 sp on the same triangle, repeat from * to just before last loop would be worked, ch 11, sc in nxt ch-2 sp, ch 2, sc in nxt ch-2 sp, ch 5, quintuple stitch (*see below for method), in last sc.
Quintuple Stitch: Yarn over SIX times, insert hook in the indicated stitch, yarn over and pull up a loop, (yarn over and pull through two loops) repeat this parenthesis a total of 7 times, stitch complete.
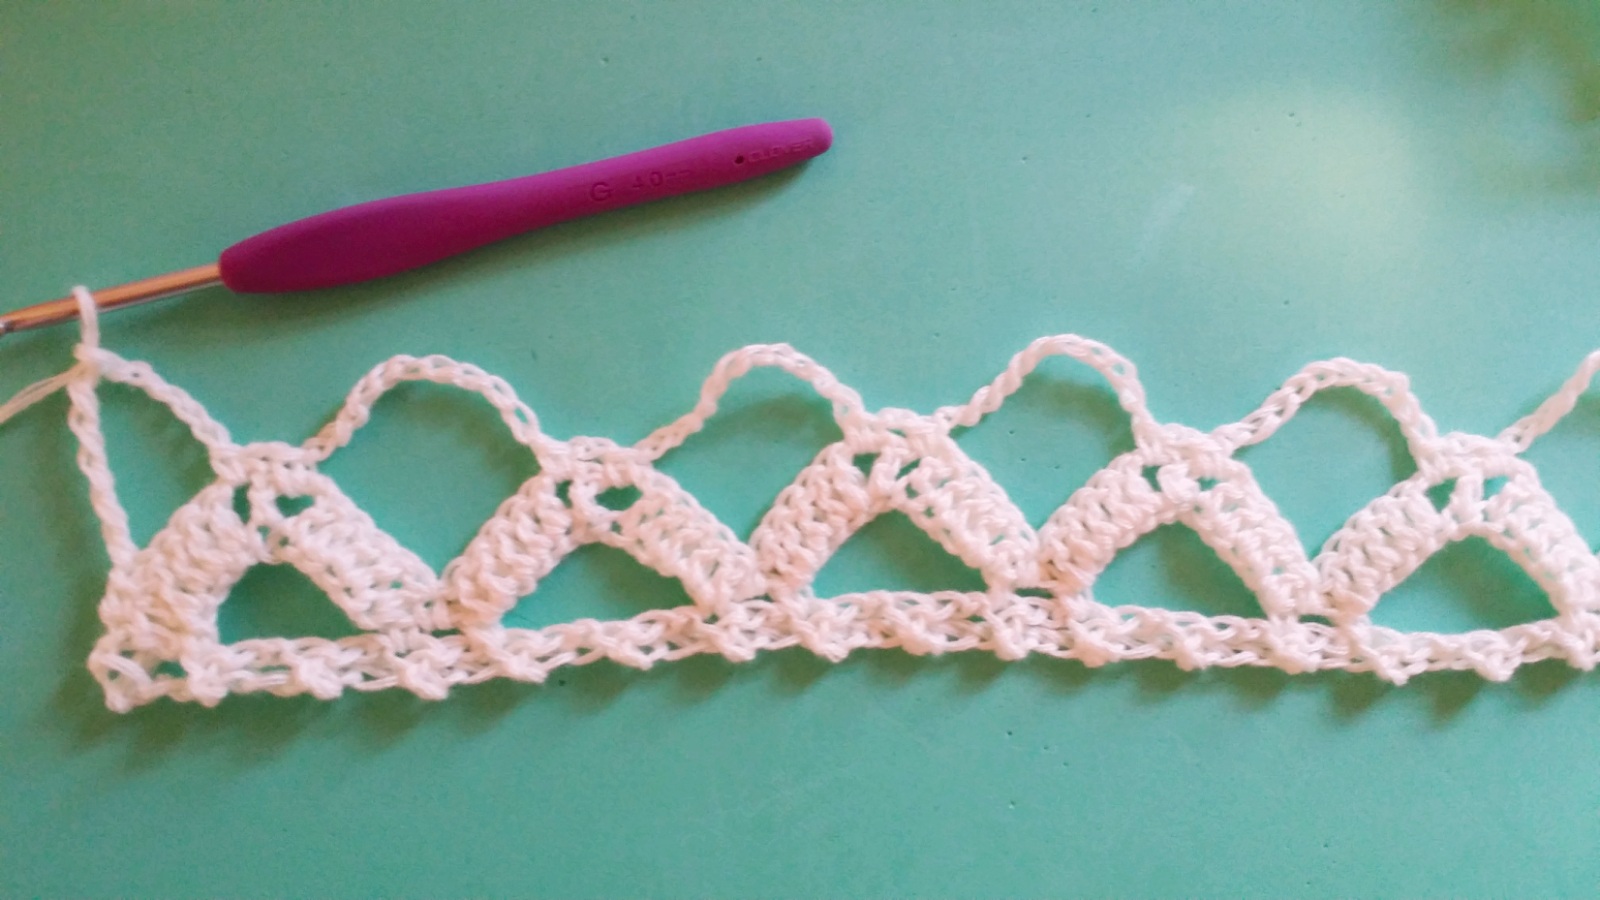
TIP: I learned a genius trick from working the Mandala Madness CAL by Helen Shrimpton to help eliminate that big gap that occurs at the top of very tall stitches like this. As you wrap your yarn around the hook (SIX times for this one) you ROLL YOUR HOOK downward at the same time as you wrap. That ch-5 you worked just prior will become encircled around your hook as you wrap. When you work the loops off the hook, that rolling downward technique will eliminate that big gap at the top! WOW. One of my favorite things I have recently learned! See in the image below how there is no gap?!
Row 5: Ch 1, turn, sc in same st, dc in nxt 5 chs, sc in nxt ch-2 sp, *dc in 1st 5 chs of the nxt ch-11 loop (again be sure you don’t miss that 1st one that can get scrunched), ch 2, dc nxt ch , ch 2, dc last 5 chs of the same ch-11 loop, sc in nxt ch-2 space, repeat from * to just before last ch-11 loop is worked, dc in 1st 5 chs, ch 2, dc in the nxt ch, ch 2, dc in the last 5 chs of the same ch-11 loop, sc in the nxt ch-2 sp, dc in the nxt 5 chs of the beg ch-13 loop of the previous row, sc in nxt ch, leaving the remaining chains unworked.
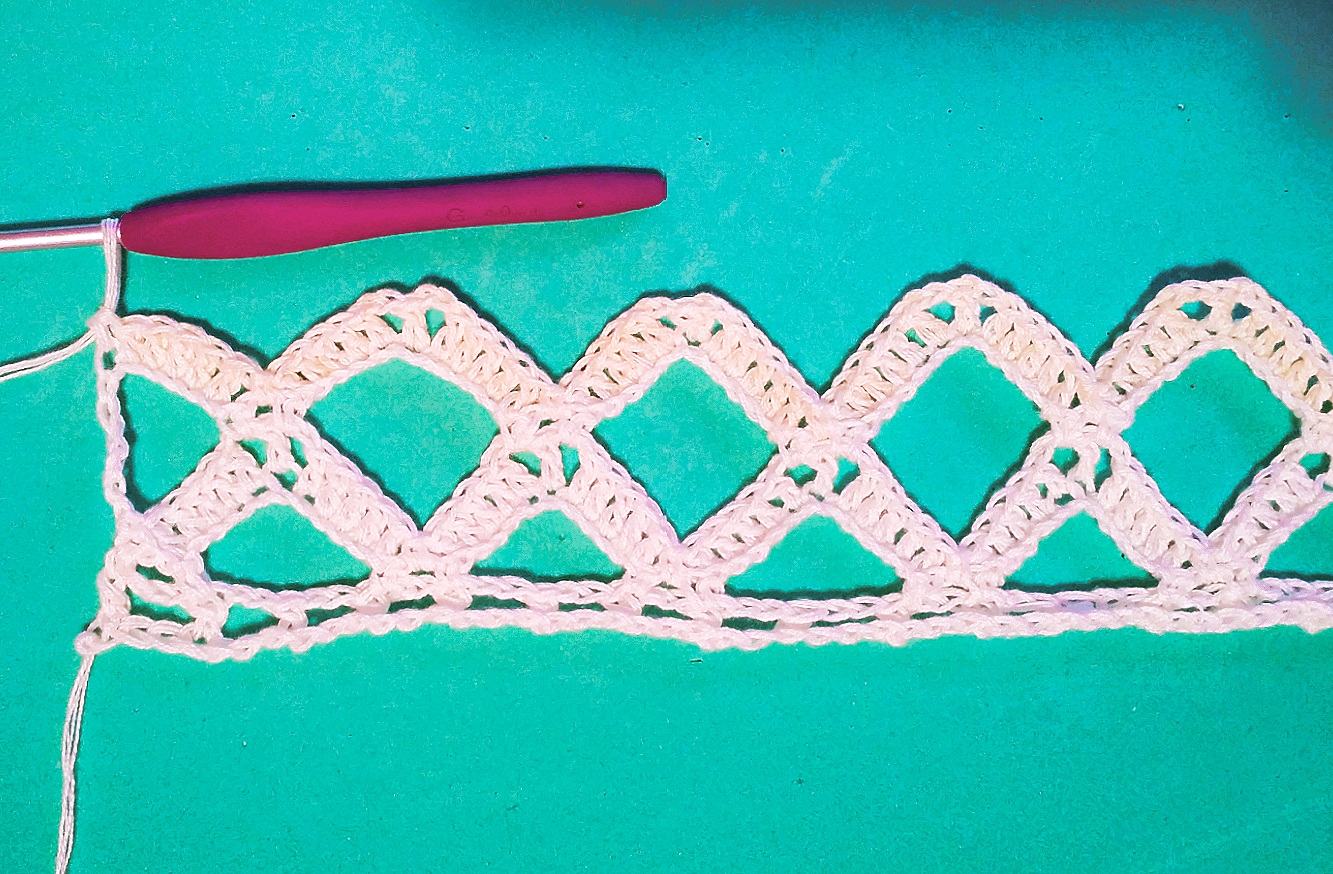
The image below shows what your work will look like at the end of the Row 5.
Row 6: Ch 1, turn, sc in same st, *ch 11, sc in nxt ch-2 sp, ch 2, sc in nxt ch-2 sp, repeat to just before the last full triangle, ch 11, sc in the nxt ch-2 sp, ch 2, sc in the nxt ch-2 sp, ch 11, sc in last sc at end.
Row 7: Ch 1, turn, sc in same st, * dc in the 1st 5 chs of the nxt ch-11 loop, ch 2, dc in nxt ch, ch 2, dc in last 5 chs of the same ch-11 loop, sc in the nxt ch-2 sp, repeat from *, until you have one ch-11 loop remaining, dc in 1st 5 chs of the ch-11 loop, ch 2, dc in nxt ch, ch 2, dc in the last 5 chs of the same ch-11 loop, sc in last sc of the row.
Row 8-23: Repeat Rows 4-7, FOUR times more.
Row 24: Repeat Row 20, tie off.
**REMEMBER: There will NOT be any additional instructions given during week two of the crochet along. You will simply finish the task in this posting!!**
Hooks down! Don’t worry about any blocking yet, we will take care of that in Part 3!
So, how pretty is this so far? I hope you are loving it and it’s starting to “click” in your brain about how the pattern is created and repeated.
See you next week for a pep talk, but NO NEW INFORMATION in Week 2, simply finish the task set out in this posting! Week 3 will be posted on 10/17/16, right here on crochetverse.com!
Please show your work in the CAL Crochet A Long group on FB so we can all see your beauties!!
Much Love & Yarn,
Stephanie
The information and photos in this posting are the sole copyrighted property of Crochetverse©2016. Please do not copy and paste any of the information contained within either electronically, verbally, or written in part or in whole. Instead, please share the DIRECT LINK to this posting only, and if you do, I thank you for sharing. You of course may sell anything you make from this pattern that you have made with your own two hands, no contract labor or mass productions are permitted. If you credit Crochetverse as the designer that is greatly appreciated!

You, my darling friend, have produced a beautiful garment that showcases Wolltraum yarn to it’s fullest and FINEST potential. I am so happy for you and commend all the hard work you have put into achieving this masterpiece of CAL pattern. I wish you all the luck and success in the next month or so until it all has come together and is complete. All the best Stephanie!
Much love,
Angela
Owner/Operator of Infinity Yarn – Wolltraum Canada
Thank you so very much Angela, the yarn was such a pleasure to work with. I literally anticipated each color change, which kept me stitching far longer into the night than I intended on many a night while creating the project. This may be my first with Wolltraum, but certainly will NOT be my last! Thank you for your amazing customer service!
ThAnk you so much for being back I thought I will not be able to finish my project!
Just a little glitch, I am not going anywhere as long as I can help it! LOL, Welcome back!
Do you have a printable version of your instructions? Thanks. This is a great pattern- so versatile!!!
Hello! For free crochet alongs, the pattern is only available on the blog. It helps keep me afloat and continue to offer more in the future. I hope you decide to work on up and would love to see it when you do or answer questions if needed!
This is a beautiful piece, thank you so much for sharing. This will give me something to do while I wait for all my belongings to be shipped to Ecuador!
Thank you! I hope they arrive quickly!!
Comments are closed.