

")
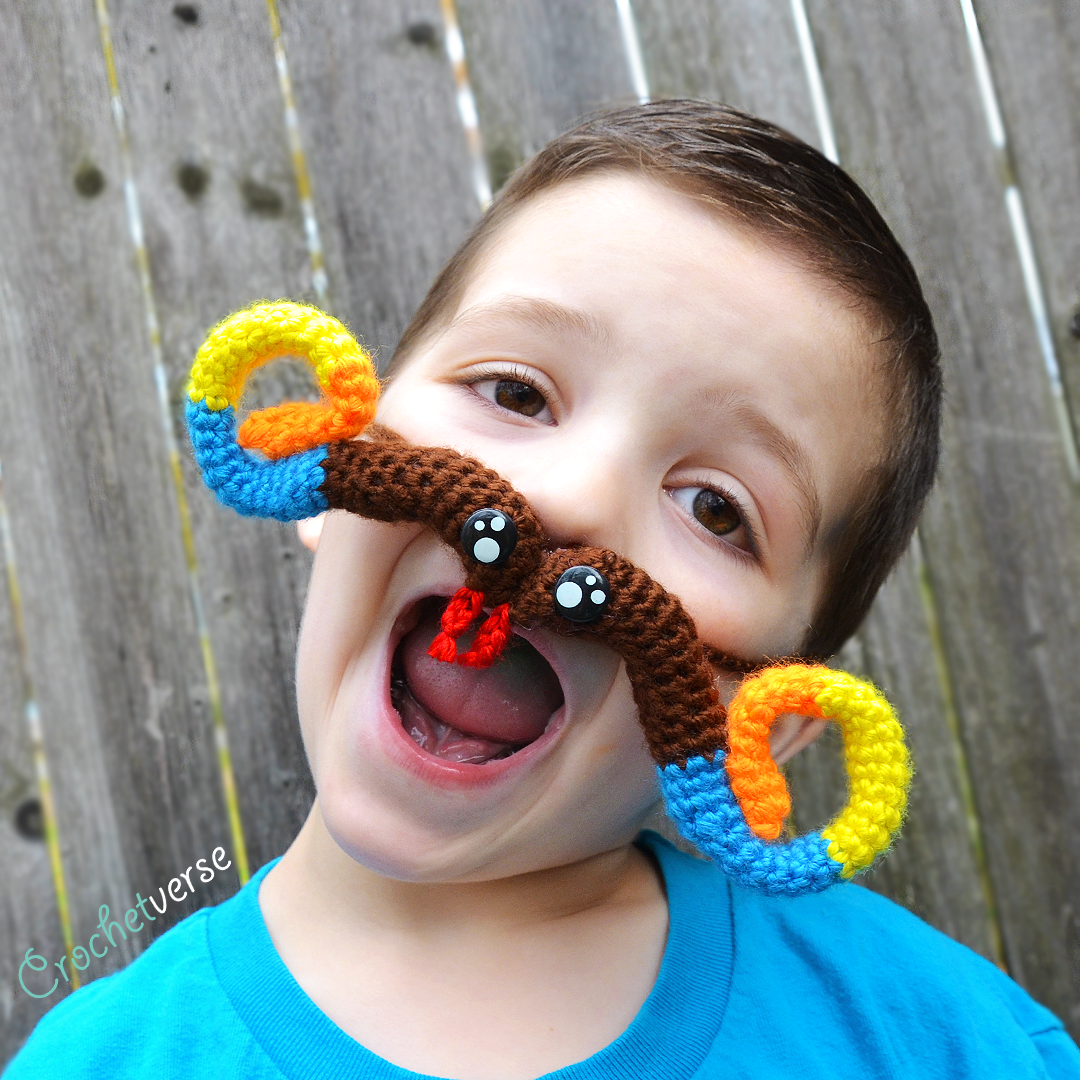
“Mom, Monday at school is Crazy Mustache Day!”
“Say no more, Fam…I got you.”
I present this crazy Tim Burton-esque “SNAKESTACHE!” for like when your mustache turns into swirly snakes and they are kissing and stuff haha!
My son’s school is raising money for United Way and each day over a 2 week period, the kids are asked to donate 50 cents and participate in a fun event for each day.
Crazy Mustache Day was one of them. How cute it that?!
No Shave November? No mustache? No problem…make this!
Want to save it to Ravelry for safe keeping? Find that here: https://www.ravelry.com/patterns/library/crazy-snake-mustache
Let’s make it:
Materials:
- small amounts of light worsted weight yarn, Caron Simply Soft is a great choice
(Shown in Chocolate, Blue, Super Duper Yellow, Autumn Red, and Neon Orange)
- size E(3.5mm) crochet hook
- small amount of stuffing or yarn scraps
- tapestry needle & scissors
- (2) 3/8″ plastic eyes (Mine are from Etsy and called “kawaii eyes”) -OR- you can use yarn and just stitch them on too
Gauge:
The goal is here is SUPER tight stitches, you want the least amount of holes possible when making anything amigurumi style. I crochet fairly tightly and therefore you may have to DROP a hook size from what I have used to achieve this.
Finished Size:
About 7″ wide from side to side, once rolled up.
Instructions:
Mustache Half (Make 2)
With color to match the hair of the wearer (medium brown shown), make magic ring, ch 1:
Round are not joined or turned. This is worked in a spiral. Mark rounds with a marker to keep track.
Amigurumi has a tendency to turn inside out as you work, especially when working small. you want the right side of your stitches to face outward. As you work, the hook should be going from the outside to the inside. If your work has flipped inside out, turn it right after the 1st few rounds are completed.
Rnd 1: work 8 sc in the ring, pull tail to close ring. (8)
Rnd 2: sc in nxt 3 sts, 2 sc in each of the nxt 2 sts, sc in nxt 3 sts. (10)
Rnd 3: sc in nxt 5 sts, 2 hdc in each of nxt 2 sts, sc in nxt 3 sts. (12)
Rnd 4: scdec over nxt 3 sts (3 sc become 1), sc in nxt 9 sts. (10)
Rnd 5-7: sc in each st around. (10)
Rnd 8: sc in nxt 5 sts, scdec over nxt 3 sts, sc in nxt 2 sts. (8)
Rnd 9: hdc in nxt st, 2 hdc in nxt st, hdc in nxt st, sc in nxt 5 sts. (9)
Rnd 10: sc in nxt 2 sts, hdc in nxt st, 2 hdc in nxt st, hdc in nxt st, (scdec over nxt 2 sts) twice. (Just repeat the parentheses twice, not the whole round) (8)
Rnd 11-13: sc in nxt 8 sts, after round 13, sl st to nxt st and cut yarn. (8)
Stuff with polyfil or yarn scraps up to here only, the rest gets rolled up so needs no stuffing.
Rnd 14: join nxt color (blue shown) with a sl st in the same st you sl st in to end the previous round, ch 1, sc in same st and in each st around. (8)
Rnd 15-16: sc in each st around. (8)
Rnd 17: (sc in nxt 2 sts, scdec over nxt 2 sts) twice. (6)
Rnd 18-24: sc in each st around, after round 24, sl st to nxt st and cut yarn. (6)
Rnd 25: join nxt color (yellow shown) with a sl st in the same st you sl st in to end the previous round, ch 1, sc in same st and in each st around. (6)
Rnd 26-35: sc in each st around, after round 35, sl st to nxt st and cut yarn. (6)
Rnd 36: join nxt color (orange shown) with a sl st in the same st you sl st in to end the previous round, ch 1, sc in same st and in each st around. (6)
Rnd 37-42: sc in each st around. (6)
Rnd 43: (sc in nxt st, scdec over nxt 2 sts) twice, cut yarn leaving a long tail to sew into a spiral. (4)
Tongue:
Fold a strand of red yarn about 14″ long in half.
Insert your hook around the bar of any stitch near the front of the face near round 2 or 3, check the picture for placement guidance.
Lay the looped end of the yarn over your hook and pull it through the stitch of the mustache, then chain 3.
Pull the end through and trim closely to simulate the tongue.
Repeat for both sides.
Tie:
With the medium brown yarn, chain 150. Pull the end through and trim closely to the beginning and ending chain. You can lengthen or shorten this as needed to properly fit the person who will wear it.
Assembly:
1. If you want to crochet eyes, I would create a magic ring and single crochet into it 4 times, then pull it tightly to close. Stitch that to the face and maybe accent with a black strand for the pupil. If you have buttons or safety eyes (I have only used the front and no locking back as this is for my child of age to be safe):
I used my crochet hook to stretch open the stitch on the face where I wanted to insert the eye. Once it was spread open, I took my glue gun and put a small spot of glue in that stitch. I then worked the spiral-y end of the safety eye into the hole and glue to place and secure. Repeat that for both sides.
2. Using the tail from round 43, roll the end onto itself to create the curly end of the stache. Notice how the end tip of the orange is about half way into the blue. Secure it in position with stitching taking care to work so the yarn is hidden inside the work. Do the same for the second half.
3. Using the tail from the 1st round of one half or a separate strand of the brown, sew the two halves together, round 1 of one side to round 1 of the other side. Use your hands to “mold” or accentuate the curves created in the stitching. You want it to curve as shown.
4. Using the crochet hook, I pulled one end of the tie through the back side of the mustache on either side a bit nearer to the center top so the weight is properly balanced when worn. I then tied it above the ears and around the back of the head with a simple bow to wear.
*PLEASE USE YOUR OWN DISCRETION TO DETERMINE SAFETY FOR YOUR OWN CHILD* This is your sole responsibility. Please adjust and modify in anyway to be sure you are comfortable with its safety for your liking.
MOST importantly, PLEASE ENJOY!
Much Love and Yarn,
Stephanie
The information and photos in this posting are the sole copyrighted property of Crochetverse©2017. Please do not copy and paste any of the information contained within either electronically, verbally, or written in part or in whole. Instead, please share the DIRECT LINK to this posting only, and if you do, I thank you for sharing. You of course may sell anything you make from this pattern that you have made with your own two hands, no contract labor or mass productions are permitted. If you credit Crochetverse as the designer that is greatly appreciated!

I love this snake mustache!! Thank you so much for sharing!!
So welcome, glad you enjoy our shenanigans!
Comments are closed.