

")
My husband is an avid hunter, and he requested I make him a lapghan for his tree stand. It’s not often I get the chance to make something for him, so I jumped at the chance!
(Note: Please remember to be safe and follow all the laws for hunting in your area and use this at your own discretion, hunting is a serious sport!)
When he gets in that stand, it is SUNRISE to SUNSET. Toes get in serious jeopardy out there in Northeast Ohio.
So, never being one to go simple, I designed this Tree Stand Utility Apron!
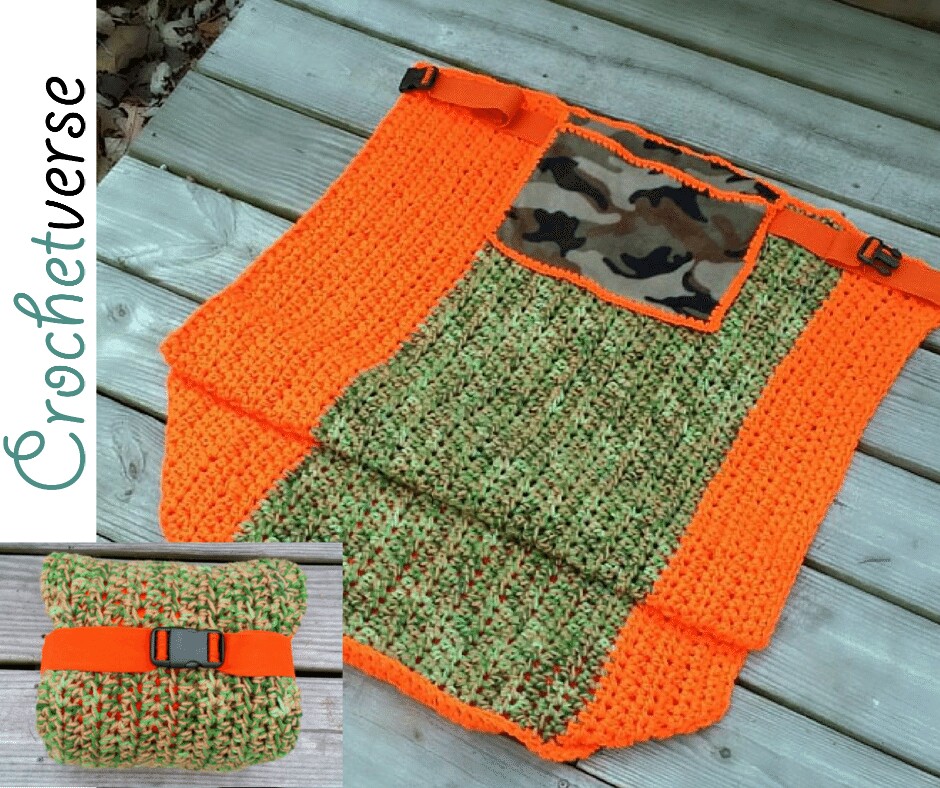
It has a foot pocket to not only keep your boots quiet on the stand, but also to help stop the cold from the metal from creeping up into your toes. It has an elastic strap that goes around the waist so it won’t slip off and lay on the ground all day, while you try not to move and keep quiet. That little pouch can store whatever or those little hand warmers too! Finally, it folds all up into that nice little pack so it’s easy to move. And, of course, its made of RED HEART, so this will withstand washings and mud and whatever else your hunter gets on it. (FYI, I don’t machine dry my Red Heart, the heat can make the yarn yukky, just wash it and lay it flat to dry!)
Not originally intending to write this up as a pattern, and not working with fabric and yarn together, I’ve done my best to describe my process to you. Should you have any questions or need any clarifications, please just ask me on my FACEBOOK PAGE HERE! and I will be more than happy to help.
The Pattern Begins:
Materials:
– Red Heart Super Saver in the following quantities and amount
– (2) skeins Flame
– (2) skeins Camouflage
– Size N/P (10.mm) crochet hook, or size needed to obtain gauge
– Size G (4.0mm) crochet hook
– (1/3) yard coordinating fleece
– (1) snap buckle (found in notions section of your store)
– (1.5) yards of 1 ½” coordinating elastic
– rotary cutter with skip blade, or a way to make holes in the fleece so you may crochet into it
– tapestry needle and sewing needle
– coordinating sewing thread
Finished Dimensions:
26” wide x 40” long. (sized for an adult, namely my husband 6’1”, I feel this will fit work well for most adults)
Gauge:
4 Rows Single Crochet = 2.5” tall
4 Stitches = 2.5” wide
Instructions:
Main Apron Panel
*Yarn will be held DOUBLE strand throughout unless specifically noted.
With Flame, ch 64
Row 1: sc in 2nd chain from hook and each chain across. (63 sc)
Row 2-5: ch 1, turn, sc in each sc across.
Row 6: ch 1 (does NOT count as 1st hdc here or throughout), hdc in 1st st and in each st across. (63 hdc)
Row 7-15: repeat Row 6, after row 15, tie off Flame.
Row 16: Turn, join Camo (double strand) with a sl st in last hdc made, ch 1, hdc in same hdc and in each hdc across.
Row 17: ch 1, turn, hdc in each hdc across.
Row 18-38: ch 1, turn, hdc in each hdc across, tie off camo after Row 38.
Row 39: Turn, join Flame (double again) with a sl st in last hdc made, ch 1, hdc in same hdc and in each hdc across. (63 sts)
Row 40-42: ch 1, turn, hdc in each hdc across.
Row 43: ch 1, turn, sc in each st across. (63 sc)
Row 44-47: ch 1, turn sc in each sc across, after row 47, tie off.
Foot Panel:
With orange, ch 35:
Row 1: sc in 2nd ch from hook and in each across. (34 sc)
Row 2-5: ch 1, turn, sc in each sc across.
Row 6: ch 1, (does not count as hdc here or throughout), turn, hdc in 1st st and in each st across.
Row 7-15: ch 1, turn, hdc in each st across, tie off after row 15. (34 hdc)
For assembly:
Not originally intending to write this up as a pattern, but prompted to do so because there was interest and I wanted others to be able to make it, the assembly process is described in depth and to the best of my ability. Should you have any questions or need specific clarifications please ask on our FACEBOOK PAGE!
Attach Foot Panel to Main Panel:
The foot panel is not as wide as the main panel, this is done so that the bottom, once connected, forms a taper to keep out the cold better. So, first, center the foot panel along one short edge of the main panel. The stripes are asymmetrical, because I like to be fancy, so there will not be even color on either side, don’t worry about it. Reference the high tech drawing below as you proceed.
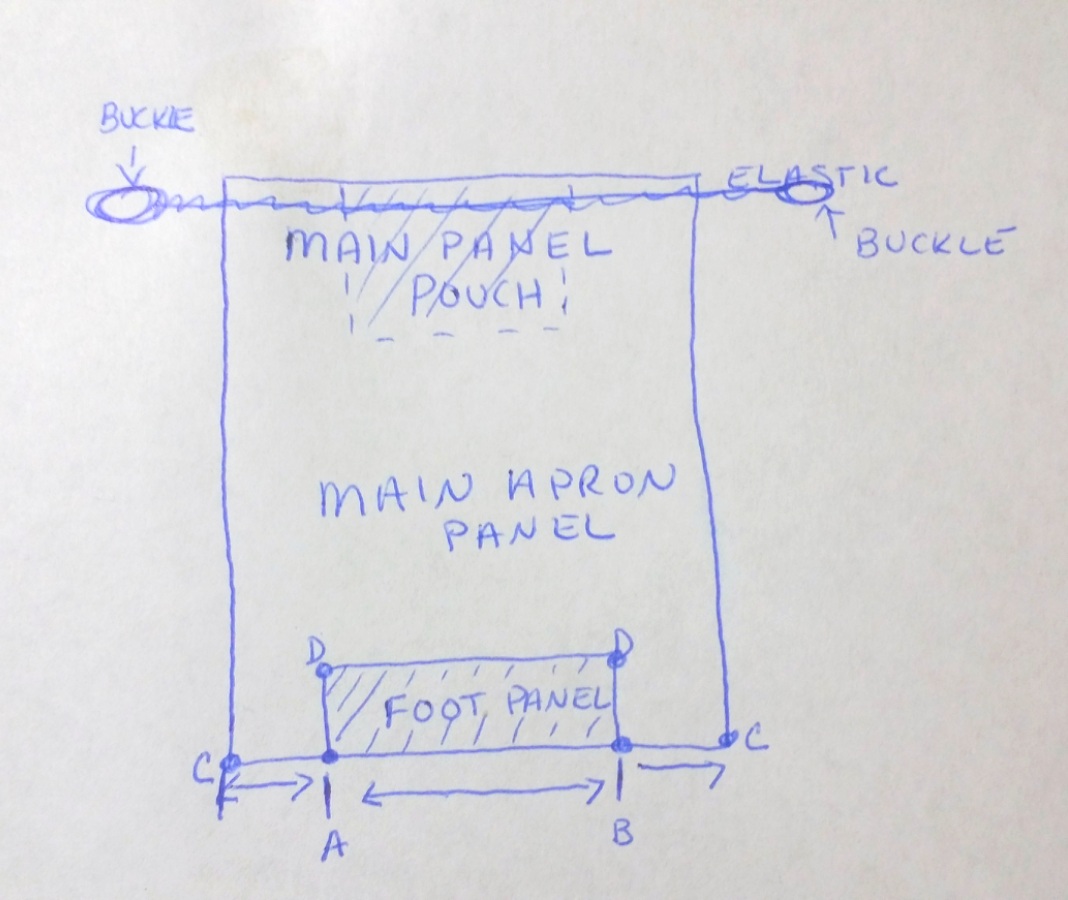
- Seam the foot panel to the main panel from point A to point B on the drawing.
- Now, match up point C to point D, the foot panel will have more length to seam than the main panel. Again, this is to close up that toe pocket to keep your feet warm. You will need to scrunch up the foot panel edge evenly and stitch it to the matched up portion of the main panel, it puckers some, and you want this, just try to keep it even.
Fleece Pouch/Belt Combo:
Use this second high tech drawing for reference as you proceed:
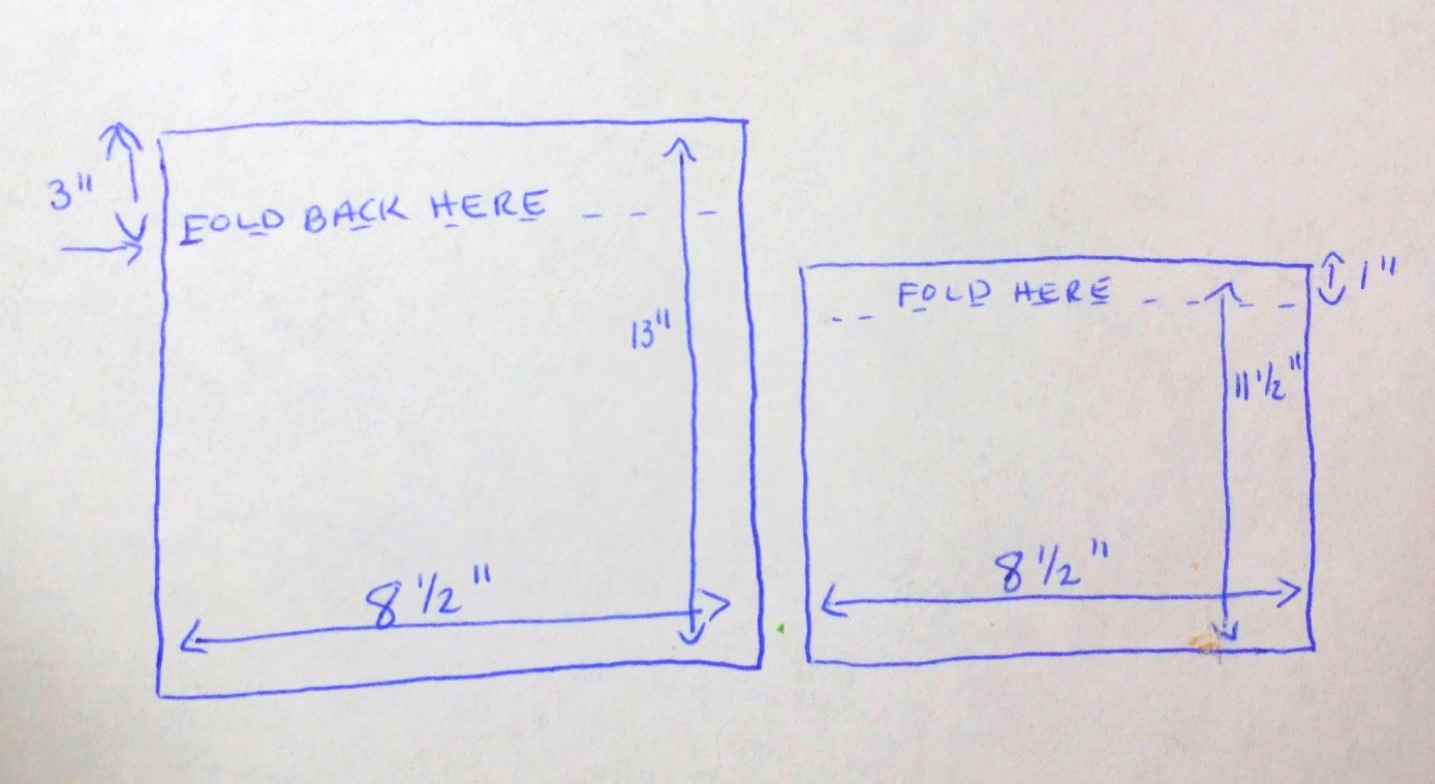
- Cut 2 pieces of fleece: (1) piece 8.5” x 11.5” and (1) piece 8.5” x 13”
- Now, to create the channel through which we will place the elastic through, we must sew (I don’t love it either, but I did this by hand in 5 minutes, so we can handle that!).
– With the right side of the larger panel of fleece facing you, fold the top edge 3” down BEHIND the panel, with the needle and thread stitch the long edge of the folded portion to the main body, creating a channel. Stitch back and forth 2 or 3 times so it’s secure.
- To prepare to crochet the pouch together, we must skip blade cut it, then we will crochet the panels together.
-First, with the right side of the smaller panel facing you, fold the top edge away from you 1” from the top. Pin this in place. Run the skip blade across the top folded edge about 1/2” in from the folded edge through both thicknesses. Not too close or the fleece will tear when you go to work into the holes.
-Second, lay the prepared smaller panel on the larger panel as follows: the right side of the large panel faces you, the channel faces away, lay the wrong side of the smaller panel on top of the larger panel with it’s folded edge away from you as well. Match the bottom edge of the two panels together, the front smaller panel will be shorter than the back larger panel. Now, skip blade around all four sides, keeping pinned so the holes don’t become unaligned.
- Next, we will crochet the fleece together to form the pouch.
-Join the Flame yarn, with the G hook in any set of holes through both thicknesses around the main perimeter of the pouch, I worked 2 sc in each set of holes around to join them together and 3 sc at each corner to move around without puckering the pouch, sl st to the 1st sc you made and tie off. Now join the flame through both thicknesses in the holes across the folded edge of the shorter front panel and make 2 sc in each matched set of holes across.
- Finally, we will attach the apron to the pouch.
-With the foot panel pouch facing away from you, align the completed pouch centered on the opposite top edge with the opening facing upwards to the edge. Join Flame with a sl st at the stitch all the way at the right top edge of the MAIN APRON PANEL, sc evenly across the top edge working as many stitches into the row ends so that it stays flat and doesn’t bunch, when you get to the pouch, single crochet through the stitches on the pouch and through the ends of the row on the main apron panel, then, when you are across the pouch, single crochet in the ends of the rows until you reach the other side. That’s it.
Finishing:
Slide the elastic through the channel created in the pouch and thread the ends through the buckle clasp, mine is an adjustable one so I didn’t have to sew anything here. Weave in all ends. Use the tails from the sc edge across the folded edge of the smaller panel to “connect” that edge to the side edges for a cohesive look to the border.
To Fold:
With the blanket lying so the pouch is facing you: flip the pouch up, fold the blanket in 3rds to match the width of the pouch, begin rolling at the foot panel end and roll all the way up, flip the pouch back onto the roll, criss cross the elastic and wrap it around to the other side and clip the buckle to close.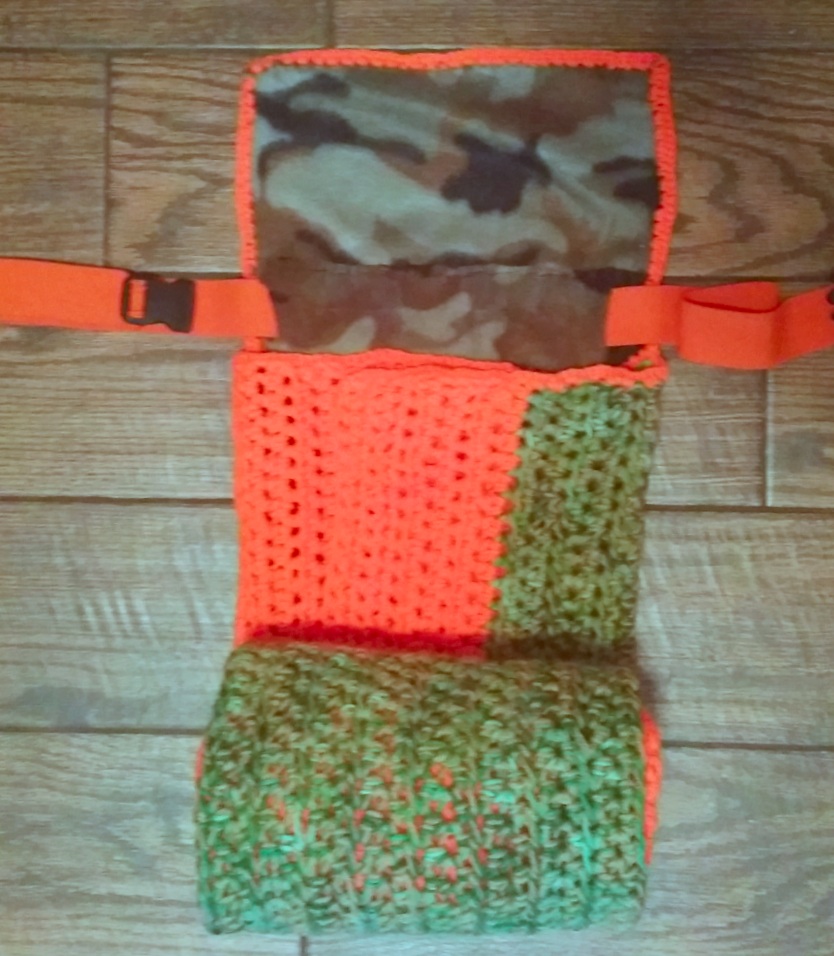

Please feel free to sell your items on a small scale (no mass productions), share the watermarked photos and the link as you wish, in fact I thank you if you do. But, please do not copy and repost the information withing. Thank you so much!
