


Things are so unpredictable right now! I think we can all agree on that.
My littles (and myself) are true creatures of routine for comfort! I know we are not alone. With the upcoming school year, we all have to decide what is best for our family; remote learning, heading into school, or full online school, it can be overwhelming! And that is just the tip of the iceberg!
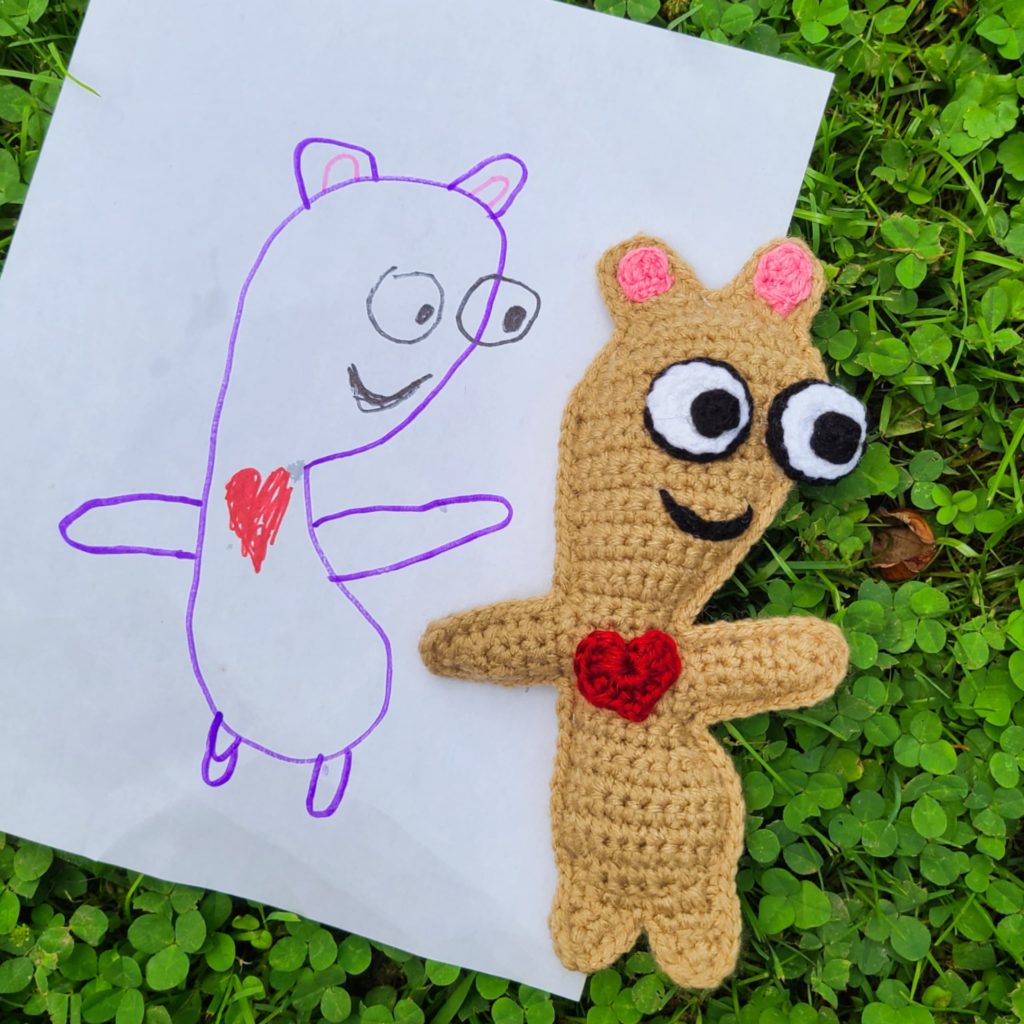
Here’s where Walt comes in… This little bear is full of derp, but also has an AMAZING purpose. I asked my Jake to draw me a teddy bear, but make him new and he drew this! (and then set it on the wet counter, but hair dryer to the rescue lol!)
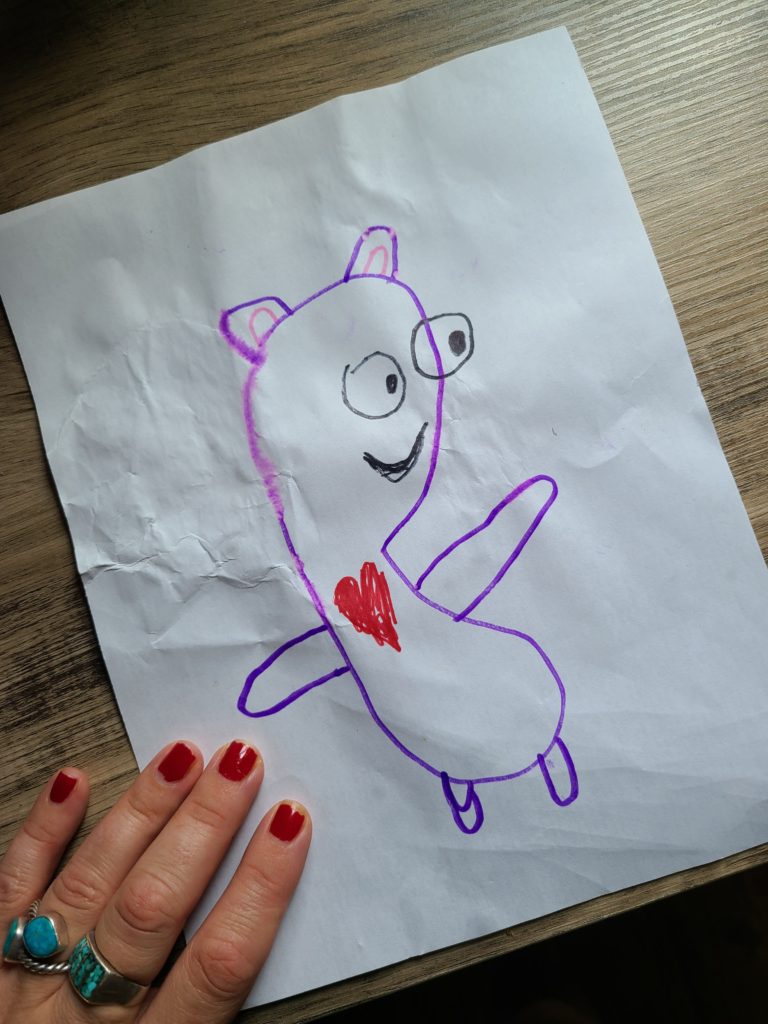
Then, I brought him to life as Walt the Worry Bear! You tell him your worries, put him under your pillow, and while you are asleep, Walt takes care of business leaving you waking up stress free and relaxed. Little things like this are a fun and tangible way to work through stresses and anxieties with your children. It has worked for me and I hope you find the same <3.
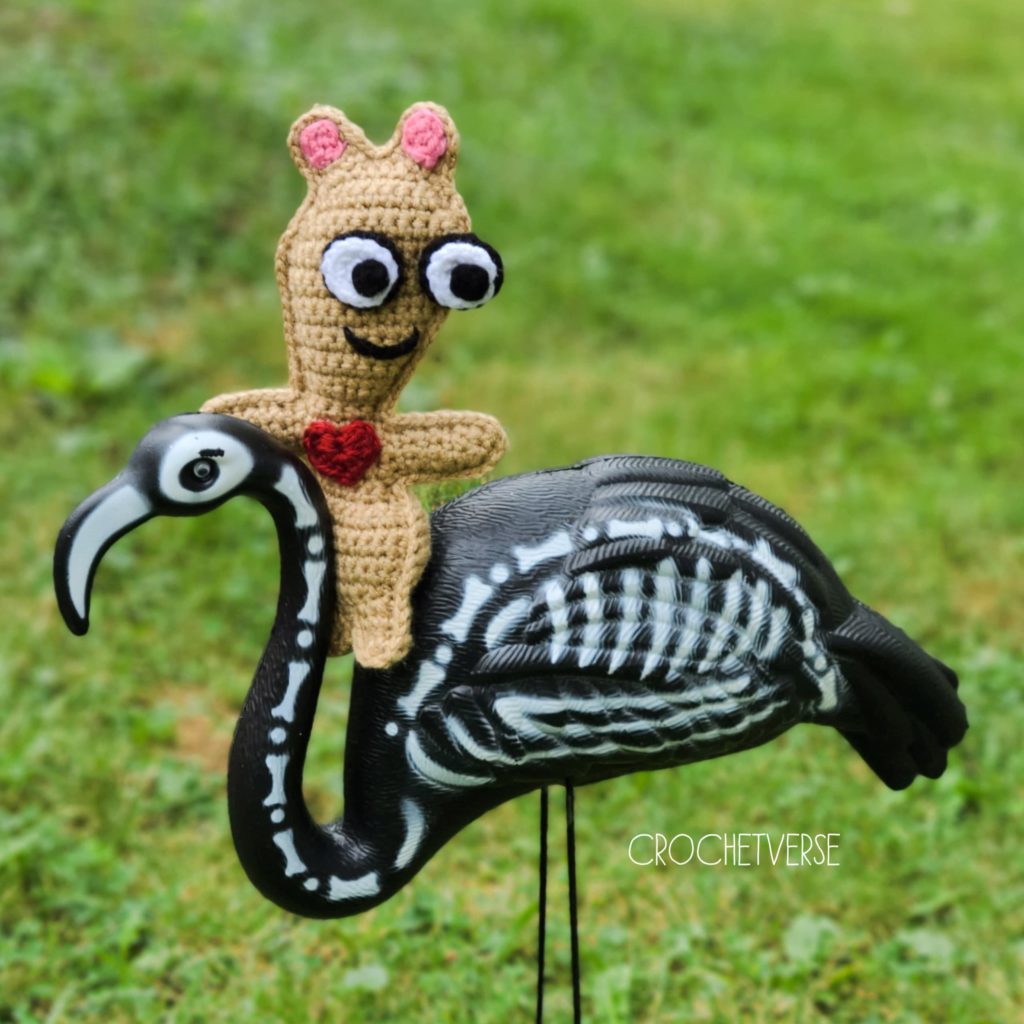
Be a little careful, our Walt is pretty wild. He does all kinds of silly things around the house too! We found him out riding out flamingo today! So definitely keep your eye on him!
He is SUPER quick to make and the perfect size to tuck in a school bag if permitted, pocket, or under your pillow at night. Hope you enjoy!
I’d love to see your worry bears over on my Facebook page at https://www.facebook.com/Crochetverse
Materials:
- small amounts thicker worsted weight yarn such as Red Heart Super Saver in tan, black, white, red, and pink
- Size F(3.75mm) crochet hook
- small amount polyfill stufing
- tapestry needle, scissors
Instructions (US Terms):
Main Bear (Repeat all twice to create two panels)
All pieces done in main bear color (tan shown).
Body:
Chain 7, place marker in the 2nd and 6th ch:
Chain 1 to turn does not count as st.
Row 1: Sc in 2nd ch from hook and each rem ch. (6)
Row 2: ch 1, turn, 2sc in each of 1st 2 sc, sc in 3 sc, 2 sc in last sc. (9)
Row 3: ch 1, turn, 2sc in 1st sc, sc in nxt 7 sc, 2sc in last sc. (11)
Row 4-7: ch 1, turn, sc in each sc across. (11)
Row 8: ch 1, turn, scdec over 1st 2 sts, (scdec over nxt 2 sts) twice, sc in last 5 sts. (8)
Row 9: ch 1, turn, 2sc in 1st st, sc in nxt 5 sts, scdec over last 2 sts. (8)
Row 10: ch 1, turn, scdec over 1st 2 sts, sc in last 6 sts. (7)
Row 11-12: ch 1, turn, sc in each st across. (7)
Row 13: ch 1, turn, sc in 1st 5 sts, scdec over last 2 sts. (6)
Row 14: ch 1, turn, sc in each st across, place marker in 1st and last st of this row in outer side edge. (6)
Row 15-16: ch 1, turn, sc in each st across. (6)
Row 17: ch 1, turn, sc in 1st 3 sts, 2sc in each of last 3 sts. (9)
Row 18-19: ch 1, turn, sc in each st across. (9)
Row 20: ch 1, turn, 2sc in 1st st, sc in last 8 sts. (10)
Row 21: ch 1, turn, sc in each of 1st 9 sts, 2sc in last st. (11)
Row 22: ch 1, turn, sc in each st across. (11)
Row 23: ch 1, turn, sc in 1st 10 sts, 2sc in last st. (12)
Row 24-25: ch 1, turn, sc in each st across. (12)
Row 26: ch 1, turn, 2sc in 1st st, sc in last 11 sts. (13)
Row 27: ch 1, turn, sc in 1st 12 sts, 2sc in last st. (14)
Row 28: ch 1, turn, sc in 1st 12 sts, scdec over last 2 sts. (13)
Row 29: ch 1, turn, scdec over 1st 2 sts, sc in last 11 sts. (12)
Row 30: ch 1, turn, scdec over 1st 2 sts, sc in nxt 8 sts, scdec over last 2 sts. (10)
Row 31: ch 1, turn, sc in each st across. (10)
Row 32: ch 1, turn, scdec over 1st 2 sts, place marker in the decrease just made at outer side edge of st, sc in nxt 6 sts, scdec over last 2 sts. (8)
Row 33: ch 1, turn, sk 1st st, sl st loosely in nxt st, hdc in nxt st, place marker in the hdc just made, hdc in nxt 3 sts, sk nxt st, sl st in last st, cut yarn.
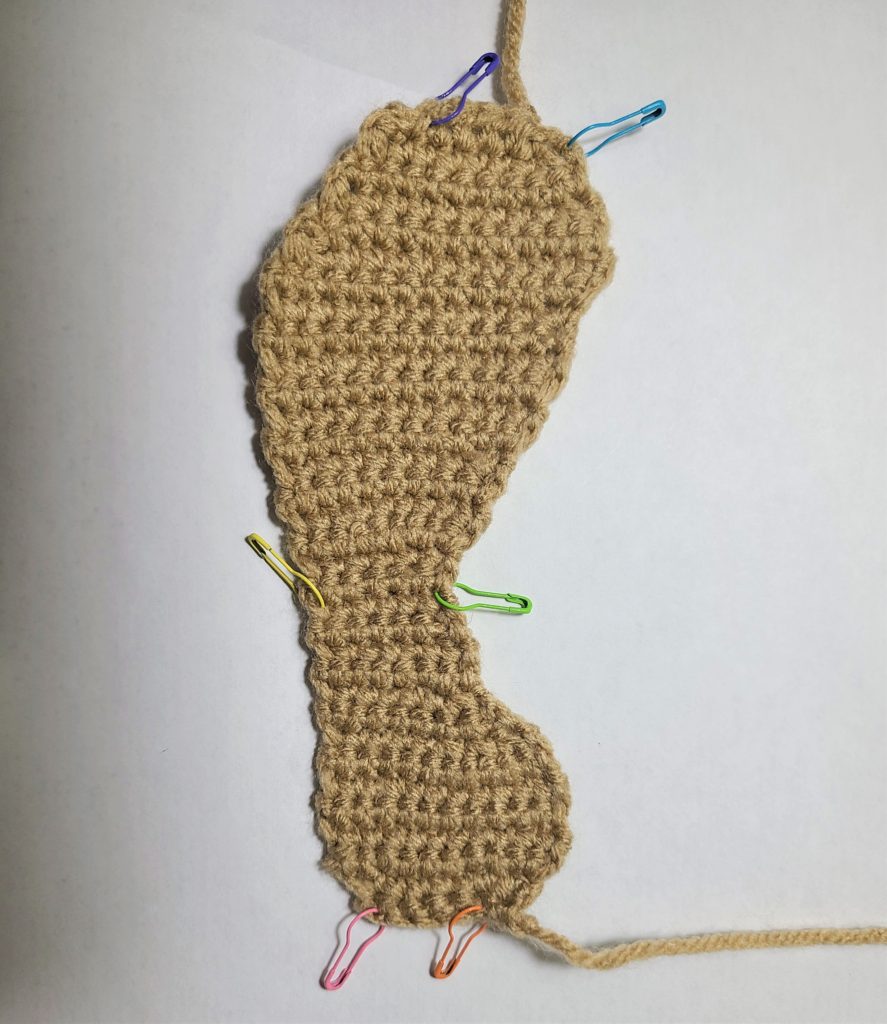
Here is the body with all the stitch makers in place. Refer to the image and the color marker stated in each of the following directions to ensure proper placement of the remaining features.
Leg 1:
With row 1 of body placed farthest from you and curved edge on left side, join yarn with a sl st in the marked st from beg chain that is placed in the 6th chain, shown in image with pink marker.
Row 1: ch 1, sc in same marked st and nxt 2 sts (actually chs). (3)
Row 2-3: ch 1, turn, sc in each st across. (3)
Row 4: scdec over 1st 2 sts, sl st in last st, cut yarn.
Leg 2:
With row 1 of body farthest away from you and curved edge on left side, join yarn with a sl st in the marked st from the beg chain that is placed in the 2nd chain, showed in image with orange marker.
Row 1: ch 1, sc in same ch, sc in nxt ch, hdc in end of nxt row. (3)
Row 2-4: Repeat row 2-4 of Leg 1.
Arm 1:
With flat edge of body farthest from you and row 1 of body to the right, join yarn with a sl st in the marked stitch from row 14, shown in image with yellow marker.
Row 1: ch 1, sc in same end of row and nxt 3 end of rows. (4)
Row 2-4: ch 1, turn, sc in each st across. (4)
Row 5: ch 1, turn, scdec over 1st 2 sts, scdec over nxt 2 sts, sc in the same 2nd st of the last dec made. (3)
Row 6: ch 1, turn, sc in each st across. (3)
Row 7: ch 1, turn, scdec over 1st 2 sts, sc in last st. (2)
Row 8: ch 1, turn, sc in 1st st, (sc/sl st) in last st, cut yarn.
Arm 2:
With curved edge of body farthest from you and row 1 of body to the right, join yarn with a sl st in the stitch PRIOR (towards the leg end) the remaining marked st from row 14, shown in image with green marker.
Row 1: ch 1, sc in same end of row and nxt 3 end of rows. (4)
Row 2-6: ch 1, turn, sc in each st across. (4)
Row 7: ch 1, turn, 2 sc in 1st st, sc in nxt st, scdec over last 2 sts. (4)
Row 8: ch 1, turn, scdec over 1st 2 sts, scdec over nxt 2 sts, sc in the same 2nd st of the last dec made. (3)
Row 9: ch 1, turn, sc in 1st st, scdec over last 2 sts, sl st in the same 2nd st of the last dec made, cut yarn. (2)
Ear 1:
With row 1 of body closest to you from and curved edge of body to the right, join yarn with a sl st in the marked st from row 32, shown in image with blue marker.
Row 1: ch 1, sc in same st, nxt end of row, and nxt st. (3)
Row 2-3: ch 1, turn, sc in each st across. (3)
Row 4: ch 1, turn, scdec over 1st 2 sts, sl st in last st, cut yarn.
Ear 2:
With row 1 of body closest to you and curved edge of body to the right, join yarn with a sl st in the marked st from row 33, shown in image with purple marker.
Row 1: ch 1, sc in same st, sc in nxt st, sc in nxt end of row. (3)
Row 2: ch 1, turn, sc in each st across. (3)
Row 3: ch 1, turn, sc in 1st 2 st, 2 sc in last st. (4)
Row 4: ch 1, turn, sk 1st st, scdec over nxt 2 sts, sl st in last st, cut yarn.
You can weave in all ends now or just tuck them inside as you crochet the panels together as I did.
Lay the panels on top of each other eith the curved edge to the right. With the side you want to be the front facing up, join yarn with a sl st through any matching stitch working through both panels, ch 1, sc in each end of row and stitch around working through both panels to attach them together, work 2sc in each st that rounds a corner, such as at the ears and hands ends. Stuff as you go around, sl to to 1st st made, cut yarn. Weave in ends.
Features:
Inner Ear (Make 2):
With pink, chain 3:
Rnd 1: sc in 2nd ch from hook, 3 sc in last ch, working up opposite side sc in nxt st, ch 1, sl st to 1st sc made, cut yarn leaving tail for sewing.
Sew the end with the ch-1/sl st end of round towards ear top end to one ear. Repeat the same for the 2nd ear.
Heart:
With red, make magic ring:
Rnd 1: ch 1, (4 dc, 2 hdc, ch 2, 2 hdc, 4 dc, sl st) all in the ring, pull very tightly to close hole, cut yarn leaving long tail for sewing.
Sew to center chest between arms.
Eye (Repeat each part twice):
Do not turn round, only join when told.
With black make magic ring:
Rnd 1: ch 1, 6 sc in ring, sl st to 1st sc made, pull tail tightly to close. (6)
Rnd 2: ch 1, does not count as st, 2hdc in each st around, sl st to 1st hdc made, cut yarn, leaving long tail for sewing. (12)
With white, make magic ring:
Rnd 1: ch 1, 6 sc in ring, pull tail tightly to close. (6)
Rnd 2: 2sc in each sc around, sl st to 1st sc made, cut yarn leaving long tail for sewing. (12)
With black, make magic ring:
Rnd 1: ch 1, 4 sc in ring, sl st to 1st sc made, cut yarn leaving tail for sewing. (4)
Sew the 4sc circle on top and to the side (not centered, see main pattern photo for guide) of the white circle. Sew that assembly on top of the black circle. Weave in all ends except black tail, use that to stitch to face. Right eye is half on the face and half off. Left eye is just to the right of the midline of the face.
Weave in any remaining ends.
Using a strand of black and needle, stitch the mouth on using the main pattern photo as a guide.
He is done, I hope you love his little face as much as we do and have fun!
Please consider joining me and following on my social media outlets for new patterns, exciting posts, and general crochet tomfoolery!
Much love,
Stephanie Pokorny/Crochetverse
