

")
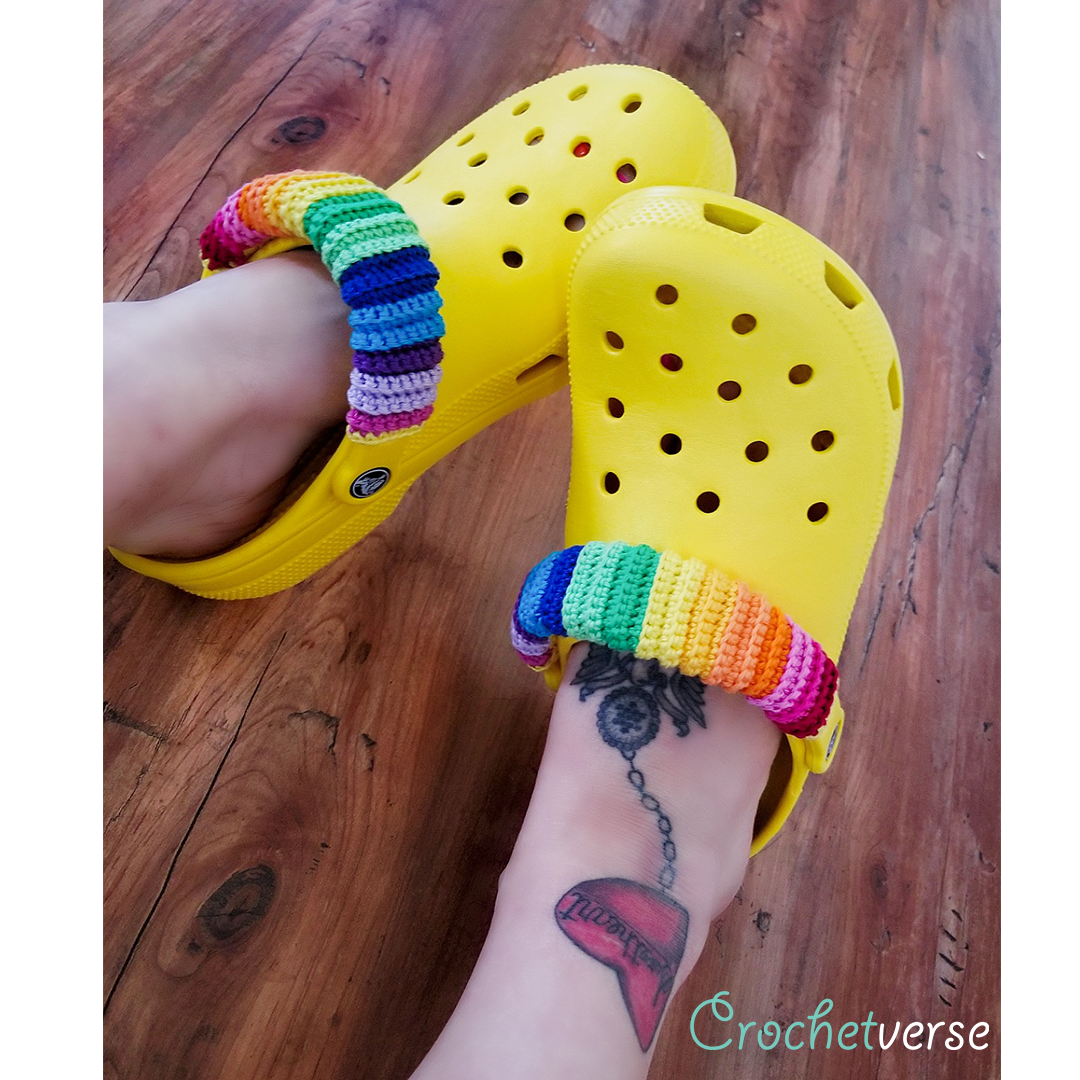
AIN’T NO SHAME IN MY CROCS GAME!
…and Lord KNOWS I can never leave well enough alone.
I MUST rainbow and crochet ALL.THE.THINGS!
December 2017, I unexpectedly had a subarachnoid hemmorage, a brain hemmorage which often doesn’t have the best outcome. I was so very blessed to recover with minimal after effects. Unfortunately, on of them is severe migraines. Slowly, but surely, I m learning my new “triggers” for what makes them worse and one of those things is…dun dun dun…EVERY single floor surface in my home. Being all wood or ceramic tile, the impact of it all day really does a number on my spine.
So, I have found the miracle of my “HOUSE CROCS!” I wear them in the home all the time and they really really help absorb the shock and I am hoping, reduce my migraines.
But ….OF COURSE…they needed that *Crochetverse* touch…RAINBOW STRAPS!
Wanna do the same? It’s super easy, follow along below:
Materials:
- about 100 yards total of sport weight mercerized cotton (this will hold up well with wear)
I’ve used Scheepjes Catona in 14 colors, it comes in small balls that are fairly value priced and you can grab that at Love Knitting here: https://www.loveknitting.com/us/scheepjes-catona-25-gram
I’ve used 14 colors: Scarlet 192, Shocking Pink 114, Fresia 519, Tangerine 281, Peach 386, Yellow Gold 208, Lemon 280, Parrot Green 241, Chrystalline 385, Electric Blue 201, Vivid Blue 146, Delphinium 113, Light Orchid 226, and Garden Rose 251
- Size C(2.75mm) crochet hook
- scissors, tapestry needle, tape measure
This should fit most adult crocs straps with a little more or less coverage on either end. You will want to sew it on centered so the taper of the strap fits with the taper of the cover.
It’s SO EASY. Really, but I wanted to share my method to save you any figuring out at all!
Gauge:
Row 1-6 measure 1 1/8″ tall and 2″ wide. I crochet tightly, you may need to drop a hook size to meet my gauge.
Finished Size:
About 7″ long, to fit the average adult croc. If you need it longer or shorter, add multiples of 6 rows, placing 3 of those at the beginning half before the increased middle and the other 3 at the other end before cutting yarn. This is so the tapered wider center will remain evenly centered.
Pattern:
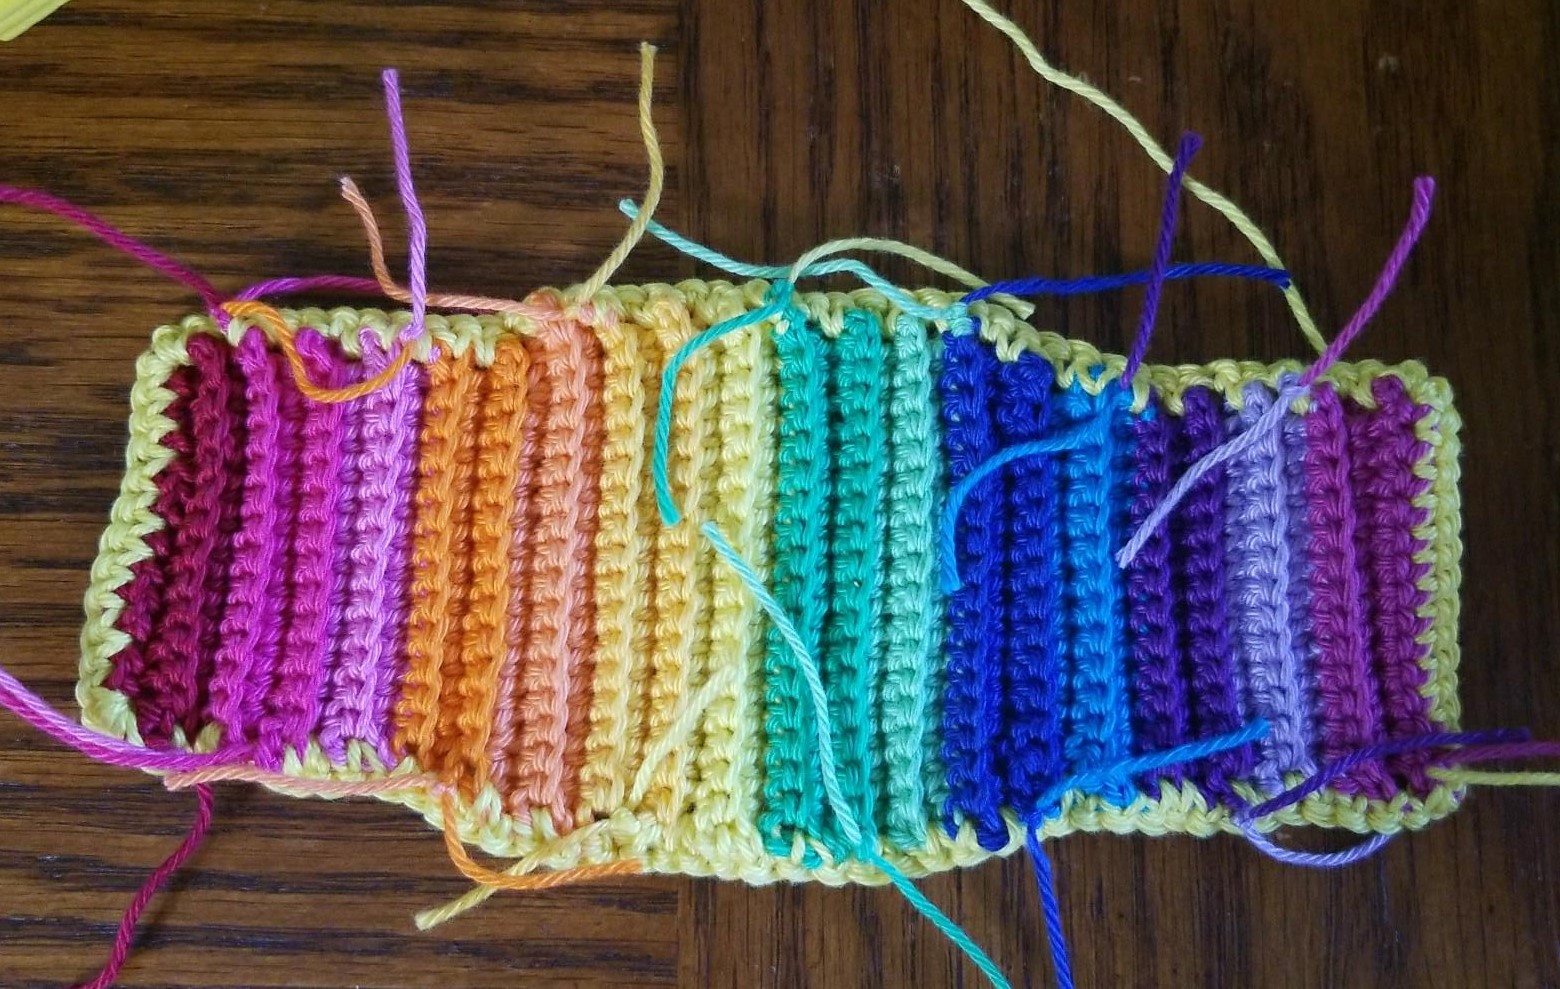
I worked in order that I have listed the Catona colors above, beginning with the Scarlet and ending with the Garden Rose.
I have worked THREE ROWS of each color.
I have CHANGED COLOR at the final yarn over/pull through of the last single crochet of the row just prior to me needing the new color.
Chain 15:
Row 1: sc in 2nd ch from hook and each rem ch across. (14)
Rows 2-12: ch 1, turn, scBLO (single crochet in the BACK LOOP only or the one towards the back of the work) in each st across. (14)
Row 13: ch 1, turn, 2 scBLO in 1st st, 2 scBLO in nxt st, sc in nxt 10 sts, 2 scBLO in each of the last 2 sts. (18)
Rows 14-29: ch 1, turn, scBLO in each st across. (18)
Row 30: ch 1, turn, scBLO decrease over the 1st two sts, scBLO decrease over the nxt 2 sts, scBLO in the nxt 10 sts, scblo decrease over the nxt 2 sts, scBLO decrease over the last 2 sts. (14)
Rows 31-42: ch 1, turn, scBLO in each st across, cut yarn after row 42.
Weave Ends:
If you used just a few colors or one color, you can weave the ends in as you normally would with a tapestry needle. I used so many colors and there were a TON of ends, so instead of weaving each end in, I securely knotted each end to an end that was close to it three times each. I then trimmed the tails to about 1″ long. When I worked the edge round I made sure the tails were pushed to the back of the work and when I sewed it on the shoe, I made sure they were forever hidden and tucked inside there too. It has held well over the time I have worn them. Work smarter not harder! <3
Here is what the inside of mine looked like with the tails knotted and trimmed.
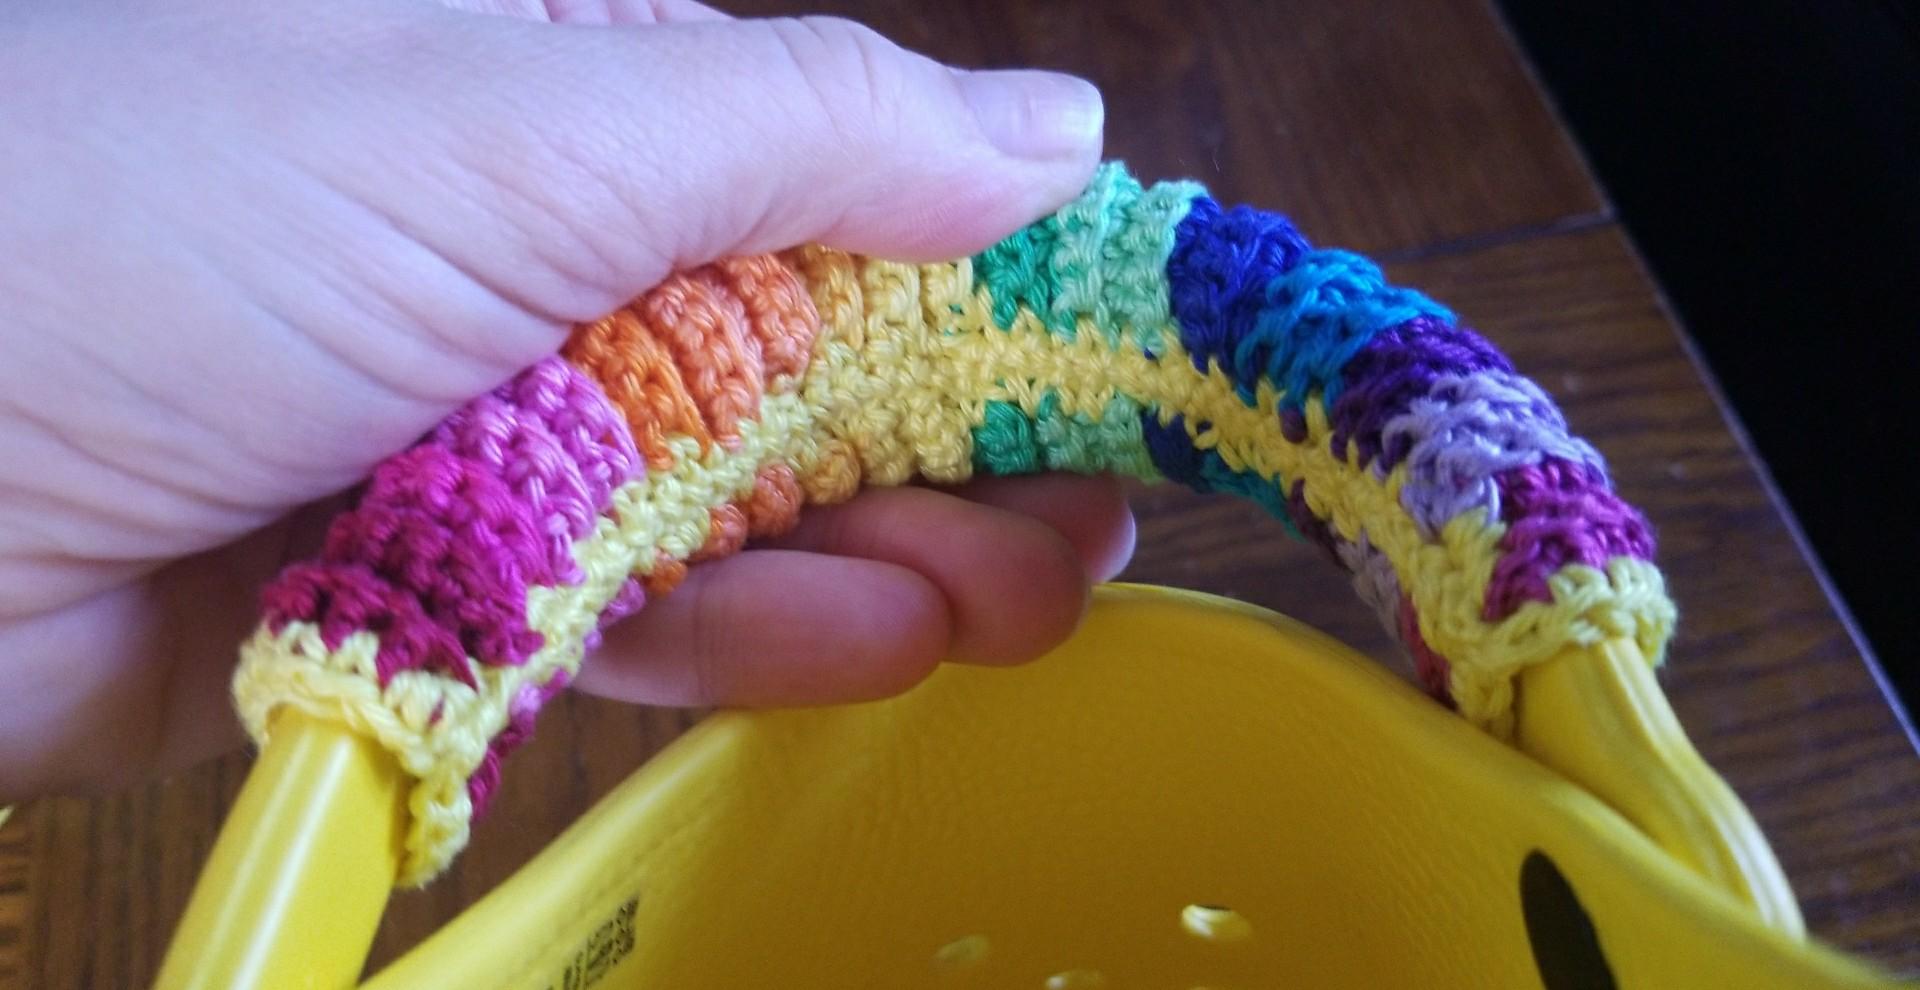
Edge:
I wanted my cover’s color order to be mirror image of each other once on the shoes. Meaning, that the 1st color I used would be on the outer side of both feet and the last color I used would be on the inner side of both feet. Therefore I edged my straps in opposite directions so the right side of the edge round would be facing up and the color order would be opposite.
If you made solid colors or do not mind a non-mirrored color order; edge both straps according to “First Strap” directions.
FIRST STRAP (used on my left shoe): Choose a color that is the same color as your Croc. I chose the Lemon yellow. Join with a sl st in the rightmost corner st of row 1, ch 1, work 3 sc in the corner, work 1 sc in the end of each row across the edge, 3 sc in the 1st st of the last row made, sc in each of the nxt 12 sts of the last row made, 3 sc in the last st, work 1 sc in the end of each row along the second long side, make 3 sc in the 1st st on the 1st row made, sc in each of the nxt 12 sts, sl st to the 1st sc made of the edging and cut yarn leaving a 28″ tail to sew the cover onto the shoe.
SECOND STRAP (used on my right shoe): With the same color as you edged the 1st strap with, join with a sl st in the rightmost corner of st of the LAST row you made on the strap (opposite of what you did for the first strap) and repeat edge round as for the 1st strap.
Sew on Shoes:
Be sure you pay attention to how you want them on the shoe. I had the first color I used on the strap on both outer ankles and the last color I used on both inner ankles so the order of each shoe mirrored the other.
Using the long end tail from the edge round and making sure the right side of the edge round is facing out on each show, sew the long edges of the strap together and around, encasing the shoe strap within. Once completed weave in the remaining ends and twist the cover so the seam from sewing it on is in the inside center of the strap to be hidden.
Now head out into the world and enjoy those AMAZING things that are embellished CROCS!
Much Love and Yarn,
Stephanie
The information and photos in this posting are the sole copyrighted property of Crochetverse©2018. Please do not copy and paste any of the information contained within either electronically, verbally, or written in part or in whole. Instead, please share the DIRECT LINK to this posting only, and if you do, I thank you for sharing. You of course may sell anything you make from this pattern that you have made with your own two hands, no contract labor or mass productions are permitted. I need your visits to keep me around creating! Please never screenshot or copy and paste the info within, instead share the link so I may entertain your friends as well! If you credit Crochetverse as the designer that is greatly appreciated!

[…] Thank you, Crochetverse! […]
Comments are closed.