

")
Let the world know if you are feeling like a “Sour Puss” or full of love and ready to “Pucker Up” with the madly adorable and quick double sided amigurumi lemon from ME, Stephanie Pokorny, here at Crochetverse!!
This is a free pattern, but please always share the link to my page here and never the pattern itself. Your visits to me allow me to continue to bring you cute freebies! Thank you kindly for honoring the work! <3
Materials:
- 50 yards worsted weight yarn (Shown Red Heart Super Saver in Bright Yellow)
- 10 yards worsted weight yarn in green and pink (Shown Red Heart Super Saver Glowworm, Black, Pretty In Pink)
- Size G (4.25mm) crochet hook
- small amount stuffing or yarn scraps
- scissors, tapestry needle
- small amount white yarn or white puffy paint for eyes
Finished Size:
About 5″ tall x 3″ wide
Gauge:
Not important BUT you do need nice tight amigurumi style stitches so the stuffing does not show thought. I crochet tightly. Feel free to drop down a hook size or two if you are looser tension.
Body (Make 2):
With yellow, ch 2:
Row 1: 2 sc in 2nd ch from hook. (2)
Row 2: ch 1, turn, sc in each sc. (2)
Row 3: ch 1, turn, 2 sc in each sc. (4)
Row 4: ch 1, turn, 2 sc in 1st sc, sc in nxt 2, 2 sc in last sc. (6)
Row 5: ch 1, turn, 2 sc in each of 1st 2 sc, sc in nxt 2 sc, 2 sc in each of last 2 sc. (10)
Row 6-7: ch 1, turn, sc in each sc. (10)
Row 8: ch 1, turn, 2 sc in each of 1st 2 sts, sc in nxt 6 sts, 2 sc in each of last 2 sts. (14)
Row 9-14: ch 1, turn, sc in each sc across. (14)
Row 15: ch 1, turn, sc dec over 1st 2 sts, sc in nxt 10 sts, sc dec over last 2 sts. (12)
Row 16: ch 1, turn, sc in each sc across. (12)
Row 17: ch 1, turn, sc dec over 1st 2 sts, sc in nxt 8 sts, sc dec over last 2 sts. (10)
Row 18: ch 1, turn, sc in each sc across. (10)
Row 19: ch 1, turn, sc dec over 1st 2 sts, sc in nxt 6 sts, sc dec over last 2 sts. (8)
Row 20: ch 1, turn, sc dec over 1st 2 sts, sc in nxt 4 sts, sc dec over last 2 sts. (6)
Row 21: ch 1, turn, sc dec over 1st 2 sts, sc in nct 2 sts, sc dec over last 2 sts, cut yarn on FIRST body piece, do NOT CUT yarn on second body piece and move to join. (4)
Join:
Pull up the final loop on the 2nd body panel so it doesn’t pull out and lay the 1st body panel made on top of the 2nd body panel made. Insert your hook in the matching stitch on the top panel where the loop is on the 2nd panel. Pull the loop through the top panel, ch 1, working through BOTH body panels at once to join, sc in each end of row around working 3 sc at the small tip on top. Before you join the bottom, stuff with polyfil (not too much) and complete round, sl st to 1st st made. Cut yarn. Weave in any ends to this point.
Eyes (Make 4):
With black, make a magic ring:
Rnd 1: 8 sc in ring, sl st to 1st made, cut, leave tail to sew to face. (8)
Cheeks (Make 2):
With pink, make magic ring:
Rnd 1: 6 sc in ring, sl st to 1st made, cut, leave tail to sew to face. (6)
Leaves (Make 2):
With green, ch 10:
Rnd 1: sl st in 2nd ch from hook and nxt 2 chs, sc in nxt ch, hdc in nxt 2 chs, dc in nxt 2 chs, 6 dc in last ch, working up the opposite side of the chain in the remaining free loops, dc in nxt 2 chs, hdc in nxt 2 chs, sc in nxt ch, sl st in nxt 2 chs, sl st to skipped 1st ch, cut yarn, leave tail to sew to body.
Assembly:
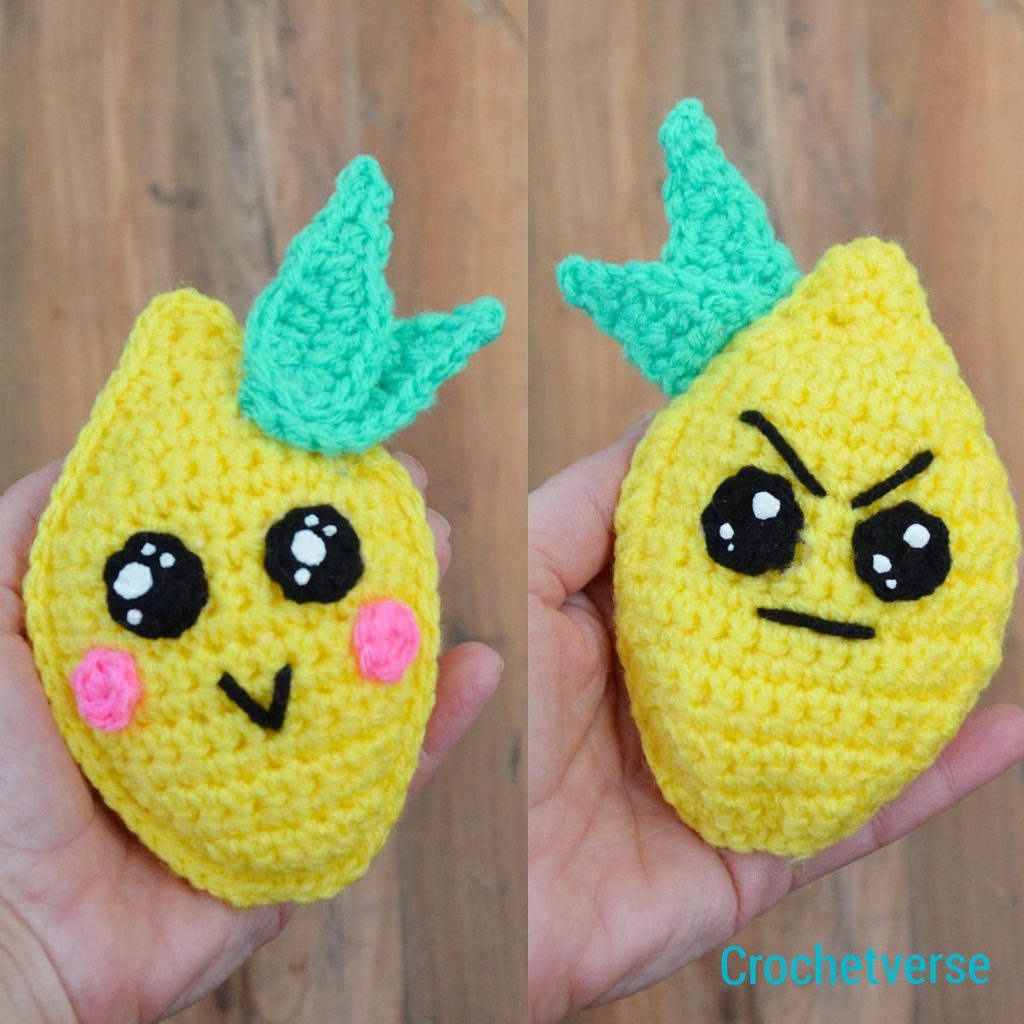
Using the photo as a guide throughout:
- Sew the leaves on the top pointed end atop each other and slightly spread apart.
- Sew 2 eyes on each side of the body a little above midway between top and bottom.
- On happy side (sides with leaves), sew on the cheeks just below and outside the eyes. Using a strand of black yand and straight stitch, sew a small “v” for a mouth.
- On the cranky side, using a strand of black yarn and straight stitch, sew a straight line mouth and eyebrows that angle sharply down and to center.
- Using white yarn or puffy paint (I used puffy paint), make one large dot and 3 small on the happy side as shown. On the cranky side, make one large and one small dot. if using paint, let one side dry fully before doing the 2nd side.
Follow me on any of my social media to stay in touch, I would love to have you! Much love and yarn, Stephanie Pokorny (Crochetverse)
The information and photos in this posting are the sole copyrighted property of Crochetverse©2019. Please do not copy and paste any of the information contained within either electronically, verbally, or written in part or in whole. Instead, please share the DIRECT LINK to this posting only, and if you do, I thank you for sharing. You of course may sell anything you make from this pattern that you have made with your own two hands, no contract labor or mass productions are permitted. I need your visits to keep me around creating! Please never screenshot or copy and paste the info within, instead share the link so I may entertain your friends as well! If you credit Crochetverse as the designer that is greatly appreciated!
