

")
Why does snow sparkle? Where does glitter come from?
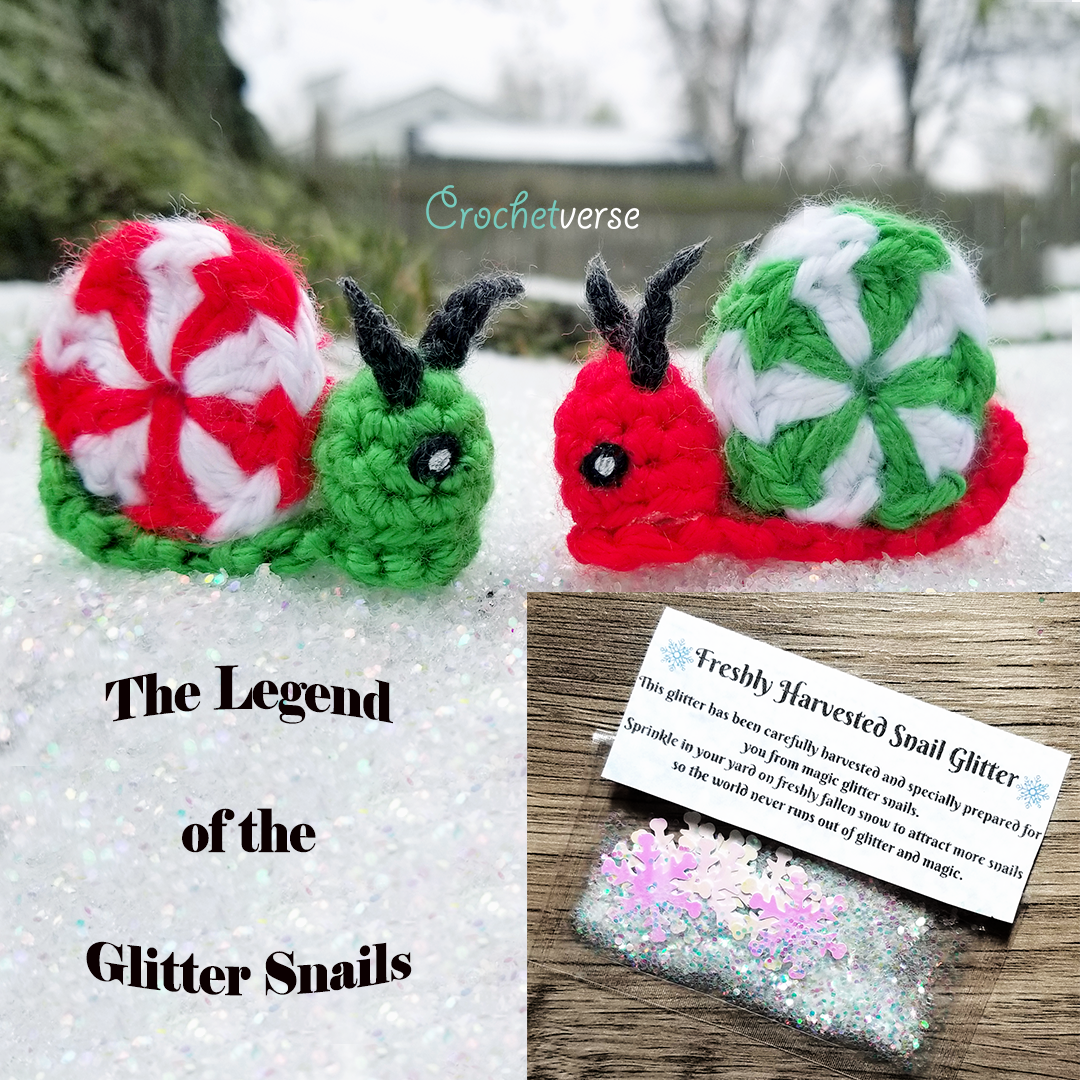
The Legend of the Glitter Snails
(FREE PATTERN AND PRINTABLE!)
***NOTE: don’t forget to use biofriendly glitter or sub in sugar if you want to sprinkle outdoors!***
“Where does glitter come from?”, my children asked me the other day. It is a well guarded secret, but today, I will let you in on the secret story. Pinky promise you won’t tell anyone? Good. Here we go…..
As Mother Nature ushers in Winter with her first snow, so comes the return of the elusive Glitter Snails! They are not your regular average snails. Where a shell usually rests, these creatures opt for a twirly candy shell in its place. No slimy head here, these snails bodies are instead made of sugar filled gumdrops! Teeny antennae rest atop their tiny head guiding them as they creep across newly fallen snow. I was lucky to able to capture these cute little baby snails as I was outside with my children the other day, a rare occurence no doubt. One I will treasure always. But what do they do?!?
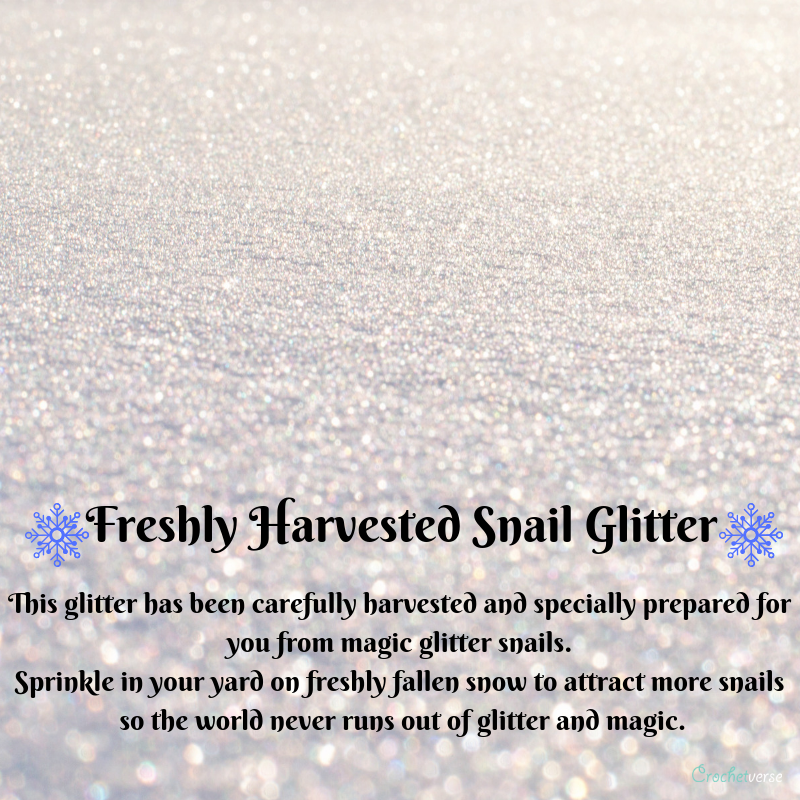
As they move slowly across the snow, a trail of shiny gem-like glitter trails behind them; no slime for these magical creatures. This is why snow glistens! Then, farmers, long done with their final crops for the season, come and collect that glitter and after carefully washing it, send it off to craft stores to be distributed to glitter addicts like you and I! They are held to a oath to never share the secret of their winter crops, but I trust you, so here I sit, sharing Nature’s secrets with you. Do not worry, this does not harm the snails, it is a natural part of their life and actually harvesting the glitter helps them make more sparkle and magic!
I am offering you this adorable FREE PATTERN and FREE PRINTABLE!
Create these adorable candy snails as class gifts for parties, package toppers, gifts from Elf on the Shelf, or just to share magic with someone in your life!
This story and legend is my own creation. (Stephanie Pokorny) I am so pleased to share it with you! BUT, Please never copy and paste the pattern or story anywhere. Instead share the link to this page, your visits here allow me to keep creating free wonderful patterns for you!
First, make the wee baby snail.
Then, print this label and fold it atop a small bag of ECOFRIENDLY glitter OR REGULAR SUGAR for outdoor sprinkling!
Finally, SHARE MAGIC WITH A CHILD IN YOUR LIFE!
Printable (Just right click on the image, save and print):
Materials:
- small amounts of worsted weight yarn in red, green, white, and dark gray
- F (3.75mm) hook OR size needed to make tight tight small stiches. I crochet tightly, you may have to drop a hook size or two.
- glue gun and glue sticks
- toothpicks and white acrylic paint to dot eyes if desired
- tapestry needle, scissors
Finished Size:
About 2″ wide x 1.5″ tall
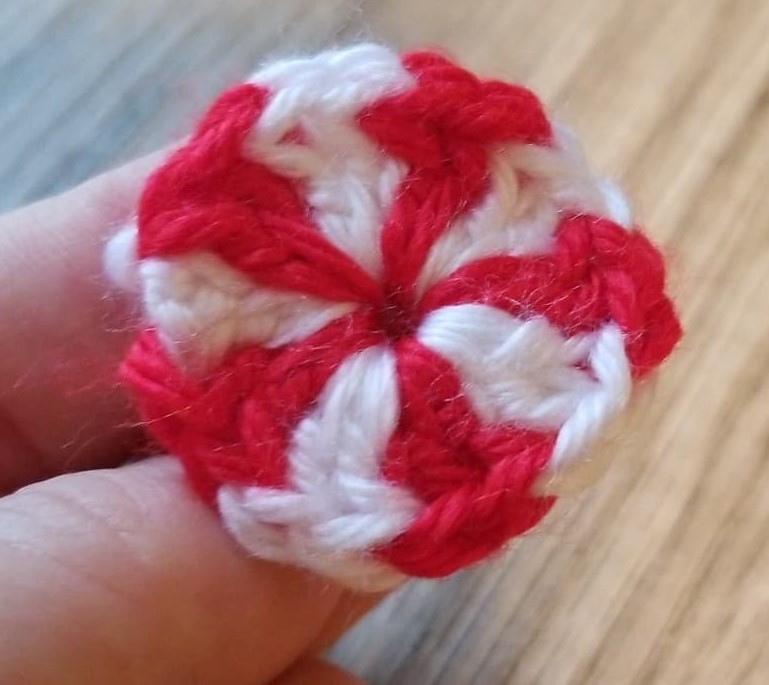
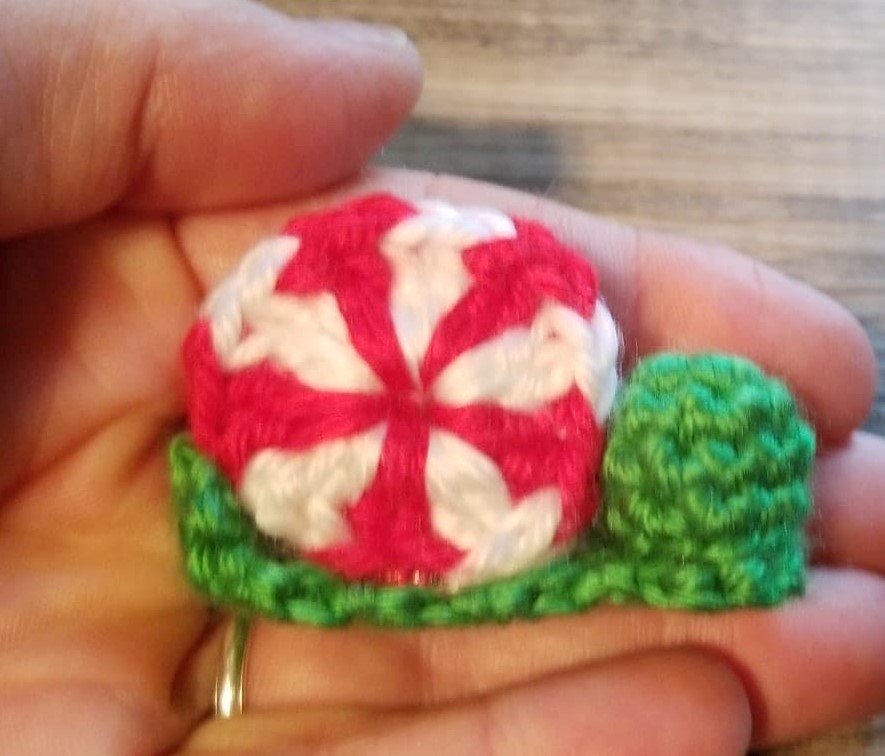
Peppermint Candy Body (Make 2):
(one shown as color 1/white, color 2 green and another shown color 1/white, color 2/red)
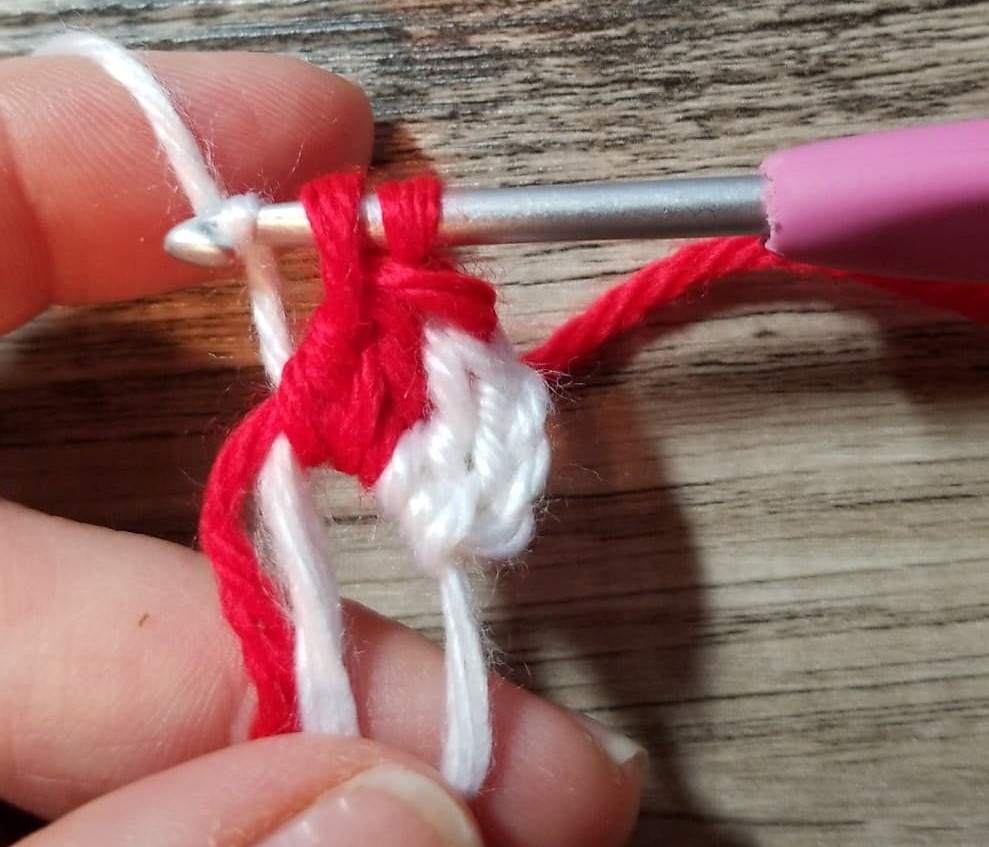
With color 1, make magic ring:
Special Stitches:
dccc (double crochet color change): perform a double crochet as standard, but at the last pull through of the stitch change to the opposite color and complete stitch with the new color. The color not being used currently will be laid along the magic ring and worked around (encased) within the stitches until it is needed next.
Rnd 1: ch 3 (counts as 1st dc), dccc changing to color 2, *dc , dccc changing to color 1 (making sure to lay the unused along the ring and work the stitches around it), dc, dccc cnhanging to color 2, repeat from * 3 times more, 2 dc, sl st to top of beginning ch 3, cut all yarn. Pull beginning tail from magic ring tightly to close. (20 dc)

I wove only the last tail of color 2 into the back center of the piece. I then knotted all 4 tails together and trimmed to about ¼”. Set aside for assembly later.
Gumdrop Head (Make 1):
In color 3, make magic ring:
Rnd 1: ch 1, 6 sc in ring. (6 sc)
Rnd 2: do not turn, (sc in nxt st, 2 sc in nxt st) three times total. (9 sc)
Rnd 3: do not turn, sc in each sc around. (9 sc)
Rnd 4: do not turn, sc in each sc around, sl st to nxt sc, cut yarn.
Weave in ends and stuff the head with the trimmings. Add a few more trimmings if needed. Set aside for assembly later.
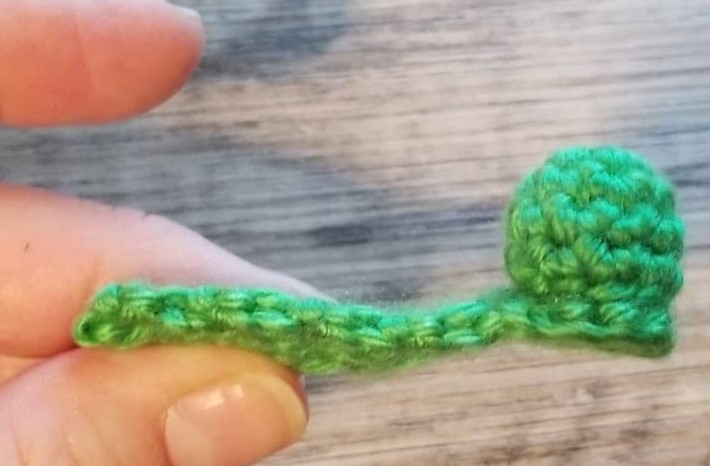
Candy Strip Bottom (Make 1):
In color 3, make magic ring:
Rnd 1-2: repeat as for gum drop head, then sl st to nxt st on ring.
Row 3: ch 1, turn, sc in nxt 3 sc.
Rows 4-10: ch 1, turn sc in each of the 3 sc.
Row 11: sc dec over the 3 sc (3 sc become 1), ch 1, cut yarn.
Weave in ends on piece.
Assembly:
I have used a glue gun for the entire piece. It is very strong and a great method for pieces like this. You may of course sew the pieces in place instead. (might be hard to do on the peppermint body if you want to maintain integrity of color changes)
- Glue the 2 peppermint candy body pieces together with the wrong sides facing in and matching the color striping sections
Be sparing on the glue, swirl the tip of the gun before pulling it away to reduce the fly away strands. Put the glue ring not right at the edge, that way when you press the 2 pieces together it does not mush out the sides.
- Glue the open end of the gunmdrop head to rounds 1-2 of the candy strip bottom, lining of the stitches of the outer ring. Again sparing on the glue.
- Run a line of glue along the back of the head on the gumdrop (the side facing the long strip tail) and then down the center of the strip to the end. Set it on a table (so the bottom will lay flat when done) and place the peppermint candy body assembly up against the back of the head, then along the strip. Finish by curling the tail end of the strip up the back of the peppermint body.
Finishing:
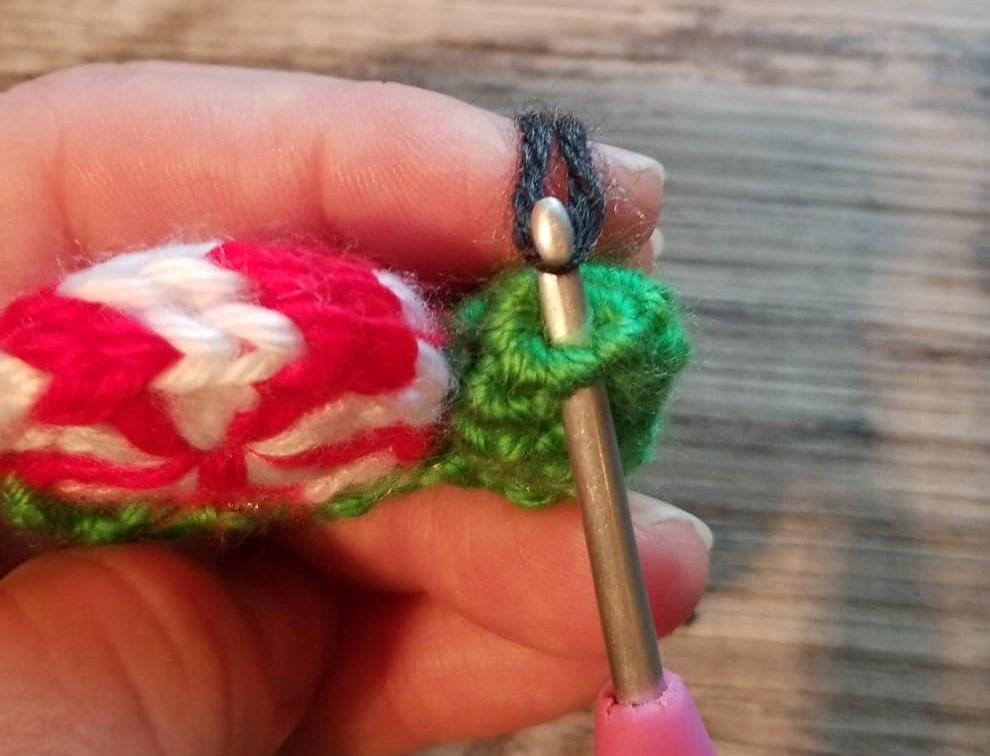
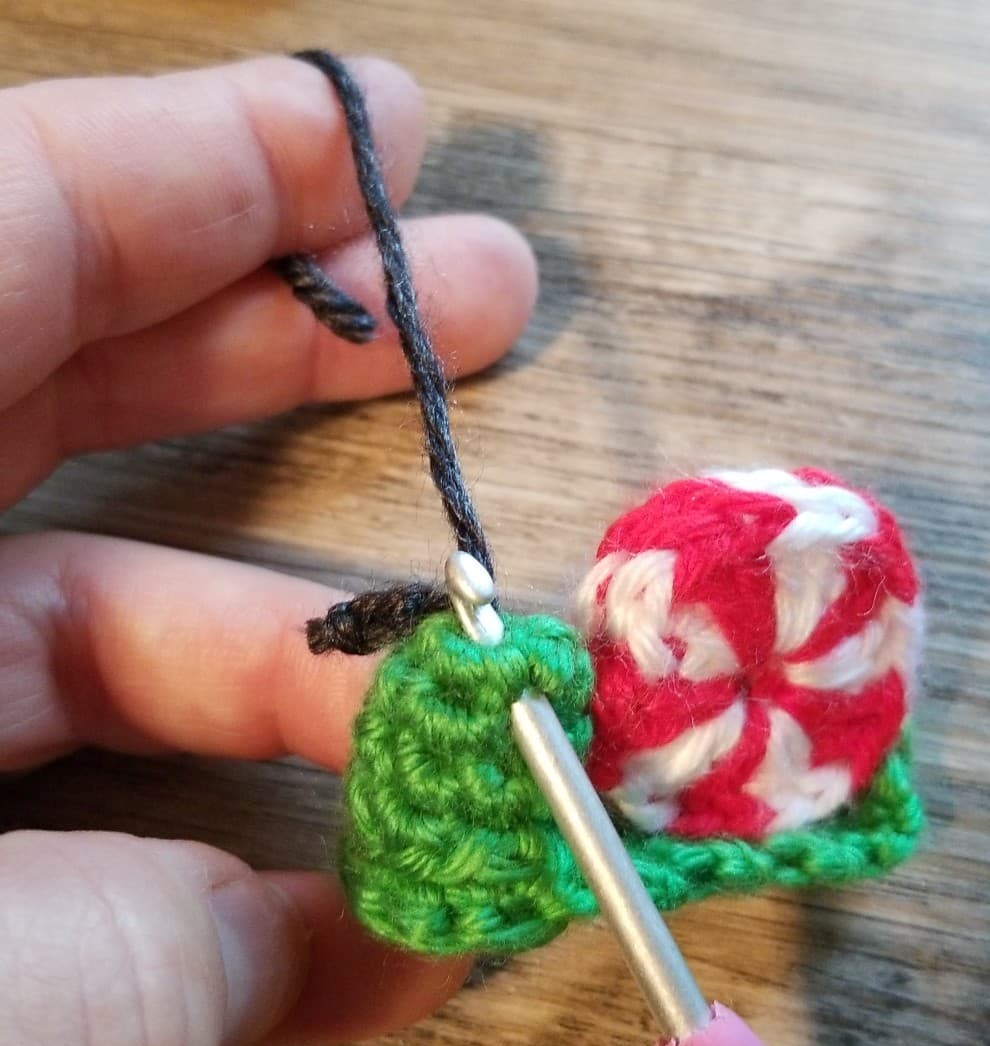
Antennae:
With gray (or antennae color of choice) fold a 16” piece of yarn through the center top of the head as shown, chain 3 with the one end of the yarn, pull tightly, knot as close to the chain as you can and trim. Insert hook on the opposite side as shown, pull of the remaining tail end, ch 3, knot and trim.
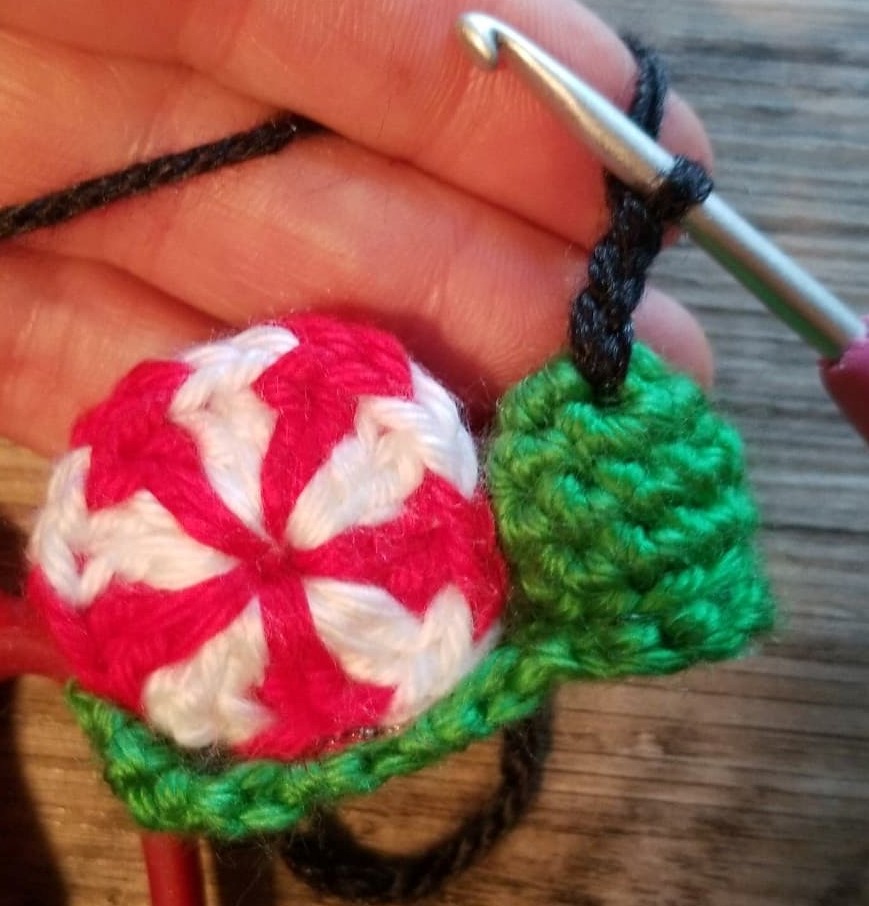
Eyes: With gray or color of choice, sew a satin stitch eye on either side of the face. I then dotted a tiny bit of white acrylic paint on each eye with a toothpick.
Follow me on any of my social media to stay in touch, I would love to have you! Much love and yarn, Stephanie Pokorny (Crochetverse)
The information and photos in this posting are the sole copyrighted property of Crochetverse©2018. Please do not copy and paste any of the information contained within either electronically, verbally, or written in part or in whole. Instead, please share the DIRECT LINK to this posting only, and if you do, I thank you for sharing. You of course may sell anything you make from this pattern that you have made with your own two hands, no contract labor or mass productions are permitted. I need your visits to keep me around creating! Please never screenshot or copy and paste the info within, instead share the link so I may entertain your friends as well! If you credit Crochetverse as the designer that is greatly appreciated!
