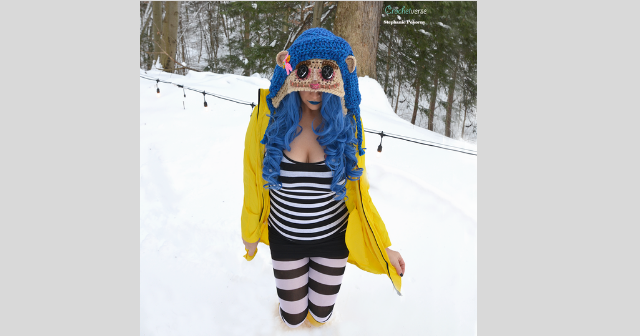
MCoraline! One of my favorite movies. So creepy and so amazing! The imagination that went into making it is mind blowing to me!
I often get asked how I create my costumes. This FREE pattern will give you a beginner insight as to how I work. <3 If you notice any errors, please feel free to message me! I can be found across all social medias as Crochetverse!
Please do feel free to sell a COMPLETED item you make from this pattern. Please do NOT ever copy and paste any part of the pattern and share it anywhere else or attempt to sell it or give it for free. I work many hours to bring you these patterns and want to keep being able to do so, so I need you all to visit me here! <3 If you see the pattern anywhere but here on my blog, please do let me know! We are part of a strong as heck “stand together” community and I love it! Without further ado, please enjoy and come share your works with me on Facebook at http://www.facebook.com/Crochetverse
MATERIALS:
– Worsted weight yarn in the following approximate amounts and colors:
Dark Blue: 200 yards
Royal Blue: 200 yards
Skintone: 150 yards
Black, Dark Gray, White, Bubblegum Pink, Medium Brown, Dark Tan, Light Coral, Dark Pink, Light Turquoise: Less than 20 yards each.
– Sizes N(9mm), H(5mm), G(4mm), E(3mm), 1.5mm crochet hooks
– tapestry needle, scissors, tape measure, stitch markers
– glue gun and glue stick if you choose to use this method
– small amount of fiber stuffing
– various shadows and makeup brushes if you choose to highlight
GAUGE: 6 rows x 9 sts in half double crochet is 4” x 4”
SIZED FOR: Average teen/adult although my 4 year old can wear it just fine with more drape.
FINISHED DIMENSIONS: about 14 at tallest point and about 11” deep from face to back of head
INSTRUCTIONS:
Main Hood:
With dark blue and royal blue held double strand and 9mm hook, chain 18:
Row 1: hdc in 2nd ch from hook (skipped ch does NOT count as a st here and throughout), hdc in nxt 15 chs, 3 hdc in last ch, (place marker in the 2nd hdc of the 3 hdc just made), continue working up the opposite side of the beginning chain working in the remaining free loops, hdc in nxt 16 chs.
Row 2: ch 1 (does not count as st here and throughout), turn, hdc in same st as ch-1 and nxt 16 sts, 3 hdc in nxt st , move marker to the 2nd hdc, hdc in last 17 sts.
Row 3: ch 1, turn, hdc in same st and nxt 17 sts, 3 hdc in marked st, move marker to 2nd hdc of the 3, hdc in last 18 sts.
Row 4: ch 1, turn, hdc in same st and nxt 18 sts, 3 hdc in marked st, move marker to 2nd hdc of the 3, hdc in last 19 sts.
Row 5: ch 1, turn, hdc in same st and nxt 19 sts, 3 hdc in marked st, move marker to 2nd hdc of the 3, hdc in last 20 sts.
Row 6: ch 1, turn, hdc in same st and nxt 20 sts, 3 hdc in marked st, move marker to 2nd hdc of the 3, hdc in last 21 sts.
Row 7: ch 1, turn, hdc in same st and nxt 21 sts, 3 hdc in marked st, move marker to 2nd hdc of the 3, hdc in last 22 sts.
Row 8: ch 1, turn, hdc in same st and nxt 22 sts, 3 hdc in marked st, move marker to 2nd hdc of the 3, hdc in last 23 sts.
Row 9: ch 1, turn, hdc in same st and nxt 23 sts, 3 hdc in marked st, move marker to 2nd hdc of the 3, hdc in last 24 sts.
Row 10: ch 1, turn, hdc in same st and nxt 24 sts, 3 hdc in marked st, move marker to 2nd hdc of the 3, hdc in last 25 sts.
Row 11: ch 1, turn, hdc in same st and nxt 25 sts, 3 hdc in marked st, move marker to 2nd hdc of the 3, hdc in last 26 sts.
Row 12: ch 1, turn, hdc in same st and nxt 26 sts, 3 hdc in marked st, move marker to 2nd hdc of the 3, hdc in last 27 sts.
Row 13: ch 1, turn, hdc in same st and nxt 27 sts, 3 hdc in marked st, move marker to 2nd hdc of the 3, hdc in last 28 sts. (59 hdc)
Row 14-16: ch 1, turn, hdc in same st and each st across, cut blue yarns. (59 hdc)
Row 17: turn the piece as normal to work back on the same row and join double strand skintone yarn with a sl st in the 7th st from the end (skip last 6 sts made on row 16), ch 1, hdc in same st as ch-1, hdc in nxt 46 sts, leave the remaining 6 sts of row 16 unworked. (47 hdc)
Row 18: ch 1, turn, hdc in same st as ch-1 and each rem hdc across, cut the skintone yarn, mark the last st made of this row with a stitch marker. (47 hdc)
Row 19: turn the piece as normal to work back on the same row and join double strand skintone yarn with a sl st in the 11th st from the end (skip the last 10 sts made on row 18), ch 1, sl st in the same st as the ch-1, sc in the nxt st, hdc in the nxt 23 sts, sc in the nxt st, sl st in nxt st.
Row 20: ch 1, turn, sk the 1st sl st and sc of previous row, sc in the nxt st, hdc in nxt 21 sts, sc in nxt st, sk nxt st, sl st in last st.
Row 21: ch 1, turn, sk the 1st sl st and sc, sc in nxt st, hdc in nxt 18 sts, sc in nxt st, sk nxt st, sl st in last st.
Row 22: with the wrong side of row 18 facing you, join double strand skintone yarn in the marked last st of the row, ch 1, sc in the same st, sc in each st around the edge of the skin tone stitches making TWO sc in the end of each row across the visor portion (row 19-21).
Row 23: ch 1, reverse sc in each sc made in row 22, cut yarn.
Blue Hair Panel:
Row 1: With blue shades held double strand make a chainless foundation row of 63 hdc. Alternatively, chain 64, hdc in 2nd ch from hook and each ch across. (63 hdc)
Row 2-6: ch 1, turn, hdc in same st as ch-1 and each rem st across, cut yarn after row 6. (63 hdc)
Mold and Attach Hair Panel:
1. Tuck up the ends to create a little bulk. Fold stitches 1 & 2 onto 3 & 4 and sew into place with the hair color yarn. Fold stitches 60 & 61 onto 62 & 63 and sew into place.
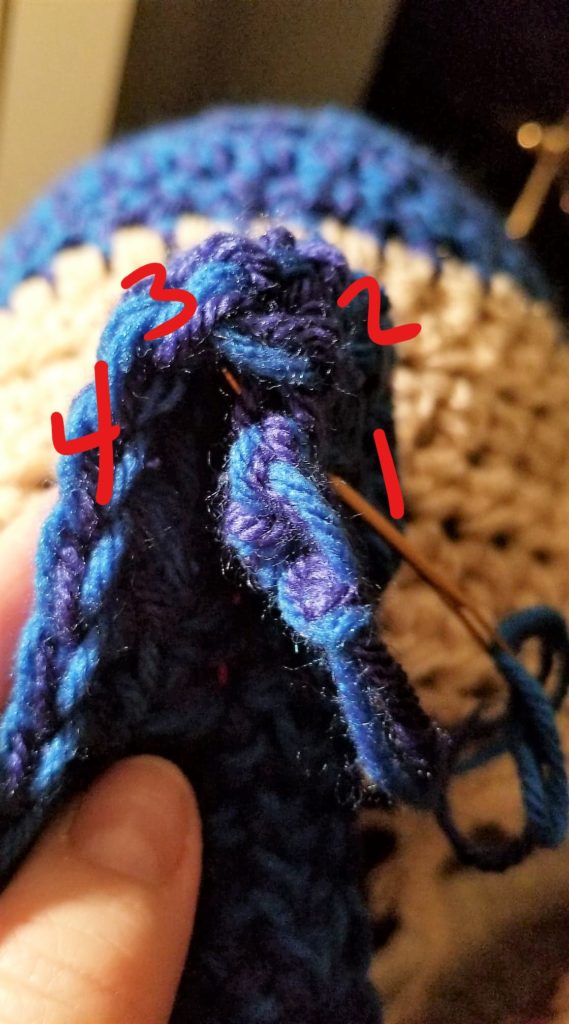
2. Lay the folded stitches of the 1,2,3,4,5,6 end lined up with the skintone stitches on the left side of the hood (left side envisioning being worn), sew into place there along the short folded edge.
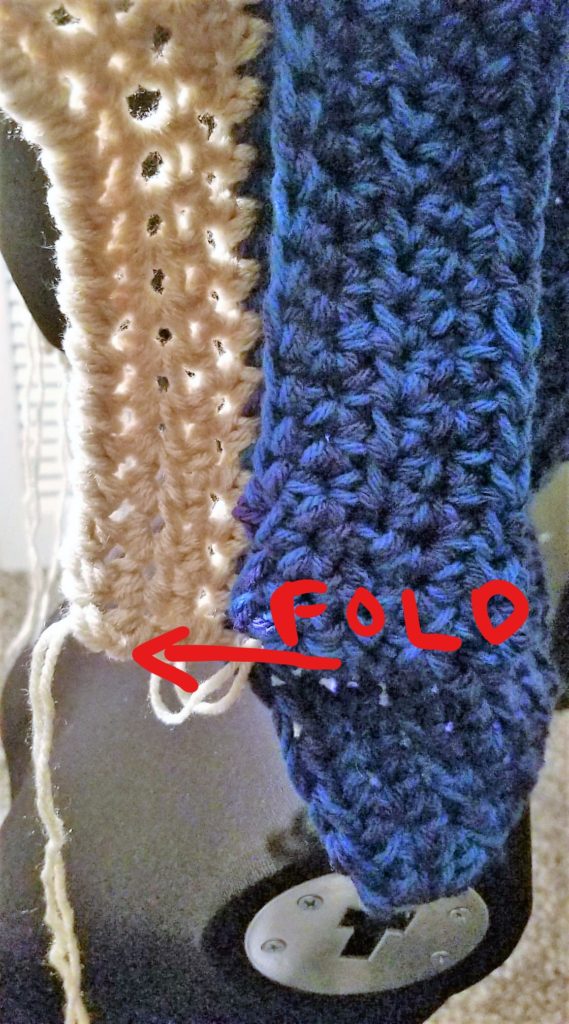
3. Continue to sew into place at the line where the blue and skintone meet (slightly have the blue overlap the skintone so there is no ugly gapping) stop 1” to the right (when looking at the hood straight on) short of the midline of the skintone visor extension. Take the opposite folded end and pin temporarily in place matched up the the skintone edge as you did for the 1st folded edge. Using the slack that is still present in the hair panel, pinch up about 1” to create the “hair bump”. Use stitches to tack this shut up the pinch and to the hair line as well. Continue to sew along the front edge until the hair panel is fully sewn to the hairline across the front of the hood.

4. Sew along the entire back long edge of the hair panel attaching it into place, BUT place the smallest amount of stuffing inside as you sew. You want to give it a little body but not allow it to show through the stitches.
Eyes (Make 2):
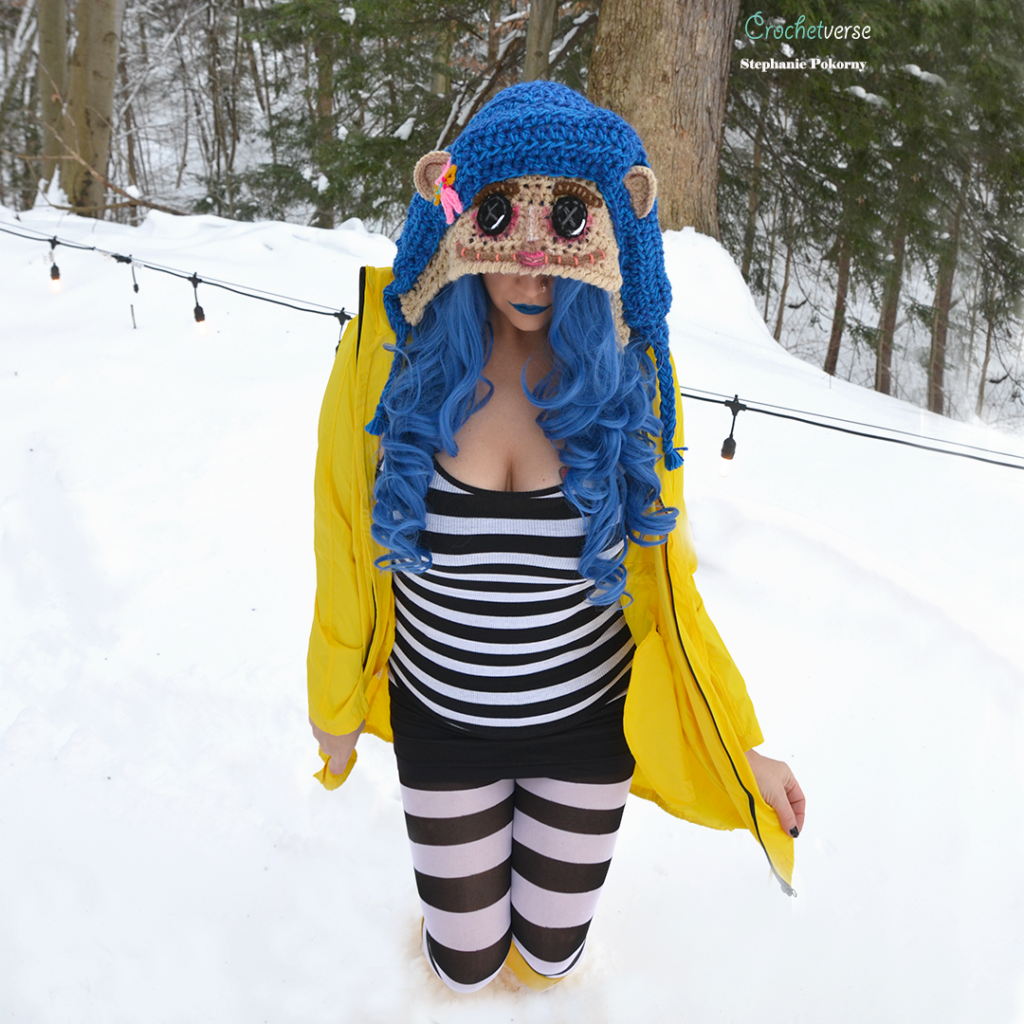
***REFER TO THIS PICTURE THROUGHOUT FACE CREATION AND SHADING***
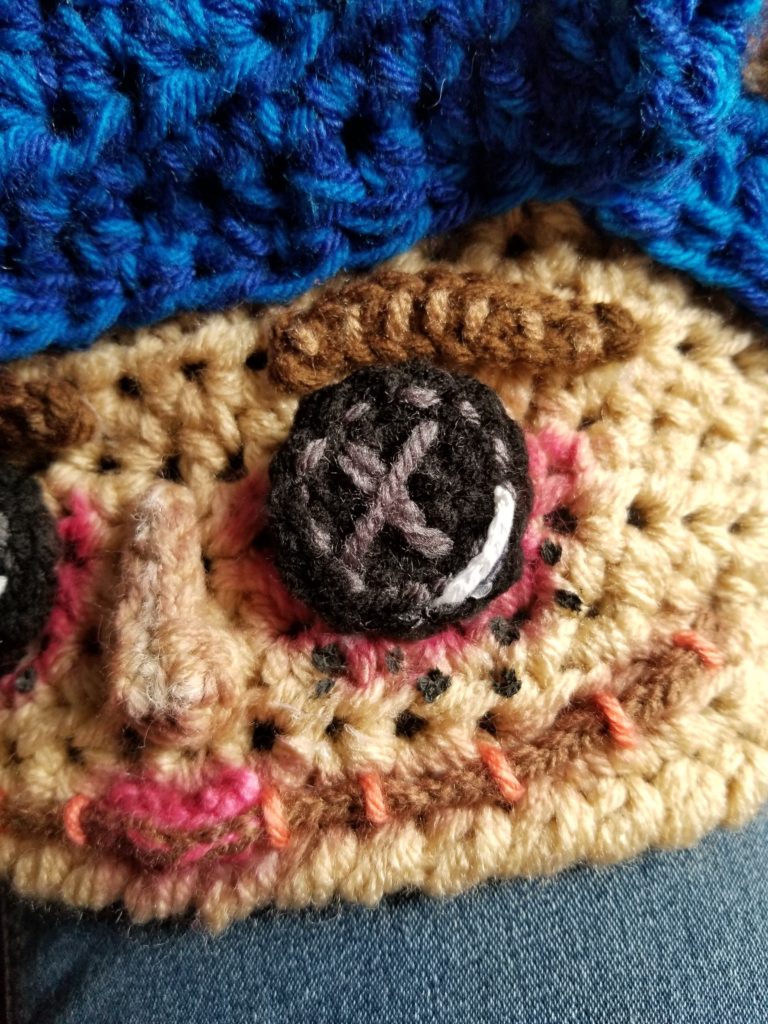
With G hook and double strand black, make magic ring, ch 1:
Rnd 1: make 6 sc in the ring, sl st to 1st sc made, pull tightly on tail to close ring. (6)
Rnd 2: do not turn, 2 sc in each sc around, sl st to 1st sc made. (12)
Rnd 3: switch to H hook, ch 1, sl st loosely in the BACK LOOP ONLY of each sc around, sl st to the 1st sl st made, cut yarn.
With single strand of dark gray yarn and a tapestry needle, sew an “X” shape in the middle of each eye, as you would write it on paper “open end” of the “x” at top and bottom. Using the same gray yarn, sew little straight stitches around the circumference of the circle just inside the final sl st round.
With 1 ply of a separated strand of white yarn (or fingering weight cotton as I used) and a 1.5mm hook (tiniest you have probably!) make a chain of 6.
Sew the chain 6 to the eye using the photo as a guide, position the same on both eyes and beginning at about the 4 o’clock position and ending about the 6 o’clock position.
Using the photo as a guide, sew or glue each eye into place on the hood visor, making sure you leave a little room for the eyebrows.
You can definitely use a precision tip glue gun to tack these pieces down. It WILL hold and is stronger than you may think! You can use a tooth pick to apply the glue, it is a one shot deal. If you use to much it is hard to correct.
Eyebrows:
Left Eyebrow (envisioning it being worn):
With G hook and double strand of a medium brown, chain 11:
Row 1: sl st in 2nd ch from hook and nxt ch, sc in nxt 5 sts, sl st in last 3 chs, cut yarn, knot beginning and end tails together tightly, leave tail long to sew to face.
Right Eyebrow (envisioning it being worn):
With G hook and double strand of a medium brown, chain 11:
Row 1: sl st in 2nd ch from hook and nxt 2 sts, sc in nxt 5 sts, sl st in last 2 sts, cut yarn, knot tails firmly, leave tail for sewing to face.
With a dark tan yarn single strand and tapestry needle, sew 7 vertical straight stitches in each eye brow (see photo as a guide) to simulate hairs on the brows and create depth. Weave in tails and attach the eye brows to the face; the 2 sl st end is closest to the ears and the 3 sl st end is closest to the nose on both sides.
Mouth:
Lips:
With G hook and double strand bright pink, chain 5:
Row 1: sl st in 2nd ch from hook and each rem chain across, cut yarn.
Using the tail, sew to the face using the photo as a guide, turning the corners slightly up into a wee bit of smile as you sew.
Stitch Line:
Using the same dark tan you used for eyebrow accent hair held single strand and G hook, chain 50, cut yarn.
Either sew or glue this OVER the mouth using the photo as a guide, turned up at the ends. The ends on either side are just under the eyes and in line with where ears would be on the face.
Stitch Accents:
With a tapestry needle and a light coral or salmon shade of yarn, sew small vertical stitches along the stitch line of the mouth.
Lip Accent:
Separate a strand of the lip color yarn into two plies. With a tapestry needle, come back and make tiny straight stitches OVER the dark tan stitch line so it looks like the mouth has an opening that was sewn shut.
Ears (Make 2):
With G hook and double strand skintone yarn, make a magic ring, ch 1:
Row 1: 6 sc in the ring, pull tail to close ring. (6)
Row 2: ch 1, turn, sc in the 1st st, 2 sc in the nxt st, (sc in nxt st, 2 sc in nxt st) twice. (9)
Row 3: ch 1, turn, 2 scblo in the 1st st, scblo in nxt 7 sts, 2 scblo in last st. (11)
Row 4: ch 1, turn, sc in 1st st, 2 sc in nxt st, sc in nxt 2 sts, 2 sc in nxt st, sc in nxt 3 sts, 2 sc in nxt st, sc in nxt st, 2 sc in last st. (15)
Row 5: ch 1, turn, sl st LOOSELY in the BACK LOOP ONLY of each st across, cut yarn leaving tail to sew to head.
Pin the ears in place at same level as eyes and on TOP of the blue hair panel. (The ears emerge from the hair) using the photo as a guide. Make sure the are even top to bottom and also front to back. You want them to curve forward slightly so they “cup” and sew so they “countersink” into the hair panel and look as if they are coming from inside the hair.
Nose:
With G hook and double strand skintone yarn, chain 6:
Rnd 1: hdc in 2nd ch from hook and nxt 3 chs, ( ch 1, hdc, ch 1, sc, ch 1, hdc, ch 1) all in the last ch, working up the opposite side of the beginning chain, sc in nxt 3 chs, sl st in last ch, cut yarn, knot tails firmly and cut yarn to sew to face.
Sew to nose between eyes, pinch up the end with the bunch of stitches to create the tip of the nose.
Dragonfly Clip:
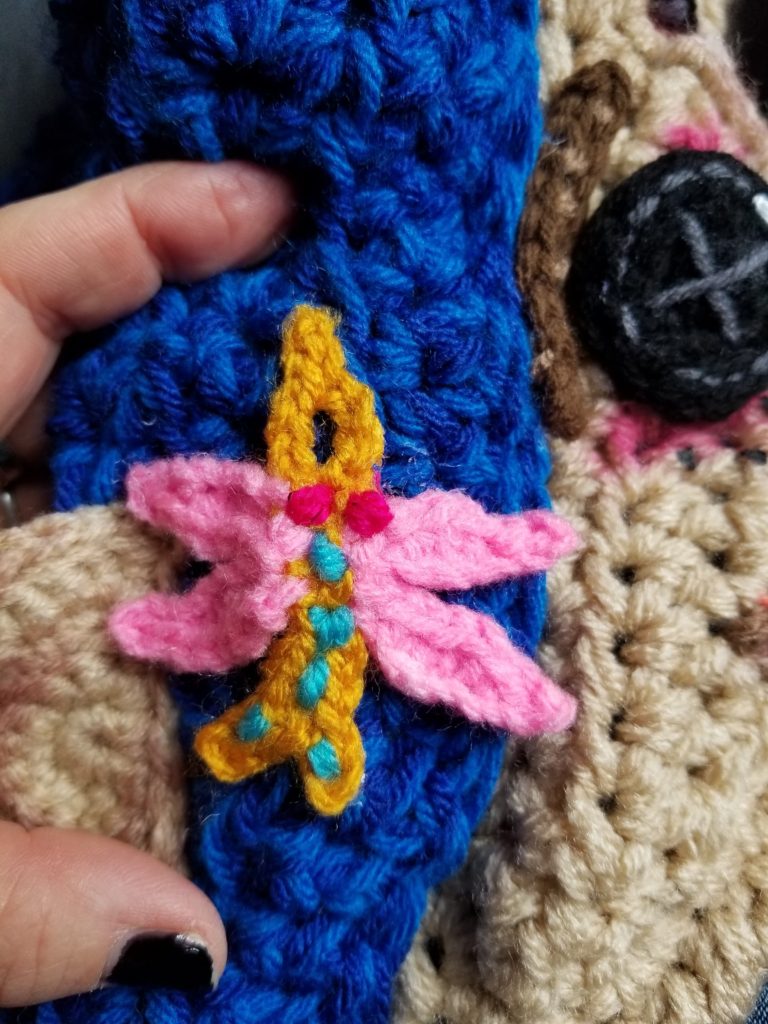
Body:
With E hook and single strand golden yarn, ch 14:
Rnd 1: sl st in 2nd ch from hook and nxt ch, ch 3, sk nxt 3 chs, sl st in nxt ch 7 chs, ch 4, sl st in 2nd ch from hook and nxt 2 chs, sl st in the same ch at the base of the ch 4, ch 4 again, sl st in 2nd ch from hook and nxt 2 chs, sl st once more in the same ch at the base of the ch 4, sl sl in the nxt 6 chs, cut yarn.
Wings:
With the right side of the stitches of the body facing up, join single strand pink yarn with E hook in the 3rd last sl st made on the end of rnd 1, ch 8, sl st in 2nd ch from hook and nxt ch, sc in nxt ch, hdc in nxt 2 chs, sc in nxt ch, sl st in last ch, sl st in same ch on body you began from, sl st into nxt ch on body, ch 7, sl st in 2nd ch from hook and nxt ch, sc in nxt ch, hdc in nxt 2 chs, sl st in nxt ch, sl st in nxt ch on golden body on cut yarn.
Turn so the opposite side of the golden body is right side up with looped end to the right and rejoin pink yarn with a sl st in the chain that is opposite the ch you worked the wing closest to the loop end on the other side, ch 7, sl st in 2nd ch from hook and nxt ch, sc in nxt ch, hdc in nxt 2 chs, sl st in nxt ch, sl st in same st on golden body you joined to, sl st in nxt st on golden body, ch 8, sl st in 2nd ch from hook and nxt ch, sc in nxt ch, hdc in nxt 2 chs, sc in nxt ch, sl st in nxt ch, sl st in same st on golden body this chain 8 emerged from, cut yarn.
With a fuchsia yarn and tapestry needle sew eyes on the body at the looped end. With light turquoise yarn sew straight stitches along the length of the golden body. Weave in all ends. Sew or glue over right ear onto hair panel.
Braided Detail:
Cut 3 strands of each of the blue yarns you used for the hair (6 total) that are 60” long each. Fold in half and slide through the corner most front stitch of the main hood in the end of the blue rows. Separate evenly into 3 sections and braid the strands until it is about 7” long. Overhand knot as close to the end of the braid as you can and trim ends to about ½”.
Repeat the entire process for the opposite side of the hood.
Weave in any remaining ends.
Optional Shading:
I shade with eye shadows and dry brushed on acrylic paints. The eyes are shaded with pinkish red shadow and a makeup brush. Do a little at a time. You can always add more. You cannot take away if you do too much. It does not surround the eyes completely, just the lower 2/3rds. I shaded the nose with brown shadows along each side and a smidge of dry brushed white down the center. The mouth and stitch line across the mouth are also shaded with brown shadows. She also has freckles under each eye. I created these with acrylic paint and the end of the brush stick dotted on.
Follow me on any of my social media to stay in touch, I would love to have you! Much love and yarn, Stephanie Pokorny (Crochetverse)
The information and photos in this posting are the sole copyrighted property of Crochetverse©2018. Please do not copy and paste any of the information contained within either electronically, verbally, or written in part or in whole. Instead, please share the DIRECT LINK to this posting only, and if you do, I thank you for sharing. You of course may sell anything you make from this pattern that you have made with your own two hands, no contract labor or mass productions are permitted. I need your visits to keep me around creating! Please never screenshot or copy and paste the info within, instead share the link so I may entertain your friends as well! If you credit Crochetverse as the designer that is greatly appreciated!
Embed: http://<meta name=”p:domain_verify” content=”6cef01cb0d423edba39e05af60b398e2″/>


