

")
Hi again, and welcome to the LAST week of our Garden Party Jacket! In no time at all now, you’ll be strutting your stuff in your new wearable art!
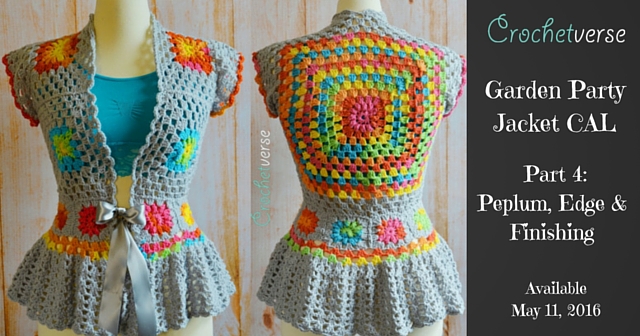
Up this week: Peplum, Edge, & Finishing
If you’ve missed the “The Info & Supply” post, you can find that: HERE
If you’ve missed “Part 1: Gauge & Squares/Pt.1”, you can find that: HERE
If you’ve missed “Part 2: Squares/Pt. 2 & Blocking”, you can find that: HERE
If you’ve missed “Part 3: Body Assembly & Sleeves”, you can find that: HERE
Enormous thanks and gratitude once again to the incredible translators and the CAL – Crochet A Long Group for their diligent work and amazing support. Below are the links for each alternate language. Simply click on your chosen language to be taken to the blog posting for this week!
Now, Let’s begin:
BE CERTAIN TO CHECK THE TIPS & TRICKS BLOG POST BEFORE YOU BEGIN THIS FINAL STEP, You may decide to alter some things slightly based on how your garment is turning out at this point. PLEASE do not forget to do this!
We have three steps this week:
Step 1: Create the peplum
Step 2: Edge the garment
Step 3: Final finishing
Onward, friends!!
STEP 1: PEPLUM
Remember how I stated earlier that this garment is mathematically designed to fit together like a puzzle? Well, this holds true in creating the peplum as well. It will be precisely TWICE the width of the body at it’s fullest point; thereby creating a nice full, flattering, and sweet ruffle to really bring the design together.
Let’s start:
With the right side of garment facing up and the bottom free edge of the (8) small square strip facing away from you, join the AC in the ch-1 space at the right corner edge with a sl st:
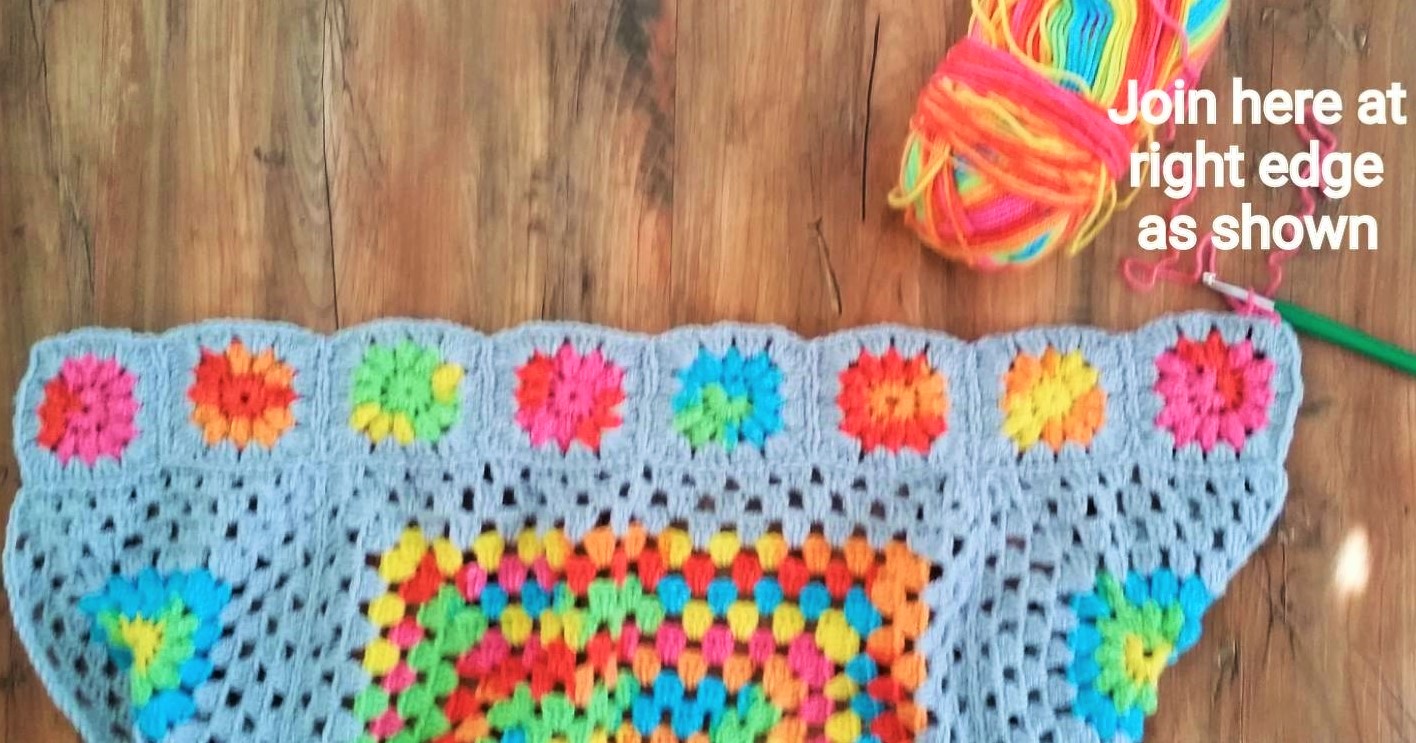
Row 1: ch 4 (counts as dc, ch 1), 3 dc in the 2nd dc of the 1st 3dc group, ch 1, *3 dc in the 2nd dc of the next 3-dc group, ch 1, repeat from * across, dc in the ch-1 sp at the left corner edge of the garment.
# of 3dc groups across (DO NOT COUNT the solitary double crochet at either edge, we are counting 3dc groups ONLY):
XXS/XS: 32, S/M: 40, L/XL: 48, 2X/3X: 56, 4X/5X: 64
***When working the dc into the turning ch-4 of each row, remember that you will work into the THIRD chain made, as this would be considered the top of the double crochet. The 4th chain made counts as the chain 1.***
Row 2: ch 4 (counts as dc, ch 1), *3 dc in the 2nd dc of the next 3dc group, ch 1, repeat from * across, dc in the last dc, tie off AC.
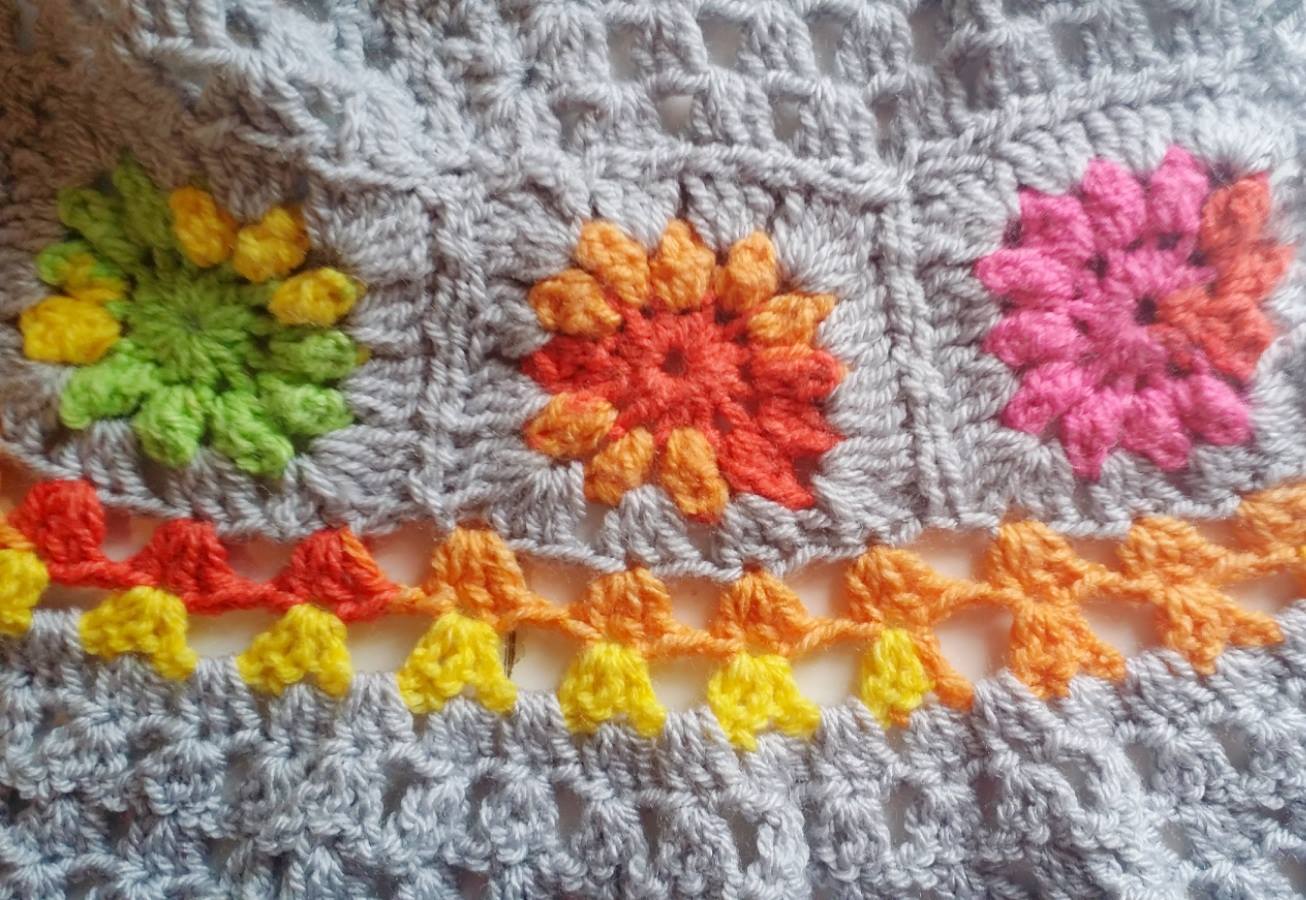
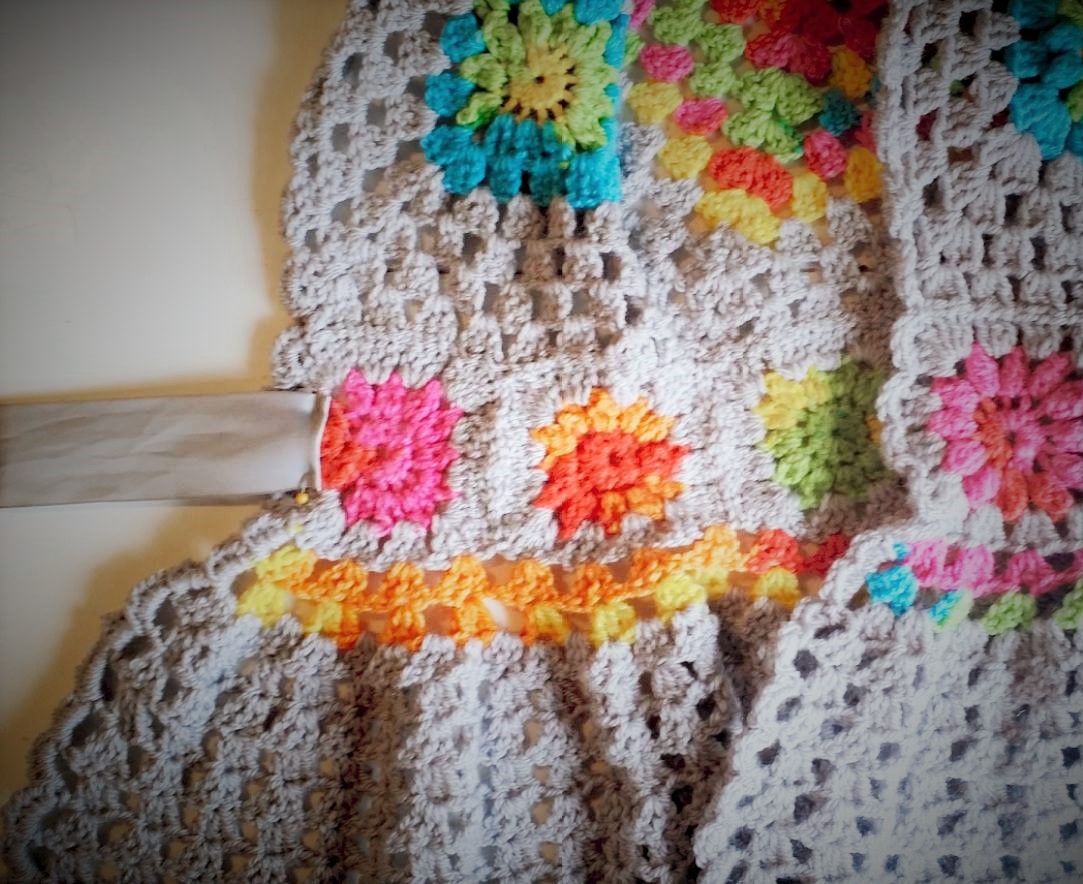
In this photo, the multi colored rows of AC, below the strip created of 8 small squares, shows how the peplum is worked into the main body. Note how the 3dc groups of the peplum are worked into the 2nd dc of the 3dc groups of the squares.
Now, we will create the fullness of the peplum by doubling the 3dc group count in row 3.
Row 3: with right side of garment facing up and row 2 just created furthest from you, join MC in the 1st dc all the way at the right edge , ch 4 (counts as dc, ch1), *3 dc in the 2nd dc of the nxt 3dc group, ch 1, 3 dc in the nxt ch-1 sp, repeat from * across until the last ch-1 space before the edge dc is reached, 3 dc in the last ch-1 space, ch 1, dc in the 3rd chain of the ch-4 at the end (remember to work into the 3rd chain of the chain 4)
# of 3dc groups across (DO NOT COUNT the solitary double crochet at either edge, only the 3dc groups.)
XXS/XS: 64, S/M: 80, L/XL: 96, 2X/3X: 112, 4X/5X: 128
Take note how this is exactly twice the number of 3dc groups you had after completing rows 1 & 2 of the peplum.
Row 4: ch 4 (counts as dc, ch 1), turn, *3 dc in the 2nd dc of the nxt 3dc group, ch 1, repeat from *, across, dc in the 3rd chain of the ch-4 on the previous row.
Row 5-11: repeat row 4, tie off for XXS/XS, S/M, L/XL, continue on for all other sizes.
Row 12-15: repeat row 4, tie off for all remaining sizes.
LENGTH CUSTOMIZATION POINT***: Here is another spot where the generous yardage estimation will come in handy. Should you desire, you can continue repeating row 4 as many times as you wish or your yarn on hand allows. Heck, make it floor length should you like! (This would DEFINITELY require more yarn that stated in the yardage requirements, BUT, it is entirely possible.) Just try it on as you go and when it reaches a length you like; tie off and carry on to the edging below! Math is seriously cool when it applies to yarn and crochet!
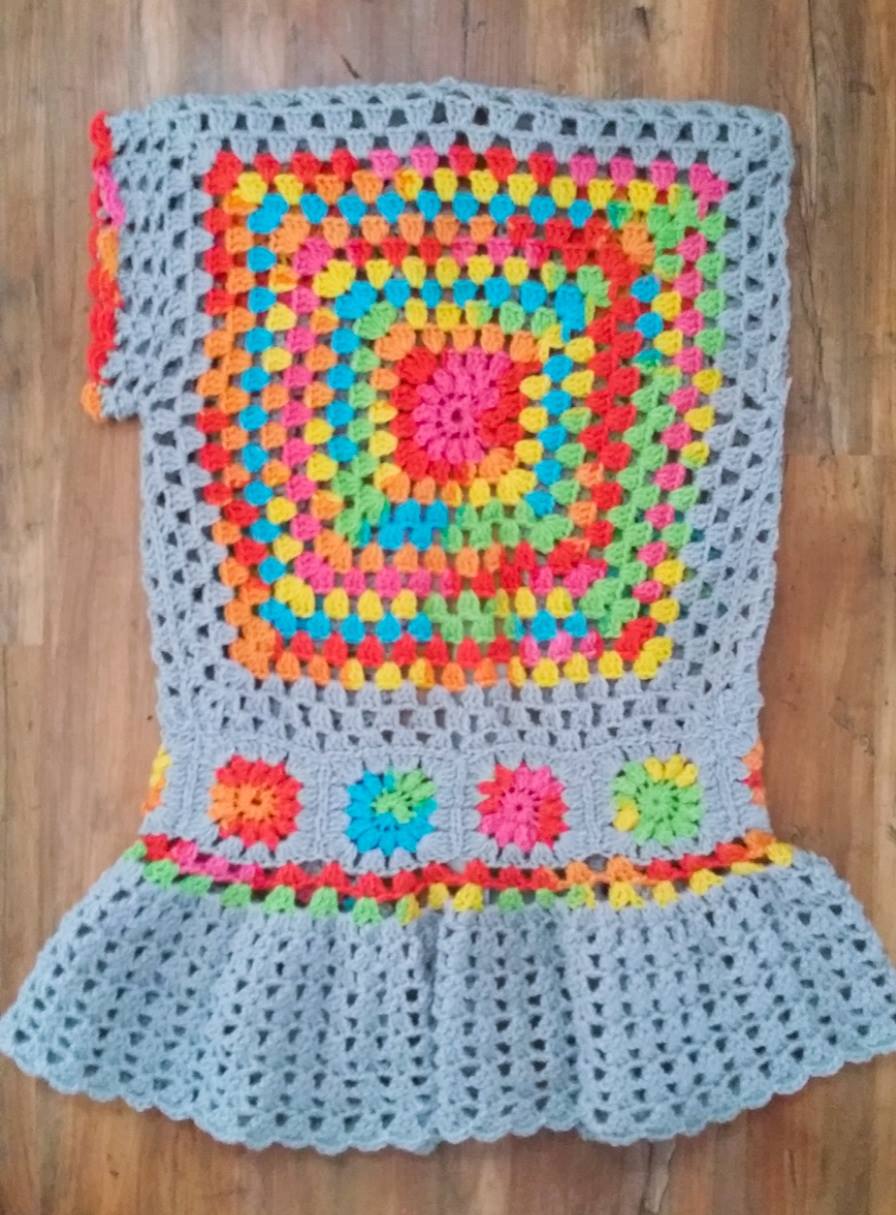
Pay no mind that this photo was taken before I completed the second sleeve, I’d like to show you the beauty of the fullness of the peplum as it floats and ruffles away from the main body section! To me, it epitomizes femininity! 🙂
STEP 2: EDGING
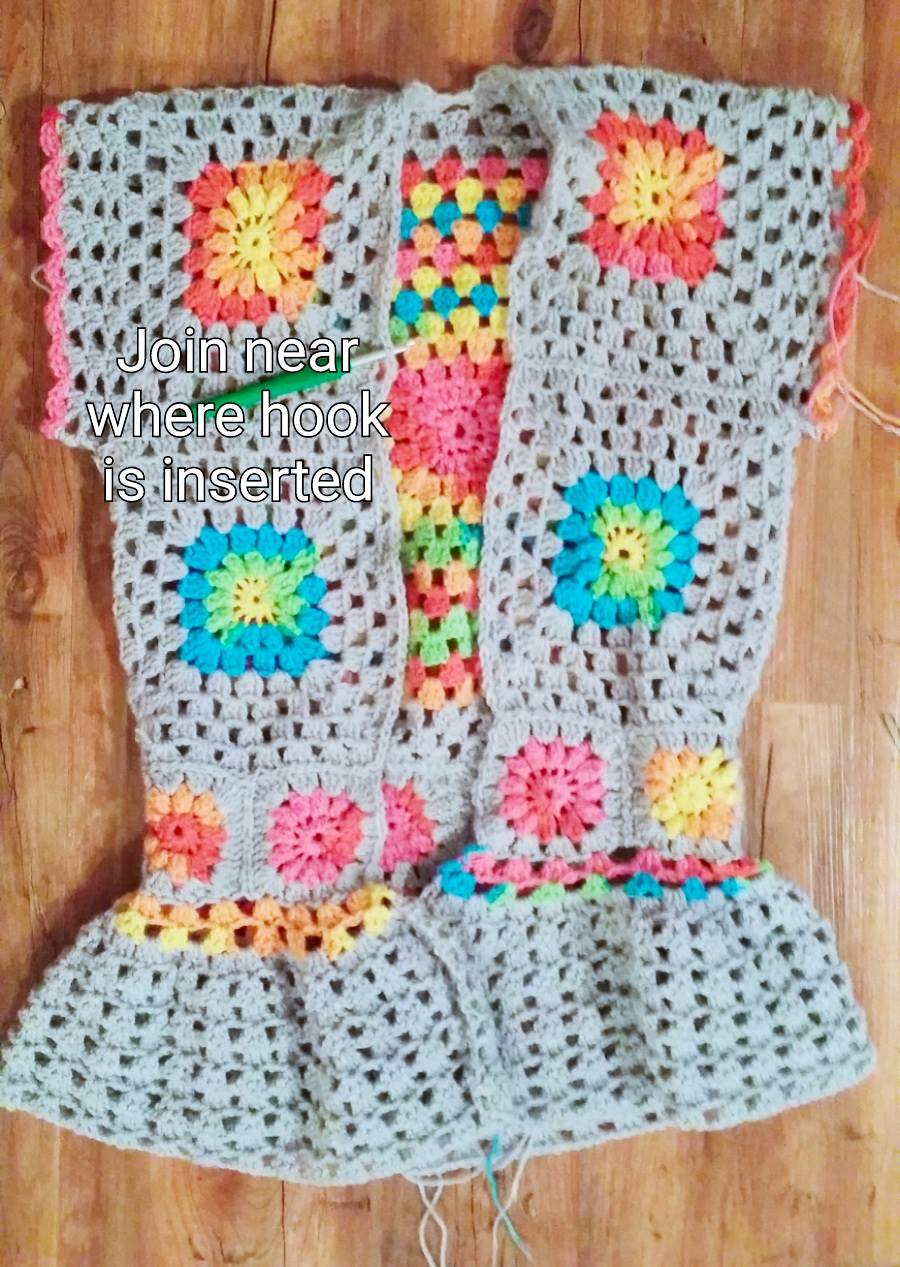
With right side facing, join MC in the 2nd dc of any 3dc group on the right edge of the garment. Anywhere on the right middle main body is fine, just avoid the peplum area edge as the pattern is slightly different there. Use the photo as a guide of a good approximation of a point to join to. (I was a bad crocheter and had not woven in my ends yet here. Shame on me!)
The edging consists of ONE ROUND ONLY, but the pattern changes slightly depending on where we are at in the garment, so the round is broken down into parts so you don’t become confused or overwhelmed as you work.
Rnd 1: (Broken down into steps)
A: ch 1 (does not count as a stitch), 4 hdc in the same st, sl st in the nxt ch-1 space, *4 hdc in the 2nd dc of the next 3dc group, sl st in the next ch-1 sp, repeat from *, until you reach the center back of the neck where the 2 panels meet.
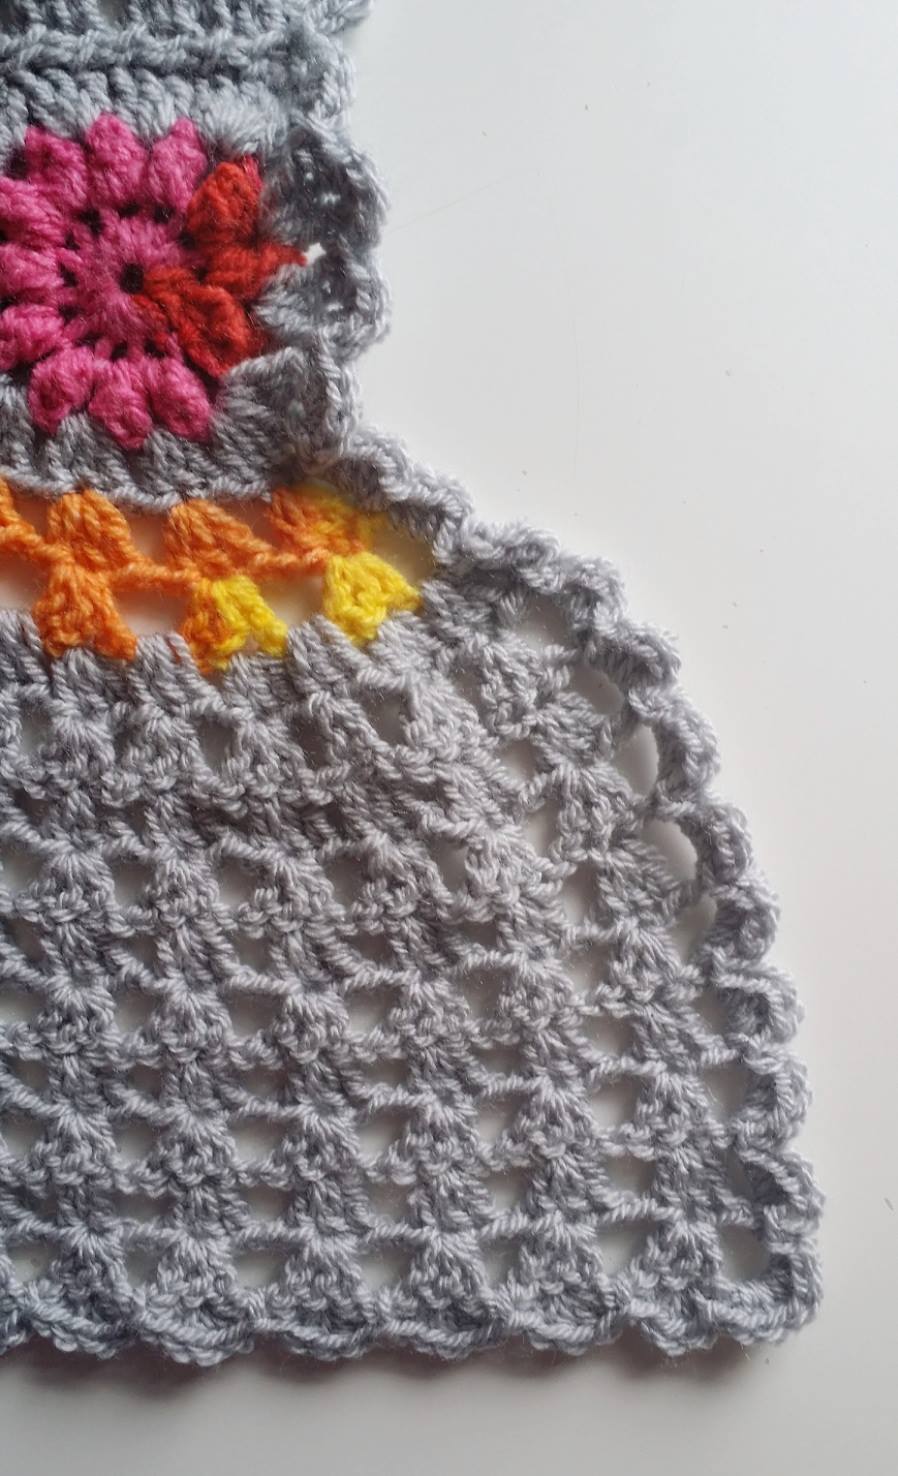
The low point of the “V” shown in the photo above is where the two front panels (made of medium squares) meet together on the large back panel. The edging will slightly come up the back of the neck when finished, giving a touch of “Victorian Elegance”, if you will, to the garment.
B: sl st in that ch-1 space on the large back square in the middle (LOW point of the “V” shown and described above), then sl st in the nxt ch-1 sp at the corner of the next medium square, resume the pattern, *4 hdc in the 2nd dc of the nxt 3dc group, sl st in the nxt ch-1 sp, continue down the side until you reach the rows that created the peplum with the solitary double crochet stitches at the edge)
* NOTE: when you reach the spot where 2 squares meet and are seamed together, work 2 sl sts: one in the corner ch-1 of the 1st square, next in the corner ch-1 of the next square, then carry on in normal pattern stitch.
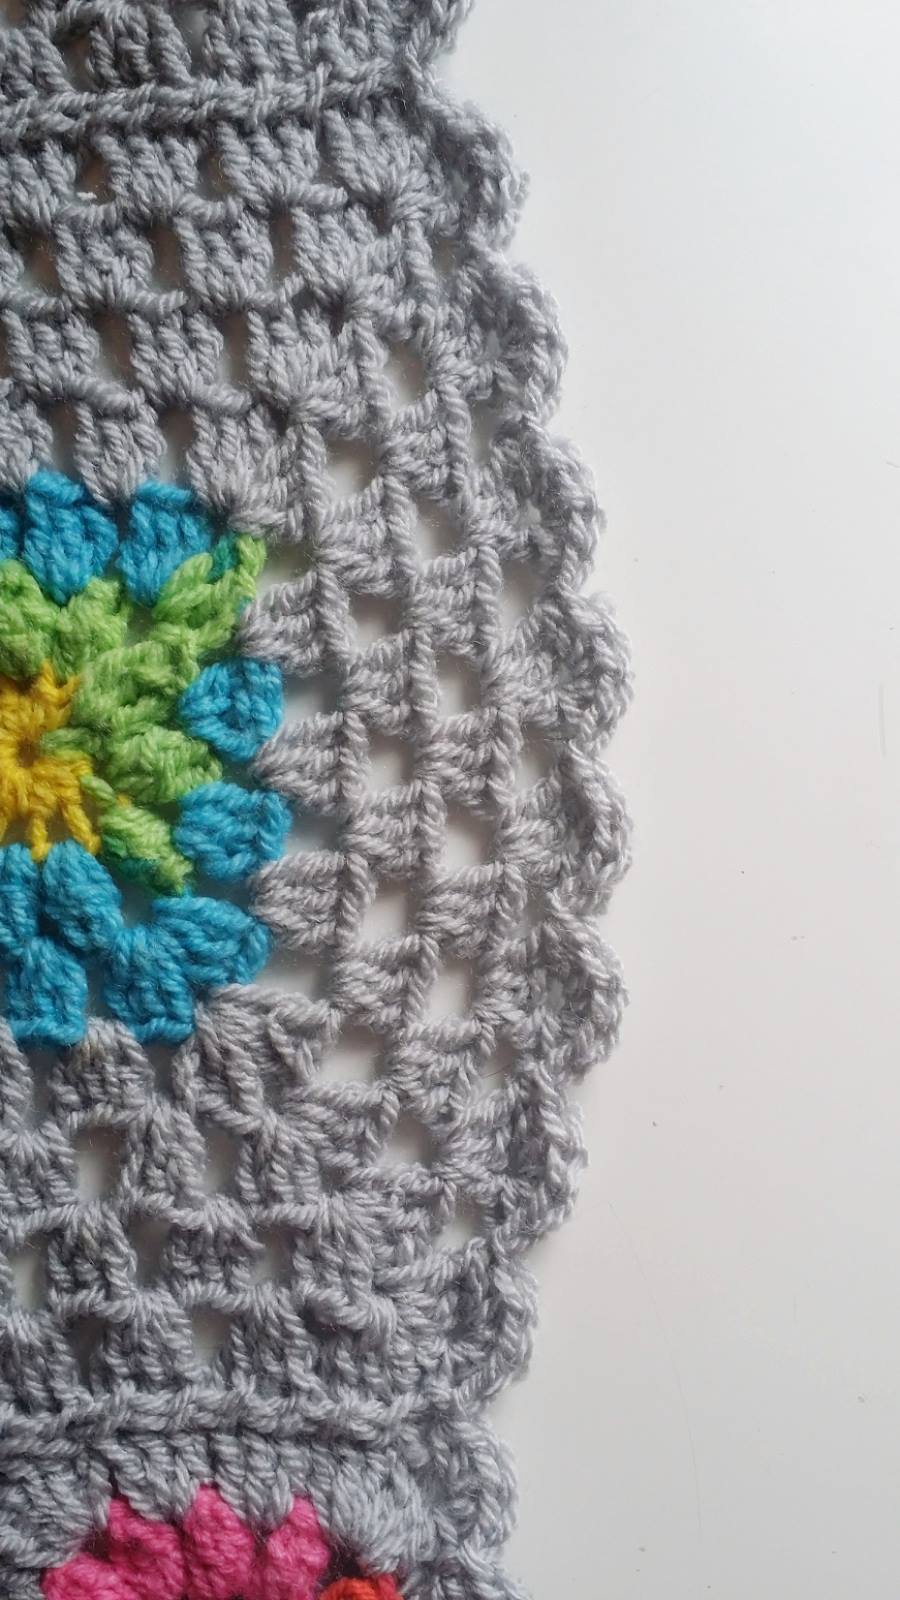
Here is a photo of the edging as it should appear on the main body, down the sides of the panels created with the medium squares:
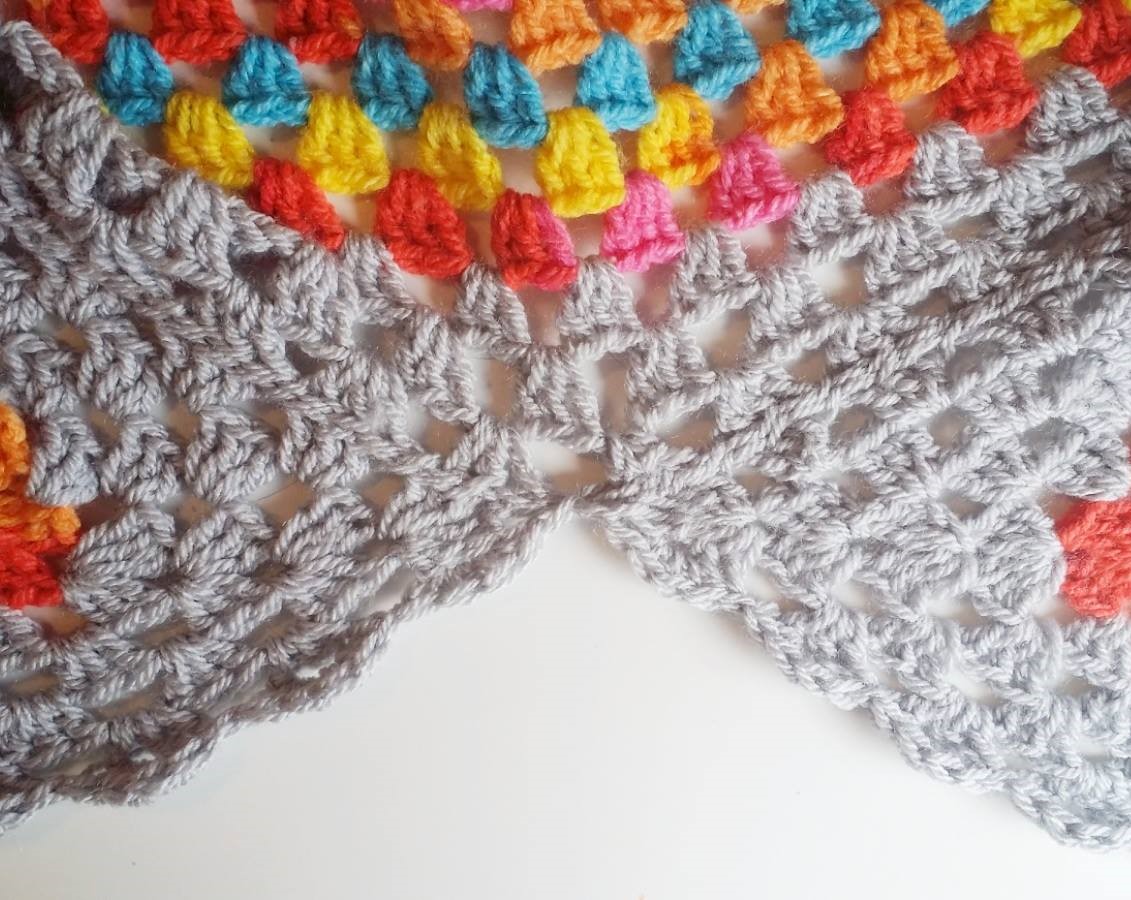
Below is a photo of how your edge round should appear down the side of the peplum, review it before we continue:
C: sl st into the ch space at the edge of the 1st peplum row, 3 hdc in the same space, sl st back into the same space again, *sl st into the next ch space at the edge of the next peplum row, 3 hdc in the space, sl st back into the same space again, repeat down the edge until one chain space remains at the bottom edge/corner.
D: sl st into the last space at the corner, 6 hdc in the same space, sl st back into the same corner space, sl st into the 2nd dc of the 1st 3dc group along the bottom edge of the peplum, 4 hdc in the same st, sl st in the nxt ch-1 sp, *4 hdc in the 2nd dc of the nxt 3dc group, sl st in the nxt ch-1 sp, * repeat from * across the bottom until one 3dc group remains.
E: 4 hdc in the 2nd dc of the last 3dc group, sl st back into the same dc, now work back up the end of the rows of the peplum as before, sl st into the corner space, 6 hdc in the same space, sl st back in the same space, *sl st into the next chain space up the edge, 3 hdc in the same space, sl st into the same space once again, repeat up the ends of the rows of the peplum until the medium square edge is reached.
F: sl st into the 2nd dc of the next 3dc group, 4 hdc in the same dc, sl st in the nxt ch-1 sp, *4 hdc in the 2nd dc of the next 3dc group, sl st in the next ch-1 space, repeat from * until you reach the 1st group of your border you created, sl st to the top of the 1st hdc made, and tie off.
STEP 3: FINAL FINISHING
HOOKS DOWN FOLKS! Our stitching is complete! Now, let’s do just a few more things to finish this beauty up!
- Weave in all remaining ends using that super secure method I have described previously.
- Pin one 24” length of ribbon (more if you want a larger bow) to the wrong side of one of the small square edges at the waist on the WRONG SIDE , as shown in the photo below. Be sure you are on the square and not the edging round, it will offer a bit more stability for the ribbon. I’ve rolled the edge of the ribbon under about 1/4 to 1/2″ twice, so the end has a little thickness to it, and therefore, stability. You will want to be sure it is pinned so the RIGHT SIDE (if your ribbon is not double sided) faces out on the right side of the garment. The wrong side should be facing the inside of the garment. Using needle and coordinating sewing thread, stitch in place very securely. Use fray check on the ends of the ribbon if needed to prevent fraying. Repeat for the opposite side in the same position on the other small square at the edge.
NOW, GO FIND YOUR NEAREST MIRROR!
Put on your newly completed piece of wearable art and stand there in awe of your amazing talent. YOU did this, YOU made clothing with your own two hands, from nothing more than string and hook. THAT IS IMPRESSIVE, to say the least!
All I ask is that you post photos of your lovely creations on the FACEBOOK PAGE HERE!
I’m so excited to see all the color combinations you all have come up with!
I truly deeply hope you have enjoyed this crochet along. It has been nothing short of a delight for me. I am very passionate about crochet and sharing knowledge and designs with all of you is what makes my world go round. Thank you for following along. I hope you wear your new Garden Party Jacket in good health, wealth, and happiness. Until, we meet again for a future CAL….
Much Love & Yarn,
Stephanie
Much Love & Credit Given to the Test Team: Nichole Chapel, Jamie Cowley, Janean Craig, Tammii Crosland, Maggie Diaz, Katherine Popowski, Amber Sarita, & Heather Sutton
The information and photos in this posting are the sole copyrighted property of Crochetverse©2016. Please do not copy and paste any of the information contained within either electronically, verbally, or written in part or in whole. Instead, please share the DIRECT LINK to this posting only, and if you do, I thank you for sharing. You of course may sell anything you make from this pattern that you have made with your own two hands, no contract labor or mass productions are permitted. If you credit Crochetverse as the designer when you sell, that is greatly appreciated. Thank you so much for respecting the hard work that goes into patterns, so that we may all remain creative 🙂
