


Welcome back! Let’s pause and talk about how amazing and fun it is to wait for the new color to emerge from your yarn cake of Wolltraum! I kid you not, I stayed up way too late a few times just to get to the next color gradient in the yarn! This week we will create the armholes and finish up the shawl body.
If you missed the Info/Supply/Gauge post, you can find that here: https://crochetverse.com/lattice-rose-info-supply/
If you missed Week 1 & 2: Main Shawl – Start & Middle, you can find that here: https://crochetverse.com/lattice-rose-week-1-2/
Here are your super amazing translations available for this week:
LATTICE ROSE WEEK 3: AFRIKAANS
Let’s dive right in:
Stitch Key:
ch(s): chain(s) sk: skip
dc: double crochet sp(s): space(s)
nxt: next st(s): stitch(es)
sc: single crochet sl st: slip stitch
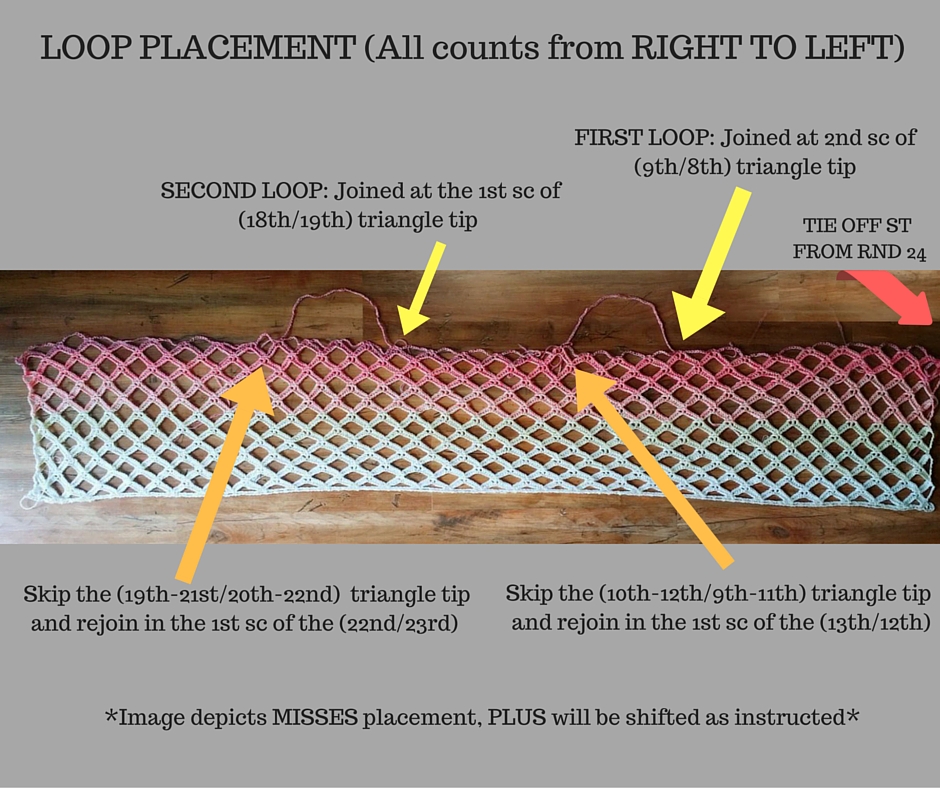
NOW WE WILL CREATE THE SPACES FOR OUR ARMHOLES!
The image shows the overview of what we will be doing here:
Here is where you will decide if you would like the misses or plus size across the back. First up, decide which size you will make.
I have been conservative stating 2X, I feel it will fit comfortably a bit larger, but I am going to give you measurements so YOU may decide for yourself if this garment will fit you and which size you should choose.
The limiting measurement of the garment is the “crossback” and is measured armpit crease to armpit crease across the back. Do not stretch the tape, simply lay it across the back. If you plan to wear the garment over other clothing, you will want to measure with something similar on your body so that is added in to be sure it is going to be comfortable to you. Measure this “crossback” as shown in this image:
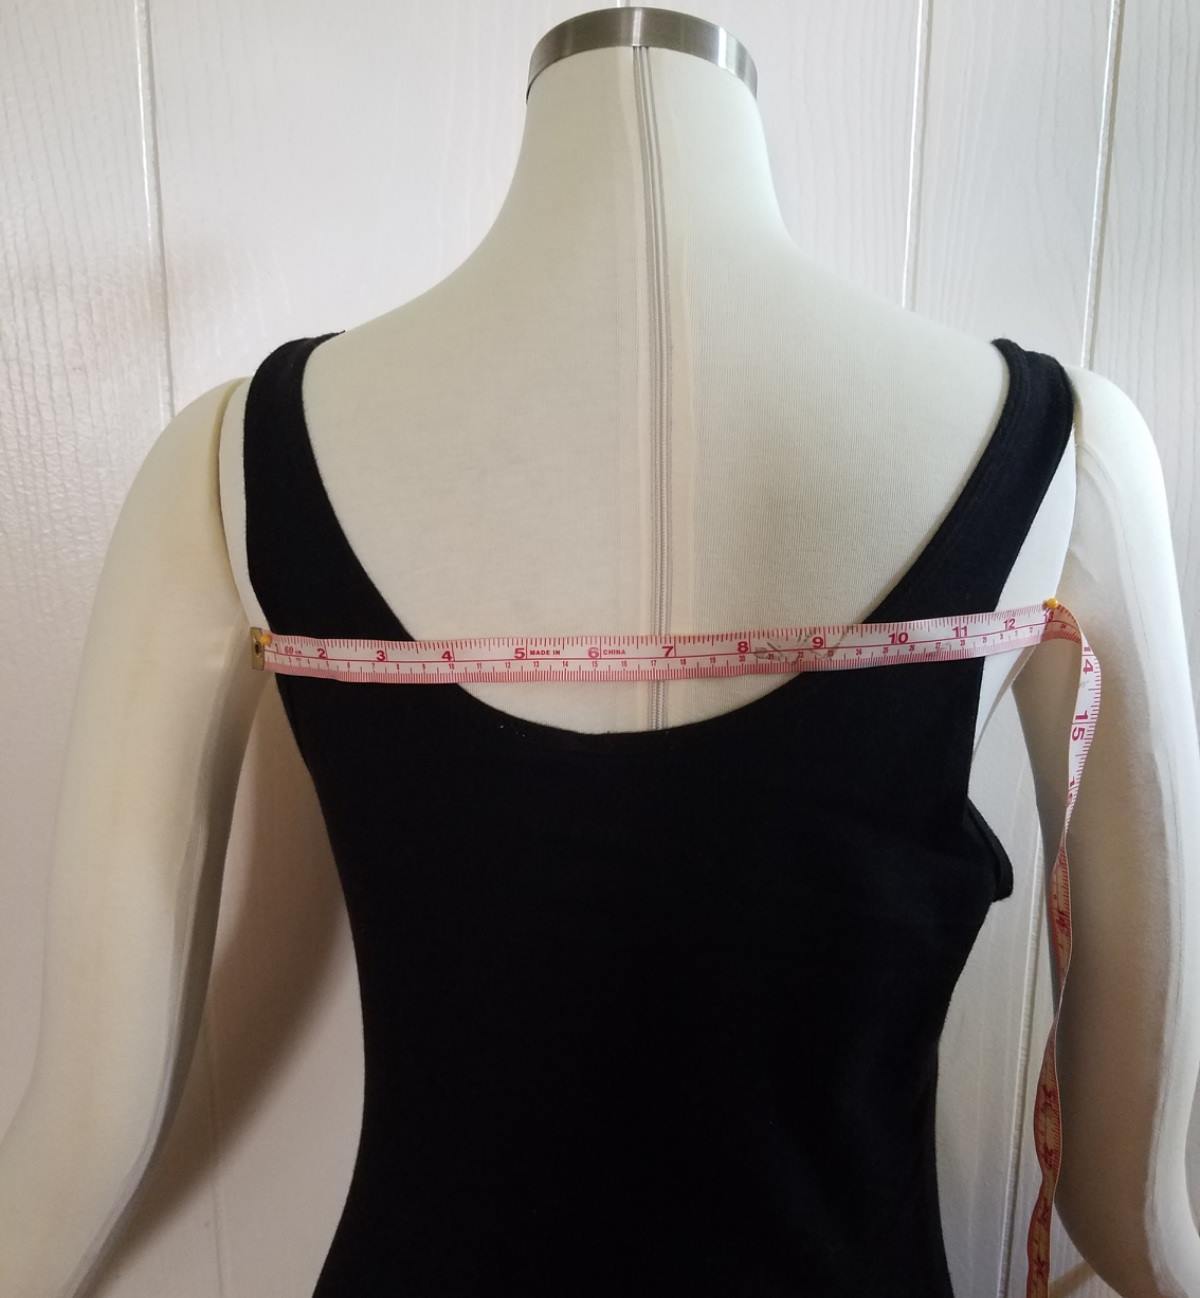
The measurement shown above on the finished garment when stretched firmly is:
(These are the MAXIMUM measurements. When just draped on the body, it is smaller of course. But the fabric is very open and stretchy, allowing us a larger range of sizes to fit)
Crossback: Approx 18″ for the Misses and Approx 24″ for the Plus
Using those measurements, you can now determine if this will fit you in a manner you like. I have had 4X women with a cross back of 23” and say yes to the design. I have had 2x women with a 26” cross back and say no to the design. Every person’s body is different, so the measurements are given so you may decide.
***The fabric is QUITE stretchy, if you are between sizes or close, you may want to size DOWN.
The changes in the pattern are shown as (MISSES, PLUS). The ONLY difference between the two is going to be the distance across the back between the arm holes. Go through the steps and highlight the instruction that pertains to your size if you’d like.
FIRST ARMHOLE:
*Position the piece so the tie off stitch you just did in Row 24 is at the top right corner.
Loop #1: Rejoin the yarn with a sl st in the 2nd sc at the tip of the (9th/8th) triangle in from the right edge, ch 47, sl st in the 1st sc at the tip of the (13th/12th) triangle from the right, skipping the
(10th-12th/9th-11th) triangle tips in between, tie off.
SECOND ARMHOLE:
Loop #2: Keeping the garment positioned as in step 1 above and counting again from right to left, rejoin the yarn with a sl st in the 2nd sc in the (18th/19th) triangle tip, ch 47, sl st in the 1st sc at the tip of the (22nd/23rd) triangle from the right, skipping the (19th-21st/20th-22nd) triangle tips in between, tie off.
NOW, we resume to the pattern stitch and ROWS to create the top edge of the shawl.
NOTE: Row 25 is broken down into steps to make it easier to follow along.
Row 25: Rejoin your yarn with a sl st in the SAME st (the quintuple stitch) as the tie off at the end of Row 24, Ch 1, sc in same st, dc in nxt 5 chs, sc in nxt ch-2 sp, *dc in 1st 5 chs of the nxt ch-11 loop (again be sure you don’t miss that 1st one that can get scrunched), ch 2, dc nxt ch, ch 2, dc in the last 5 chs of the same ch-11 loop, sc in nxt ch-2 space, repeat from *, until you complete the sc in the last ch-2 sp before you chained 47 to create the armhole
Working in the 1st chain-47 loop: **dc in the nxt 5 chs, ch 2, dc in the nxt ch, ch 2, dc in the nxt 5 chs, sl st in the nxt ch, repeat from **, TWO TIMES MORE, dc in the nxt 5 chs, ch 2, dc in the nxt ch, ch 2, dc in the last 5 chs of the ch-47, sc in the nxt ch-2 space on the main body of the shawl
Working across the space between the ch-47 loops: *dc in 1st 5 chs of the nxt ch-11 loop, ch 2, dc nxt ch, ch 2, dc last 5 chs of the same ch-11 loop, sc in nxt ch-2 space*, repeat from *-*until you complete the last sc in the last ch-2 sp before the 2nd ch-47 loop.
Working across the 2nd ch-47 loop: **dc in the nxt 5 chs, ch 2, dc in the nxt ch, ch 2, dc in the nxt 5 chs, sl st in the nxt ch, repeat from **, TWO TIMES MORE, dc in the nxt 5 chs, ch 2, dc in the nxt ch, ch 2, dc in the last 5 chs of the ch-47, sc in the nxt ch-2 space on the main body of the shawl
Working across the remainder of the body of the shawl: *dc in 1st 5 chs of the nxt ch-11 loop, ch 2, dc nxt ch , ch 2, dc in the last 5 chs of the same ch-11 loop, sc in nxt ch-2 space, repeat from * to just before last ch-11 loop is worked, dc in 1st 5 chs, ch 2, dc in the nxt ch, ch 2, dc in the last 5 chs of the same ch-11 loop, sc in the nxt ch-2 sp, dc in the nxt 5 chs of the ch-13 loop of the previous row, sc in nxt ch, leaving the remaining chains unworked.
Row 26: Ch 1, turn, sc in same st, *ch 11, sc in nxt ch-2 sp, ch 2, sc in nxt ch-2 sp, repeat to just before the last ch-11 loop is worked, ch 11, sc in last sc at end.
*TIP: When you are working this row across the newly created armhole area, be sure you do not twist the armhole as you work across it*
Row 27: Ch 1, turn, sc in same st, * dc in the 1st 5 chs of the nxt ch-11 loop, ch 2, dc in nxt ch, ch 2, dc in last 5 chs of the same ch-11 loop, sc in the nxt ch-2 sp, repeat from *, until you have one ch-11 loop remaining, dc in 1st 5 chs of the ch-11 loop, ch 2, dc in nxt ch, ch 2, dc in the last 5 chs of the same ch-11 loop, sc in last sc of the row.
Row 28: Ch 13, turn, sc in the 1st ch-2 sp, ch 2, sc in the nxt ch-2 sp, *ch 11, sc in nxt ch-2 sp, ch 2, sc in the nxt ch-2 sp, repeat from * to just before last loop is worked, ch 11, sc in nxt ch-2 sp, ch 2, sc in nxt ch-2 sp, ch 5, quintuple stitch in last sc.
Row 29: Ch 1, turn, sc in same st, dc in nxt 5 chs, sc in nxt ch-2 sp, *dc in 1st 5 chs of the nxt ch-11, ch 2, dc nxt ch, ch 2, dc last 5 chs of the same ch-11 loop, sc in nxt ch-2 space, repeat from * to just before last ch-13 loop is worked, dc in the nxt 5 chs of the ch-13 loop from the previous row, sc in nxt ch, leaving the remaining chains unworked.
Rows 30-33: Repeat Rows 26-29
Row 34: (Be sure to chain loosely so as not to bind your edge, if you have a hard time doing that, go UP one hook size for this row ONLY) Ch 1, turn, sc in same st, ch 2, sc in the nxt dc, ch 5, sc in the nxt ch-2 sp, ch 2, sc in the nxt ch-2 sp, *ch 5, sc in the nxt ch-2 sp, ch 2, sc in the nxt ch-2 sp, repeat from * across until you are at the top of the last triangle tip just before the partial one at the end, ch 5, skip the nxt 5dc/sc/4dc (aross the low-V section), sc in the nxt dc, ch 2, sc in the sc at the end of the row.
Row 35: (If you switched to a size bigger hook for Row 34, don’t forget to switch back now) Ch 4 (counts as dc, ch 2), turn, skip the ch-2 and dc in the nxt sc, ch 2, sk 2 chains, dc in the nxt ch, ch 2, sk nxt 2 chs, dc in the nxt sc, *ch 2, sk the nxt 2 chs, dc in the nxt sc, ch 2, sk nxt 2 chs, dc in the nxt ch, ch 2, sk nxt 2 chs, dc in the nxt sc, repeat from * across until you have (1) ch-2 and sc remaining, ch 2, sk the 2 chs, dc in the last sc.
AWWW BUDDY…take a deep breath and MARVEL at your work so far! The main shawl body (except edge) is DONE! I couldn’t stop staring at the slow gradient in all its glory. I hope you feel the same way!
You don’t need to block just yet, we will do that next week! We will have a smaller amount of work to do: Edge & Block. This will also give you a chance to catch up should life have gotten in the way of crochet time. It happens to all of us!! Keep truckin’ along, it’s really starting to take shape now!!
See you next week where for Week 3: Edge & Block
Until then….
Much Love & Yarn,
Stephanie
The information and photos in this posting are the sole copyrighted property of Crochetverse©2016. Please do not copy and paste any of the information contained within either electronically, verbally, or written in part or in whole. Instead, please share the DIRECT LINK to this posting only, and if you do, I thank you for sharing. You of course may sell anything you make from this pattern that you have made with your own two hands, no contract labor or mass productions are permitted. If you credit Crochetverse as the designer that is greatly appreciated!
