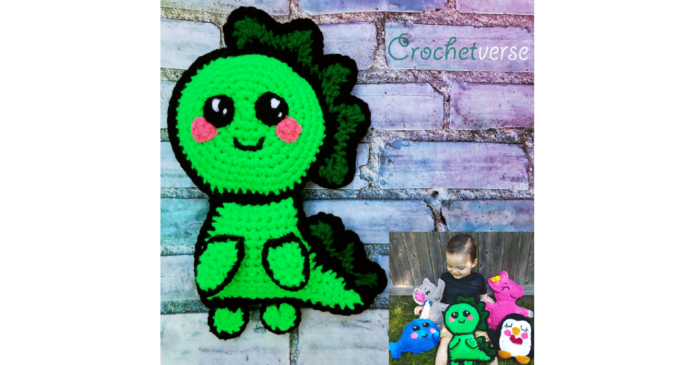
There is a new kid on the block today in my Ragdoll Menagerie!!
He marks the FIFTH free ragdoll pattern! Find all the others in my Ravelry, linked below!
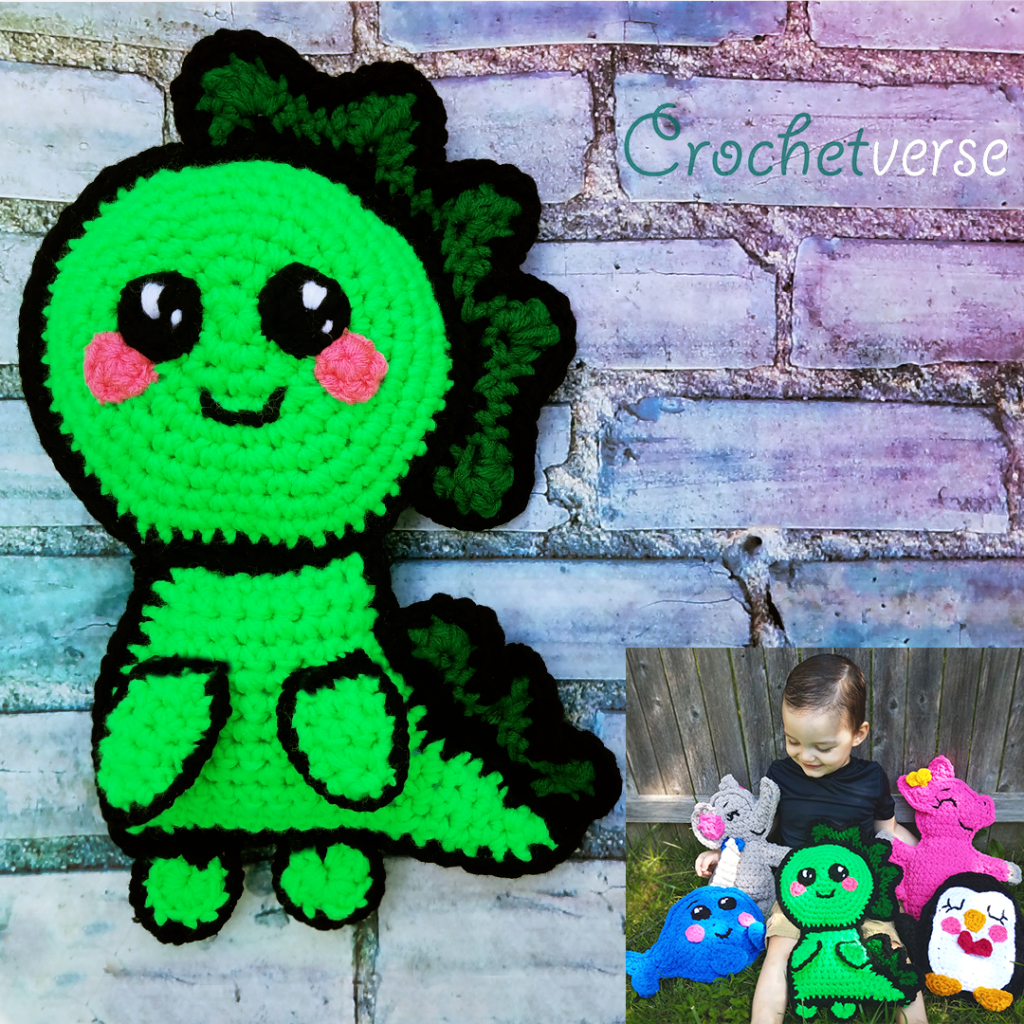
This little DINOSAUR almost looks like he is going to 3D pop out of your screen due to his black edges! I feel like I colored him on a coloring book page and he just POPPED out to life. I love him!
Best part?! Every ragdoll you see in the image (elephant, piggy, penguin, narwhal, and dino) are FREE patterns! You can access them all here on crochetverse.com OR you can save them to your Ravelry library so you don’t misplace them! They can all be found here:
http://www.ravelry.com/designers/stephanie-pokorny
Let’s get to the pattern for this latest baby! If you have questions, message me on my Facebook page here:
http://www.facebook.com/Crochetverse
And we are OFF!
Materials:
-300 yards bright green worsted weight yarn (Shown: Red Heart Super Saver Gloworm)
-100 yards dark green worsted weight yarn (Shown: Red Heart Super Saver Hunter Green)
-75 yards black worsted weight yarn (Shown: Red Heart Super Saver Black)
– 20 yards or less of pink and white worsted weight (Shown Red Heart White and Pretty n Pink)
– Size N (9mm) crochet hook
– Size H (5mm) crochet hook
– scissors, tape measure, stitch marker of choice, needle for ends
– polyfil for stuffing
Yarn Sub:
The worsted weight yarn is held and worked TRIPLE strand for the entire piece, except where noted. You can sub in one strand of super bulky yarn in place of the three worsted. An example would be Bernat Blanket.
Gauge:
Not imperative, but you want to be sure your stitches are nice and tight withought holes or gapping. The stuffing will show through if they are. I tend to crochet on the tighter side, so you MAY need to drop a hook size or two to be sure your stitches are tight and firm.
Finished Size:
About 16” tall by 10” wide
Notes for Success:
The ENTIRE pattern is worked with the N hook, EXCEPT for the arm and leg edge rounds. Those are worked with the H hook. The rounds are NOT joined or turned throughout the piece unless you are specifically told. You should mark the 1st or last st of each round to keep track.
Stitch Key:
sl st slip stitch ch chain
sc single crochet nxt next
hdc half double crochet dec decrease
dc double crochet tc triple/treble crochet
st stitch
Instructions (US Terms):
Head Panel (Make 2):
With 3 strands of bright green, make a magic circle, ch 1:
*Do not turn or join rounds throughout unless specifically instructed. The piece is worked in a spiral.
Rnd 1: make 6 sc in the ring. (6)
Rnd 2: 2 sc in each sc around. (12)
Rnd 3: (sc in nxt sc, 2 sc in nxt sc) six times total. (18)
Rnd 4: (sc in nxt 2 sc, 2 sc in nxt sc) six times total. (24)
Rnd 5: (sc in nxt 3 sc, 2 sc in nxt sc) six times total. (30)
Rnd 6: (sc in nxt 2 sc, 2 sc in nxt sc, sc in nxt 2 sc) six times total. (36)
Rnd 7: (2 sc in nxt sc, sc in nxt 5 sc) six times total. (42)
Rnd 8: (2 sc in nxt sc, sc in nxt 6 sc) six times total. (48)
Rnd 9: (sc in nxt 2 sc, 2 sc in nxt sc, sc in nxt 5 sc) six times total, sl st to nxt sc, tie off. (54)
JOIN:
Position the two panels so both wrong sides are facing in and both right sides are facing out: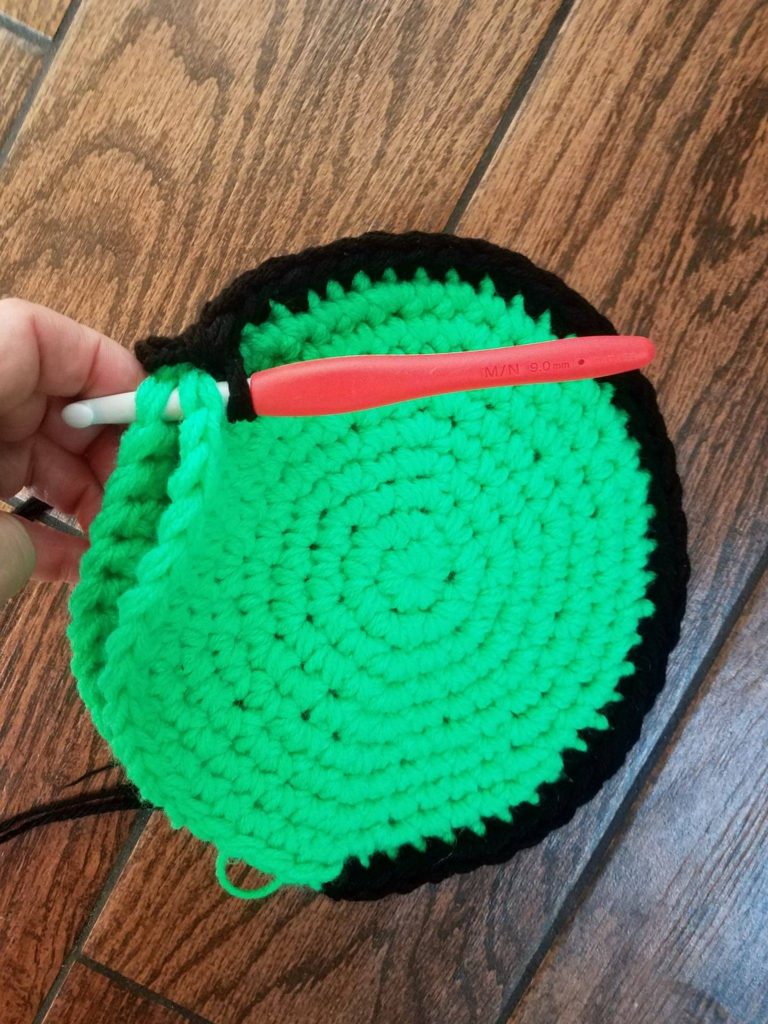
Insert hook through both panels, and join 3 strand of black with a sl st:
Rnd 1: ch 1, working through BOTH panels matching stitch for stitch, sc in the same st as the join and in each sc around, sl st to the 1st sc made, tie off. ADD STUFFING just before you complete the last few stitches. (not too much, just to give it some body, but still remain fairly flat)
Body/Tail Panels (Make 2):
With 3 strands of bright green, ch 10:
Row 1: sc in 2nd ch from hook and each rem ch across. (9)
Row 2: ch 1, turn, sc in each sc across. (9)
Row 3: ch 1, turn, 2 sc in the 1st sc, sc in the nxt 7 sts, 2 sc in the last sc. (11)
Row 4: ch 1, turn, sc in each sc across. (11)
Row 5: ch 1, turn, 2 sc in the 1st sc, sc in the nxt 9 sts, 2 sc in the last sc. (13)
Row 6-10: ch 1, turn, sc in each sc across. (13)
Row 11: ch 1, turn, sc dec over 1st 2 sc, sc in nxt 9 sc, sc dec over last 2 sc. (11)
Row 12-13: ch 1, turn, sc in each sc across, do NOT tie off. (11)
Continue to create tail:
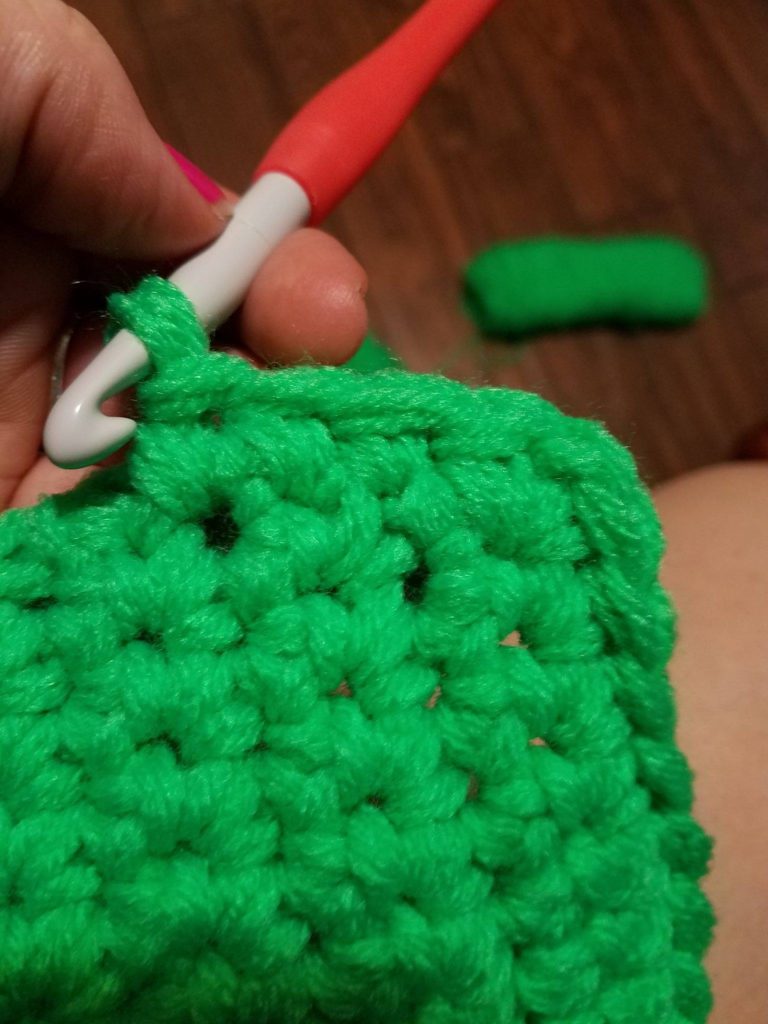
This image shows row 14 as it is worked in the ends of the rows 13-10.
Row 14: ch 1, now sc in the end of the last 4 rows made (row 13, 12, 11, 10)
Row 15-16: ch 1, turn, sc in each sc across. (4)
Row 17: ch 1, turn, sc dec over 1st 2 sc, sc in nxt 2 sc. (3)
Row 18: ch 1, turn, sc in 1st sc, sc dc over last 2 sc. (2)
Row 19: ch 1, turn, sc in each sc across. (2)
Row 20: ch 1, turn, (sc dec over 2 sc). (1)
Join:
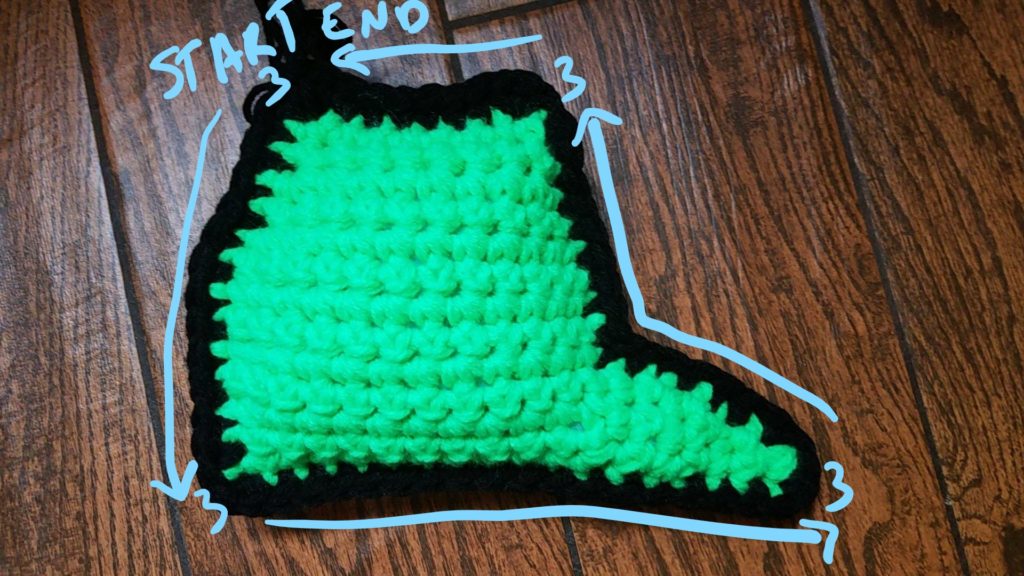
Lay the 2 body/tail panels on top of each other, both wrong sides facing in, join 3 strands of black yarn in the position shown in the image and ch 1:
Rnd 1: 3 sc in the same corner st as the join, make 1 sc in each st and end of row around as shown in the image, work 3 sc at the corners and tip of the tail as marked in the image, sl st to the 1st st, tie off. Stuff lightly just before the last few stitches are worked shut, leave a long tail about 24” to seam to head.
Head Spikes (Make 2):
With 3 strands of dark green, ch 24:
Row 1: sc in the 2nd ch from the hook, *(hdc, 2 dc, hdc) all in the nxt st, sl st in the nxt 4 sts (loosely), repeat from * three times more, (hdc, 2 dc, hdc) in the nxt st, sc in the nxt st, tie off.
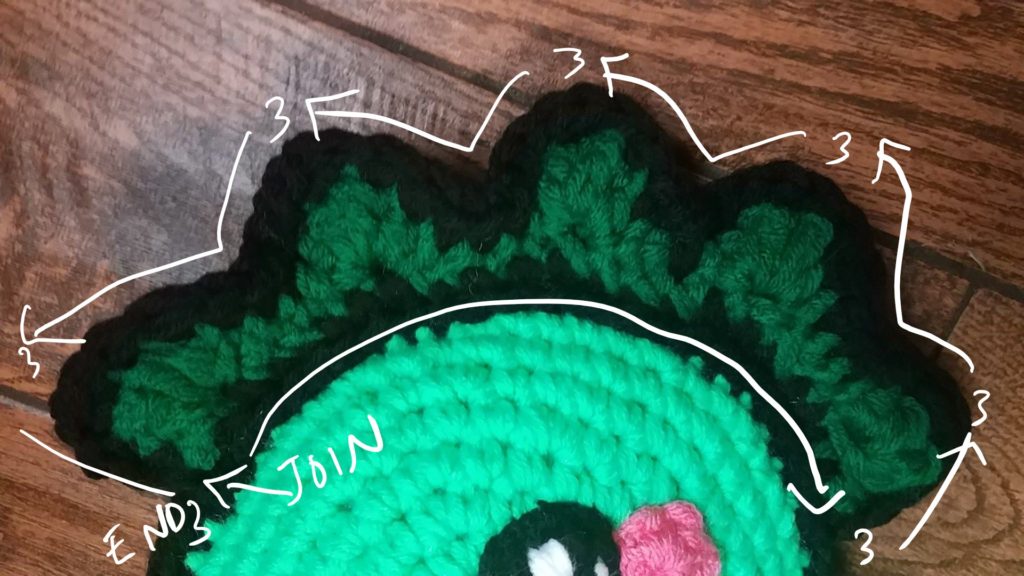
Join: Position the head spike pieces so that both wrong sides are facing in and touching, join 3 strands of black yarn with st st where the image says join, ch 1:
Rnd 1: working through both pieces, sc in the same st and in each st and row end around, work 3 sc at the corners and tips of each spike, sl st to the 1st sc made, tie off leaving a long tail to sew to head later. Tuck the tails in as you work, there is no need to stuff additionally.
Tail Spikes (Make 2):
With 3 strands of dark green, ch 12:
Row 1: sc in 2nd ch from the hook, *(sc, 2 hdc, sc) all in the nxt st, sl st in the nxt 3 sts (loosely), repeat from * one time more, (sc, 2 hdc, sc) all in the nxt st, sc in the last st, tie off.
Join: Join the tail spike pieces in the same manner as the head spikes.
Cheeks (Make 2):
With 3 strands of pink, make magic circle, ch 1:
Rnd 1: (sc, 2 hdc, sc, sl st) all in the ring, do not join the round, tie off leaving a long tail to sew to face later.
Eyes (Make 2):
With 3 strands of black, make magic circle, ch 1:
Rnd 1: make 8 sc in the ring, sl st to the 1st sc made, tie off leaving a long tail to seam to face.
Using a single strand of white and a needle we will now stitch on the eye “sparkles”. There will be one larger in the 1 o’clock position and will be stitched around 4-5 times. The second one will be in about the 4 o’clock position and will be stitched around only 2 times and be shorter in length by about half. Insert your needle through the plies of the yarn if needed to get the positioning correct. I then tied ALL the tails (except just ONE of the longest black one which will be used to sew to the face) in a knot behind the eye and trimmed them as they will be hidden behind the eye.
Arms (Make 4):
With 3 strands of bright green, ch 4:
Row 1: sc in 2nd ch from hook and in each rem ch across. (3)
Row 2-3: ch 1, turn, sc in each st across.
Row 4: ch 1, turn, sc dec over 1st 2 sc, sc in last sc. (2)
Row 5: ch 1, turn, sc dec over the 2 sc, ch 1, tie off. (1)
As you have joined before, place two arm pieces on top of each other, both wrong sides facing in and touching, BUT only join ONE strand of black yarn and for this part only, drop to an H hook, ch 1:
Join: make 2 sc in each st and row end around, make 4 sc at each corner and tip of the arm, sl st to the 1st st made, tie off leaving a long tail to sew to body. Tuck the tails in the arm as you work, there is not need to stuff them additionally.
Feet (Make 2):
With 3 strand of bright green, make a magic circle, ch 1:
Row 1: (sc, dc, sl st) 3 times in the ring, sc in the ring once more, do not join the round, tie off.
With the right side of round 1 facing up, join ONE strand of black in the BACK LOOP ONLY (the one to the back of your work) of the 1st sc made on round 1, ch 1:
Edge: make 2 sc in each sc BACK LOOP ONLY across row 1, make 4 sc in each corner and evenly space 6 sc across the bottom edge, sl st to the 1st sc made, tie off leaving long tail to seam to body.
ASSEMBLY:
Step 1: Sew Head to Body. Using the long tail from the body join round, sew the head to the top neck portion of the body (opposite the tail). I overlapped the head black edge round OVER the black edge round of the body. It added a bit of stability (though the neck on this baby is wobbly still because he is a ragdoll ❤) I stitched back and forth 3 times to reinforce the seam.
Step 2: Sew Eyes to Face. Using the long black tail and the main pattern photo as a guide, sew he eyes on to either side of the face. Be sure to position the large sparkle in about the 1 o’clock position and the smaller sparkle in the 4 o’clock position for BOTH eyes.
Step 3: Sew Cheeks to Face. Using the long tail from the cheeks, sew the right cheek to the lower right corner of the right eye and the left cheek to the lower left corner of the left eye. Refer to the main pattern photo for placement. The non-joined side (where the 1st and last stitches of the cheek were made) should butt right up against the eye.
Step 4: Sew on Mouth: Use a doubled strand of black and a needle and refer to the photo as a guide and sew on the mouth.
Step 5: Sew Spikes on Head. Use the main pattern photo as a guide and using the long tail from the join round, position the spikes on TOP of the edge round of the head (overlap them as you did for the neck). Sew the spikes into position, I went back and forth twice to secure.
Step 6: Sew Spikes on the Tail. Using the tail from the join round of the spikes seam them on top of the join round of the tail area. They do cross over each some. I went ahead and played into this and ran a stitch between spikes so they overlapped nicely and evenly.
Step 7: Sew Arms to Body: Using the tail from the join round, sew the arms to the body, the pointy ends face the feet. Only sew the top edge of them so they float freely from the body otherwise.
Step 8: Sew Legs to Body: Using the tail from the join round, sew the legs placing the join round of the legs on top of the join round of the bottom edge of the body.
Step 9: Weave in any remaining ends.
Thank you so much for creating along with me!!
Please post projects and questions to any of the social media sites below, and/or email me at info@crochetverse.com
Much Love and Yarn, Stephanie
Follow on Facebook Here! http://www.facebook.com/crochetverse
Follow on Instagram Here! Handle Name: Crochetverse
Follow on Ravelry Here! Shop Name: Crochetverse
Follow on Pinterest Here! Handle Name: Crochetverse
Follow on YouTube Here! Channel Name: Crochetverse
Follow on Twitter Here! Handle Name: Crochetverse
Follow on Etsy Here! Shop Name: Crochetverse
The information and photos in this posting are the sole copyrighted property of Crochetverse©2017. Please do not copy and paste any of the information contained within either electronically, verbally, or written in part or in whole. Instead, please share the DIRECT LINK to this posting only, and if you do, I thank you for sharing. You of course may sell anything you make from this pattern that you have made with your own two hands; no contract labor or mass productions are permitted. If you credit Crochetverse as the designer, that is greatly appreciated!



I have just put the ragdoll patterns into my favorites on their ad. These will work up so quickly for me to give as gifts that are needed. I also give stuffed animals to an organization that has to go into homes to take children out of bad environments, sometimes during the night. These will be very much appreciated by all!
Thank you for the free patterns to make them and be given the opportunity to go to children needing a little comfort.
Also, if you have more coming up, please let me know. I do go onto Ravelry quite often also.
Thank you so much, that is wonderful to hear!!
Comments are closed.