COUNTDOWN TO CHRISTMAS WITH SNOOPY & WOODSTOCK!
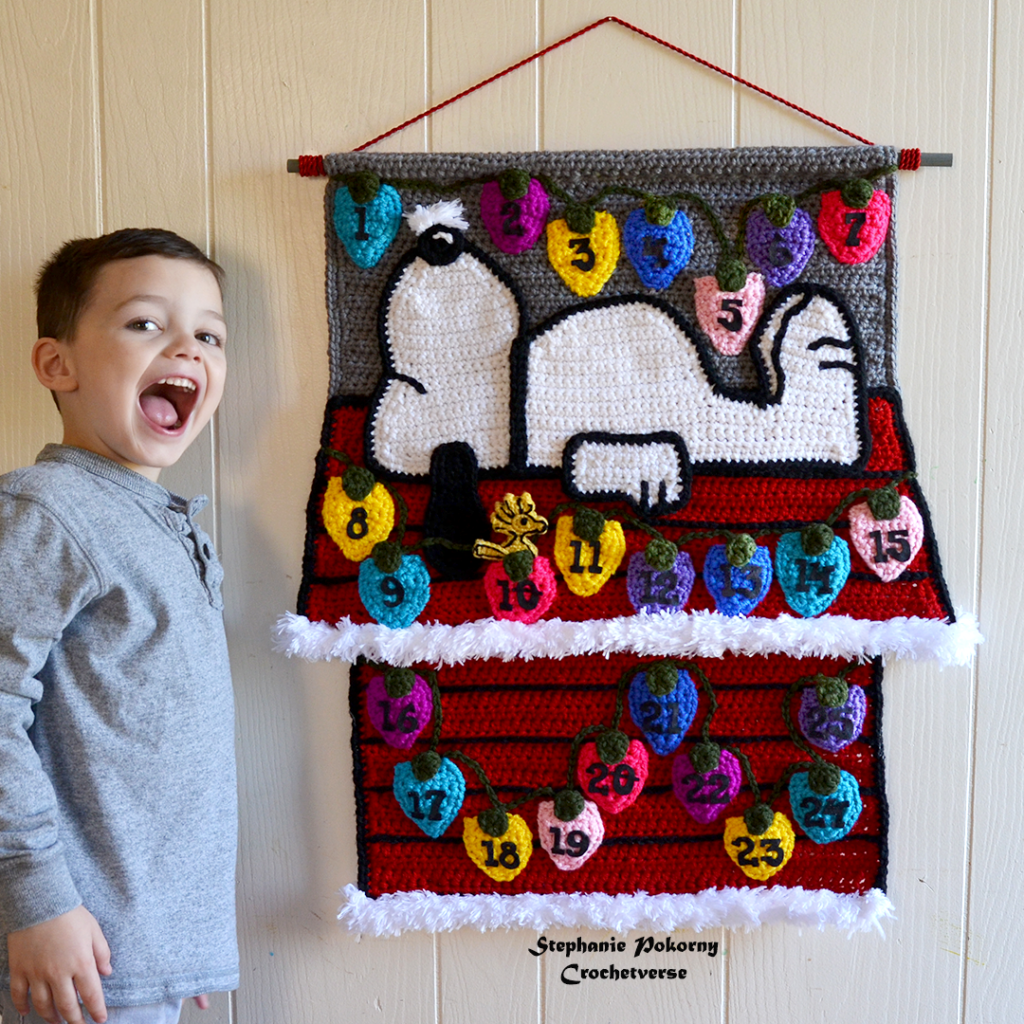
Merry early Christmas from me to you. Or happy whatever you celebrate or honor this time of year! I have been so blessed over the year and thank YOU for your support! Please enjoy this FREE pattern for this calendar!
ONLY available here on the blog, please share by linking directly to this page! Never copy or paste or share elsewhere. This allows me to keep bringing free patterns to you!
MUCH LOVE! Stephanie Pokorny/Crochetverse!
I had the pleasure to work with Premier Yarns for this project! Specifically, their anti-pilling. It is their own proprietary fiber and NOONE else has it. It is soft, durable, and a great weight for a worsted (not overly thin or thick!).
ENJOY 30% off ALL PURCHASES OF THE PREMIER YARN from their SITE with MY EXCLUSIVE CODE (through 12/31/19) Enter code: CV30 This CANNOT be combined with other offers or codes, but 30% is amazing! So enjoy the sale and rest assured you will have an heirloom project that will last a life time. Check the reviews on the anti-pilling line, over 500 5 STAR REVIEWS, that is saying something. You know NOONE filters when it comes to product review online <3 ORDER HERE AT PREMIER: https://www.premieryarns.com/pages/anti-pilling
#MemoriesMadeToLast #MakeItPremier #PremierYarns
You can also store this in your Ravelry Library: https://www.ravelry.com/patterns/library/snoopy-advent-christmas-calendar
MATERIALS:
– size J (6mm) crochet hook OR size needed to obtain gauge (USED FOR ENTIRE PROJECT EXCEPT WOODSTOCK)
– size D (3.25mm) crochet hook for Woodstock ONLY
*THIS ENTIRE PROJECT UNLESS NOTED IS DONE HOLDING THE YARN DOUBLE STRAND*
– 600 yards worsted weight red yarn (Shown Premier Anti-Pilling Everyday Worsted in Really Red)
– 200 yards worsted weight white yarn (Shown Premier Anti-Pilling Everyday Worsted in Snow White)
– 200 yards worsted weight black yarn (Shown Premier Anti-Pilling Everyday Worsted in Black)
– 350 yards worsted weight dark gray yarn (Shown Premier Anti-Pilling Everyday Worsted in Steel)
– 200 yards deep hunter green yarn (Shown Premier Anti-Pilling Everyday Worsted in Pine Green)
– 30 yards yellow (Shown Premier Anti-Pilling Everyday Worsted in Sunshine)
– 40 yards each of 7 colors worsted yarn (Shown Premier Anti-Pilling Everyday Worsted in Azure, Violet, Baby Pink, Neon Pink, Lemon, Bright Violet, and Royal Blue)
– 30 yards super bulky fur yarn in white (Shown Premier Bunny in White)
– ½” dowel rod cut to 24”. You can leave this natural or paint it as I have done with mine
– 2 yards braided trim or ribbon to hang the calendar
– (1) set felt numbers 1.25” tall I purchased them from SunshineAnnieDieCuts on Etsy and used this set in black: https://etsy.me/32VUKCd
– I absolutely use hot glue (specifically Gorilla Glue sticks) for my projects. It holds forever. I have torn yarn to shreds trying to move something once applied, so firstly, use care when gluing and secondly it WILL last forever. If you would like to sew all pieces, of course do this instead.
– Aleene’s Fabric Fusion glue with the narrow tall tip. I used this for my felt numbers only. They are small and the hot glue was just not precise enough for my liking. I applied liberally and let dry 4 hours.
– scissors, tape measure, tapestry needle, stitch markers
FINSIHED SIZE:
About 30” tall and 24” wide
GAUGE:
Row 1 and 2 of the doghouse bottom half should measure about 17” long and 1 1/8” tall.
You want to be as close to this as possible. If not, you will use more yarn and it will be not as sturdy.
Note, I tend to crochet tightly.
ABBREVIATIONS:
Ch chain dec decrease
Sl st slip stitch bb back bump on a chain
Sc single crochet st stitch
Hdc half double crochet rnd round
Dc double crochet
Nxt next
Rem remaining
INSTRUCTIONS:
DOGHOUSE:
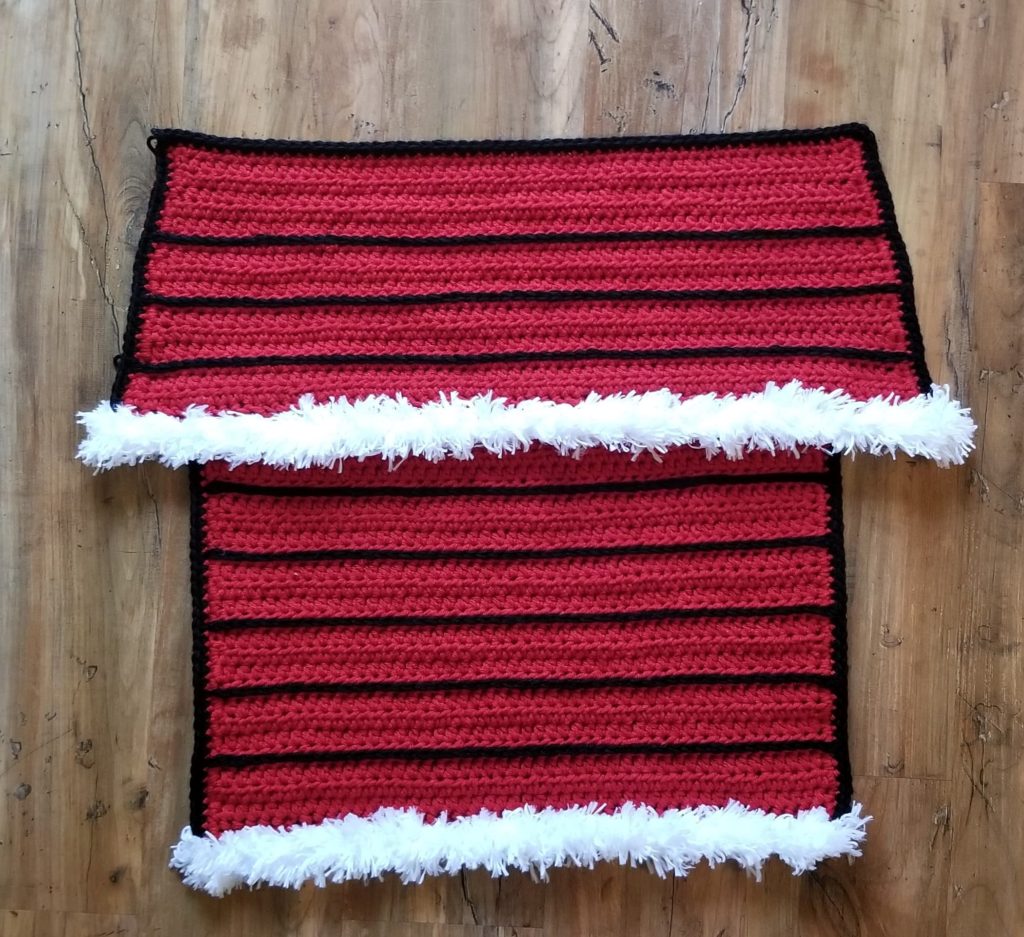
Doghouse Bottom Half:
Holding the red yarn double strand:
Row 1: Make a chainless single crochet foundation row of 48 sts. (48)
Alternatively, chain 49, sc in 2nd ch from hook and each ch across. (48)
Row 2-25: ch 1 (does not count as a st), turn, hdc in same st as ch-1 and each st across, after row 25 do not cut yarn, move to edge round below. (48)
Edge Round: Do not turn. Chain 1, make 3 sc in the end of each of 2 rows of hdc down the 1st side, 3 sc in 1st st along bottom edge, sc in each st across bottom until 1 st remains, 3 sc in the last st, sc up the 2nd side again working 3 sc per 2 row ends, make 3 sc in the 1st st along the top (row 25), sc in each st across the top until 1 st remains, 3 sc in last st, sl st to 1st st made, cut yarn.
Black Striping:
With the right side of the edge round facing up:
Holding black yarn double strand, surface crochet along the top of rows 4, 8, 12, 16, and 20, making sure to begin on the same edge of the house bottom for each row.
Join on one edge just inside the edge round, keep the working yarn on the underside of the piece, insert the hook from front to back in the spaces between the sts, pull up a loop and sl st across the row in the spaces making sure not to pull tightly and pucker the work, end the row by sl st across the edge.
This video by Repeat Crafter Me is what I direct people to if they are not familiar with surface crochet techniques: https://www.youtube.com/watch?v=L5znaN5Itpk
Weave in these ends. When weaving in the joining side of the ends, wrap the yarn around the edge st so the row goes completely from edge to edge.
Black Edge Round:
Position the piece so the right side of the edge round is facing up.
Join black yarn held double in any st around the piece with the surface crochet rows right side up, ch 1, sc in same st and in each st around working 3 sc in each corner st, once around, sl st to 1st st made and cut yarn.
Weave in all ends to this point.
Snow Row:
Join the fur yarn single strand in the bottom corner st of the black edging from the WRONG side, ch 1, sc in each st across the bottom edge, cut yarn. Weave ends.
Doghouse Roof:
With red double strand:
Row 1: Make a chainless single crochet foundation row of 64 sts. (64)
Alternatively, chain 65, sc in 2nd ch from hook and each ch across to end. (64)
Row 2: ch 1, turn, hdc in each st across. (64)
Row 3: ch 1, turn, hdcdec over st ch-1 emerges from and nxt st, hdc in each st until 2 sts remain, hdcdec over last 2 sts. (62)
Row 4-5: ch 1, turn, hdc in each st across. (62)
Row 6: rep row 3. (60)
Row 7-10: ch 1, turn, hdc in each st across. (60)
Row 11: rep row 3. (58)
Row 12-14: ch 1, turn, hdc in each st across. (58)
Row 15: rep row 3. (56)
Row 16-17: ch 1, turn, hdc in each st across, after row 17, do not cut yarn, continue to edge round. (56)
Edge Round: Do not turn. Chain 1, make 3 sc in the end of each of 2 rows of hdc down the 1st side, 3 sc in 1st st along bottom edge, sc in each st across bottom until 1 st remains, 3 sc in the last st, sc up the 2nd side again working 3 sc per 2 row ends, make 3 sc in the 1st st along the top (row 25), sc in each st across the top until 1 st remains, 3 sc in last st, sl st to 1st st made, cut yarn.
Black Striping:
With the right side of the edge round facing up:
Holding black yarn double strand, surface crochet along the top of rows 4, 8, and 12 making sure to begin on the same edge of the house bottom for each row.
Join on one edge just inside the edge round, keep the working yarn on the underside of the piece, insert the hook from front to back in the spaces between the sts, pull up a loop and sl st across the row in the spaces making sure not to pull tightly and pucker the work, end the row by sl st across the edge.
Weave in these ends. When weaving in the joining side of the ends, wrap the yarn around the edge st so the row goes completely from edge to edge.
Black Edge Round:
Position the piece so the right side of the edge round is facing up.
Join black yarn held double in any st around the piece with the surface crochet rows right side up, ch 1, sc in same st and in each st around working 3 sc in each corner st, once around, sl st to 1st st made and cut yarn.
Weave in all ends to this point.
Snow Row:
Join the fur yarn single strand in the bottom corner st of the black edging from the WRONG side, ch 1, sc in each st across the bottom edge, cut yarn. Weave all ends.
With the right side of the surface crochet rows facing up on both pieces, place the snow edge of the roof about halfway between the topmost black surface crochet row and the top edge of the piece. Using a tapestry needle and red yarn sew the whole roof in place securely.
Top Background for Behind Snoopy:
Hold gray double strand:
Row 1: Make a chainless foundation row of 56 single crochet. (56)
Alternatively, chain 57, sc in 2nd ch from hook and each rem ch across. (56)
Row 2-24: ch 1, turn, hdc in each st across, after row 24, do not cut yarn, ch 1 and continue to edge rounds. (56)
Edge Rounds:
Rnd 1: ch 1, do not turn, sc in each st and work 3 sc in the end of each 2 rows of hdc down the side, work 3 sc in each corner, once around, sl st to 1st st made.
Rnd 2: ch 1, do not turn, sc in each st around working 3 sc in each corner, once around sl st to 1st st made, cut yarn leaving a 30” long tail.
SNOOPY:
With white yarn held double strand:
Row 1: Make a chainless single crochet row of 52 sts. (52)
(For the body features to start the right way, you really need to do a chainless foundation for his body. If you absolutely cannot, you will need to do your chained start row, then one additional row before proceeding to row 2 of the pattern so the work faces the right way.)
Row 2: ch 1, turn, 2 sc in 1st st, sc in each of nxt 51 sts. (53)
Row 3-4: ch 1, turn, sc in each st across. (53)
Row 5 (Begin Foot Extension): ch 1, turn, scdec over the st the ch-1 emerges from and nxt st, sc in nxt 7 sts, mark the last st made in this row. (8)
Row 6-8: ch 1, turn, sc in each st across. (8)
Row 9: ch 1, turn, sc in 1st 7 sts, 2 sc in last st. (9)
Row 10: ch 1, turn, 2 sc in 1st st, sc in last 8. (10)
Row 11: ch 1, turn, sc in 1st 9 sts, 2 sc in last st. (11)
Row 12-13: ch 1, turn, sc in each st across. (11)
Row 14: ch 1, turn, scdec over 1st 2 sts, sc in nxt 7 sts, scdec over last 2 sts. (9)
Row 15: ch 1, turn, sc in each st across. (9)
Row 16: ch 1, turn, scdec over 1st 2 sts, sc in nxt 5 sts, scdec over last 2 sts. (7)
Row 17: ch 1, turn, sc in each st across. (7)
Row 18: ch 1, turn, scdec over 1st 2 sts, sc in nxt 3 sts, scdec over last 2 sts. (5)
Row 19: ch 1, turn, sk 1st st, sc in nxt 3 sts, sl st in last st, cut yarn.
*Position piece so the foot extension just made is to the right. Rejoin double strand white yarn with a sl st in the 2nd stitch counting left from the marked st in row 5.
Row 1: ch 1, sc in same st as ch-1 and nxt 42 sts. (43)
Row 2: ch 1, turn, sc in the 1st 38 sts. (38)
Row 3: ch 1, turn, 2 sc in 1st st, sc in nxt 37 sts. (39)
Row 4: ch 1, turn, scdec over 1st 2 sts, sc in nxt 35 sts, scdec over last 2 sts. (37)
Row 5: ch 1, turn, scdec over 1st 2 sts, sc in nxt 33 sts, scdec over last 2 sts. (35)
Row 6: ch 1, turn, scdec over 1st 2 st, scdec over nxt 2 sts, sc in nxt 31. (33)
Row 7-8: ch 1, turn, sc in each st across. (33)
Row 9 (Begin Tummy Extension): ch 1, turn, sc in 1st 21 sts, mark last st made of this row. (21)
Row 10: ch 1, turn, scdec over 1st 2 sts, sc in nxt 17 sts, scdec over last 2 sts. (19)
Row 11: ch 1, turn, scdec over 1st 2 sts, sc in nxt 13 sts, (scdec over nxt 2 sts) twice. (16)
Row 12: ch 1, turn, scdec over 1st 2 sts, sc in last 14 sts. (15)
Row 13: ch 1, turn, scdec over 1st 2 sts, sc in nxt 11 sts, scdec over last 2 sts. (13)
Row 14: ch 1, turn, scdec over 1st 2 sts, sc in nxt 9 sts, scdec over last 2 sts. (11)
Row 15: ch 1, turn, sk 1st st, sc in nxt 9 sts, sl st in last st, cut yarn.
*Position piece so the foot extension is to the right. Rejoin double strand white yarn with a sl st in the 1st stitch left of the marked st from row 9 of the tummy extension.
Row 1: ch 1, sc in same st and nxt 11 sts. (12)
Row 2: ch 1, turn, sc in 1st 11 sts, 2 sc in last st. (13)
Row 3: ch 1, turn, 2 sc in 1st st, sc in nxt 11 sts, 2 sc in last st. (15)
Row 4-7: ch 1, turn, sc in each st across. (15)
Row 8: ch 1, turn, scdec over 1st 2 sts, sc in nxt 11 sts, scdec over last 2 sts. (13)
Row 9: ch 1, turn, scdec over 1st 2 sts, sc in nxt 9 sts, scdec over last 2 sts. (11)
Row 10: ch 1, turn, scdec over 1st 2 sts, sc in nxt 7 sts, scdec over last 2 sts. (9)
Row 11: ch 1, turn, sc in each st across. (9)
Row 12: ch 1, turn, scdec over 1st 2 sts, sc in nxt 5 sts, scdec over last 2 sts. (7)
Row 13: ch 1, turn, scdec over 1st 2 sts, sc in nxt 3 sts, scdec over last 2 sts. (5)
Row 14: ch 1, turn, sk 1st st, sc in nxt 3 sts, sl st in last st, do not cut yarn, continue to edge round.
Edge Round: Making sure the foot is right and head is left (so the edge round is right side up when completed) ch 1, sc in each end of row and st around, at corners work 3 sc in the same st to turn the corner, at low points such as where chin and tummy meet closely, you can replace the sc with sl st so as not to bulk the area, but do so loosely, once around, sl st to 1st st made and cut yarn. Note: I, Stephanie Pokorny of Crochetverse, created this pattern for free for my followers as a Christmas gift in 2019. If you paid for this or accessed anywhere else but my blog or through Ravelry, then you got ripped off. Bad folks like to take free patterns from designers and dupe you into paying. If this happened to you, I am sorry. Email me at info@crochetverse.com and let me know!
Black Edge Round: Join double strand black in any st around with the right side of the previous edge round facing up, in the same manner, sc in each st around, work 3 sts in the corner sts to turn the corners and replace sc with sl st in the low points as needed. Once around, sl st to 1st st made and cut yarn.
Surface Crochet Feet and Eye:
Using the photo as a guide and double strand black yarn, surface crochet two toe separations, one foot separation line, and one eye.
Nose:
With double strand black yarn make a magic circle:
Rnd 1: ch 1, 8 sc in ring, do not join. (8)
Rnd 2: do not turn, 2 sc in each st around, sl st to 1st st made, cut yarn. (16)
Make the Nose Highlight:
Using double strand white yarn and main photo as a guide, surface crochet just between the two rounds for a few stitches.
Optional: sl st from the wrong side across 3 sts with the fur yarn single strand to put snow on his nose.
Dog Collar:
With double strand black yarn, make a chainless single crochet foundation row of 14 sts, cut yarn. (14)
Alternatively, chain 15, hdc in 2nd ch from hook and each rem ch across. (Yes, hdc, foundation rows are fatter) (14)
Ear:
With black double strand yarn, chain 4:
Row 1: sc in 2nd ch from hook and rem 2 chs. (3)
Row 2-6: ch 1, turn, sc in each st across. (3)
Row 7: ch 1, turn, 2 sc in 1st st, sc in nxt st, 2 sc in last st. (5)
Row 8-10: ch 1, turn, sc in each st across. (5)
Row 11: ch 1, turn, 2 sc in 1st st, sc in nxt 3 sts, 2 sc in last st. (7)
Row 12: ch 1, turn, sc in each st across. (7)
Row 13: ch 1, turn, scdec over 1st 2 sts, sc in nxt 3 sts, scdec over last 2 sts. (5)
Row 14: ch 1, turn, scdec over 1st 2 sts, sc in nxt st, scdec over last 2 sts. (3)
Row 15: ch 1, turn, sk 1st st, sc in nxt st, sl st in last st, do not cut yarn, continue to edge round.
Edge Round: ch 1, do not turn, sc in each end of row and st around, make 3 sc in each corner or rounded edge st so as not to pucker the work, when around sl st to 1st st made and cut yarn.
Arm:
With double strand white, chain 11:
Row 1: sc in 2nd ch from hook and each rem ch. (10)
Row 2-3: ch 1, turn, sc in each st across. (10)
Row 4: ch 1, turn, sc in 1st 7 sts, scdec over nxt 2 sts, sc in last st. (9)
Row 5: ch 1, turn, sc in 1st 4 sts. (4)
Row 6: ch 1, turn, sk 1st st, sc in last 3 sts, do not cut yarn continue to edge round.
Edge Round: ch 1, do not turn, sc in each st and end of row around working 3 sc in each corner or rounding a corner st so as to no pucker the work, once around, sl st to 1st st made and cut yarn.
Black Edge Round: With the right side of the edge round just made facing up join double strand black in any st, sc in each st around working 3 as needed in one st to round corners, when around, sl st to 1st st made and cut yarn.
Surface Crochet Fingers:
Using the main photo as a guide and double strand black yarn, surface crochet two finger separations on the hand.
Assembly:
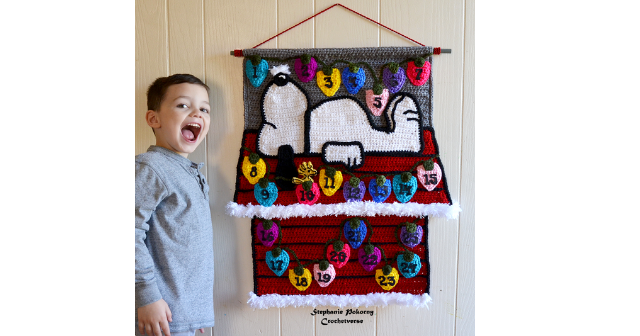
Sew the nose to the face, the ear to the head, the collar to the neck and the arm to the body. Use the photo as a guide for placement. Then, sew the whole assembly to the roof top of the doghouse, securing around the whole body.
CHRISTMAS LIGHT POUCHES:
Make 3 each of five of the colors, make 5 each of two of the colors to get to 25 pouches.
With yarn held double strand, chain 2:
Row 1: sc in 2nd ch from hook. (1)
Row 2: ch 1, turn, 2 sc in st. (2)
Row 3: ch 1, turn, 2 sc in each st. (4)
Row 4: ch 1, turn, 2 sc in 1st st, sc in nxt 2 sts, 2 sc in last st. (6)
Row-5-7: ch 1, turn, sc in each st across. (6)
Row 8: ch 1, turn, scdec over 1st 2 sts, sc in nxt 2 sts, scdec over last 2 sts. (4)
Row 9: ch 1, turn, sc in each st, do not cut yarn continue to edge round.
Edge Round: ch 1, do not turn, sc in each end of row to bottom tip, 3 sc in the bottom tip, sc in end of each row up the second side, sl st to nxt st on last row made of ornament, cut yarn leaving tail to sew to house.
Bulb Tops (Make 25)
With double dark green yarn, make a magic ring, ch 1:
Rnd 1: hdc, ch 2, hdc, ch 2, hdc, ch 2, hdc, ch 1, sl st to 1st hdc made, cut yarn.
Assembly:
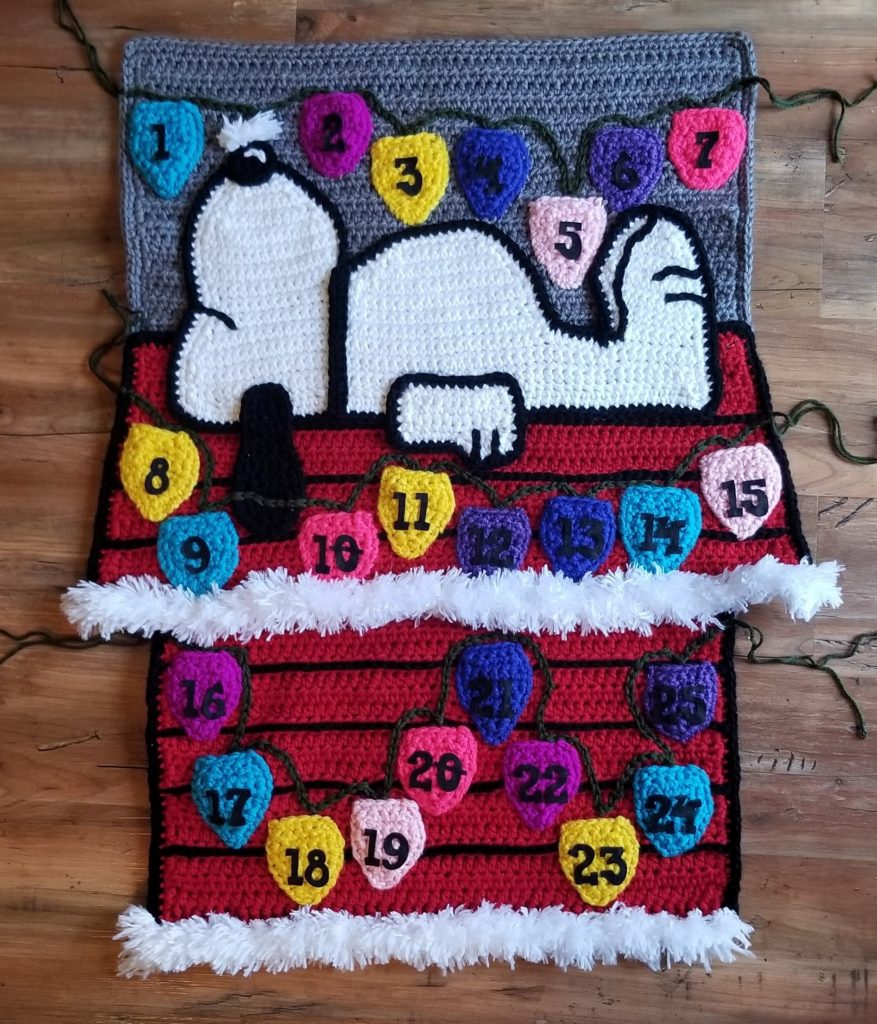
1. Sew on Christmas light pouches: Using the above photo as a guide and the ends tail and needle, sew all the ornament pouches in place on ONLY the two sides, leave the TOP OPEN SO YOU CAN INSERT LITTLE TREATS INSIDE.
2. Glue on numbers: I then fabric glued all the numbers in place. The double strand is thick enough to where nothing seeped through to the doghouse in the back.
3: Surface crochet wire: Using double strand dark green, surface crochet the wires to connect each row of bulbs. Work edge to edge so it looks like the wire is really wrapping around the back of the house.
4. Glue or sew one bulb top to each bulb with the edge with the ch-1 sl st closure pointing down as it creates a slightly narrower edge.
5. Sew the rod pouch shut. Using a strand of dark gray yarn, fold over the top edge of the background behind Snoopy about 4 rows and sew it to create a long tunnel to slide the dowel rod through. Make sure it fits before you sew it or sew around the dowel rod, your choice.
6. Attach ribbon or trim to hang: Determine how long you want the hanging rope to be. Tie around each exposed end of the dowel rod. You can add some glue to secure if desired. I added some little ribbons I found too.
7. Weave in any remaining ends.
WOODSTOCK (Make 2):
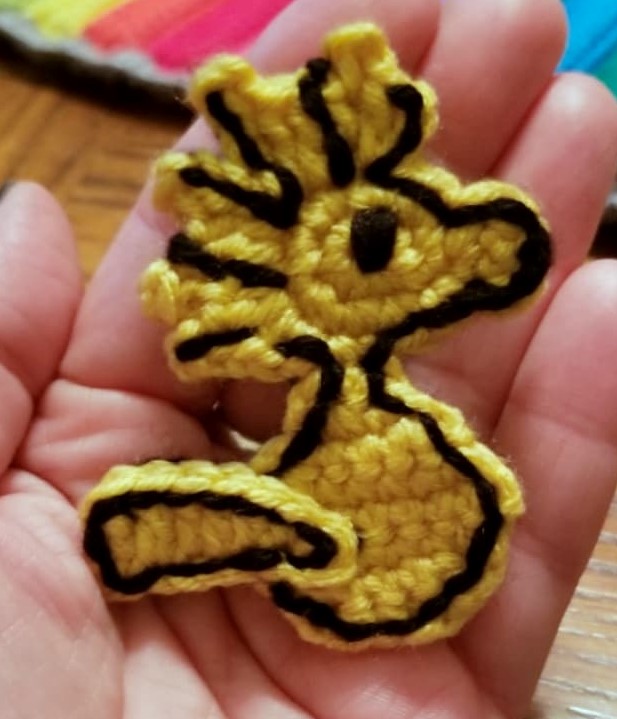
Body:
With SINGLE strand yellow yarn and D(3.25mm), make a magic ring:
Do not turn or join except when specifically instructed.
Rnd 1: ch 1, make 8 sc in ring, pull tail tightly to close. (8)
Rnd 2: 2 sc in each sc around, sl st to 1st st made. (16)
Rnd 3: ch 1, sc in same st the ch-1 emerges from, 2 sc in nxt st, sc in nxt st. (4)
Rnd 4: ch 1, turn, sc in 1st 2 sc, sl st in nxt sc, cut yarn.
With the right side of the sts facing up and nose to the right, rejoin the yarn single strand in the 3rd st left from the edge st of the nose with a sl st.
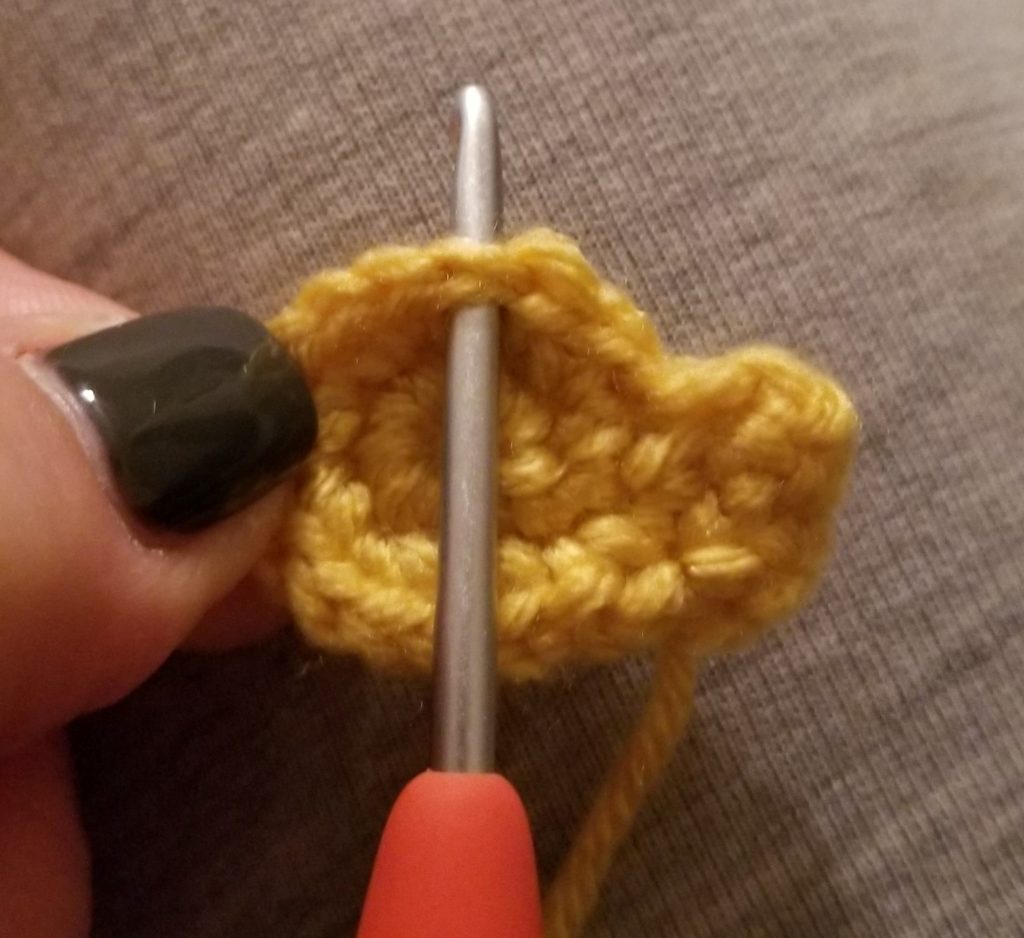
Rnd 4: ch 3, dc in same st the ch-3 emerges from, ch 2, sl st in 1st bb (back bump of the chain) and 2nd bb, 2 dc in nxt st, dc in nxt st, ch 2, sl st in 1st and 2nd bb, ch 3, sl st in same st at base of last dc made, sl st in nxt st, ch 4, sl st in 1st and 2nd bb from hook, dc in same st the ch-4 emerges from, dc in nxt st, ch 2, sl st in 1st and 2nd bb from hook, 2 hdc in nxt st, ch 2, sl st in 1st and 2nd bb from hook, (2 hdc, sl st) in nxt st, ch 1, sc in nxt 2 sts.
Row 5: ch 1, turn, sc in nxt 2 sc. (2)
Row 6: ch 1, turn, 2 sc in each sc across. (4)
Row 7: ch 1, turn, 2 sc in 1st st, sc in nxt 2 sts, 2 sc in last st. (6)
Row 8: ch 1, turn, 2 sc in 1st st, sc in nxt 4 sts, 2 sc in last st. (8)
Row 9: ch 1, turn, sc in each st across. (8)
Row 10: ch 1, turn, scdec over 1st 2 sts, sc in nxt 4 sts, scdec over last 2 sts. (6)
Row 11: ch 1, turn, scdec over 1st 2 sts, sc in nxt 2 sts, scdec over last 2 sts. (4)
Row 12: ch 1, turn, sc in 1st st, scdec over nxt 2 sts, sl st in last st, cut yarn.
Tail:
With single strand yellow yarn and D hook, chain 8:
Row 1: sc in 2nd ch from hook and nxt ch, hdc in nxt ch, dc in last 4 chs, ch 1, sl st twice down the side of the dc just made, sl st to nxt ch on bottom and cut yarn.
Outline:
This takes some attention to detail so go slowly and take care. He is small so it won’t take too long.
This is done on ONE side only. You are going to sew, using a straight back stitch, all the outline on him using a single strand of black yarn and needle working JUST inside the outer edge advancing a stitch at a time. Notice how it breaks into just lines in his hair area. The eye was done with 4 times around to give it proper size. It does NOT matter what the back looks like as long as it is not super bulky or knotted as you will be sewing the two halves together once done and it will all be covered. I did the tail outline while holding it against the body, so it got its outline and was attached to the body at the same time. Sew the un-outlined tail to the second half. Sew or glue the two halves together.
You can attach Woodstock to the calendar with a long ribbon making sure it reaches the furthest pouch from where you decide to attach him or leave him free. Move him from pocket to pocket as the countdown progresses. Fill the pouches with money or small treats.
Follow me on any of my social media to stay in touch, I would love to have you! Much love and yarn, Stephanie Pokorny (Crochetverse)
QUESTIONS? Message me on any of the social medias mentioned below!
Email: info@crochetverse.com
The information and photos in this posting are the sole property of Crochetverse©2019. Please do not copy and paste any of the information contained within either electronically, verbally, or written in part or in whole. Instead, please share the DIRECT LINK to this posting only, and if you do, I thank you for sharing. You of course may sell anything you make from this pattern that you have made with your own two hands, no contract labor or mass productions are permitted. I need your visits to keep me around creating! Please never screenshot or copy and paste the info within, instead share the link so I may entertain your friends as well! If you credit Crochetverse as the designer that is greatly appreciated!



I love this and everyday soft is my favourite yarn.
It really is so so nice, thank you!
Wow..amazing! I don’t have kids, so don’t really do advent calendars, but I NEED this!! LOVE Snoopy! You are so talented, thank you so much for this free pattern ???
Do lotto tickets or little adult treats and use it for you for sure!!
Thank you so much for this pattern, makes my day!X
You are so welcome!
Thank you for this pattern! My Sis is a Snoopy fanatic, so this is perfect for her! She has 3 grandkids, and I think they’d enjoy it as well when they visit her. I have been sewing the pieces together on top of my bed comforter, as I dont have a table big enough. This is a GREAT pattern, but definitely not for the faint of heart when it comes to sewing LOL. (I hate sewing things together 🙂 )
Haha, I don’t think anyone likes it, but I promise this will become an heirloom, so it is worth it!
Thank you so much for this pattern. I started (late) making it for my daughter and her family. The pattern is so easy to follow. It’s coming together beautifully!
You are so welcome, thank you!
Hi, with the chainless foundation, I’m a bit confused for using the chained version. Do you make the chains, then come back across the chains, then do a whole new row across that row or just start from the end where you do the across?
I’ll try to clarify:
Ch. 53, starting in 2nd chain from hook, sc across
Row 1: sc across then go to row 2 on your pattern (this is how I’m interpreting it)
or
Row 2: Ch.1, sc across (and then go to row 2 of your pattern)
I’m trying to figure out where the tail would be when I finish making the chains and then going back across.
TIA,
Melissa
Comments are closed.