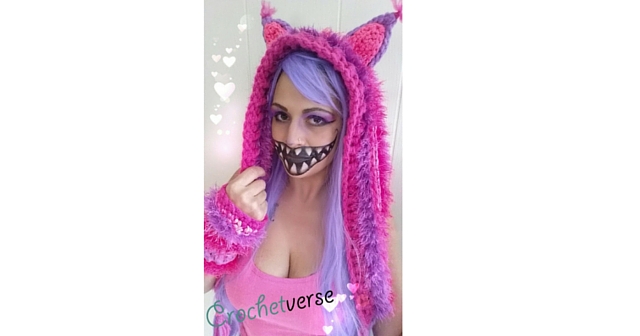
The little girl in me doesn’t hide very well, she is actually quite loud 🙂 I’ve never gotten over loving to dress up and the colors pink and purple and frankly I don’t think I should have to! Naturally…this leads me to have a semi-unhealthy obsession with the Cheshire Cat, old school of course. A beautiful combo of hot pink and orchid purple slithery goodness! Want one for yourself?? Read on…
I’ve not done this as a formal pattern (aside from the ears, those are written out) for the simple reason as I’d like you to be able to really use all the fancy yarns and combos of weights as you want, so I’m going to guide your creativity as opposed to tell you what to do outright!
The crochet pattern here was inspired by the amazing knit work by Archaical on Deviant Art. You can see her beautiful knit hood here: https://www.deviantart.com/archaical/art/Cheshire-Cat-Details-318072534
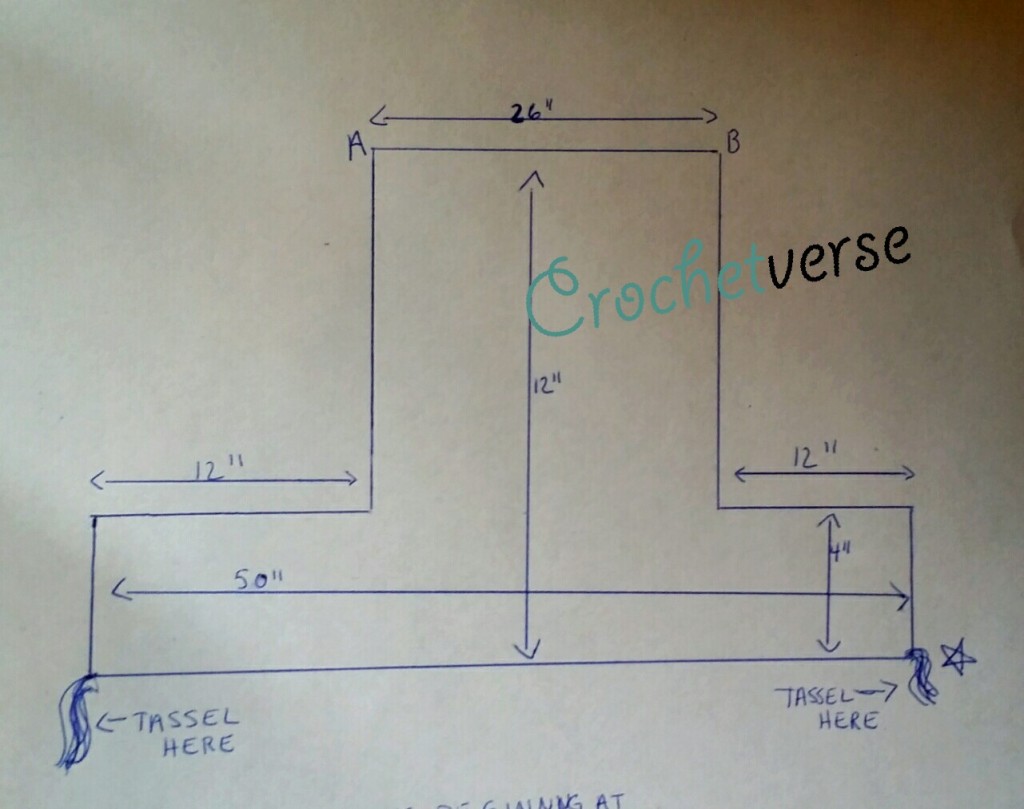
You will follow the schematic diagram below and use the guidelines and in no time, you will have your own piece of unique art.
GRAB YOUR Size P or Q hook, and let’s get started!
In short, each yarn choice needs to add up to a Super Bulky, or size 6 yarn, but that doesn’t mean you can only choose that, here are some choices that will equal that for you:
- Red Heart Mixology or any yarn marked Size 6, Size 5 would also work (this is a super bulky yarn and is used held single strand)
- Lion Brand Fun Fur (this is a thinner yarn and I used this held triple strand)
- Lion Brand Fettucinni yarn (this is super bulky and is used held single strand)
- Any worsted weight yarn (this is used held double or triple strand)
As you can see you can use ANY yarn you have around, just hold multiple stranded so the required bulkiness is there!
Here’s the best part, USE ANY STITCH YOU WANT! Do you only know single crochet? Use it. Do you love half double crochet? Use it. It does NOT matter, just work until you reach the required dimensions!
This is begun at the * on the schematic on the right bottom corner. You will begin chaining until you are about 55″ long (because you want it about 50″ and when working into the beginning chain, it will shrink up just a bit)
Following the schematic work in rows until you reach the required dimensions on the bottom, of 50″ wide and 4″ tall, then tie off the yarn.
Now, rejoin the yarn of your choice measuring 12″ in from the right end and work until the center is 26″ wide and leaving 12″ remaining unworked at the other end. Continue to work until the entire piece measures 12″ tall, then tie off.
From here, you will simply fold the points marked A & B to meet each other and use a long strand of the yarn of your choice to lace that edge shut to form the hood! Add tassels where it’s marked, and you are done with the main hood portion!
Now for the ears, I’ve used the super bulky yarn one stranded for both the inner and out ears:
The Ears: (Make 2 of each piece)
Outer ear:
To begin, ch 9:
Row 1: sc in 2nd ch from hook and in each ch across, ch 1, turn, (8 sc)
Row 2: sc in each sc across, ch 1, turn.
Row 3: sc decrease over 1st 2 sc, sc in nxt 4 sc, sc decrease over last 2 sc, ch 1, turn. (6 sc)
Row 4: sc in each sc across, ch 1, turn.
Row 5: sc decrease over 1st 2 sc, sc in nxt 2 sc, sc decrease over last 2 sc, ch 1, turn. (4 sc)
Row 6: sc in each sc across, ch 1, turn.
Row 7: (sc decrease over nxt 2 sc) twice, ch 1, turn. (2 sc)
Row 8: sc decrease over the 2 sc, ch 1. (1 sc)
Rnd 9 (Edge Round): With right side of the ear piece facing work 1 sc around the post of each stitch at each row end, 1 sc in each remaining loop of the beginning chain, and 3 sc in each stitch at the ends of row 1, sl st to the 1st sc made and tie off leaving a long tail to stitch to hat later.
Inner ear:
To begin, ch 6:
Row 1: sc in 2nd ch from hook and each ch across, ch 1, turn. (5 sc)
Row 2: sc in each sc across, ch 1, turn.
Row 3: sc decrease over 1st 2 sc, sc in nxt sc, sc decrease over last 2 sc, ch 1, turn. (3 sc)
Row 4: sc in each sc across.
Row 5: sc decrease over 1st 2 sc, sc in nxt sc, ch 1, turn. (2 sc)
Row 6: sc decrease over the 2 sc, ch 1, turn. (1 sc)
Rnd 7 (Edge Round): Make sure the right side is facing, which is the right side of Row 1 on this and all pieces, sc around the post of each stitch at the end of each row, making and each remaining loop of the beginning chain across the bottom making 3 sc at the stitch on each end of Row 1, sl st to the 1st sc made, tie off leaving a long tail to stitch to hat later.
To assemble: Stitch the inner ear to the outer ear for both ears, matching the wrong side of the inner ear to the right side of the outer ear, now being mindful of placement, stitch the ears to the top of the head on either side, view from the front/back/top to be sure they are even. Be sure to place the hat in between to be sure they are sewed on with enough room to stitch the hat between next. Stitch them on SLIGHTLY CURVED, this trick, in accompaniment with the double strand, will really make them stand up nice and proud. (No floppy ears here!)
Finally, loop a strand or two of yarn through the tips of each ear and separate the plies to give it that “frayed fur” look.
Seriously, it’s that easy. NOW, Come over to my FACEBOOK PAGE, HERE, and post your finished scoodie so you can show off your newly created cuteness!


Hi i love this pattern sooooo much struggling to find the wool but i will, can you please tell me how you made the wrist bands too as id love to make some thanks
Hi! Thank you so much! Don’t be afraid to use literally ANYTHING that coordinates, it is a perfect project to use the odd novelty yarns you love, but don’t know how else to use them! The gloves are nothing more that a tube, which are began at the end furthest from the hand. They are worked in the round, and when you get to the area where you need to create the thumb hole, instead of working into every stitch around, you chain enough so it would wrap over the base of your thumb and then skip that many stitches on the round, then finish the round as normal. On the next round, you crochet into the SPACE you made with the chains the same number of sts you chained. I hope that helps!
Bonjour , je débute dans le crochet et j’aimerais avoir quelques conseils.
Quand vous dites 55 cm de long , pour les obtenir vous montez combien de maille chainettes , par rapport aux points, peut on faire que des mailles coulée ou des mailles serrées , voir quelques brides.
Merci beaucoup
Hi! I hope I am understanding your question properly with use of my translator. You will create a beginning chain that is 55″ long. The piece is worked in single crochet, so when I turn my rows I chain one, then work my first single crochet in the 1st stitch. This is done in US terms, so it is a single crochet, not a slip stitch. I hope that helps, thank you!
Thank you for your reply.
Unfortunately I do not understand anything about it.
I will try to make it to knitting.
Hi! I’m making this and the 50 inches measurement almost reaches my wrists…it’s not the the length of the pic..did you measure it differently?
Sorry for the late reply, things have been super busy here! The center is seamed and then sits atop your head so in essence you only have half the length from top of head to it does in fact fall to where shown in the picture. Were you able to get it figured out? I hope so! Happy Halloween belated!
Comments are closed.