

")
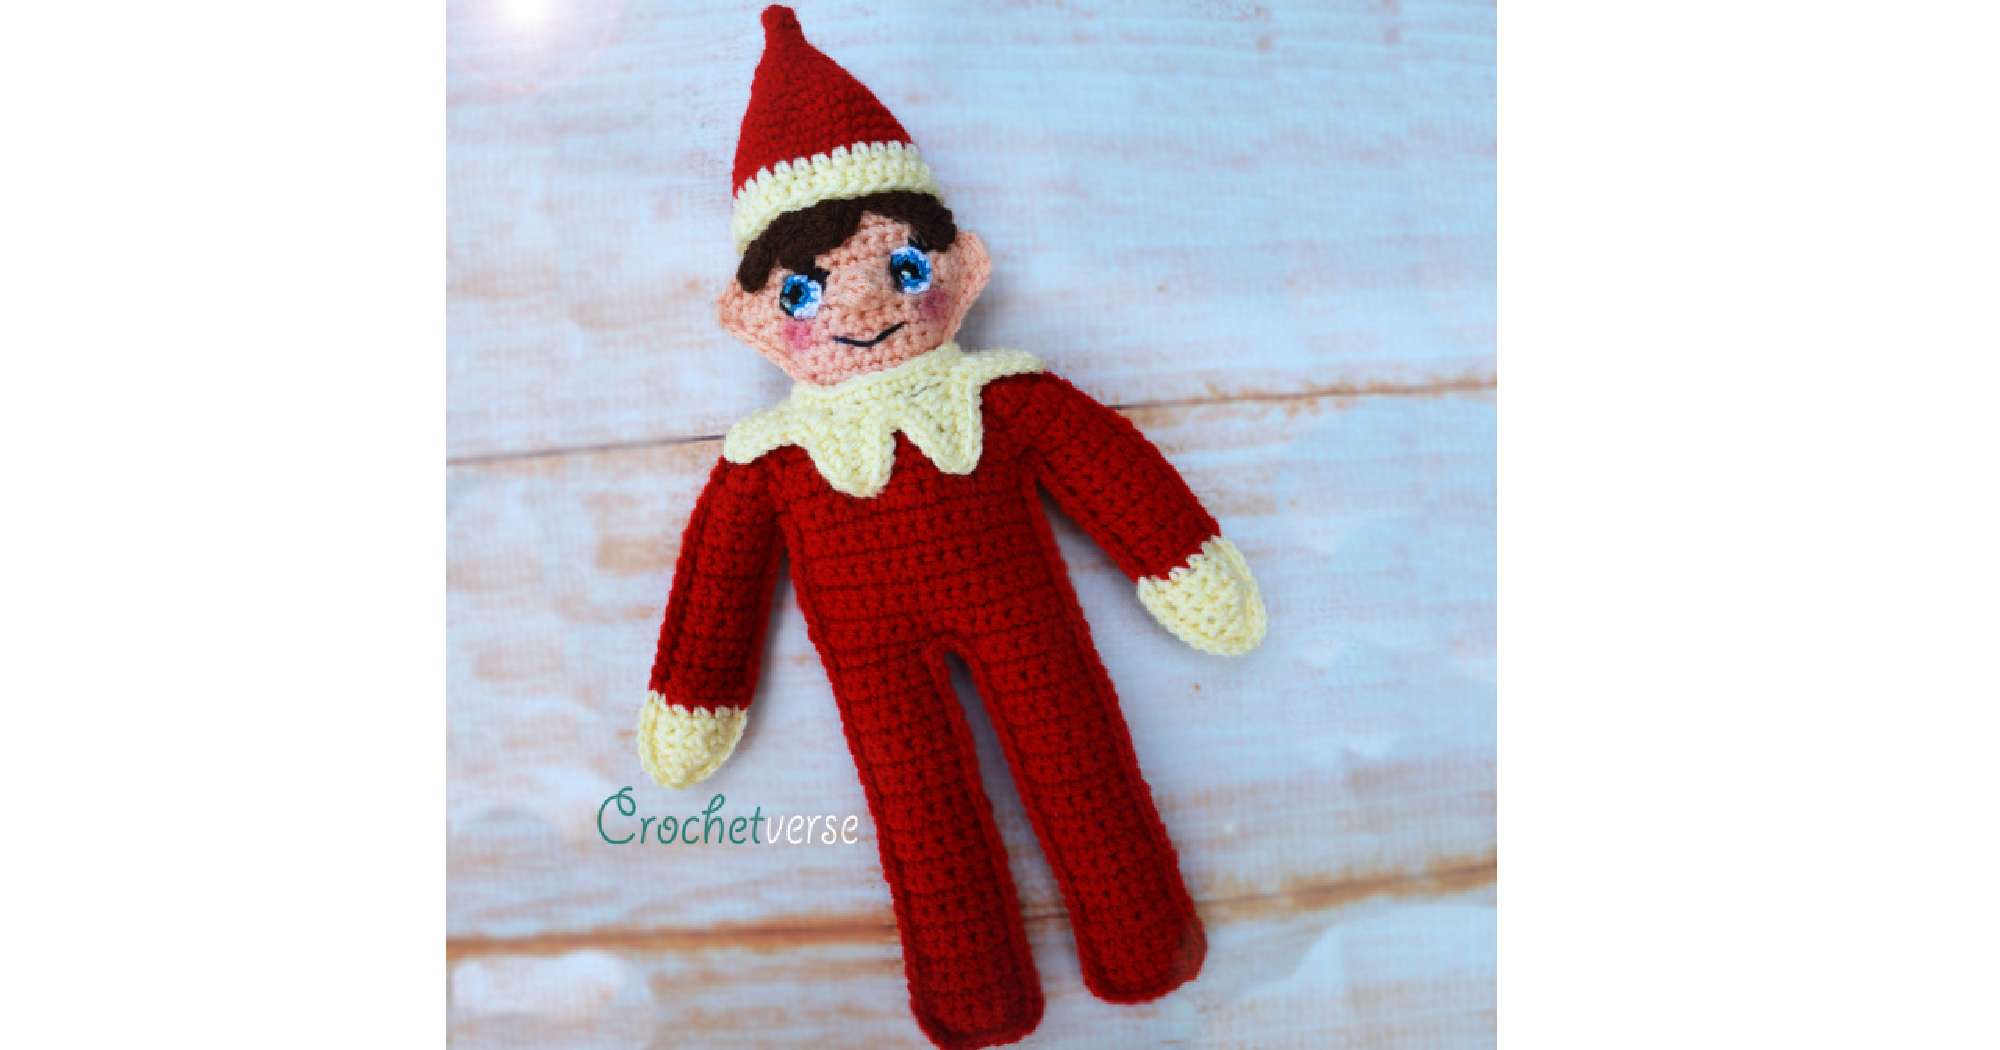
Hello! Welcome to the kick off of my FAST & FREE, not to mention cute as a button, Elf Ragdoll Crochet Along!
This Crochet Along (CAL for short) will be two parts:
Week One: HERE AND NOW!
Week Two: Released 12/5/17 here on the blog!
If you missed the Supply & Info Post, find that here: https://crochetverse.com/elf-ragdoll/
Please be sure to join the CAL – Crochet A Long group on Facebook. Not only are they our amazing hosts for the CAL, they have TONS of amazing other crochet alongs that you will be so happy you didn’t miss! Find that group here: https://www.facebook.com/groups/668646249929007/
Please also “Like & Follow” my Facebook page to stay up to date with everything going on at the Crochetverse. Find that here: https://www.facebook.com/crochetverse/
Not in CAL form, but I have MANY other Ragdolls and patterns, both free and paid, that I think you will enjoy browsing! Find all of them here: https://www.ravelry.com/designers/stephanie-pokorny
Finally, you can join my Facebook group for fun and showcasing your work! Do that here: https://www.facebook.com/groups/251695645349035/
Now let’s get to Part One (Remember if you need supply info, scroll up and click to the “Supply Info Posting” linked above.
GAUGE:
Gauge is not critical BUT you MUST crochet very tightly. You do not want holes in your ragdolls or amigurumi. I tend to crochet very tightly so you MAY have to drop a hook size from mine to get nice tight stitches.
FINISHED SIZE:
About 9” wide mitten to mitten and about 15.5” tall hat tip to toes.
ABBREVIATIONS:
Ch chain sl st slip stitch
Sc single crochet hdc half double crochet
St(s) stitch(es) yo yarn over
Rem remaining dc double crochet
Nxt next
Sc Dec single crochet decrease – work an incomplete sc in next 2 sts, yo and pull through the 3 loops
INSTRUCTIONS: (US TERMS)
You will work through creating one side of the body, then repeat through creating the second side of the body in the same manner. Then, you will crochet the two sides of the body together.
Chain 1 at the beginning of row does not count as a st throughout.
Leg One:
With red, chain 7:
Row 1: sc in 2nd ch from hook and in each rem ch across. (6)
Rows 2-23: ch 1, turn, sc in 1st st and in each st across, cut yarn. (6)
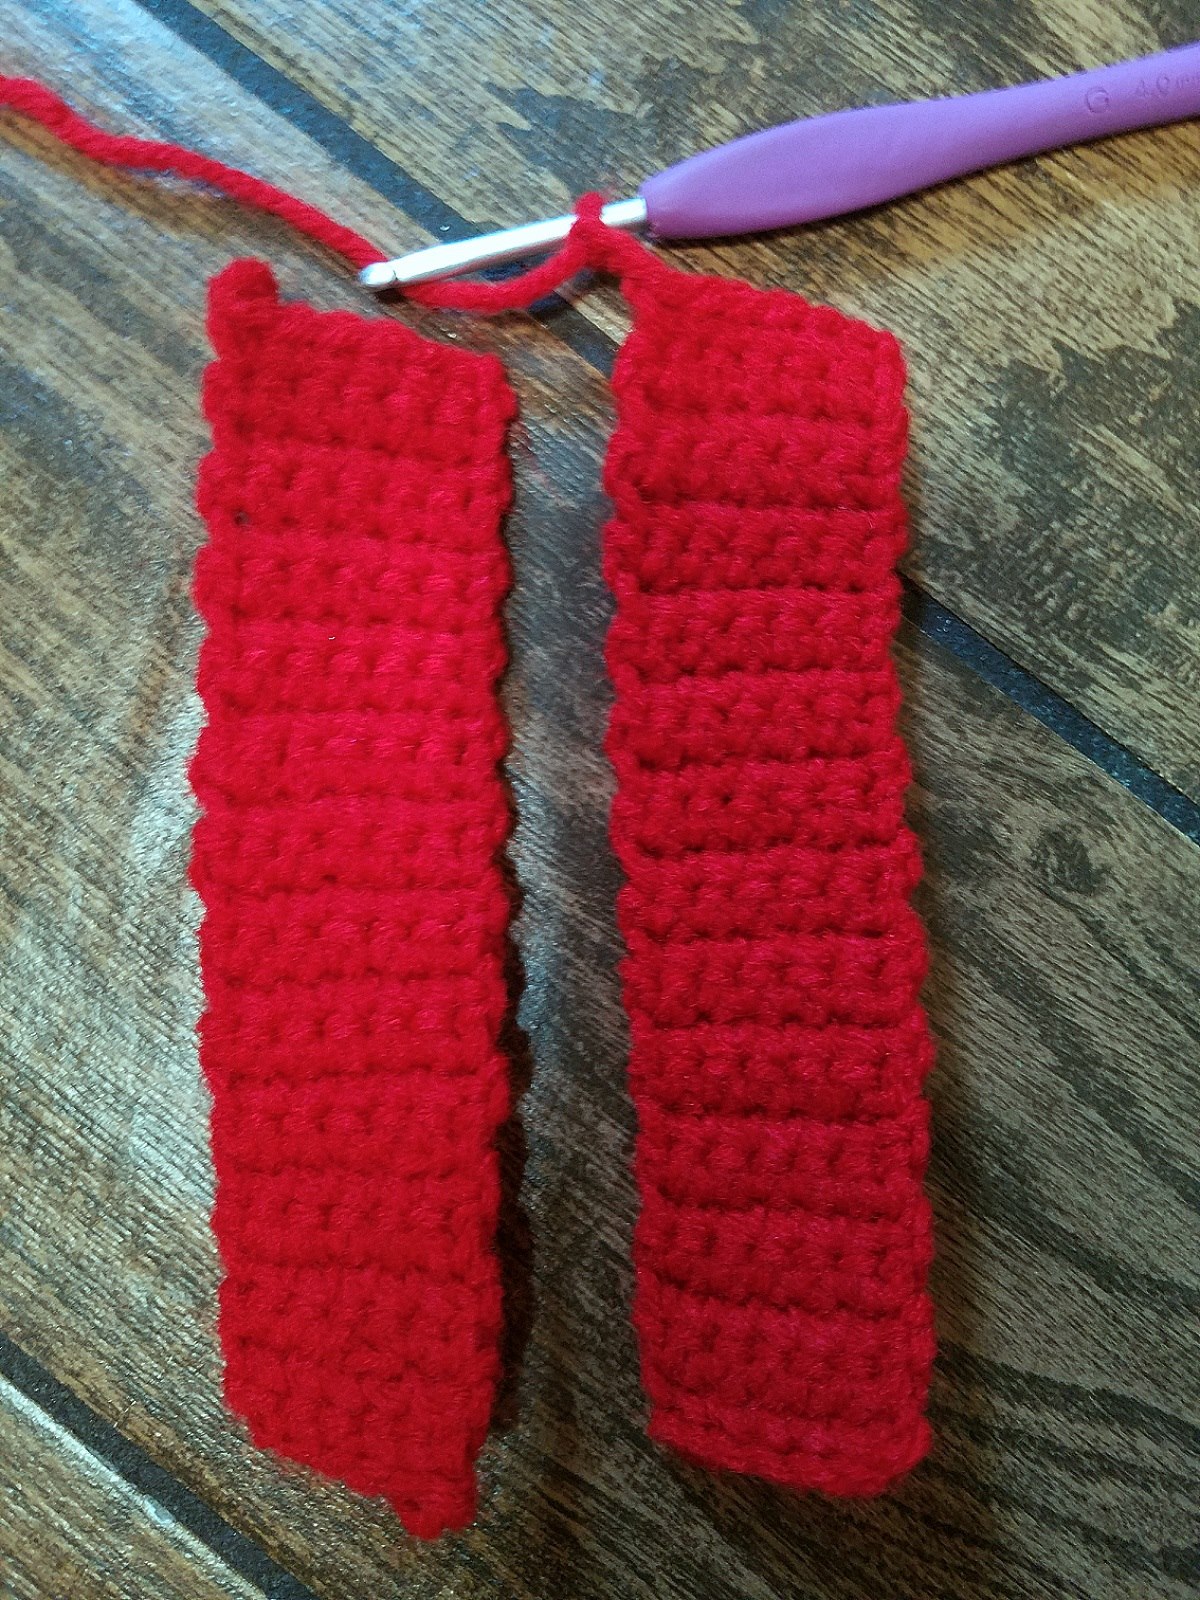
Leg Two:
With red, chain 7:
Row 1: sc in 2nd ch from hook and each rem ch across. (6)
Rows 2-23: ch 1, turn, sc in 1st sc and in each st across. (6)
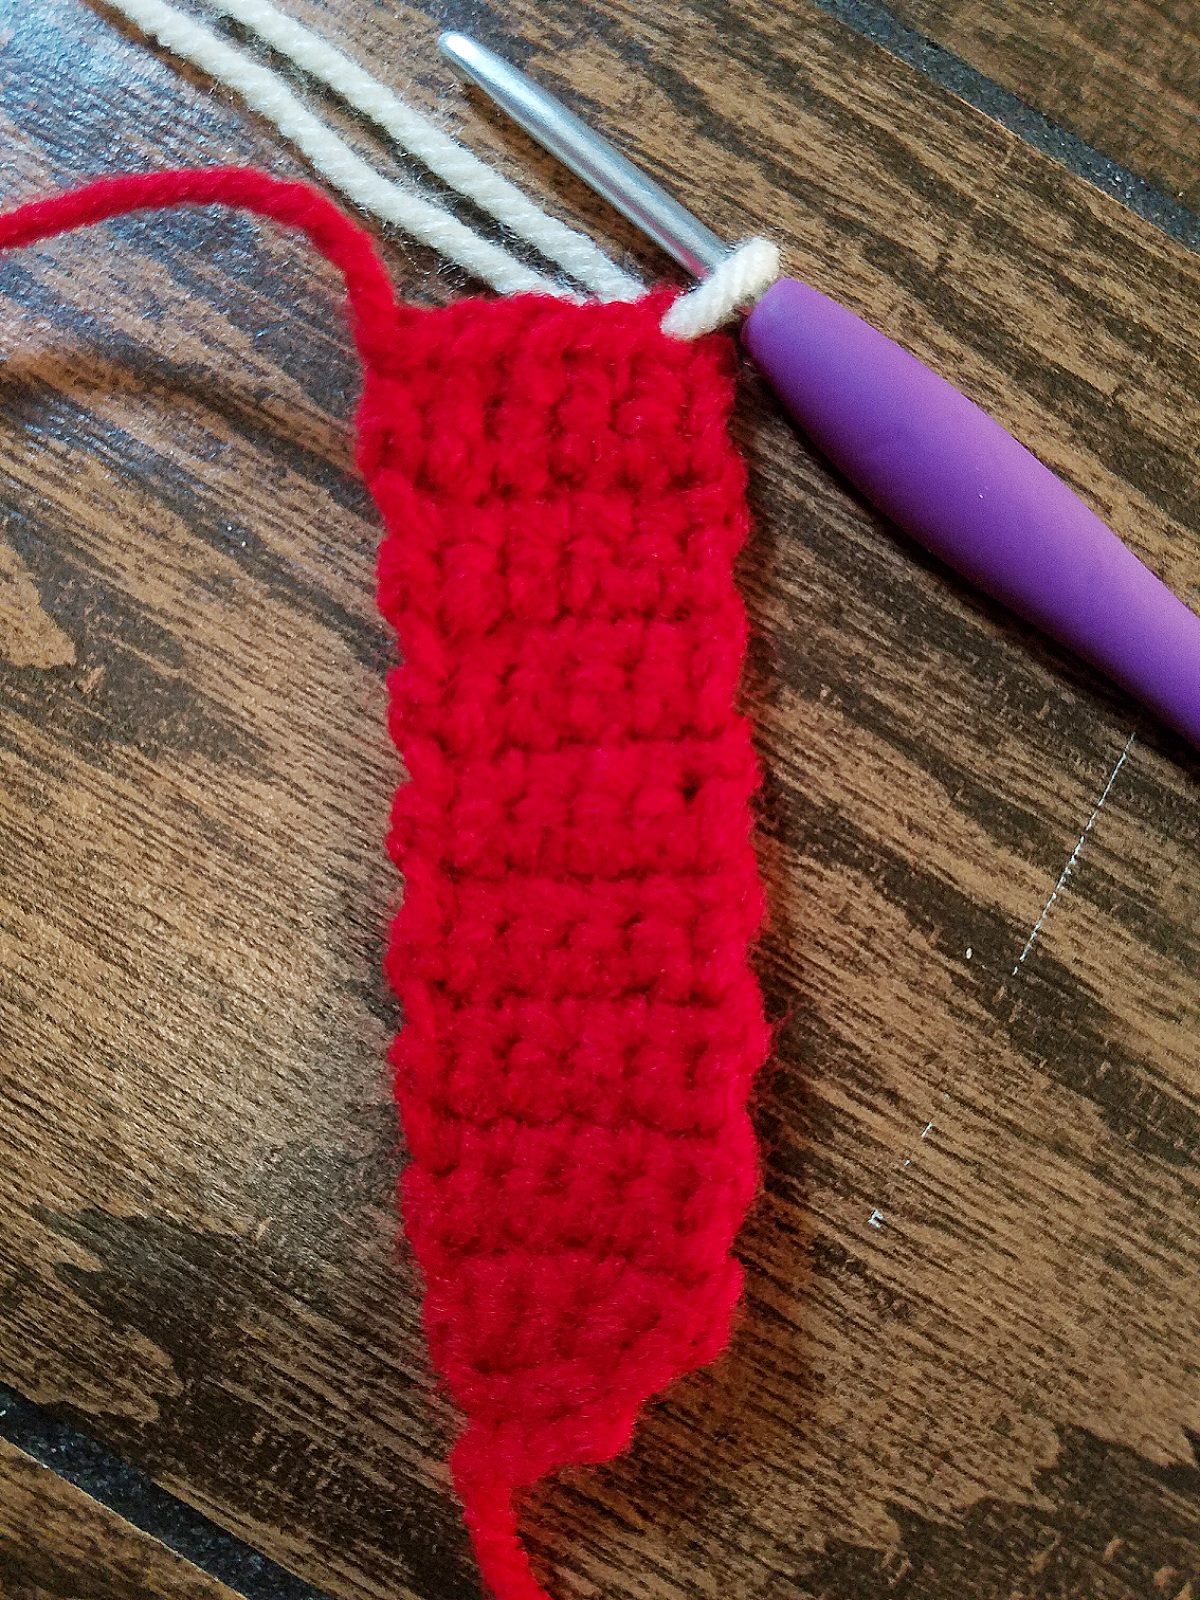
Row 24: ch 1, turn, sc in 1st sc and in each st across, then chain 3 more, do NOT cut yarn. (6sc, 3ch)
(Join Legs) Position the leg you are working on now to the right, leaving hook in the last ch worked, as shown in the photo. Place the second leg to the left of the right one and sc across the 6 sts of row 23 on the top to attach the two legs together for body. (6sc, 3ch, 6sc)
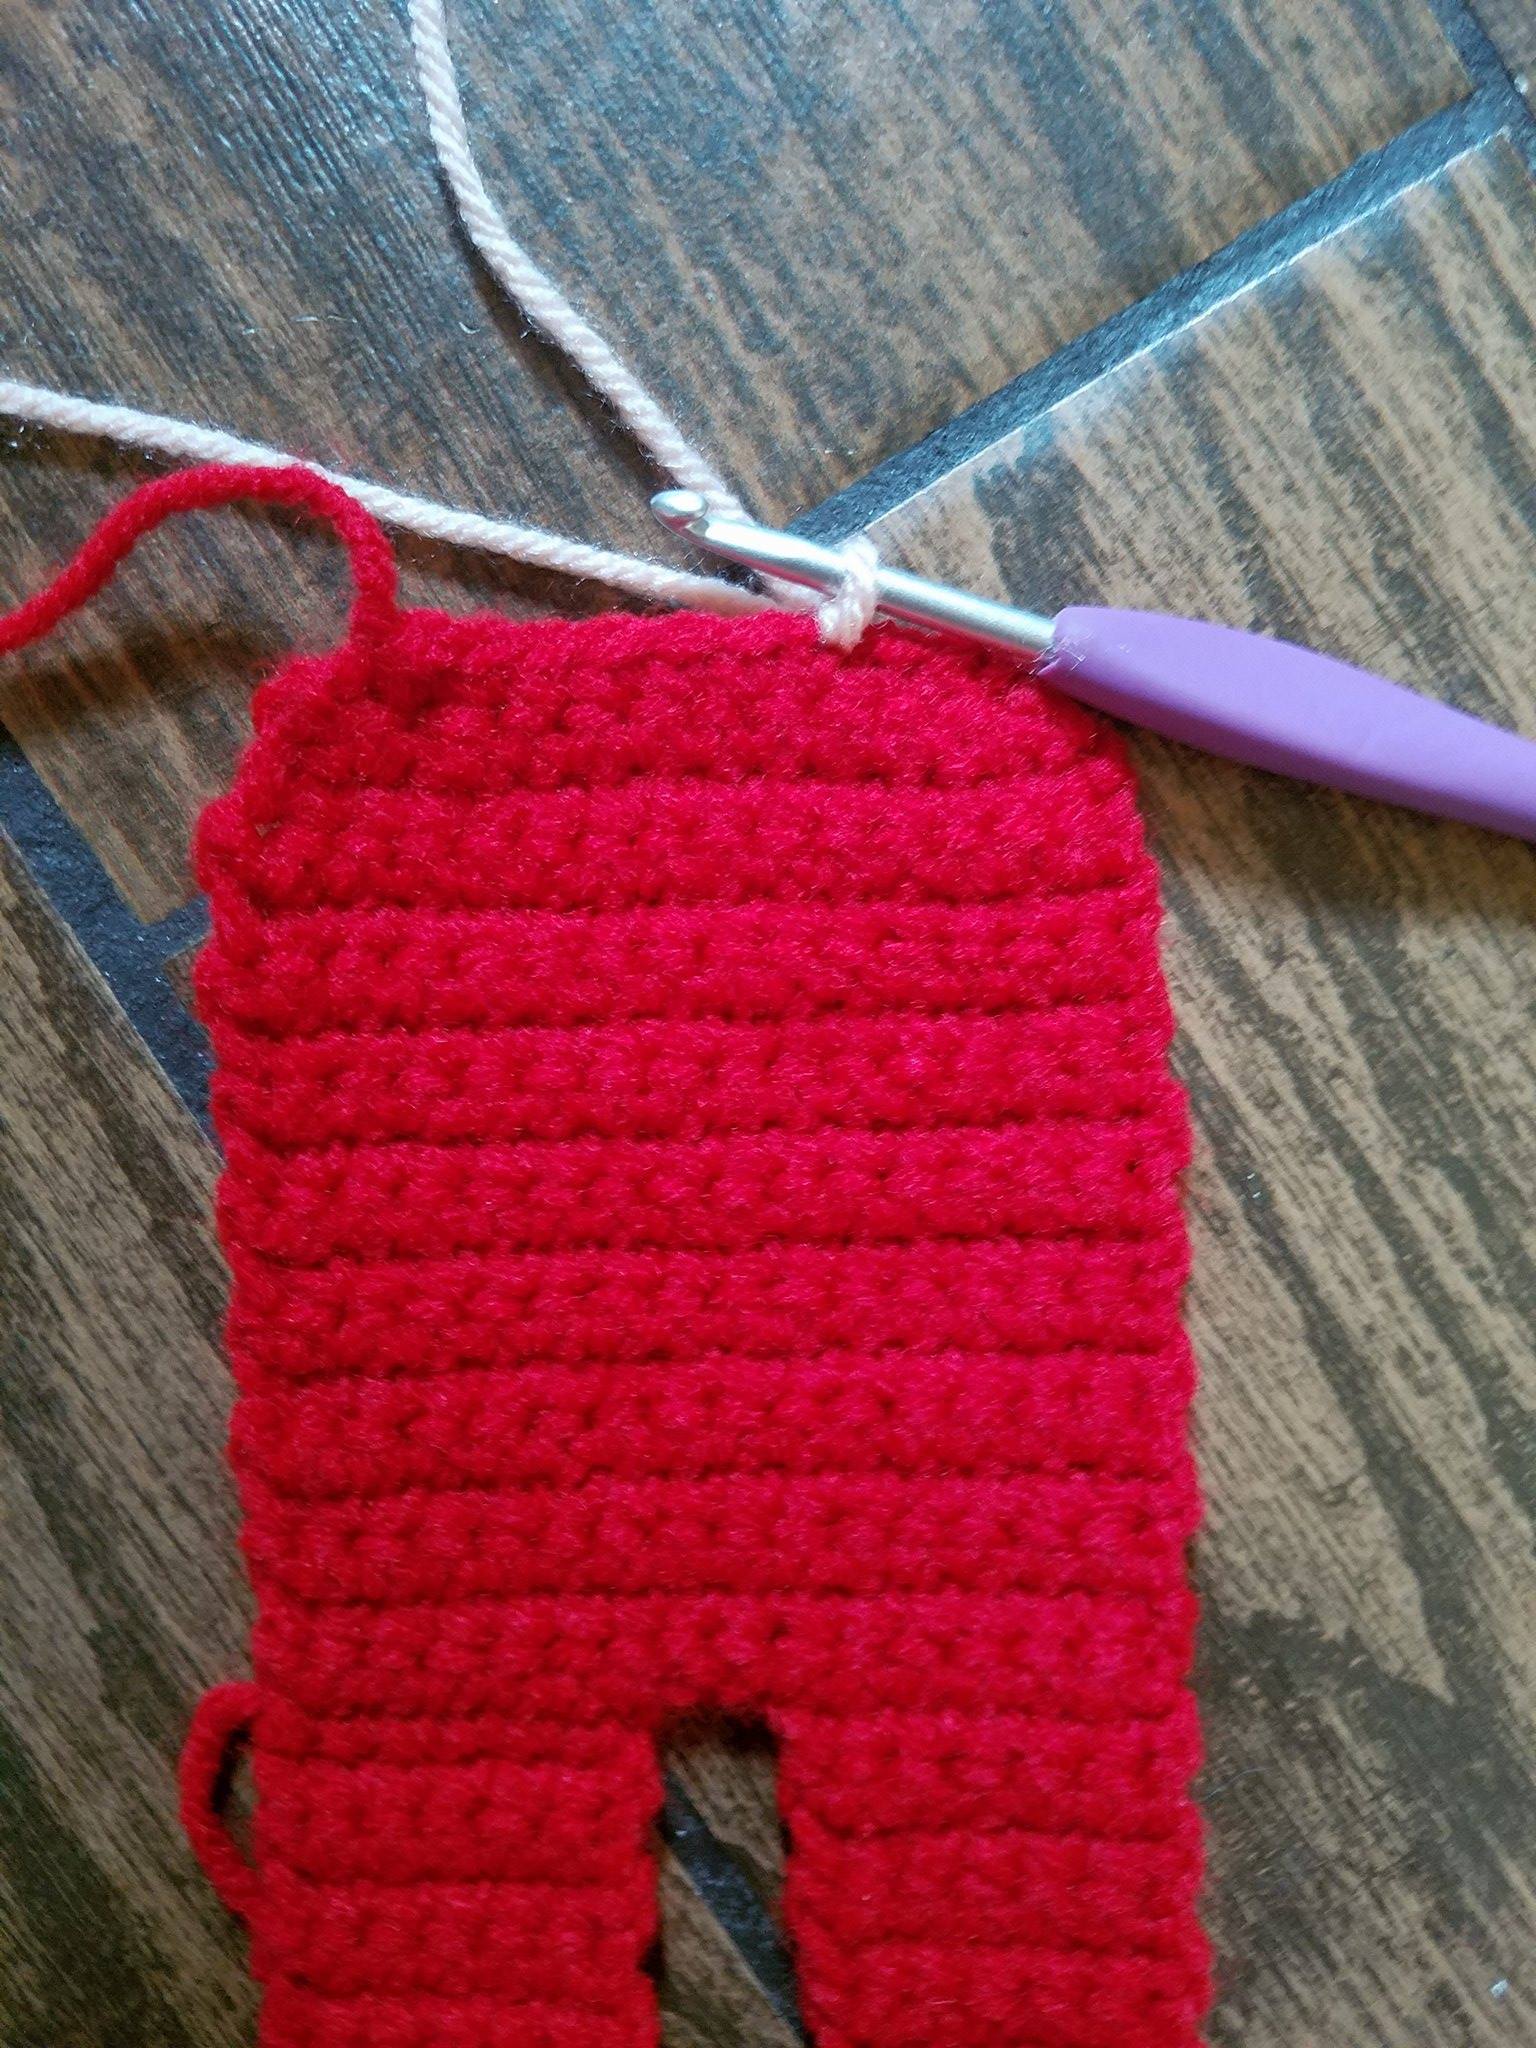
Row 25: (Continue to work for body): ch 1, turn, sc in each of the first 6 sc, work 1 sc in each of the 3 chains in the middle, sc in the last 6 sc. (15)
Rows 26 – 37: ch 1, turn, sc in each st across. (15)
Row 38: ch 1, turn, sc dec over first 2 sc, sc dec over nxt 2 sc, sc in nxt 7 sts, (sc dec over nxt 2 sts) twice. (11)
Row 39: ch 1, turn, sc dec over first 2 sts, sc in nxt 7 sts, sc dec over last 2 sts, cut yarn. (9)
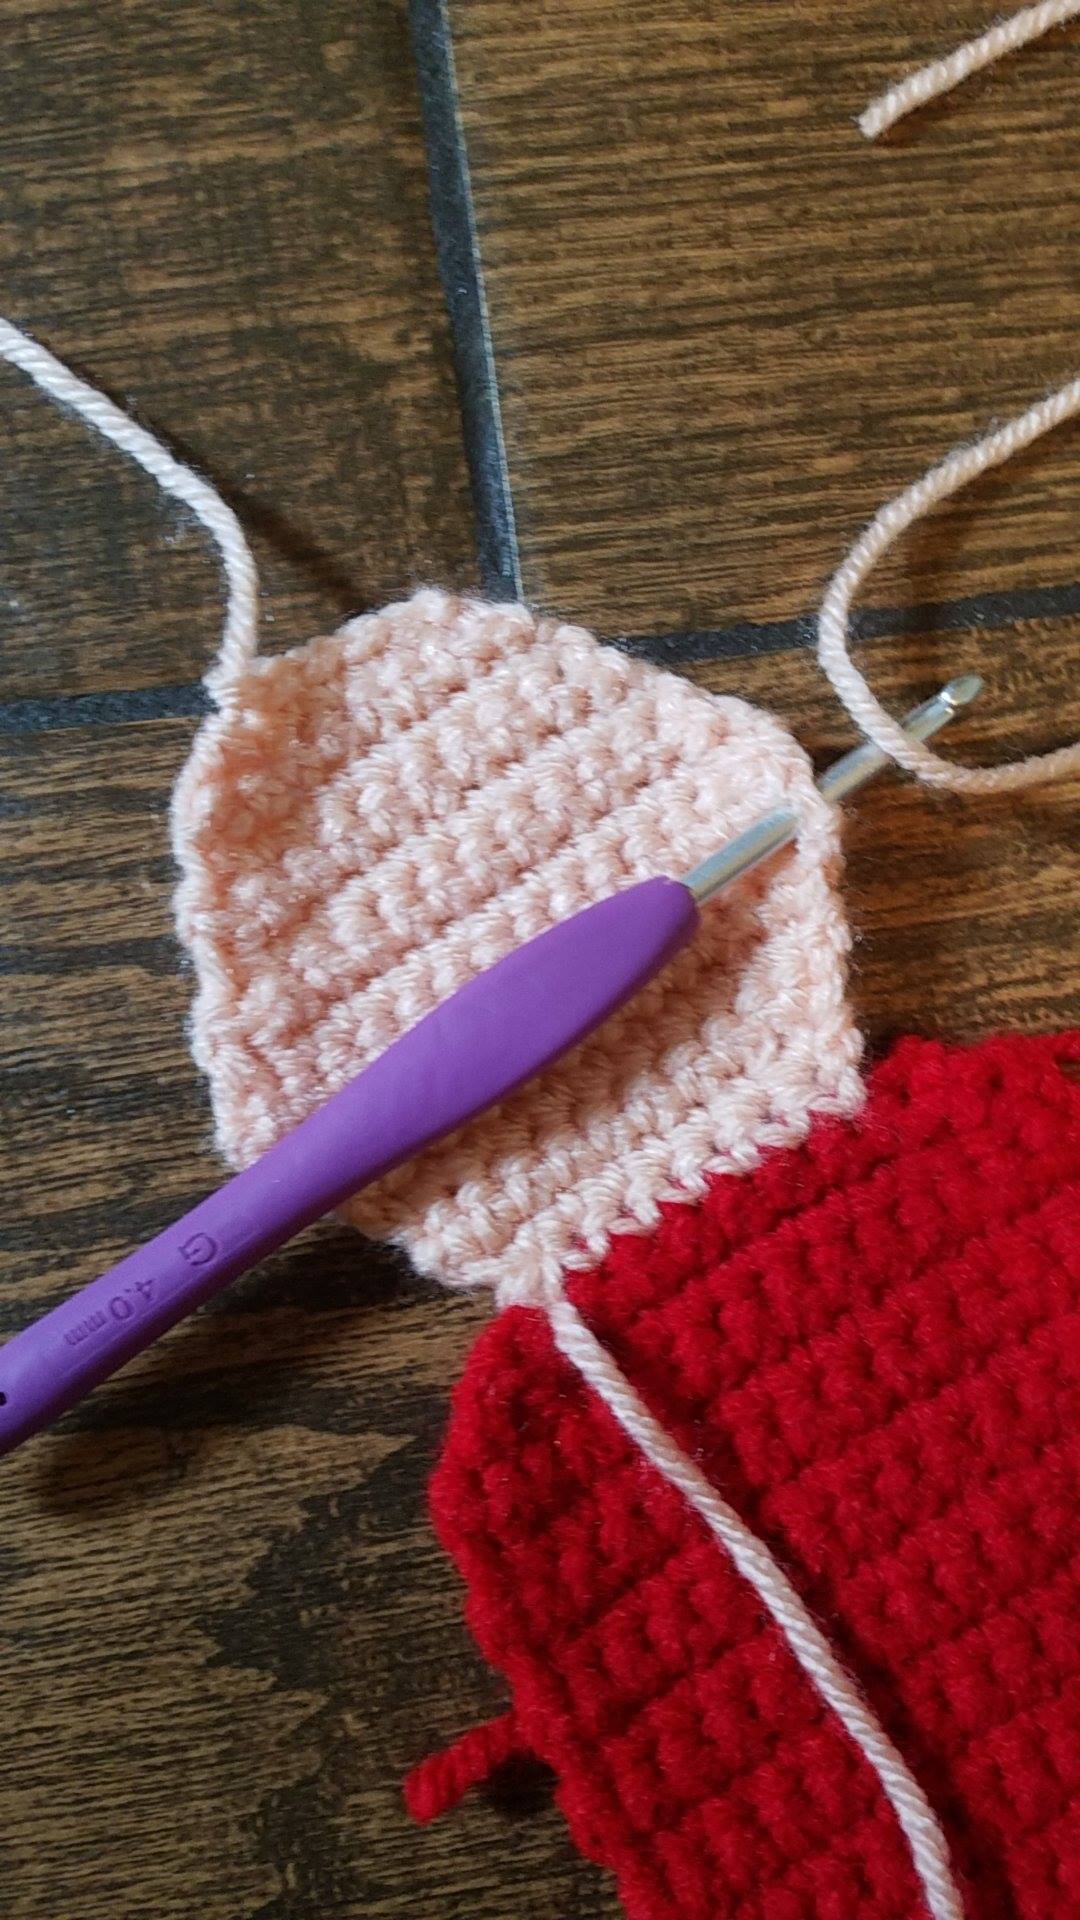
Row 40: (Continue for head) *Position as shown in the photo below with the tail from the last st of row39 to the left* Join the skin tone yarn of your choice to the 2nd st counting towards the center from the right edge, ch 1, sc in the same st as ch-1 and sc in the nxt 6 sts. (7)
Row 41: ch 1, turn, 2 sc in the 1st st, sc in the nxt 5 sts, 2 sc in the last st. (9)
Row 42: ch 1, turn, 2 sc in the 1st st, sc in the nxt 7 sts, 2 sc in the last st. (11)
Row 43: ch 1, turn, sc in each st. (11)
Row 44: ch 1, turn, 2 sc in the 1st st, sc in the next 9 sts, 2 sc in the last st. (13)
Row 45: ch 1, turn, 2 sc in the 1st st, sc in the next 11 sts, 2 sc in the last st. (15)
Row 46: ch 1, turn, sc in each st. (15)
Row 47: ch 1, turn, sc dec over first 2 sc, sc in next 11 sts, sc dec over last 2 sts. (13)
Row 48: ch 1, turn, sc dec over first 2 sc, sc in next 9 sts, sc dec over last 2 sts. (11)
Row 49: ch 1, turn, sc in each st. (11)
Row 50: ch 1, turn, sc dec over first 2 sts, sc in nxt 7 sts, sc dec over last 2 sts. (9)
Row 51: ch 1, turn, sc in each st. (9)
Row 52: ch 1, turn, sc dec over first 2 sts, sc in next 5 sts, sc dec over last 2 sts. (7)
Row 53: ch 1, turn, sc dec over first 2 sts, sc in next 3 sts, sc dec over last 2 sts, cut yarn. (5)
EARS: Work ears on each side of head on both body panels.
First Ear:
Position the panel as shown in the photo, with the end tail from the last row of the head to the left. Join the skin tone yarn with a sl st around the side of the 6th row of the head counting up from the 1st row of skin tone you made (it is JUST below the widest point of the head).
Row 1: ch 1, sc around the same row end and sc in next 2 row ends. (3)
Row 2: ch 1, turn, make a THREE sc decrease (same as a standard decrease, but you will pull up a loop,starting in same place as ch, from 3 sts as opposed to 2 before the final yarn over pull through), ch 1 more, then cut yarn. (1)
Second Ear: With the body positioned the same way as for the 1st ear, join the skin tone yarn with a sl st in the end of 8th row counting up from the body where you began the head. This is just ABOVE the widest point of the head.
Rows 1-2: Repeat as for first ear.
Ch 1 at beg of rows does not count as a stitch.
ARMS: (MAKE 4, 2 FOR EACH BODY PANEL)
Using red and leaving a long beginning tail to use to sew them to body later, chain 3:
Row 1: sc in 2nd ch from hook, sc in nxt ch. (2)
Row 2: ch 1, turn, 2 sc in each sc. (4)
Row 3: ch 1, turn, sc in first 2 sts, 2 sc in nxt st, sc in last st. (5)
Rows 4-17: ch 1, turn, sc in each st across, cut yarn after row 17. (5)
Row 18: *Position as shown in the photo below, with the tail from the last st made on row 17 on the left*. Join the white yarn in the BACK LOOP ONLY of the 1st st on the right side of row 17 just made, ch 1, sc in the same BACK LOOP and sc in each BACK LOOP ONLY across the row. (5)
Rows 19-20: ch 1, turn, sc in each st. (5)
Row 21: ch 1, turn, sc dec over first 2 sts, sc in nxt st, sc dec over last 2 sts. (3)
Row 22: ch 1, turn, sc in each st. (3)
Row 23: ch 1, turn, sc dec over first 2 sts, sc in last st, cut yarn. (2)
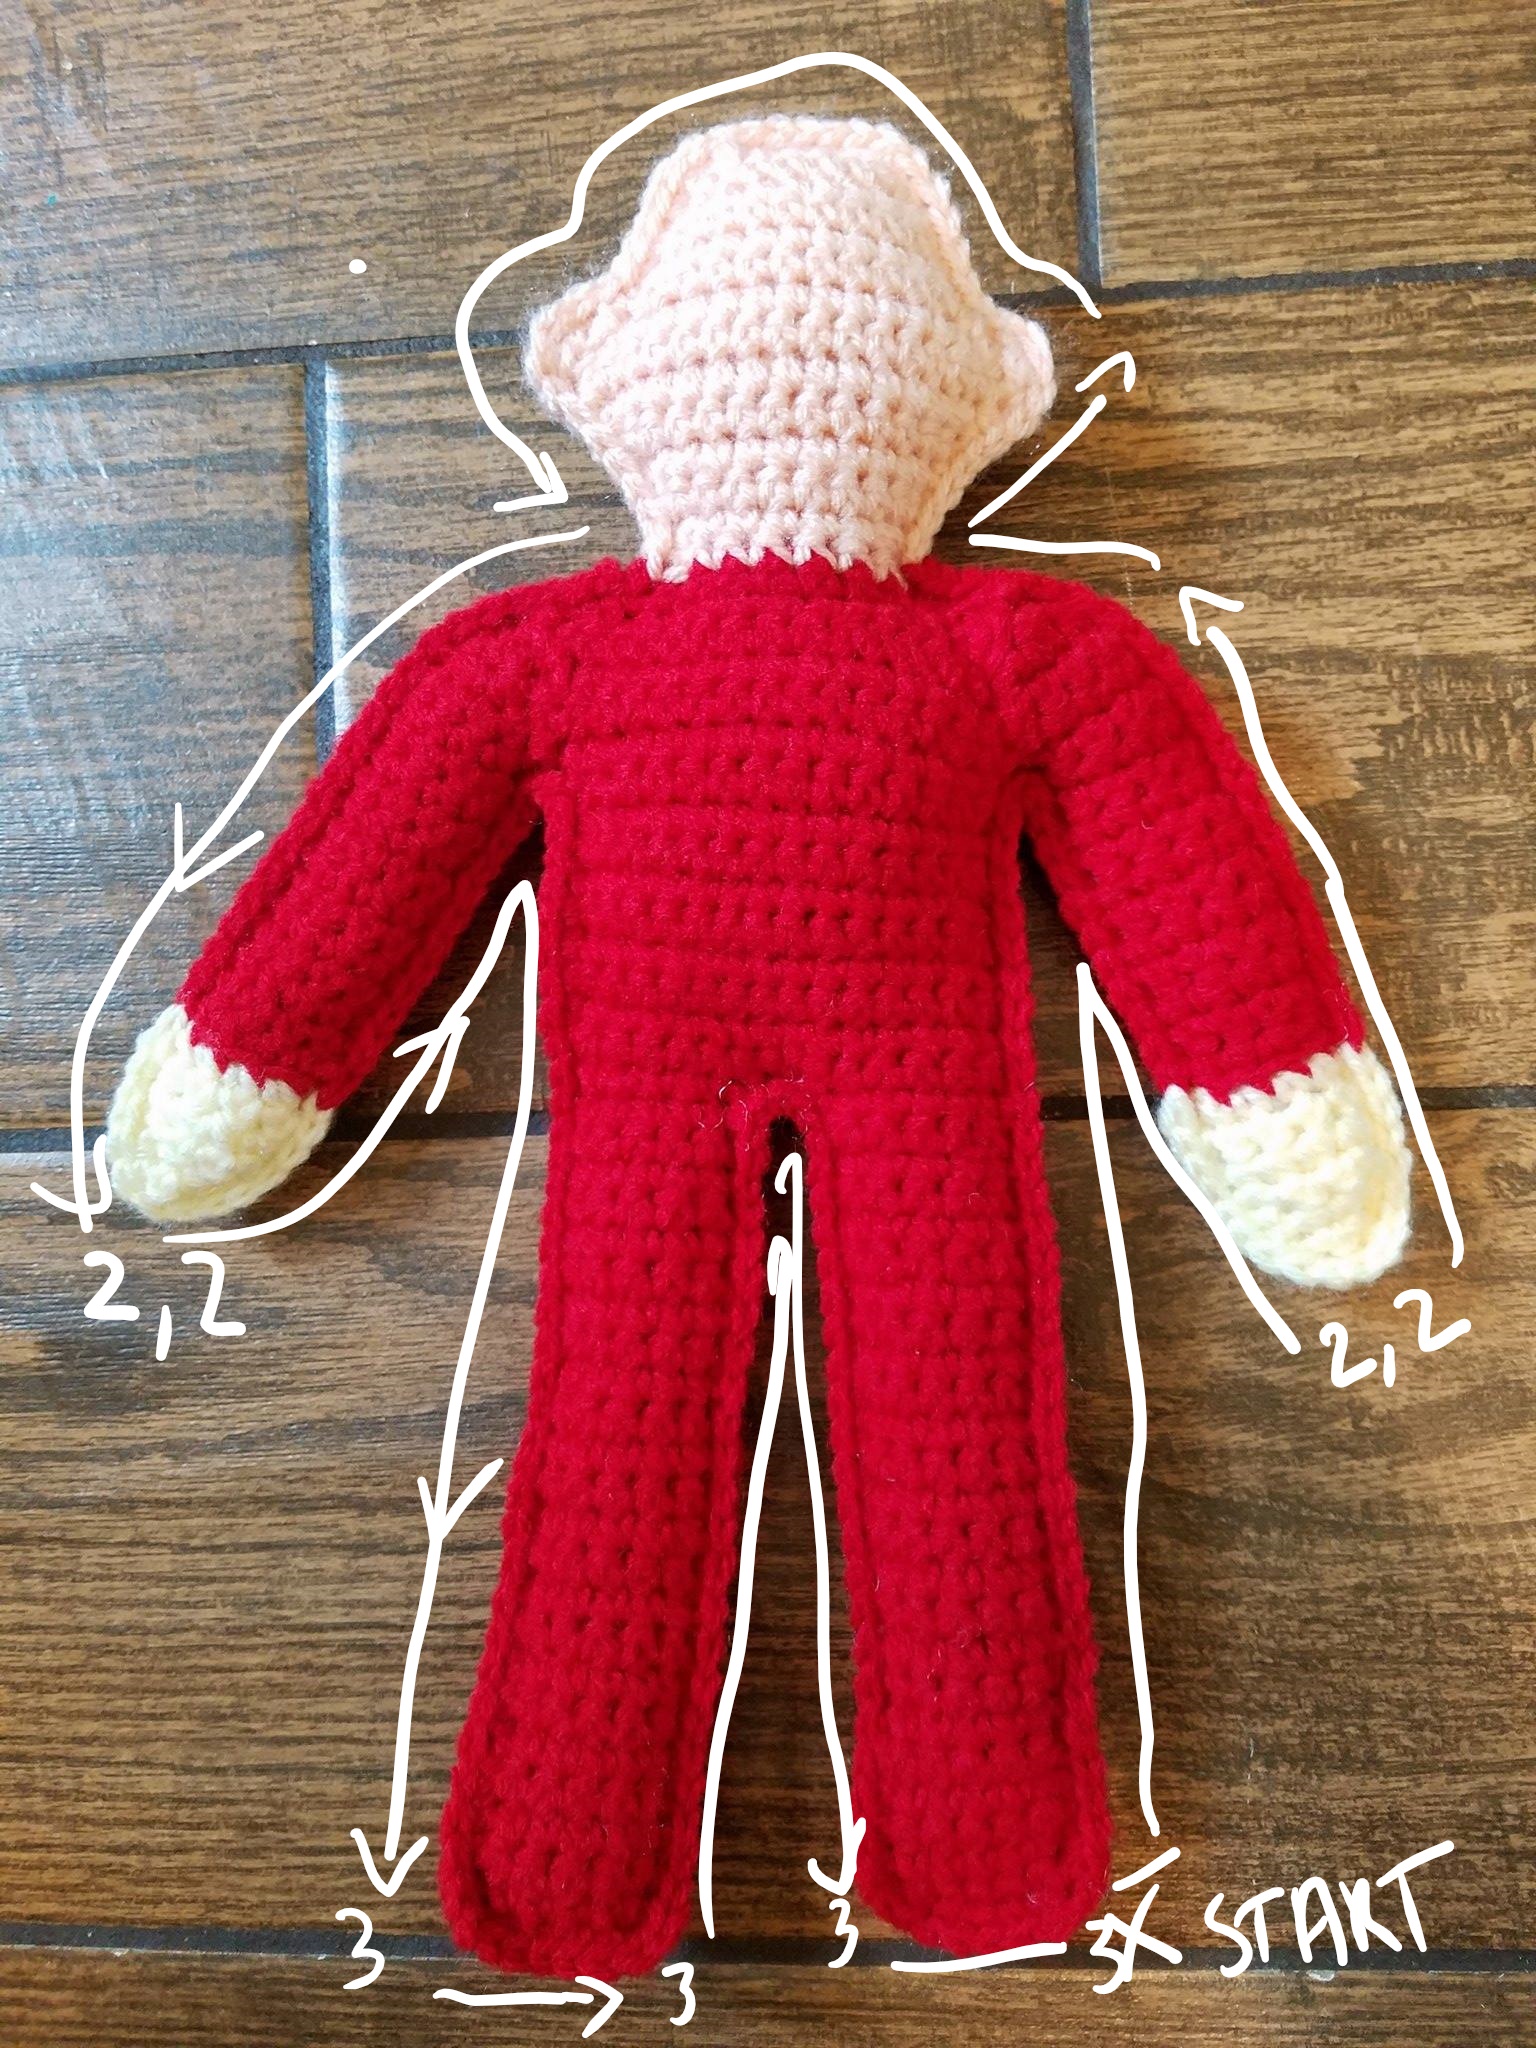
Using the long beginning tail you left, stitch one arm to either side of both body panels. Be sure that his gloves are under his sleeve. I stitched 6 sts of the arm to the body and used the tail to pull the top of the shoulder into the body to give it a rounded seamless look as if the arms were actually emerging from the body. You want to really strategically use the weaving end of the yarn to round the shoulders into the body, do not be afraid to mold and shape with the sewing!
JOIN BODY PANELS:
Position as shown in the photo below, laying the two panels on top of each other matching the position of arms and ears. Be sure the ridge at the wrist for the gloves is facing out on both pieces.
Join the red yarn in the spot shown with an “X” with a sl st working through BOTH PANELS. (Your hook will first go through the stitch on the top, THEN through the coordinating stitch on the bottom panel), ch 1:
Using your hook, gently add some stuffing into the limbs, head, and body as you complete this join round.
No ends to weave?! On these dolls, I knot my tails a few times around, and tuck them inside the body as I work. It is a lot of “knotty, tucky, stuffy” activity, but I prefer it for the ragdolls!
Row 1: Working through both panels throughout, sc in each sc at end of rows around, working 3 sc in each corner to round them slightly (shown on photo with a “3”). When you reach the stitch just PRIOR to the gloves, change to white and work the final yarn over pull through with the white, then work around the glove. (I worked 2 sc in each of the sc at the tip of the gloves, shown with “2,2” in the image) Then, in the same manner, change back to red to continue. Do the same for the head, change to the skin tone at the final yarn over pull through of the stitch just prior to the 1st st of the head edging. Change colors around in the same manner. Sl st to the 1st st made.
And that is it for Week One! Next week, we will bring out Elf to life with all the special details!
Much Love & Yarn,
Stephanie
The information and photos in this posting are the sole copyrighted property of Crochetverse©2017. Please do not copy and paste any of the information contained within either electronically, verbally, or written in part or in whole. Instead, please share the DIRECT LINK to this posting only, and if you do, I thank you for sharing. You of course may sell anything you make from this pattern that you have made with your own two hands, no contract labor or mass productions are permitted. If you credit Crochetverse as the designer that is greatly appreciated!
