


I love the beauty and magic of Christmas, who doesn’t? But, I gotta stay true and keep a little kreepy in it too… I LOVE the folktale of Krapmus and so do my children. All in good fun <3
Be good or Krampus might send this little gingerbread down the chimney on his hook to lure you up and punish you for being naughty! Take a bite out of him… no you are REALLY in trouble. Hope you enjoy this kinda cute kinda creepy Krampusy little guy!
Please note: I have created this free crochet pattern from myself to you. It is NOT to be copied and pasted and shared through documents or print. It is NOT to be saved and sold ever. It is NOT to be changed a little or a lot and claimed as your own for free or paid. Please and thank you so much! If there is any questions, please just shoot me a message via Facebook (link at bottom of page) Thank you so much!
Finished Size: About 10.5” tail and 7” wide from fingertip to fingertip.
Gauge: While not critical, you want your stitches to be tight and not gapped at all. The stuffing will show though if you work too loosely.
Materials:
- 100 yards golden yellow brown of a stiffer yarn such as Red Heart Super Saver
- Less than 20 yards each of medium lilac purple, spring green, white, and red
- Size H (5mm) crochet hook and Size D (3.25mm) crochet hook
- small amount of stuffing
- glue gun and sticks if you plan to adhere details this way
- scissors, tape measure, tapestry needle
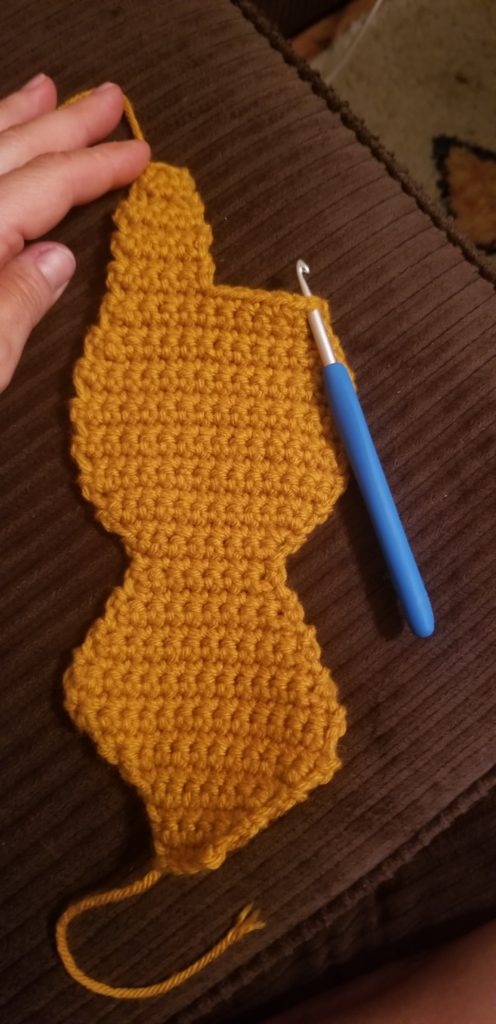
Body Half (Make 2):
With golden yellow and G hook, chain 5:
Row 1: sc in 2nd ch from hook and each rem ch across. (4)
Row 2: ch 1, turn, sc in 1st 3 sts, 2 sc in last st. (5)
Row 3: ch 1, turn, 2 sc in 1st st, sc in last 4 sts. (6)
Row 4: ch 1, turn, 2 sc in 1st st, sc in nxt 4 sts, 2 sc in last st. (8)
Row 5: ch 1, turn, 2 sc in 1st st, sc in nxt 6 sts, 2 sc in
last st, chain 4. (10 sts plus 4 chs)
Row 6: turn, sc in 2nd, 3rd, and 4th ch from hook, sc in nxt 9 sts, 2 sc in last st. (14)
Row 7: ch 1, turn, sc in 1st 13 sts, 2 sc in last st. (15)
Row 8-9: ch 1, turn, sc in each st across. (15)
Row 10: ch 1, turn, scdec over 1st 2 sts, sc in nxt 11 sts, scdec over last 2 sts. (13)
Row 11: ch 1, turn, sc in each st across. (13)
Row 12: ch 1, turn, scdec over 1st 2 sts, sc in nxt 9 sts, scdec over last 2 sts. (11)
Row 13: ch 1, turn, sc in each st across. (11)
Row 14: ch 1, turn, scdec over 1st 2 sts, sc in nxt 7 sts, scdec over last 2 sts. (9)
Row 15: ch 1, turn, sc in each st across. (9)
Row 16: ch 1, turn, scdec over 1st 2 sts, sc in nxt 5 sts, scdec over last 2 sts. (7)
Row 17: Marking the 1st and last st of this row with a stitch marker for arm placement later, sc in each st across. (7)
Row 18: ch 1, turn, 2 sc in 1st st, sc in nxt 5 sts, 2 sc in last st. (9)
Row 19: ch 1, turn, 2 sc in 1st st, sc in nxt 7 sts, 2 sc in last st. (11)
Row 20: ch 1, turn, 2 sc in 1st st, sc in nxt 9 sts, 2 sc in last st. (13)
Row 21: ch 1, turn, sc in each st across. (13)
Row 22: ch 1, turn, 2 sc in 1st st, sc in nxt 11 sts, 2 sc in last st. (15)
Rows 23-29: ch 1, turn, sc in each st across. (15)
Row 30: ch 1, turn, scdec over 1st 2 sts, sc in nxt 11 sts, scdec over last 2 sts. (13)
Row 31: ch 1, turn, sc in each st across. (13)
Row 32: ch 1, turn, scdec over 1st 2 sts, sc in nxt 9 sts, scdec over last 2 sts. (11)
Row 33: ch 1, turn, sc in each st across. (11)
Do not cut, but we are now beginning 1st leg.
Row 34: ch 1, turn, sc in 1st 5 sts. (5)
Rows 35-38: ch 1, turn, sc in each st across. (5)
Row 39: ch 1, turn, scdec over 1st 2 sts, sc in nxt st, scdec over last 2 sts. (3)
Row 40: ch 1, turn, sc in each st across. (3)
Row 41: ch 1, turn, scdec over 1st 2 sts, (sc, sl st) in last st, cut yarn.
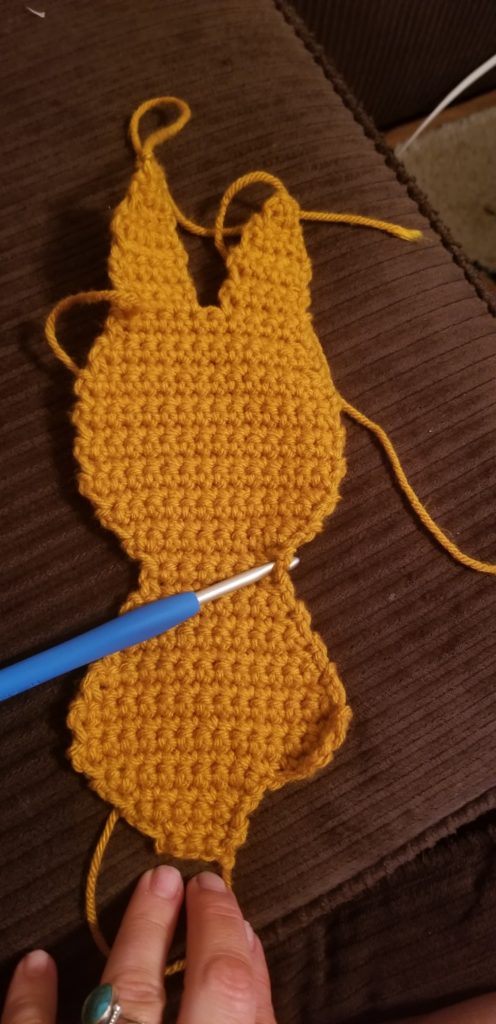
Begin 2nd leg:
With leg just completed to the left and the head end closer to you, rejoin the yarn with a sl st in the opposite end, see pic below:
Row 1: ch 1, sc in same st and nxt 4 sts. (5)
Row 2-5: ch 1, turn, sc in each st across. (5)
Row 6: ch 1, turn, scdec over 1st 2 sts, sc in nxt st, scdec over last 2 sts. (3)
Row 7: ch 1, turn, sc in each st across. (3)
Row 8: ch 1, turn, scdec over 1st 2 sts, (sc, sl st) in last st, cut yarn.
Begin 1st arm:
With bitemark on head to the right and the head closer to you, rejoin yarn in side of the st marked on the right from Row 17 above. You will be working towards the feet end 1st.
Row 1: ch 1, sc in row end as ch-1 and nxt 3 row ends. (4)
Rows 2-7: ch 1, turn, sc in each st across. (4)
Row 8: ch 1, turn, sc in 1st st, scdec over nxt 2 sts, sc in last st. (3)
Row 9: ch 1, turn, sc in each st across. (3)
Row 10: ch 1, turn, scdec over 1st 2 sts, (sc, sl st) in last st, cut yarn.
Begin 2nd arm:
With the bitemark in the head to the right and the feet closer to you, rejoin the yarn with a sl st in the remaining marked st on Row 17 from the side. You will be working to the feet end 1st.
Rows 1-10: Repeat as for right arm, but DO NOT CUT YARN. Instead continue to edge round.
Edge Round:
For one side you will NOT TURN before the edge round.
For the other side you WILL turn before the edge round.
It does not matter which is which, is just matters so that each side will have the right side of the edge round facing out when we sew them together.
Rnd 1: ch 1, (see above for turning notes), sc in each end of row and st around the entire body half, working 3 sts in the same st as you round corners and replacing the sc with a sl st as needed to reduce bulk in areas such as armpits, neck, and between legs, once around, sl st to 1st st made, cut yarn. Leave a 36” tail on one side to sew them together.
Whites of Eyes (Make 2):
With E hook and white yarn, make a magic ring:
Rnd 1: ch 1, 10 hdc in the ring, sl st to 1st hdc made, cut yarn leaving tail for sewing. (10)
Greens of Eyes (Make 2):
With E hook and green yarn, make a magic ring:
Rnd 1: ch 1, 7 sc in the ring, sl st to 1st sc made, cut yarn leaving long tail for sewing. (7)
Eyebrows (Make 2):
With yellow gold yarn held double strand and G hook, chain 5, cut yarn leaving long tail for sewing. (5)
Purple Cheeks (Make 2):
With E hook and purple yarn, make a magic ring:
Rnd 1: ch 1, 8 sc in the ring, sl st to 1st sc made, cut yarn leaving long tail for sewing. (8)
Mouth (Make 1):
With red yarn and E hook, chain 16, cut yarn leaving long tail for sewing. (16)
Buttons (Make 3):
With white yarn and E hook, make a magic ring:
Rnd 1: ch 1, 8 sc in the ring, sl st to 1st st made, cut yarn leaving long tail for sewing. (8)
Arm & Leg Frosting (Make 4):
With E hook and white yarn, chain 38, cut yarn leaving long tail for sewing.
Assembly: Use Main Photo as guide throughout for placement.
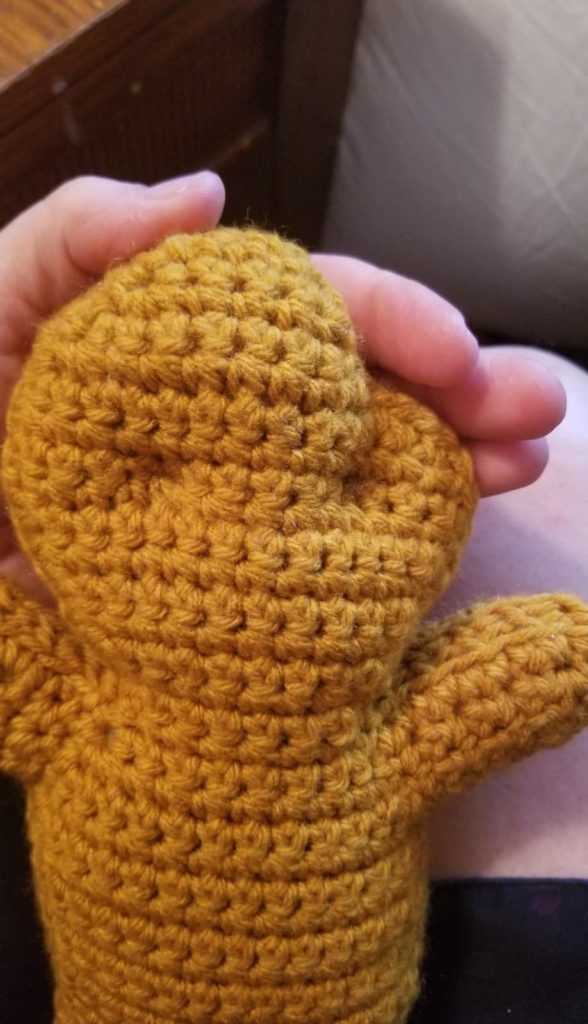
Stuffing as you sew around, place the two body halves upon each other, making sure each respective piece has the right side of the edge round facing out. Using the long tail from one half, begin sewing the two halves together. I prefer to work just through the inside loops of each piece as I sew (the two that are closest to each other), but use whatever method you like.
Using a separate strand of golden yellow yarn, needle sculpt the eye sockets to be countersunk. I insert the needle in the back of the head opposite of where I want the eye to be and then bring the yarn out through the front where the eye will be. Then, bring the yarn a stitch over and back through the front to the back in the same place you inserted and firmly knot the two pieces together tugging the yarn firmly to pucker the eye socket in. Do the same for the 2nd eye. Weave in all ends to this point.
I MUCH prefer hot glue to sewing on of details. I use Gorilla Glue brand glue sticks. It is 100% permanent, so use sparingly and pin in place the pieces as needed before you glue. Once it is down, it is there forever.
If you do not want to use glue, sew each of the pieces on.
Weave in all the ends 1st if you plan to glue and after if you plan to sew.
Glue/Sew one white eye in each countersunk eye socket.
Glue/Sew one green eye on top of each white eye, they are placed low and both to the center, in a cross eyed manner.
Glue/Sew an eyebrow over each eye. They need to point downwards to the center so he looks mad.
Glue/Sew one purple cheek to either side of the face. They are nearly centered under each eye.
Glue/Sew the mouth into position. It is a kidney bean shape, rounded on the top edge and dimpled on the bottom side.
Glue/Sew the three buttons on.
Glue/Sew the frosting on the end of each arm and leg a few rows up from the tips. I placed the beginning and end of the chain 1st together in the back, then pinned it into the wave form, then secured.
Weave in any ends that remain.
Dust/Soot:
If you want him to look dirty like he just came down from the chimney, sent by Krampus himself, use fabric paint or eyeshadow in a gray or black shade and SPARINGLY dirty him up as desired.
Please hop over to my Facebook page at http://www.facebook.com/crochetverse
You can also join my group for VIP discounts and sharing! That can be found at https://www.facebook.com/groups/251695645349035/
Follow me on any of my social media to stay in touch, I would love to have you! Much love and yarn, Stephanie Pokorny (Crochetverse)
The information and photos in this posting are the sole copyrighted property of Crochetverse©2019. Please do not copy and paste any of the information contained within either electronically, verbally, or written in part or in whole. Instead, please share the DIRECT LINK to this posting only, and if you do, I thank you for sharing. You of course may sell anything you make from this pattern that you have made with your own two hands, no contract labor or mass productions are permitted. I need your visits to keep me around creating! Please never screenshot or copy and paste the info within, instead share the link so I may entertain your friends as well! If you credit Crochetverse as the designer that is greatly appreciated!
