

")
As any good momma should, I’m fairly confident I know the line up to Nick Jr. and Disney morning cartoons a lot more thoroughly than I should. Truthfully, I wouldn’t have it any other way (even if I did, my two toddlers wouldn’t allow it, not even for one day, let’s get real, cartoons are serious business)
What I’ve done for you is simple, I’m going to show you how to embellish your favorite basic crochet beanie pattern into this Octonaut Kwazii Inspired design. There are literally probably 1000 free wonderful crochet patterns for a basic beanie available, and it seems most crocheters have their go-to pattern, so I’ve decided there really is no need for me to reinvent the wheel, BUT, what I will do is show you how to embellish that favorite beanie of yours into a cutesy-tootsie piratey kitty cat hat of adorableness. Like so:
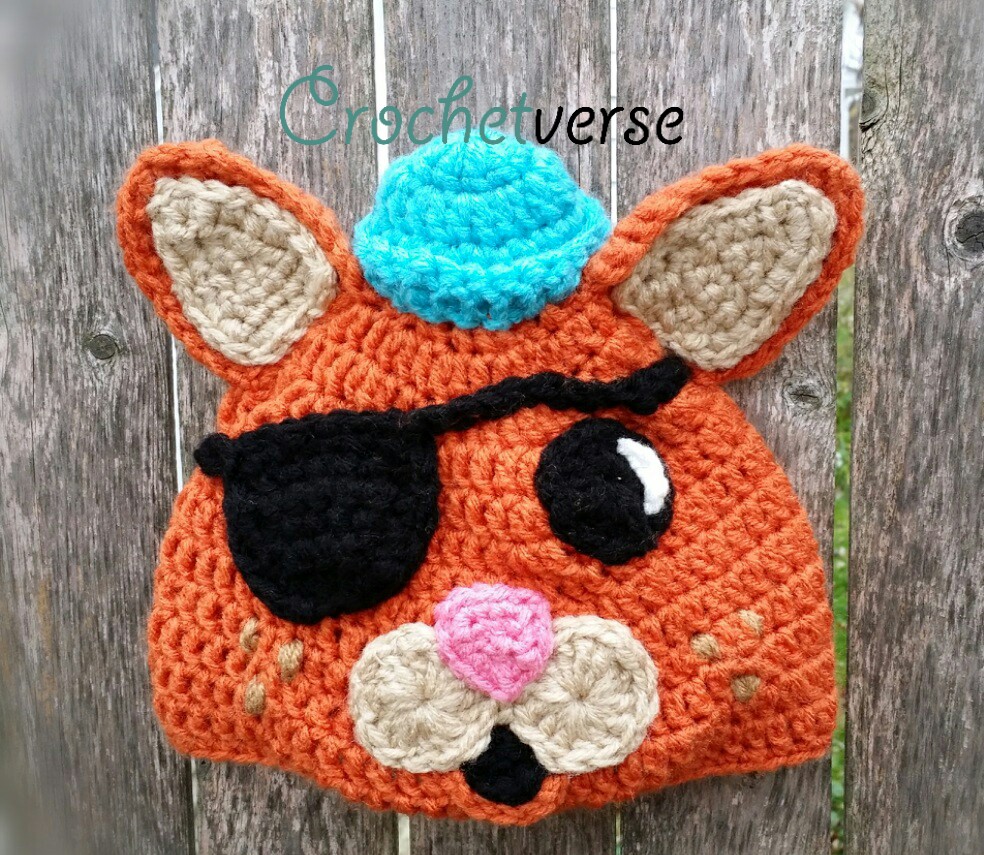
And more importantly, like so: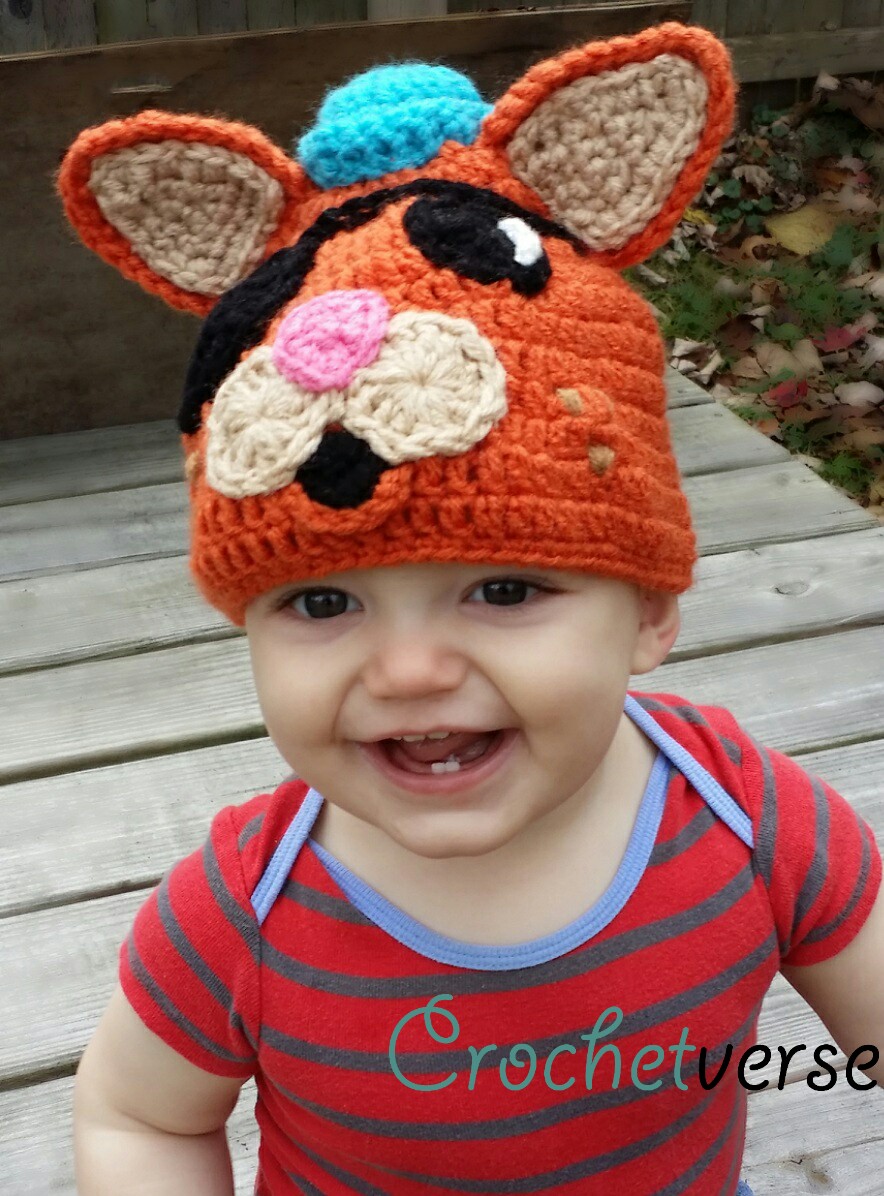
So, to begin, run and grab that go-to beanie pattern of yours and whip it up in your desired size using a deep carroty orange color, I’ve used Red Heart Super Saver in Carrot for my example.
Ok, Go…don’t worry I’ll wait for you right here until you’re done…
*Anxious finger tapping*….
Ok, great, you’re back I missed you!
Let’s get on with it now:
The PATTERN BEGINS:
In my example, I’ve used the following colors:
- Red Heart Super Saver in Turqua, Carrot, Buff, Warm Brown, White, and Black
- Red Heart with Love in Bubblegum
I’ve used an H (5.0mm) hook and a tapestry needle for weaving in the ends as well.
We’ve got to add ears, an eye patch, an eye, that little kitty nose, freckles, and that hat!
1st up, the Cheek Poofs: (Make 2)
You will use the yarn held DOUBLE stranded, I pull from the outside and the center of my skein at the same time, if this is too fiddly for you, go ahead and roll up two small balls and work that way)
With Buff, make a magic ring: (if you’re not sure how to do this, head on over to YouTube, it’s the best method for no holes in your center!)
Rnd 1: ch 2, make 14 dc in the ring, sl st to the top of the beginning ch-2, and tie off, leaving a long tail to stitch to face.
The Nose:
With Bubblegum yarn held single strand, ch 4:
Row 1: sc in 2nd chain from hook and nxt 2 chains, ch 1, turn. (3 sc)
Row 2: sc decrease over the 1st 2 sc, sc in last sc, ch 1, turn. (2 sc)
Row 3: sc decrease over the 2 sc. (1 sc)
Rnd 4: (Edge Round) Make sure right side is facing, ch 1, sc around the post of each sc at the end of the row, work 3 sc in each corner stitch of Row 1, work a sc around each post of the stitch at the row end and sl st to the 1st sc made, tie off, leaving a long tail to stitch to face.
The Eye & The Sparkle:
With black held DOUBLE strand, make a magic circle:
Rnd 1: ch 1 (does not count as a hdc) make 15 hdc in the ring, sl st to the top of the 1st hdc made, tie off, leaving a tail for seaming. (15 hdc)
With white held DOUBLE strand, ch 3, tie off.
Using the tails from the white sparkle, and photograph for placement, stitch the eye sparkle to the eye, you may knot the ends together as it won’t show and will be hidden forever under the eye once you stitch that to the face.
The Ears: (Make 2 of each piece)
Outer ear:
Leave a long beginning tail to use to stitch to hat later:
With carrot held DOUBLE strand, ch 9:
Row 1: sc in 2nd ch from hook and in each ch across, ch 1, turn, (8 sc)
Row 2: sc in each sc across, ch 1, turn.
Row 3: sc decrease over 1st 2 sc, sc in nxt 4 sc, sc decrease over last 2 sc, ch 1, turn. (6 sc)
Row 4: sc in each sc across, ch 1, turn.
Row 5: sc decrease over 1st 2 sc, sc in nxt 2 sc, sc decrease over last 2 sc, ch 1, turn. (4 sc)
Row 6: sc in each sc across, ch 1, turn.
Row 7: (sc decrease over nxt 2 sc) twice, ch 1, turn. (2 sc)
Row 8: sc decrease over the 2 sc, ch 1. (1 sc)
Rnd 9 (Edge Round): With right side of the ear piece facing work 1 sc around the post of each stitch at each row end, 1 sc in each remaining loop of the beginning chain, and 3 sc in each stitch at the ends of row 1, sl st to the 1st sc made and tie off leaving a long tail to stitch to hat later.
Inner ear:
With Buff held DOUBLE strand, ch 6:
Row 1: sc in 2nd ch from hook and each ch across, ch 1, turn. (5 sc)
Row 2: sc in each sc across, ch 1, turn.
Row 3: sc decrease over 1st 2 sc, sc in nxt sc, sc decrease over last 2 sc, ch 1, turn. (3 sc)
Row 4: sc in each sc across.
Row 5: sc decrease over 1st 2 sc, sc in nxt sc, ch 1, turn. (2 sc)
Row 6: sc decrease over the 2 sc, ch 1, turn. (1 sc)
Rnd 7 (Edge Round): Make sure the right side is facing, which is the right side of Row 1 on this and all pieces, sc around the post of each stitch at the end of each row, making and each remaining loop of the beginning chain across the bottom making 3 sc at the stitch on each end of Row 1, sl st to the 1st sc made, tie off leaving a long tail to stitch to hat later.
The Eyepatch:
With black held DOUBLE stranded, ch 25:
Row 1: sc in 2nd ch from hook and in nxt 7 chs across, ch 1, turn. (8sc) *The remaining unworked chains will be stitched to the hat as the straps for the patch later on*
Row 2: sc in each sc across, ch 1 turn.
Row 3: sc decrease over 1st 2 sc, sc in nxt 4 sc, sc decrease over last 2 sc, ch 1, turn. (6 sc)
Row 4: sc in each sc across, ch 1, turn.
Row 5: sc decrease over 1st 2 sc, sc in nxt 2 sc, sc decrease over last 2 sc, ch 1, turn. (4 sc)
Row 6: sc in each sc across, ch 1, turn.
Row 7: (sc decrease over next 2 sc) twice, ch 1. (2 sc)
Rnd 8 (Edge Round): Make sure the right side is facing and sc around the post of each stitch at the end of each row, sc in each remaining loop of the beginning chain, making 3 sc in each stitch at the ends of Row 1, when you pass by the long strand at the beginning or end, just push it to the back of the work to be picked up later, sl st to the 1st sc made, ch 15 more, then tie off, creating the other strap.
The Hat:
With Turqua held DOUBLE strand, make a magic circle: (do not turn rounds)
Rnd 1: ch 2 (counts as dc), make 9 more dc in ring, pull tail to close. (10 dc)
Rnd 2: ch 2, dc in same dc, 2 dc in each dc around, sl st to the top of the beginning ch-2. (20 dc)
Rnd 3: ch 2, dc in each of the remaining 19 dc, sl st to the top of the beginning ch-2. (20 dc)
Rnd 4: Working in the FRONT LOOPS ONLY, ch 2, dcFLO (double crochet front loop only) in the nxt 3 dc, 2 dcflo in the nxt dc, *(dcflo in the nxt 4 dc, 2 dcflo in the nxt dc), repeat from *, two times more, sl st to the top of beg ch-2, tie off leaving long tail to stitch to hat.
The Mouth:
Inner Mouth:
With black held DOUBLE strand, ch 3:
Row 1: sc in 2nd ch from hook and nxt ch, ch 1, turn. (2 sc)
Row 2: sc in each of the 2 sc, ch 1, then sl st to the sc just next to your original slip knot, tie off leaving tail for attaching later.
Lip:
With carrot held DOUBLE strand, ch 6, tie off leaving a tail to stitch to face.
Assembly:
Use the photo as a guide throughout here, I find the more attention to detail and placement you take in and recognize, the better your finished item will be.
- Stitch the two cheek poofs directly next to each other about 2 rows up from the bottom of the hat, you want to stitch SHALLOW, by this, I mean stitch through the hat, but only through the yarn about halfway, I stitch THROUGH the plies of the yarn, keeping it to the front, this way, it is secure to the hat, but when you look inside the hat, it is not a HUGE rat’s nest of random stitching (*Now you’ve got some professional stitching there, brag on Crochet Pro! J)
- Stitch the nose over the poofs as shown, smaller point down in the same manner, stitch the black inner mouth just below the center of the cheek poofs. I lifted the edge up a little on the cheeks and stitched UNDER them to it looks like one nice piece, then line the bottom edge with the lip (pinning in place if needed) and stitch into place, again stitching the corners just under the cheek poofs.
- Stitch the inner ear (buff) to the outer ear (carrot) for both ears, matching the wrong side of the inner ear to the right side of the outer ear, now being mindful of placement, stitch the ears to the top of the head on either side, view from the front/back/top to be sure they are even. Be sure to place the hat in between to be sure they are sewed on with enough room to stitch the hat between next. Stitch them on SLIGHTLY CURVED, this trick, in accompaniment with the double strand, will really make them stand up nice and proud. (No floppy ears here!)
- Stitch the hat on the head through that remaining BACK loop you left unworked, I stuffed mine with a length of the same Turqua yarn the hat is made with, this way, no white stuffing will show through and the hat has a little body to it!
- Using the Warm Brown held double stranded, simply stitch three freckles on either side of the cheek poofs, I stitched three times around for each freckle, be carefully you don’t pull to tightly and get a pucker on your hat, I then knotted the two tails together and wove them into the stitches inside and trimmed.
- Stitch the eye and eye patch in place using the same SHALLOW STITCH method, leaving the long tails of the eye patch loose. Once they are secure, you will place (and pin if you need) the straps in place, wrapping the around the head, then stitching them in place. Now, weave in all those ends that might be fladoodling around, and trim them up nice and neat…
NOW, ISN’T THAT JUST THE CUTEST THING EVER?!
*Cue- Go grab that camera and snap me a ton of picture of that pirate kitty of yours and be sure to post it on my Facebook page: CLICK RIGHT HERE! so I can brag for you!
