

")
If you know me well, you will know that I am a big fan of onesies – they are the ultimate comfort clothing! I was looking to buy myself a new onesie last week. I have a pink fluffy one currently, but it has become a bit worn and I decided it was time for a new one. I found myself on Kigurumi and stumbled across their amazing collection of narwhal onesies (https://kigurumi.co/collections/onesies-narwhal). As someone who is obsessed with rainbows and unicorns…. I kind of go by a “Have horn, will travel” kind of motto… SO of course the Narwhal fits the bill!!
Inspired by these, today, I am expanding my FREE Ragdoll Pattern Menagerie with THIS little narwhal cutie!
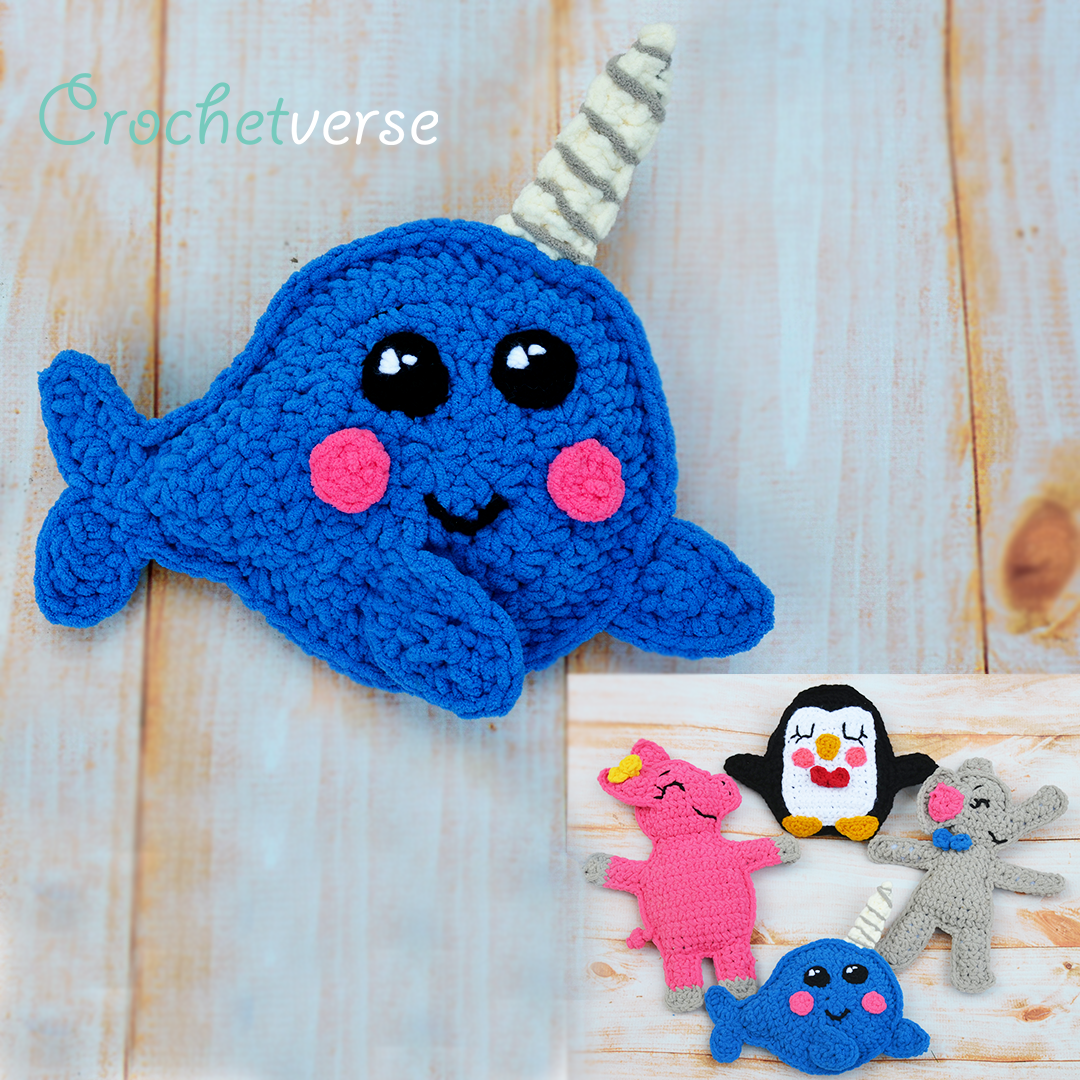
All the ragdolls you see shown are free! Check the others here:
Elephant: https://crochetverse.com/elephant-ragdoll/
Piggy: https://crochetverse.com/ragdoll-piggy/
Penguin: https://crochetverse.com/penguin-ragdoll/
The Pattern:
MATERIALS:
- about 75 yards super bulky yarn in blue (Shown Bernat Blanket Brights in Royal Blue)
- about 10-15 yards each of super bulky yarn in white, gray, and pink (Shown Bernat Blanket in Pale Gray, Vintage White, and Pixie Pink)
- about 10-15 yards each of regular worsted yarn in black and white (Shown Red Heart Super Saver in Black and White)
- Size N(9mm) crochet hook
- Size G(4mm) crochet hook
- small amount of stuffing such as poly-fil
- scissors & tapestry needle
YARN SUBSTITUTIONS:
No blanket yarn? 3 strands of regular worsted weight yarn can be held as one to equal super bulky.
Want a smaller doll? Reduce your hook and work double or single strand worsted weight, being sure to keep stitches tight.
FINISHED SIZE:
As written: about 13″ wide x 9″ tall, count the horn and he is about 14″ tall
GAUGE:
Not super important, but be certain you do not have gaps in your stitches where the stuffing will poke out. If this is occurring, choose a smaller hook size and try again.
MAIN BODY (Make 2):
With blue super bulky (3 strands worsted or 1 strand blanket yarn) & 9mm hook:
Make magic circle: *Use a stitch marker to mark rounds as needed*
Rnd 1: ch 1, 8 sc in the ring, sl st to 1st sc made, pull tail firmly to close. (8)
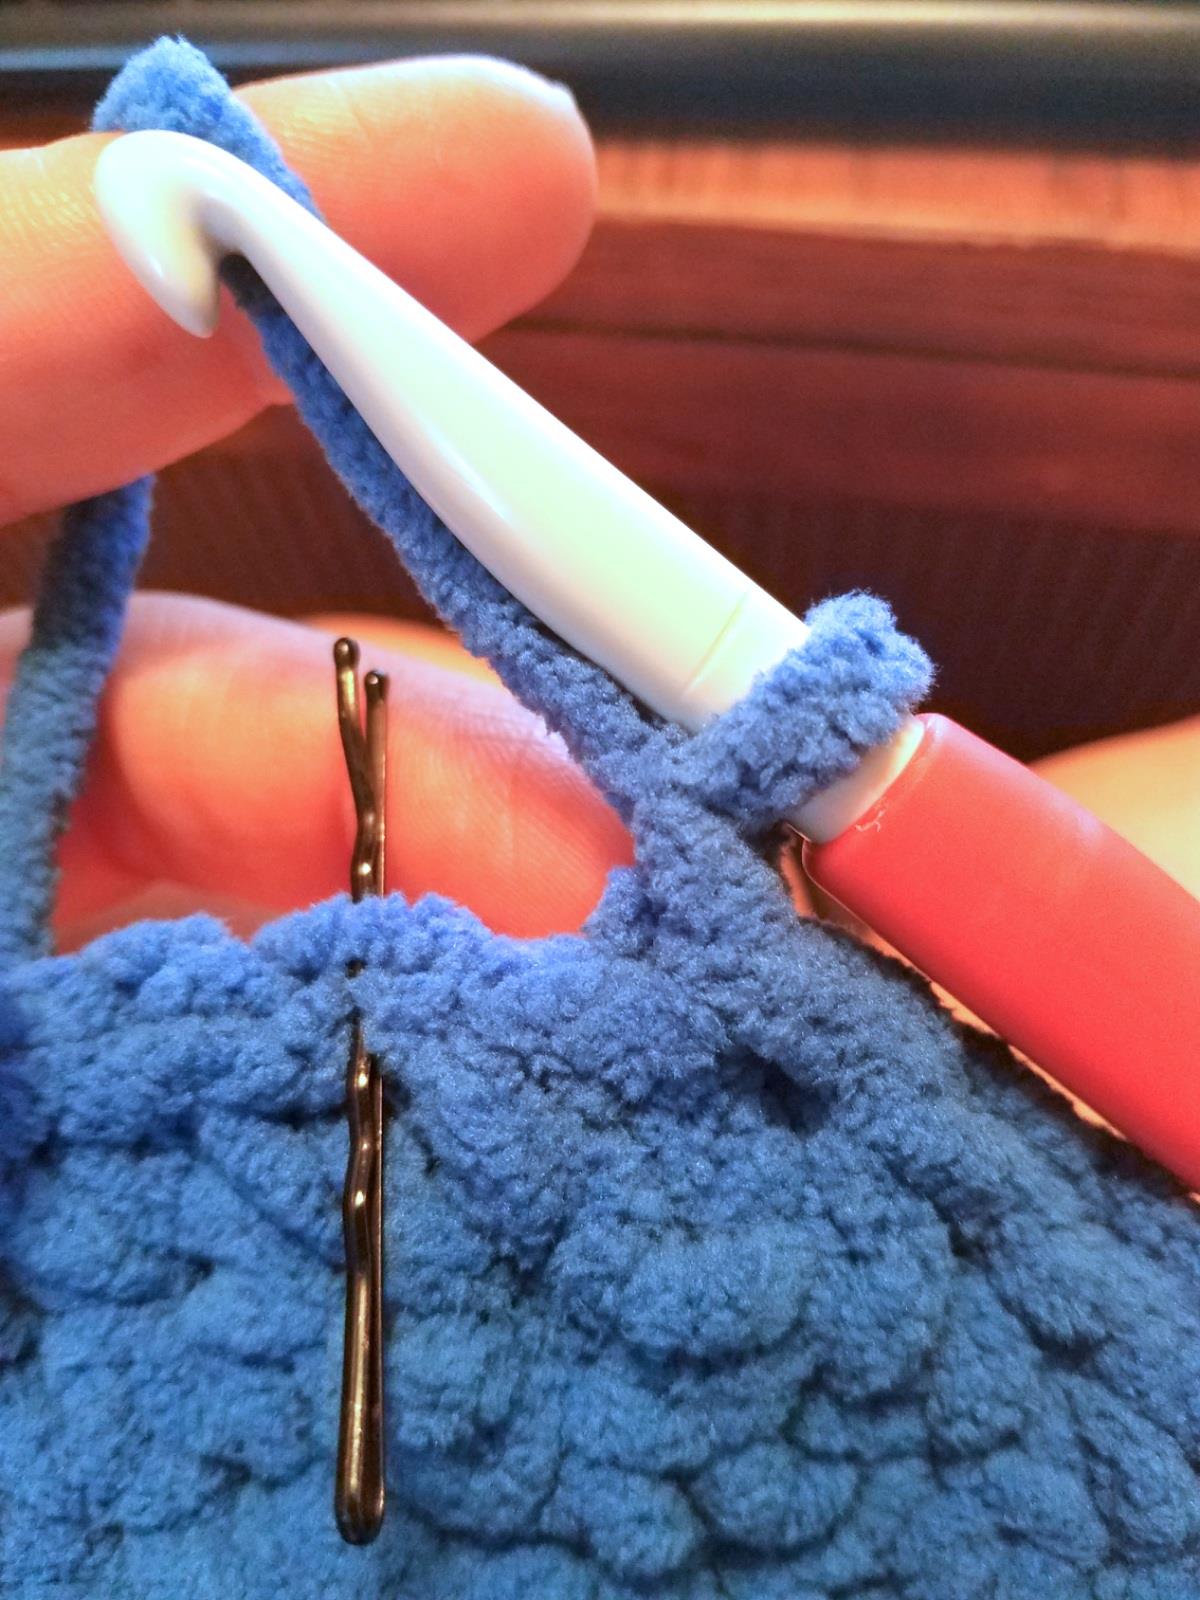
Rnd 2: ch 1, turn, 2 sc in each sc around, sl st to 1st sc made. (16)
*When I work my rounds, I work my 1st st of the nxt round in the st that follows the sl st join. The bobby pin is in the location in the spot I would make my 1st st to begin the subsequent round*
Rnd 3: ch 1, turn, (sc in the nxt st, 2 sc in the nxt st) eight times total, sl st to 1st sc made. (24)
Rnd 4: ch 1, turn, (sc in the nxt 2 sts, 2 sc in the nxt st) eight times total, sl st to 1st sc made. (32)
Rnd 5: ch 1, turn, (2 sc in the nxt st, sc in the nxt 3 sts) eight times total, sl st to 1st sc made. (40)
Rnd 6: ch 1, turn, (sc in the nxt 4 sts, 2 sc in the nxt st) eight times total, sl st to 1st sc made. (48)
Rnd 7: ch 1, turn, (sc in the nxt 2 sts, 2 sc in the nxt st, sc in the nxt 3 sts) eight times total, sl st to 1st sc made. (56)
Rnd 8 (Partial round to begin creating tail): Do not ch 1, do NOT turn, sc in nxt st, 2 sc in nxt st, sc in nxt 3 sts, 2 sc in nxt st, sc in nxt st. (9)
Row 9: ch 1, turn, sc dec over 1st 2 sts, sc in nxt, sc dec over nxt 2 sts, sc in nxt 2 sts, sc dec over last 2 sts. (6)
Row 10: ch 1, turn, (sc dec over nxt 2 sts) three times total. (3)
Row 11: ch 1, turn, sc in 1st st, sc dec over last 2 sts. (2)
Row 12: (Create Tail) turn, ch 4, sc in 2nd ch from hook, hdc in nxt ch, 2 hdc in nxt ch, sl st in each of the 2 sts from row 11, ch 4 more, and turn again, sc in 2nd ch from the hook, hdc in the nxt ch, 2 hdc in the nxt ch, sl st into the sl st on row 11, tie off.
CREATE FINS (Make 4):
With blue super bulky (3 strands worsted or 1 strand blanket yarn) & 9mm hook:
Chain 4:
Row 1: sc in 2nd ch from hook and nxt 2 chs. (3)
Row 2: ch 1, turn, sc dec over 1st 2 sts, sc in last st. (2)
Row 3: ch 1, turn, sc dec over the 2 sts, ch 1, then tie off.
Assemble/join: (Repeat 2x to create 2 fins)
- Stack 2 fin pieces on top of each other matched. As you work the join round, tuck the tails inside the piece to stuff and eliminate the need to weave in ends.
- Insert hook through BOTH pieces in the 1st st made on row 1 and join blue yarn with a sl st, ch 1.

Rnd 1: working through both panels, matching stitches, make 3 sc in the same st as the join, sc in the nxt st, 3 sc in the last st, sc in each of the 3 row ends up the side, sc in through the st on row 3, ch 1, then sc in the same st on the fin, sc in each of the 3 row ends down the 2nd side, sl st to the 1st sc made, leave a long tail to seam to body.
JOIN BODY PANELS:
- Lay the 2 main body panels on top of each other, matching stitches.
- Insert hook through BOTH pieces and join the blue yarn with a sl st somewhere near the st shown in the image, ch 1:
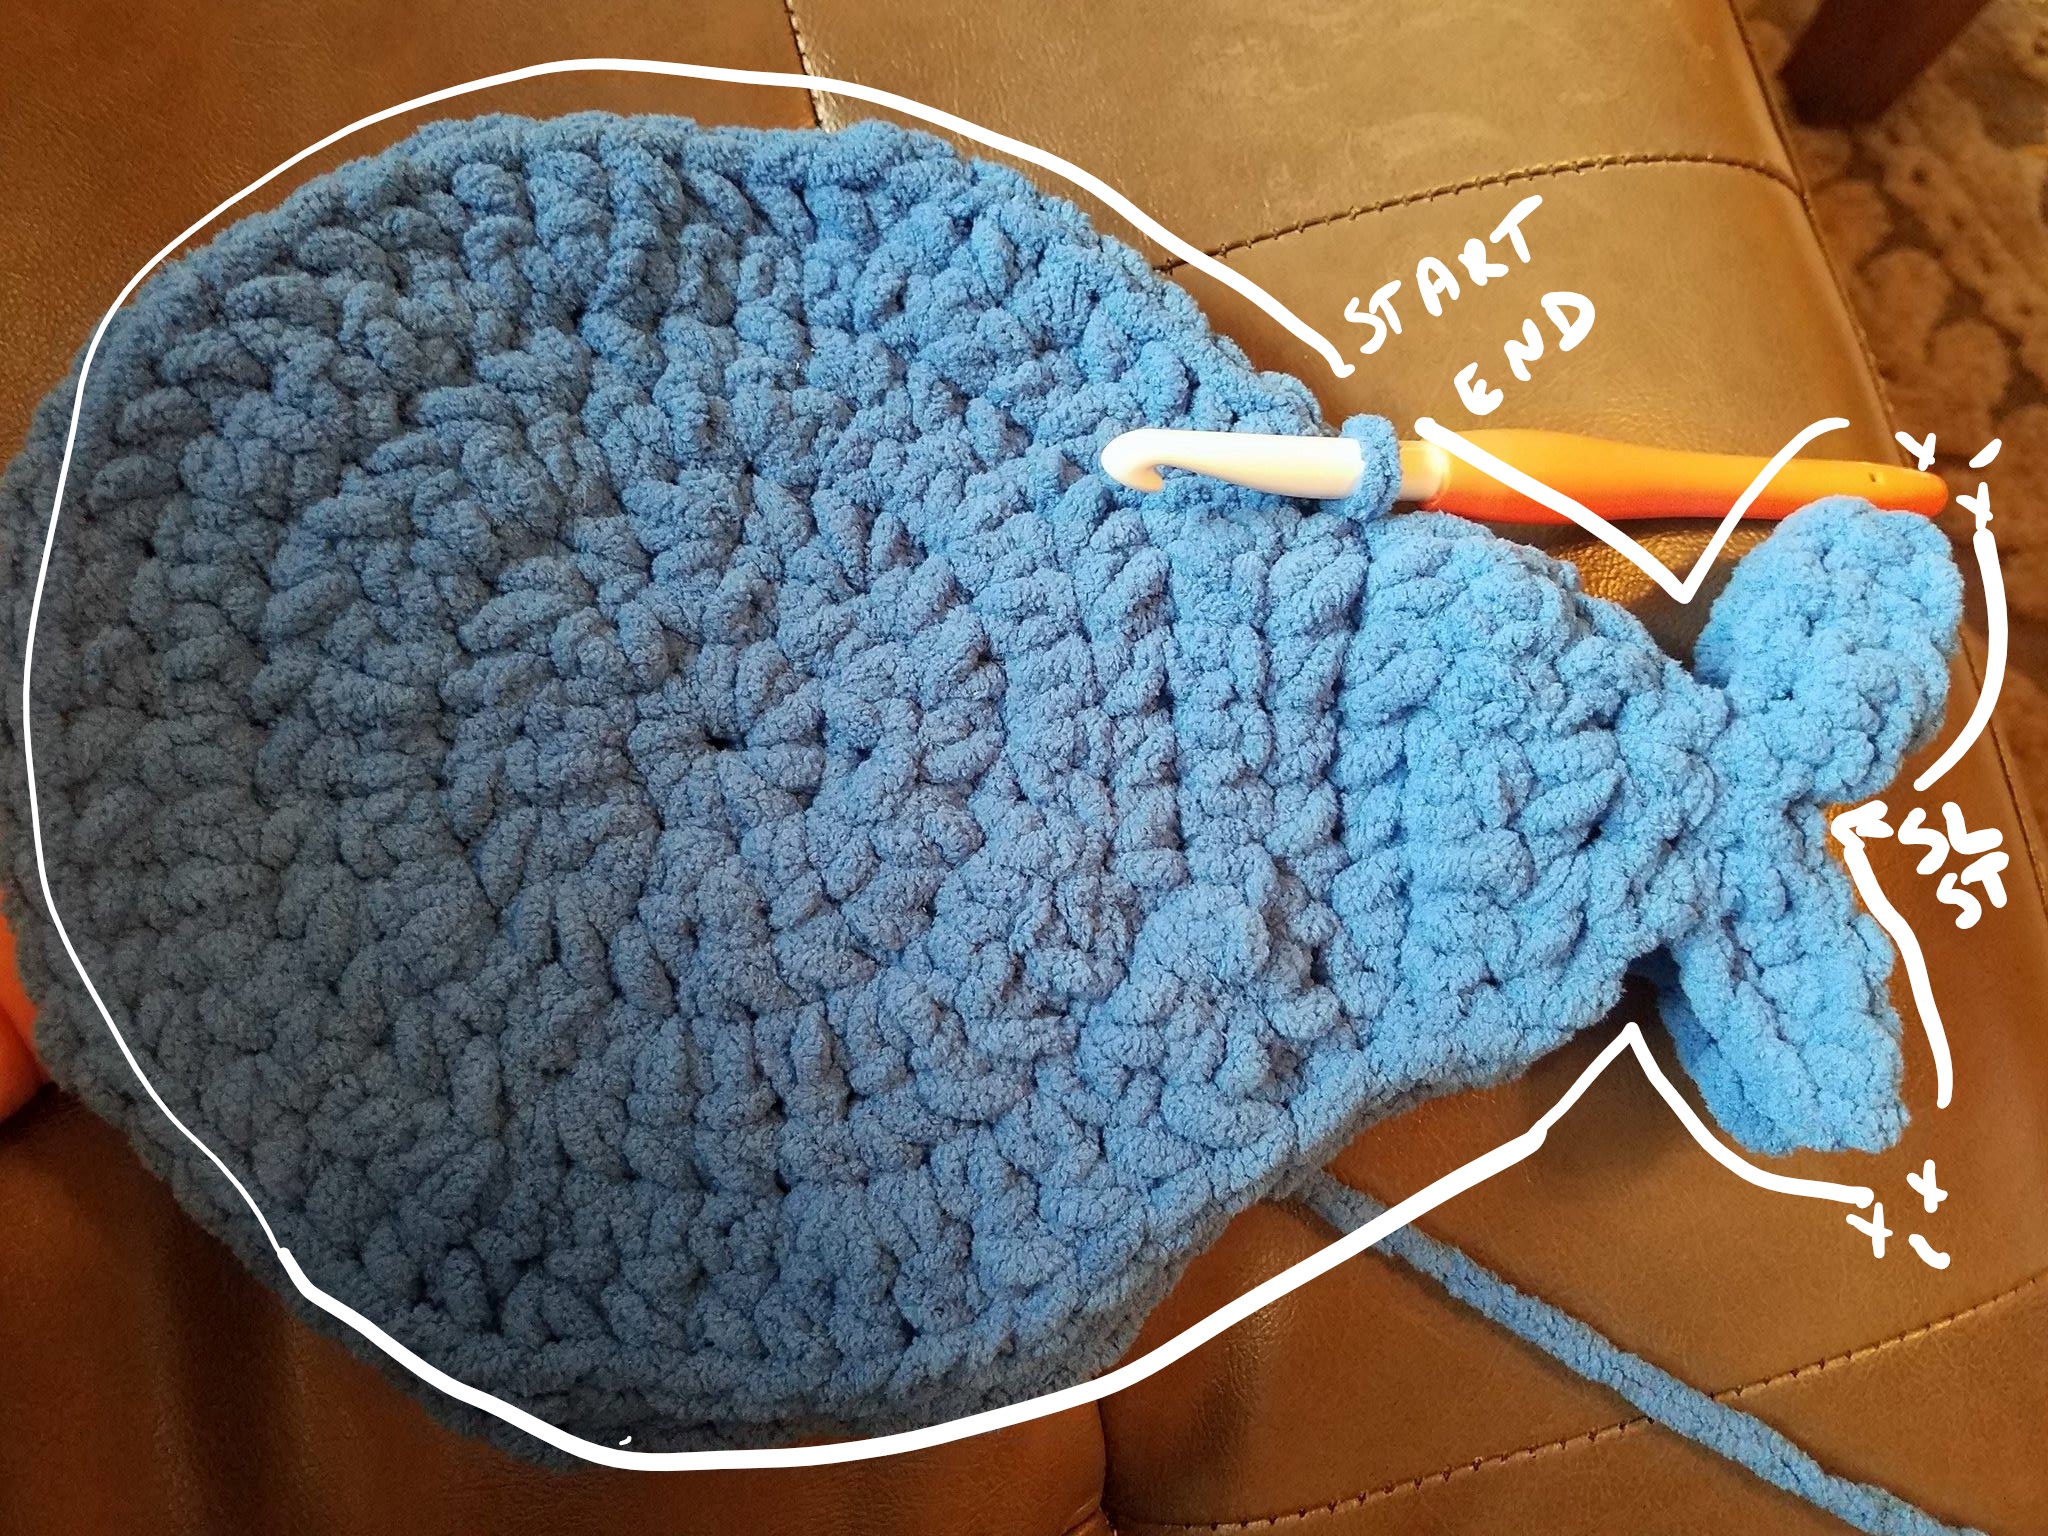
Rnd 1: working through both panels, matching stitches, sc in each st around, at the st at the tips of each fin make (sc, ch 1, sc) all in the same st, and at the low point between the 2 fins, replace the sc with a sl st. Tuck tails inside as you work around, before the last few stitches are worked, stuff a small amount of stuffing inside. You want your piece to have SOME body, but not be overly stuffed because it is a ragdoll. I did not find a need to work any increases on the join round, the body remained fairly flat.
The image above shows the location where the (sc, ch 1, sc) are worked at the tail tips and where the sl st at the point is worked.
MAKE HORN PANELS (Make 2):
With cream super bulky (3 strands worsted or 1 strand blanket yarn) & 9mm hook:
Chain 3:
Row 1: sc in 2nd ch from hook and nxt ch. (2)
Row 2: ch 1, turn, scblo in each of the 2 sts (single crochet in the BACK LOOP ONLY, or the one furthest from your towards the back of the work) (2)
Row 3: ch 1, turn, scflo in each of the 2 sts (single crochet in the FRONT LOOP ONLY, or the one closest to you on your work) (2)
Row 4: Repeat row 2.
Row 5: ch 1, turn, sc dec over the 2 sts. (1)
Row 6: ch 1, turn, sc in the st, ch 1, tie off.
Assemble/join:
- Stack the 2 horn pieces on top of each other matched with the sides that have the ridges created by the blo/flo stitches facing out. As you work the join round, tuck the tails inside the piece to stuff and eliminate the need to weave in ends.
- Insert hook through BOTH pieces in the 1st st made on row 1 and join blue yarn with a sl st, ch 1:
Rnd 1: Working through BOTH pieces at once to join, make 2 sc in each of the 2 sts across row 1 on the bottom, 1 sc in the end of each of the 7 rows up the side, in the sc at the top of row 7 make (sc, ch 2, sl st in 1st ch of the ch-2 made, sc) all in the same st, sc once in the side of each of the 7 rows down the 2nd long side, sl st to the 1st sc made, tie off, leave a long tail to seam to body.
MAKE CHEEK CIRCLES (Make 2):
With pink super bulky (3 strands worsted or 2 strand blanket yarn) & 9mm hook:
Make a magic circle, ch 1:
Rnd 1: make 6 sc in the ring, sl st to 1st sc made, tie off leaving a long tail to seam to face later.
MAKE BLACK MAIN EYES (Make 2):
With black worsted weight yarn single strand & 4mm hook:
Do not turn or join rounds unless instructed.
Make a magic circle, ch 1:
Rnd 1: 6 sc in the ring, pull tail to close tightly. (6)
Rnd 2: 2 sc in each sc around. (12)
Rnd 3: (sc in the nxt sc, 2 sc in the nxt sc) six times total, sl st to 1st sc made, tie of leaving a long tail to seam to face later. (18)
ASSEMBLY:
- Seam on fins: using the main photo as a guide and the long tail left after tying off, stitch one fin to the body and one from the side. Try to match the position as shown in the image. I like the side of the body with the right side of the join round facing up to be the right side of my piece. Same for the fins, seam them on so the right side of the join round is facing up. The fin from the side of the body should be seamed BEHIND the join round. The fin on the body should have one stitch worked in the center to the main body. This way it is still free floating but tacked into position.
- Seam on horn: using the main photo as a guide and the long tail left after tying off, stitch the horn to the top of the head, behind the join round of the main body and angled so it points slightly forward. Be sure the right side of the horn join round faces front.
- Seam on cheeks: using the main photo as a guide and the long tail left after tying off, stitch on the cheek circles making sure the right side of round 1 of the cheek is facing up.
- Seam on eyes: with a strand of white, 1st stitch on the eye sparkles as shown in the main pattern image. For the larger main dot, work around the stitches 6 times, for the smaller one just work around twice. Stitch the eyes so that both main dots face up in the same direction and are placed so the large white dot is in about the 11 o’clock position for both eyes.
- Stitch on mouth: with a single strand of black worsted weight yarn, use the photo as a guide and stitch on a little mouth.
- Enhance horn: (optional) using a strand of gray, wrap it round the hook tugging gently to make it appear the horn is spiraling.
- Stitch on eyebrows: usin a strand of black single and needle, stitch eyebrows on using the photo as guide working around twice.
- Weave in any remaining ends.
Thank you! Please show me your work on the Facebook Page “Crochetverse!”
If you are viewing this pattern anywhere but crochetverse.com or downloaded from the Official Crochetverse Ravelry or Etsy store, it is an illegal reproduction copy. Please help me stay on top of this by emailing me, so I may stay afloat and continue to share patterns and ideas with you all! <3 Much Love and Yarn, Stephanie Follow on Facebook Here!
The information and photos in this posting are the sole copyrighted property of Crochetverse©2017. Please do not copy and paste any of the information contained within either electronically, verbally, or written in part or in whole. Instead, please share the DIRECT LINK to this posting only, and if you do, I thank you for sharing. You of course may sell anything you make from this pattern that you have made with your own two hands, no contract labor or mass productions are permitted. If you credit Crochetverse as the designer, that is greatly appreciated!
