Tunisian Crochet on a Regular Crochet Hook? What?! Yep. #TrueStory
Learn how to do it and make this cute slouchy here!
As featured in the December 2015 Newsletter for Crystal Palace Yarns, the creator of the amazing Chunky Mochi, we’ve featured in the hat! Check the newsletter HERE!
Check out the CORDUROY RIDGE SLOUCHY.
Aptly named because this stitch creates ridges that look like your finest corduroy fabric 🙂
Big thanks to the folks over at www.shareapattern.com, this little hat was the featured pattern today! Tons of free patterns there, head over and share the love back!
This little cold front already has me missing the sunshiney skies and playground playin’ days. So, what to do…what to do….GRAB RAINBOW YARN and MAKE A CHEERY SLOUCHY HAT!
Take a look at that stitch…What is it you ask? Is it knit, crochet, loom? It surely looks different….The cool thing about this cheerful little topper is that it is Tunisian crochet….
The EVEN COOLER thing is that it’s done on a REGULAR CROCHET HOOK! Excited? Me too…and I’m gonna show you how. If you can single crochet, you CAN do this hat. Pinky promise. Ready? First, walk with me as I show you how to do this cool little technique with equipment you probably already have on hand…(Then, the hat pattern follows once you bag up your new tricks!)
FIRST, We will make a sample swatch, this is NOT the pattern and is simply going to be practice and learn. Make it a coaster, whatever you like, just don’t try to wear it on your head, you’ll look silly 🙂
First up: The Hook.
Normally, for Tunisian crochet, you’d need to get your hands on a Tunisian crochet hook, these basically look like a normal hook, but wayyy longer. This is needed for larger projects (I’ll explain in a few minutes why), but with this hat I’ve designed, it can be done on a standard hook. That way if you don’t like it, (which you’d have to be crazy not to, it’s an awesome new skill) you can hurl the idea across the room and no one will get hurt. I hope. No promises. Actually, just set it down if you must.
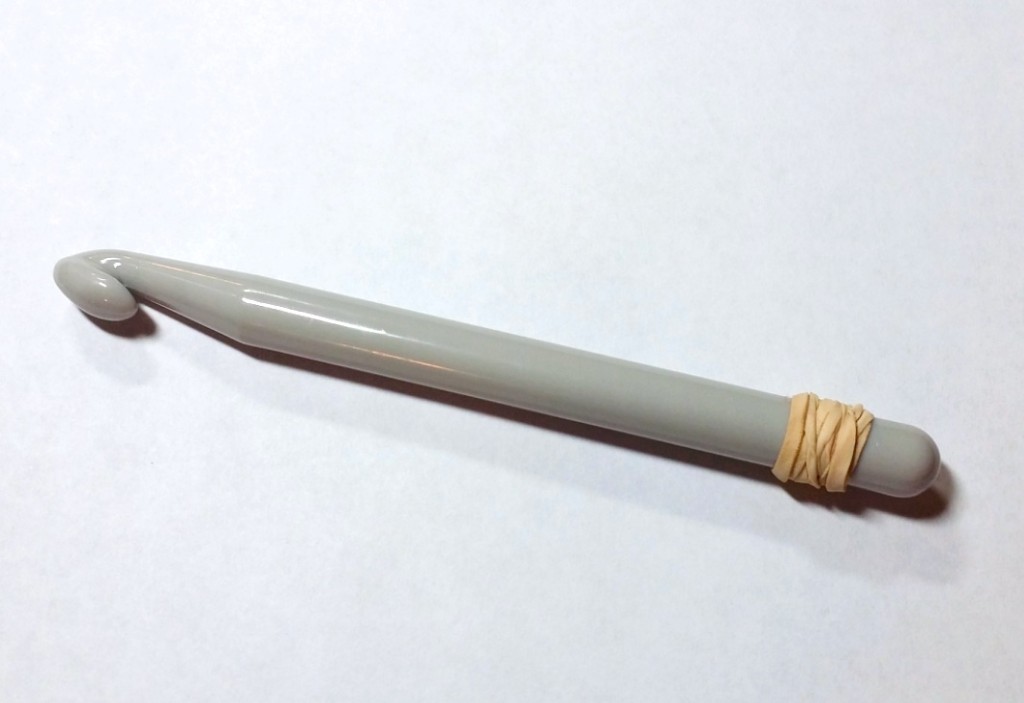
Go grab a standard P crochet hook. Let me tell you, I am a TIGHT crocheter. Do NOT be afraid to go down a hook size or even two or even three if needed to get the gauge right that is listed in the actual pattern below. Any hook will work, rubber band the end just the same. The loops might stick a little at the taper point, but don’t worry, just coax them over. In addition, gently tug the hook down after each forward pass is complete to make sure the loops are all uniform height. My fine machine shown below is from Walmart, so I know it’s readily available. Grab a plain old rubber band, and twist it over the end like you see here:
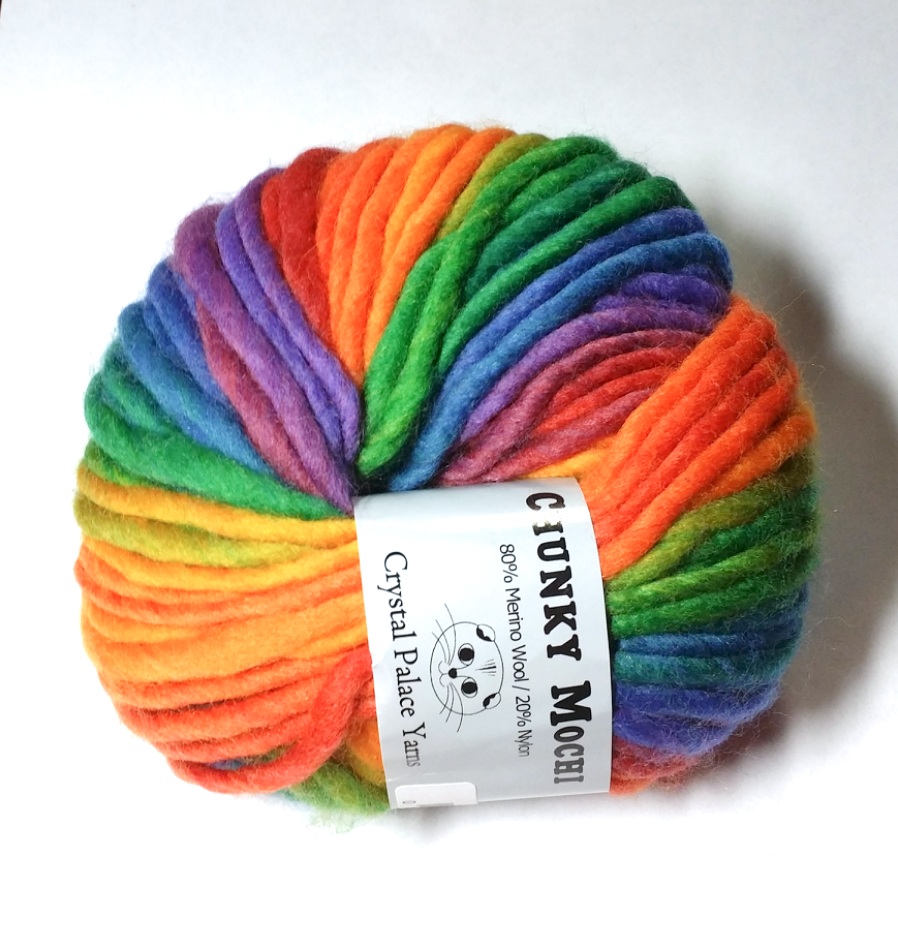
Pretty jazzy and high tech, don’t ya think? Now, grab some chunky yarn, I’m using this cloudy soft rainbow delight by Crystal Palace, called Chunky Mochi in Intense Rainbow. Nailed that color name right on the head, Crystal Palace folks.
This hat is done in a Tunisian Stitch that looks like little ridgey bumps. It is worked just a bit different than standard Tunisian Simple Stitch (I’ll show you where in just a sec)
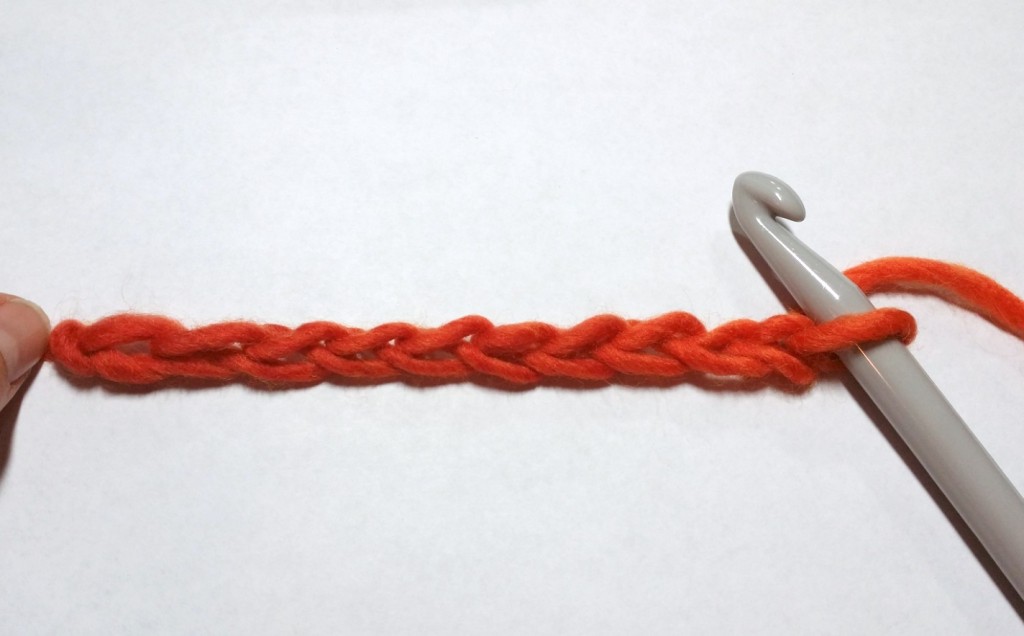
We are going to work a 10 stitch sample for you to learn the technique with, the actual PATTERN for the hat is below. If you wanted a swatch with 10 single crochets in your work, you’d chain 11, right? Well, this is NOT the same for Tunisian. You will chain the EXACT number of stitches you need for this stitch. So, because we want 10 stitches, we CHAIN 10.
As normal, you do not count the loop currently on your hook as one of the chains. If you count the nesting V’s here, you’ll see we have 10. Something to note, Tunisian crochet, by nature, tends to curl. As you work, this will ease up a bit. But it’s always a good idea to chain loosely for the beginning chain and edge/border a flat piece as these two steps help combat this natural tendency.
Now, flip that chain over and notice the “hump” or “bump” on the back of the chain. THIS is where you will be inserting your hook for the upcoming work. This will give you a nice look to your beginning edge, which will assist us in seaming later. Truthfully, this is how I work all my crochet stitches in my beginning chain, to me, it just looks nicer. #coolnewtrick
Each ROW of Tunisian consists of a FORWARD PASS, in which you will work right to left “loading” the loops on the hook, and the REVERSE PASS, in which you will work left to right and “unload” those loops back off. You DO NOT TURN your work at all in Tunisian anywhere.
THE FORWARD PASS:
Recall how you only chained the number of chains exactly as the desired stitch count (not the +1 as in traditional crochet). This is because the loop currently on the hook counts as your first loop. Here’s what to do:
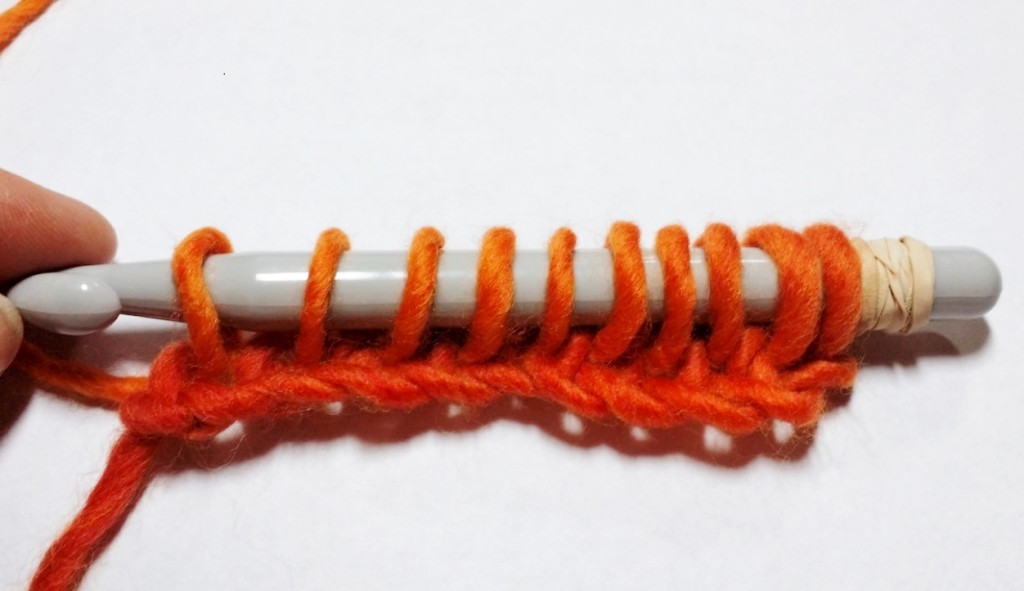
Insert your hook into the SECOND hump from the hook on the back of the chain, yarn over and pull up a loop…NOW STOP…leave it there, don’t do anything more. You know have two loops on your hook. Tunisian crochet forward pass is loading the hook with one loop for each chain made. Your hook will begin to look something like knitting here as you progress. One loop around the hook for each beginning chain. Insert your hook into the hump of the 3rd chain, yarn over, and pull up a loop, again STOP and leave it there. Now there’s three loops on the hook. Continue pulling up a loop through each hump on each chain across. Your hook will look like this photo below now… (the rubber band will keep those stitches from sliding off the other end! If you had a larger project such as an afghan, you’d see why you need that long hook. You have to hold all those loops on. But since this hat is small, this will work just dandy!) The first row forward pass is complete.
THE REVERSE PASS:
Now we will complete the 1st row, by doing the REVERSE PASS, this is done as so:
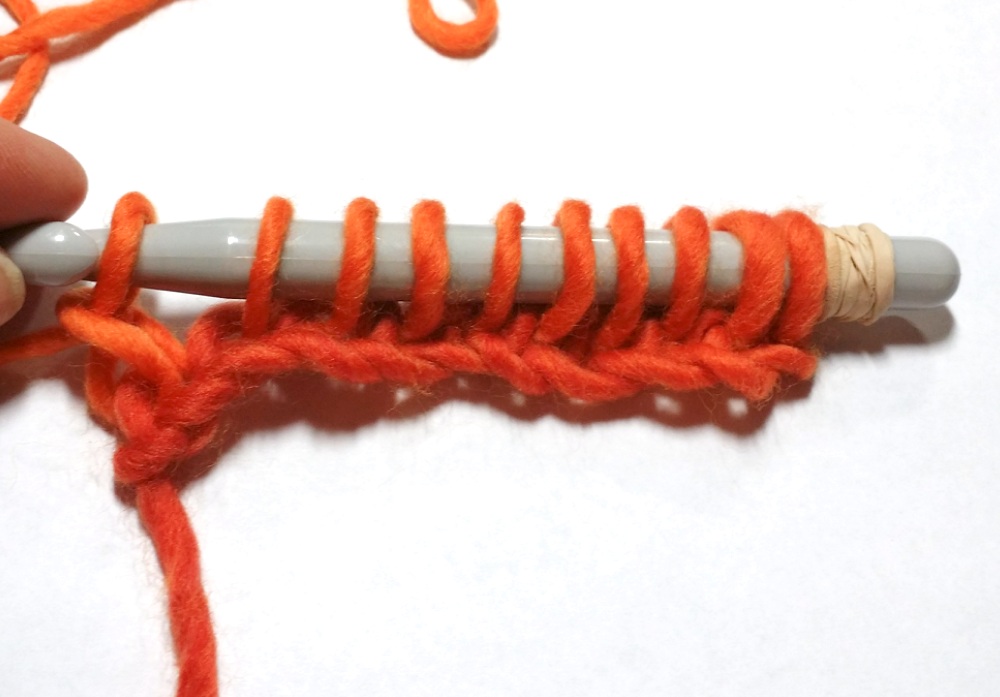
Yarn over and pull through only ONE loop, now, yarn over and pull through TWO loops. Yarn over and pull through two loops again and repeat like this all the way back the the right side of the work, leaving just ONE loop on the hook. This photo below shows the yarning over and pulling through one loop only. This is done on every row, just one loop at the beginning and two loops the rest of the way back.
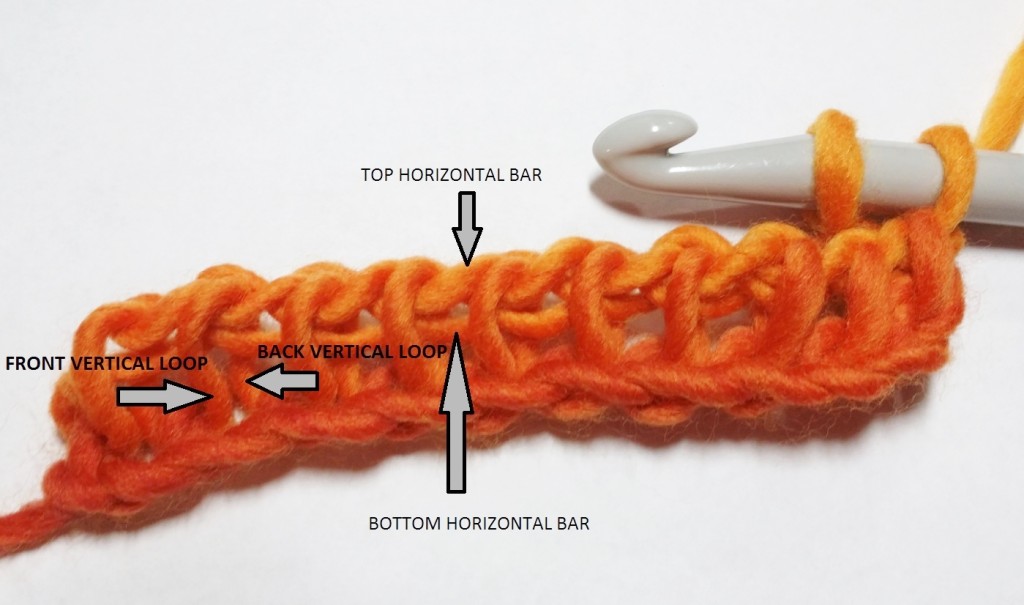
The next photo shows the REVERSE PASS COMPLETE, from which we will learn the anatomy of the stitches. Each stitch will yield FOUR parts. Notice below: the top and bottom horizontal bars and the front and back vertical loops. These are important to understand so take a second here to really look closely.
In the most basic Tunisian stitch, Tunisian simple stich, for each subsequent row, you would insert your hook from right to left, behind each FRONT VERTICAL LOOP, SKIPPING the 1st front vertical loop because that loop on the hook there, counts as the first loop for the forward pass. But, we are doing this Ridge Tunisian Stitch, so we will be inserting our hook in a different position. As with all Tunisian, that first loop counts as the loop for the 1st stitch, so skip the componets of the 1st stitch. Now, position your hook to the rear of the work, and from right to left, insert your hook through the SECOND BACK VERTICAL LOOP, yarn over and pull up a loop. Now, do the same across, pulling up a loop through each back vertical loop, inserting the hook behind the row, being sure to NOT unload them. RESIST the urge to single crochet, just leave them all there. You can do it, be strong.
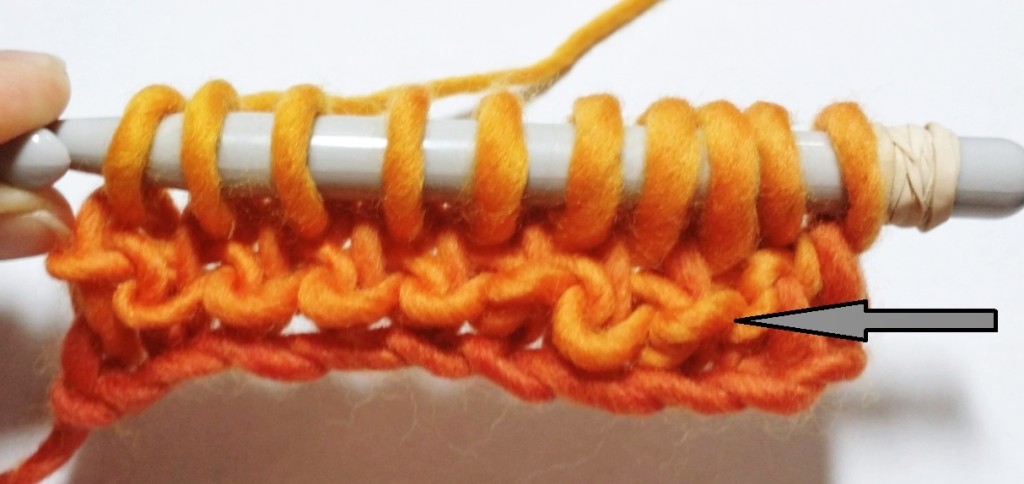
Once, you have pulled up all the loops through the back vertical loop, you should have 10 loops on the hook and the 2nd row forward pass is complete. This is shown here. Notice how you’ve created a ridge…Kind of looks like the bump from purls in knitting, no?
Now, as before, we need to complete our 2nd row, by doing the reverse pass. To recap, yarn over and pull through ONE loop only, then yarn over and pull through TWO loops, yarn over and pull through two loops, continuing like that all the way back to the right, until one loop remains on the hook. Your work should resemble this now…
Now, you will just continue to carry on in this manner, completing the number of rows the pattern calls for. REMEMBER: Each row has TWO parts, the forward pass and reverse pass. The BEGINNING CHAIN does NOT count as a row.
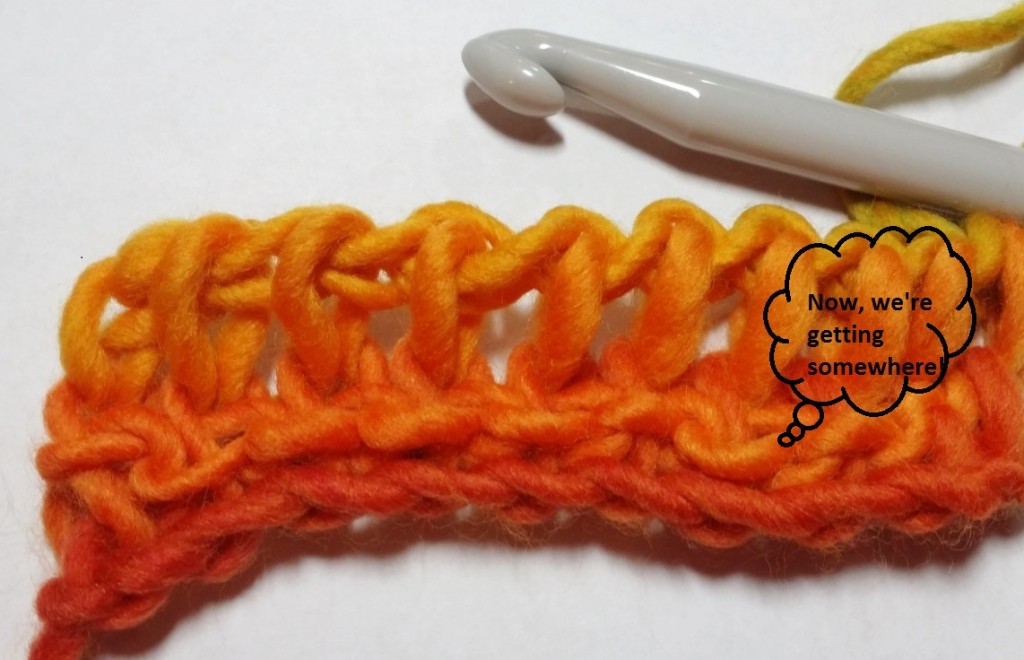
When you have completed all the rows the pattern calls for, you will notice the last row is left open in appearance because you have not working into it to bump that ridge out. So, we need to fix that. Before the “FIX”: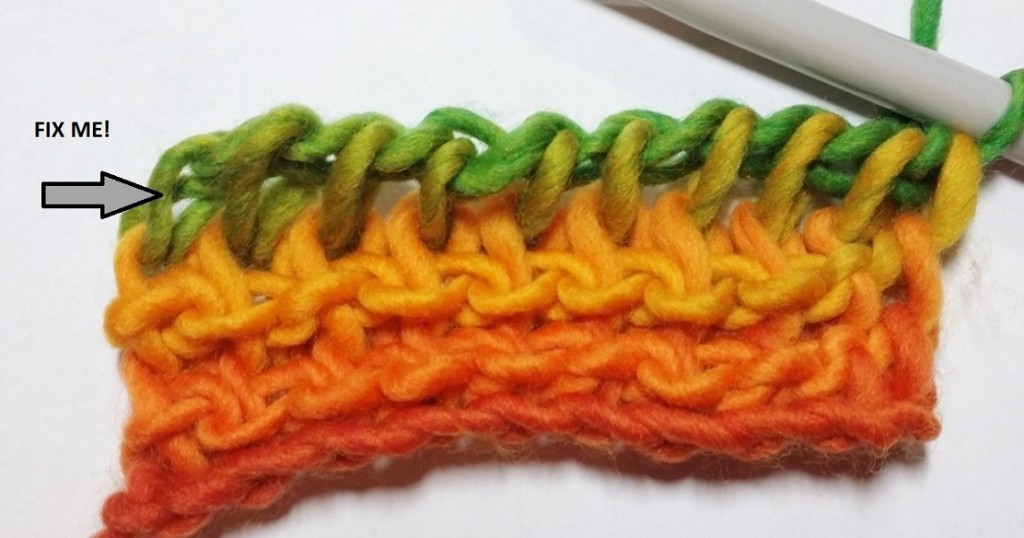
All we need to do to fix this, is to simply slip stitch across the row from right to left inserting the hook as all the other rows in the back vertical loop from behind the work. If you look at your work now, you’ll see the last row is closed up just like the others.
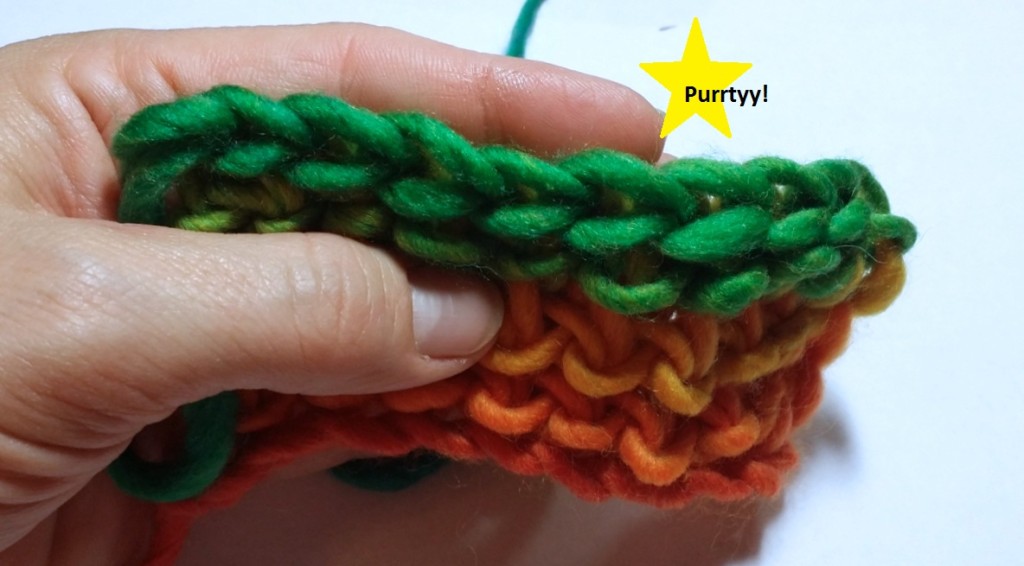
Finally, let’s look at the 4 edges of our work. This is the top edge of the last row we just created with the slip stitches. Notice the nesting V’s? Nice.
Take a peek at the right edge. Also, nice little V’s. Lift that puppy up and look at the bottom or beginning base chain row. Remember how we worked into the BUMP? Well, now you’ve got nice little V’s there too!
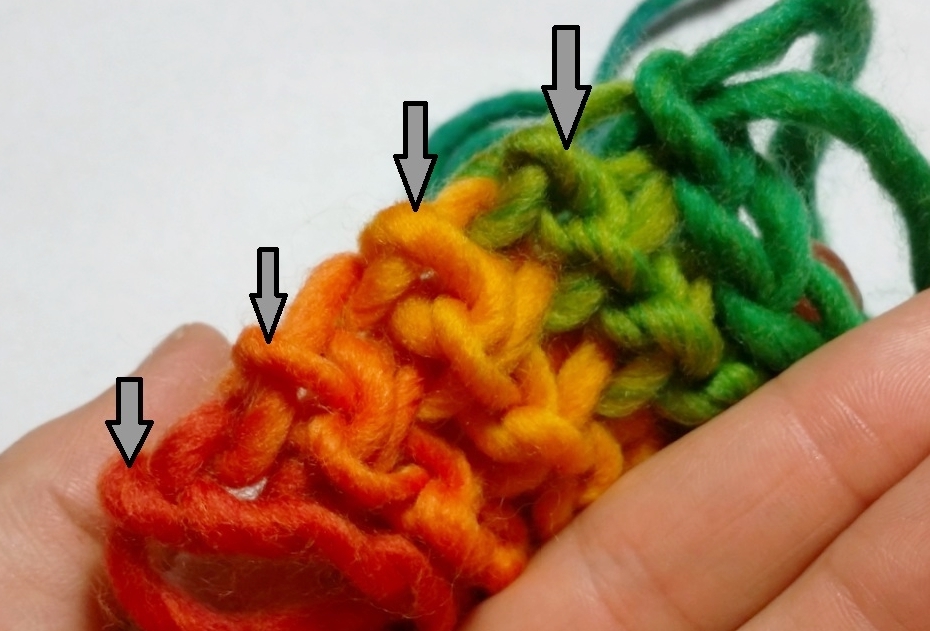
Here’s a note, when you are doing regular Tunisian crochet, the place to insert the hook on the last stitch of each forward pass is slightly different, NOT this project although, but doing so would also result in little V’s as the other edges. BUT, I’ve left it as is for this piece, because I want that BUMP to be right up next to the edge so that when we close that end up, it appears more seamless. But, for your own knowledge, when you work into the last stitch on your forward pass on OTHER pieces, you will pick up the intended loop (varies based on the stitch you are doing) AND the back horizontal bar together, Again, do not do that on this piece, but I wanted you to know. This is how OUR left edge appears: Notice the arrows pointing to the little ridge right up to the edge.
That’s IT! Pretty easy to transfer from crochet to this because they are fiber arts cousins, maybe slighty distant, but cousins none the less. Now, let’s tackle our first pattern:
THE ACTUAL PATTERN! You can rest your drink on the coaster swatch you just made from above so you can dive in with both hands!
Corduroy Ridge Slouch Hat Pattern:
THE HAT! : Sized for the average teen to adult head. Or my toddler’s oversize head. **You could very easily change the size of this by eliminating rows to go smaller since the pattern is very basic once you know the technique.**
I used 3 balls of the Chunky Mochi yarn, and it is 49 yards each. So, you’ll need just about 150 yards of chunky yarn for this project. (Yarn Sub Info at the end!)
Finished Measurements: The hat is 10″ at the band laying flat, so the opening is 20″ around. This is 2″ less than my head circumference measurement of 22″. If you choose to alter the hat for size, shoot for 2″ less than the target head circumference, it’s pretty stretchy. The hat is 10″ tall without the pom pom.
Gauge is 2 rows measure just over 1″ in height. Remember I tend to work tightly, you may have to go down in hook size to match my gauge. As a construction note, looking at your work, the left short edge will closed to become the top of the hat, the right short edge will be worked into to make the band side of the hat, and the 1st and 37th row are seamed to create the actual hat. Note, the rows go up and down in the final piece.
Begin by chaining 20 with the chunky yarn and the modified P hook.
- Keep in mind all you’ve learned, refer back up if needed, and work 37 rows of this Ridge Tunisian Stitch.
- Slip stitch across the last row to close that up and bump out the ridge.
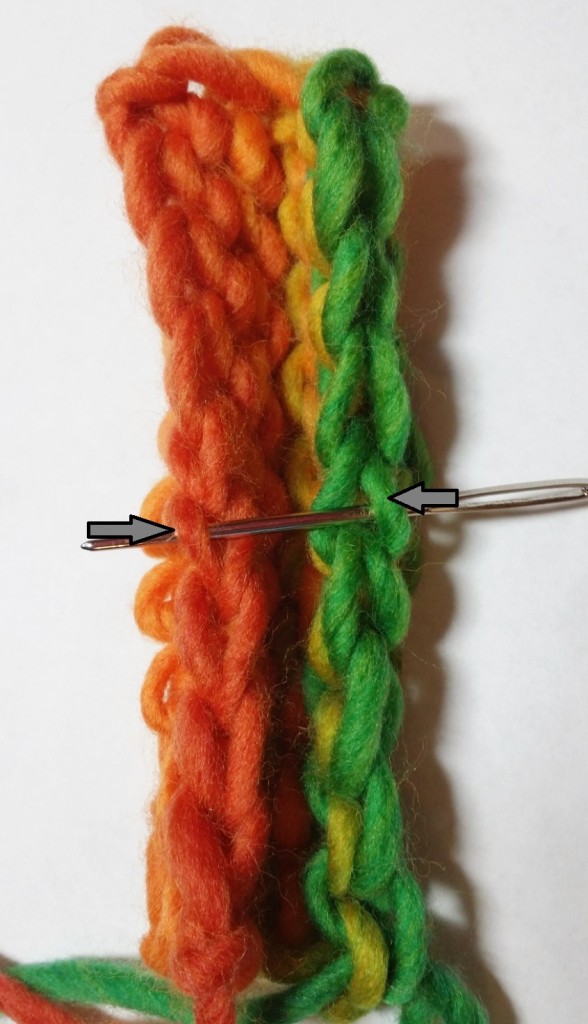
- Now, Take Rows 1 and 37 and match them up. Seam them together with a tapestry needle and piece of yarn, align it as the photo below, seam ONLY through the outer loops of the edges as shown by the needle inserted in this photo. This will make a near invisible seam. Match stitch to stitch all the way across the seam.
4. Now, look at the remaining edge openings, one will be the v’s (and is the right edge of the piece) and one edge has the ridges at the edge (and is the left edge of the piece)
5. Refer back up the the last photo of the swatch creating where you see the edge of the work (the left edge) with the 4 arrows pointing to the ridges at the edge. Take the needle and weave it through that “purl bump” at the edge of every row on the edge with out the V’s (the left edge of the work) , now pull the yarn to close up the top of the hat. Knot it well to secure.
6. Next, with the outside of the hat facing you, and the opening positioned furthest from you, join the yarn with a slip stitch in any stitch on the edge as in normal crochet, CH 1, single crochet in each st around, sl st to the 1st sc made. (since there are 37 rows, you will have 37 sc)
7. Do not turn, ch 1, and single crochet BACK LOOP ONLY in each single crochet around, sl st to the 1st st made.
8. Repeat step 7 and tie off.
9. Weave in all your ends.
10. Finally, top this baby with a poof ball. I’m in MAD LOVE with the new Clover Pom Pom makers. You MUST check them out and pick some up. I made the pom pom using the largest Clover tool and it is about 3 inches in diameter. If you do not have this tool, no worries, use any method you prefer! Stitch this pom pom to the top center of the hat and you are DONE.
The Tool Box has a NEW TRICK! Go on with your crafty self!
Want to sub another yarn? Here’s how. Take the yarn you’d like to substitue and grab an appropriate hook size for it. Now, put that hook back and go up 1 or 2 sizes, you DO NOT want this work stiff or it won’t slouch nicely! Chain until the work is 8″ wide and make rows until it is 20″ tall for an adult hat. You may end up with a slightly denser or looser fabric based on what you choose, but if you like it, go for it! Then when you pick up for the hat band, work until it is 3″ tall. That’s it!
GO TO THIS POST HERE! If you fancy to make this in Bernat Baby Blanket like you see here below, you’ll need to make a few adjusments I’ve outlined for you!
Pretty please with sugar on top, come on over and tell me what you think and show off your amazing creations at my FACEBOOK PAGE HERE!!
Much love and yarn, Stephanie <3
This little ditty and all the info and photos contained within are the sole property of Stephanie and Crochetverse 2015. Do not copy and repost any of the info contained within, rather please just link them here. You are more than welcome to share the hat photo with the watermark, any good Googler should end up here using the watermark! You can sell anything you make from this pattern, just don’t farm it out to a factory in China and make a million. I’d be sad then. And I don’t want that. Thanks so much!




Love this hat!! Thank you so much for sharing!!
You’re so welcome! Would love to see your finished hat! Like and Post on the Facebook “Crochetverse” page so you can show off!
You are so welcome! If you make one, please be sure to post on the Facebook page so I can see!!
That’s so nice to hear!
I LOVE this hat….thank you so much for sharing….I am trying to hunt down some Acrylic or cotton, or a little of both, yarn in rainbow as i can not wear wool in any form….do you have any suggestions?
Hi, You might see this twice hah, but I want to be sure the information reaches you directly. Someone else had the same question! Here are my thoughts:
Hi! Im so sorry to hear of your allergy! To get the effect, you want a yarn with not too quick of a color change. By that I mean, the variagted that places such as Red Heart produce are too short, and the hat will look flecked as opposed to striped. You will want to find a yarn with a slower or longer color change. Off the top of my head I would think that Ice Magic Light (this is a foreign yarn, but it can be bought on Ebay too) has a nice slow color change and it acrylic, it is worsted though so you would have to hold double stranded and be sure you match the color change up in the very beginning. Another thought is King Cole Riot Chunky (I got mine online through US Deramores), I even think there is a nice rainbow type one too, this is chunky and would be used single strand. Hope this helps and so glad you like the hat!
Hello, i tried to comment but it went somewhere out in internet land….i love your hat….i am trying to find a yarn that would produce the rainbow effect with out being wool. I am allergic to wool. I could use acrylic or cotton or some combination of the two. Do you have any suggestions? Thank you!
Hi! Im so sorry to hear of your allergy! To get the effect, you want a yarn with not too quick of a color change. By that I mean, the variagted that places such as Red Heart produce are too short, and the hat will look flecked as opposed to striped. You will want to find a yarn with a slower or longer color change. Off the top of my head I would think that Ice Magic Light (this is a foreign yarn, but it can be bought on Ebay too) has a nice slow color change and it acrylic, it is worsted though so you would have to hold double stranded and be sure you match the color change up in the very beginning. Another thought is King Cole Riot Chunky (I got mine online through US Deramores), I even think there is a nice rainbow type one too, this is chunky and would be used single strand. Hope this helps and so glad you like the hat!
Where do you place the hook for the finishing slip stitch?
The piece is one sided and flat so when I finish offm I cut the yarn and then yarn over and pull through the final loop of the final stitch once more to lock it in place
Comments are closed.