

")
Welcome to:
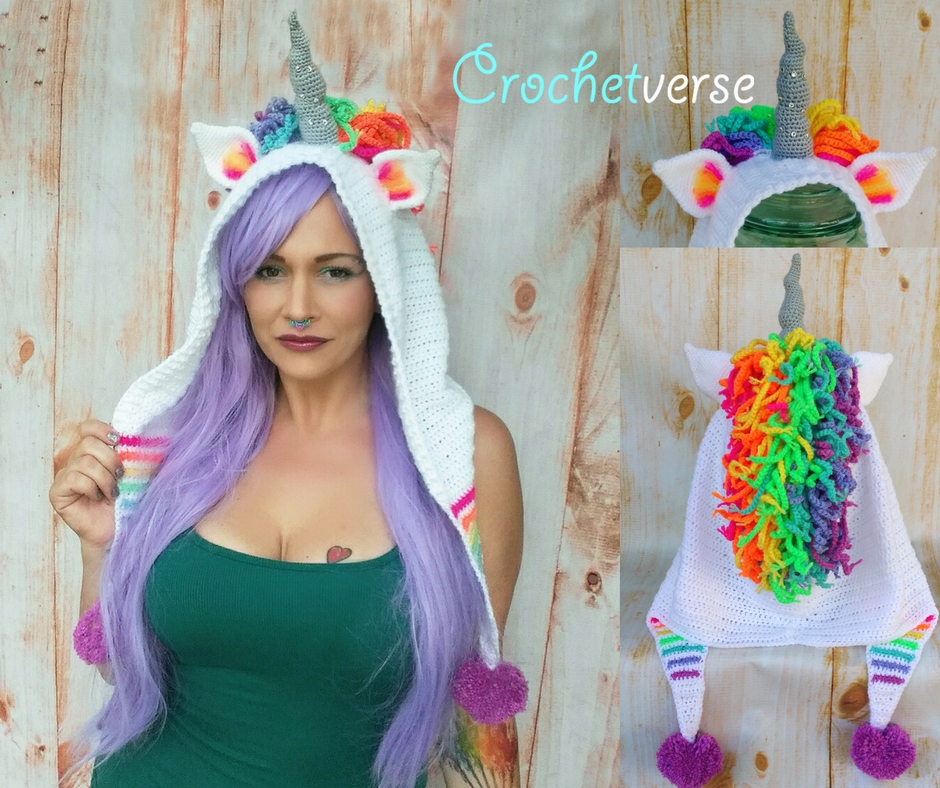
“THE ORDER OF THE UNICORN” Pattern Collection!
(Or so what myself and my fellow designers and testers came to call our little group as we worked on this project for you over the last months! It was seriously a pleasure to work with them! Jamie, Heather, Nichole, and Clarissa are my forever unicorn bff’s now!)
To fill you in, We worked in a collaboration to create the FULL outfit! There are TONS of patterns available for this costume to completely complete the complete looks! (HAHA, but true!)
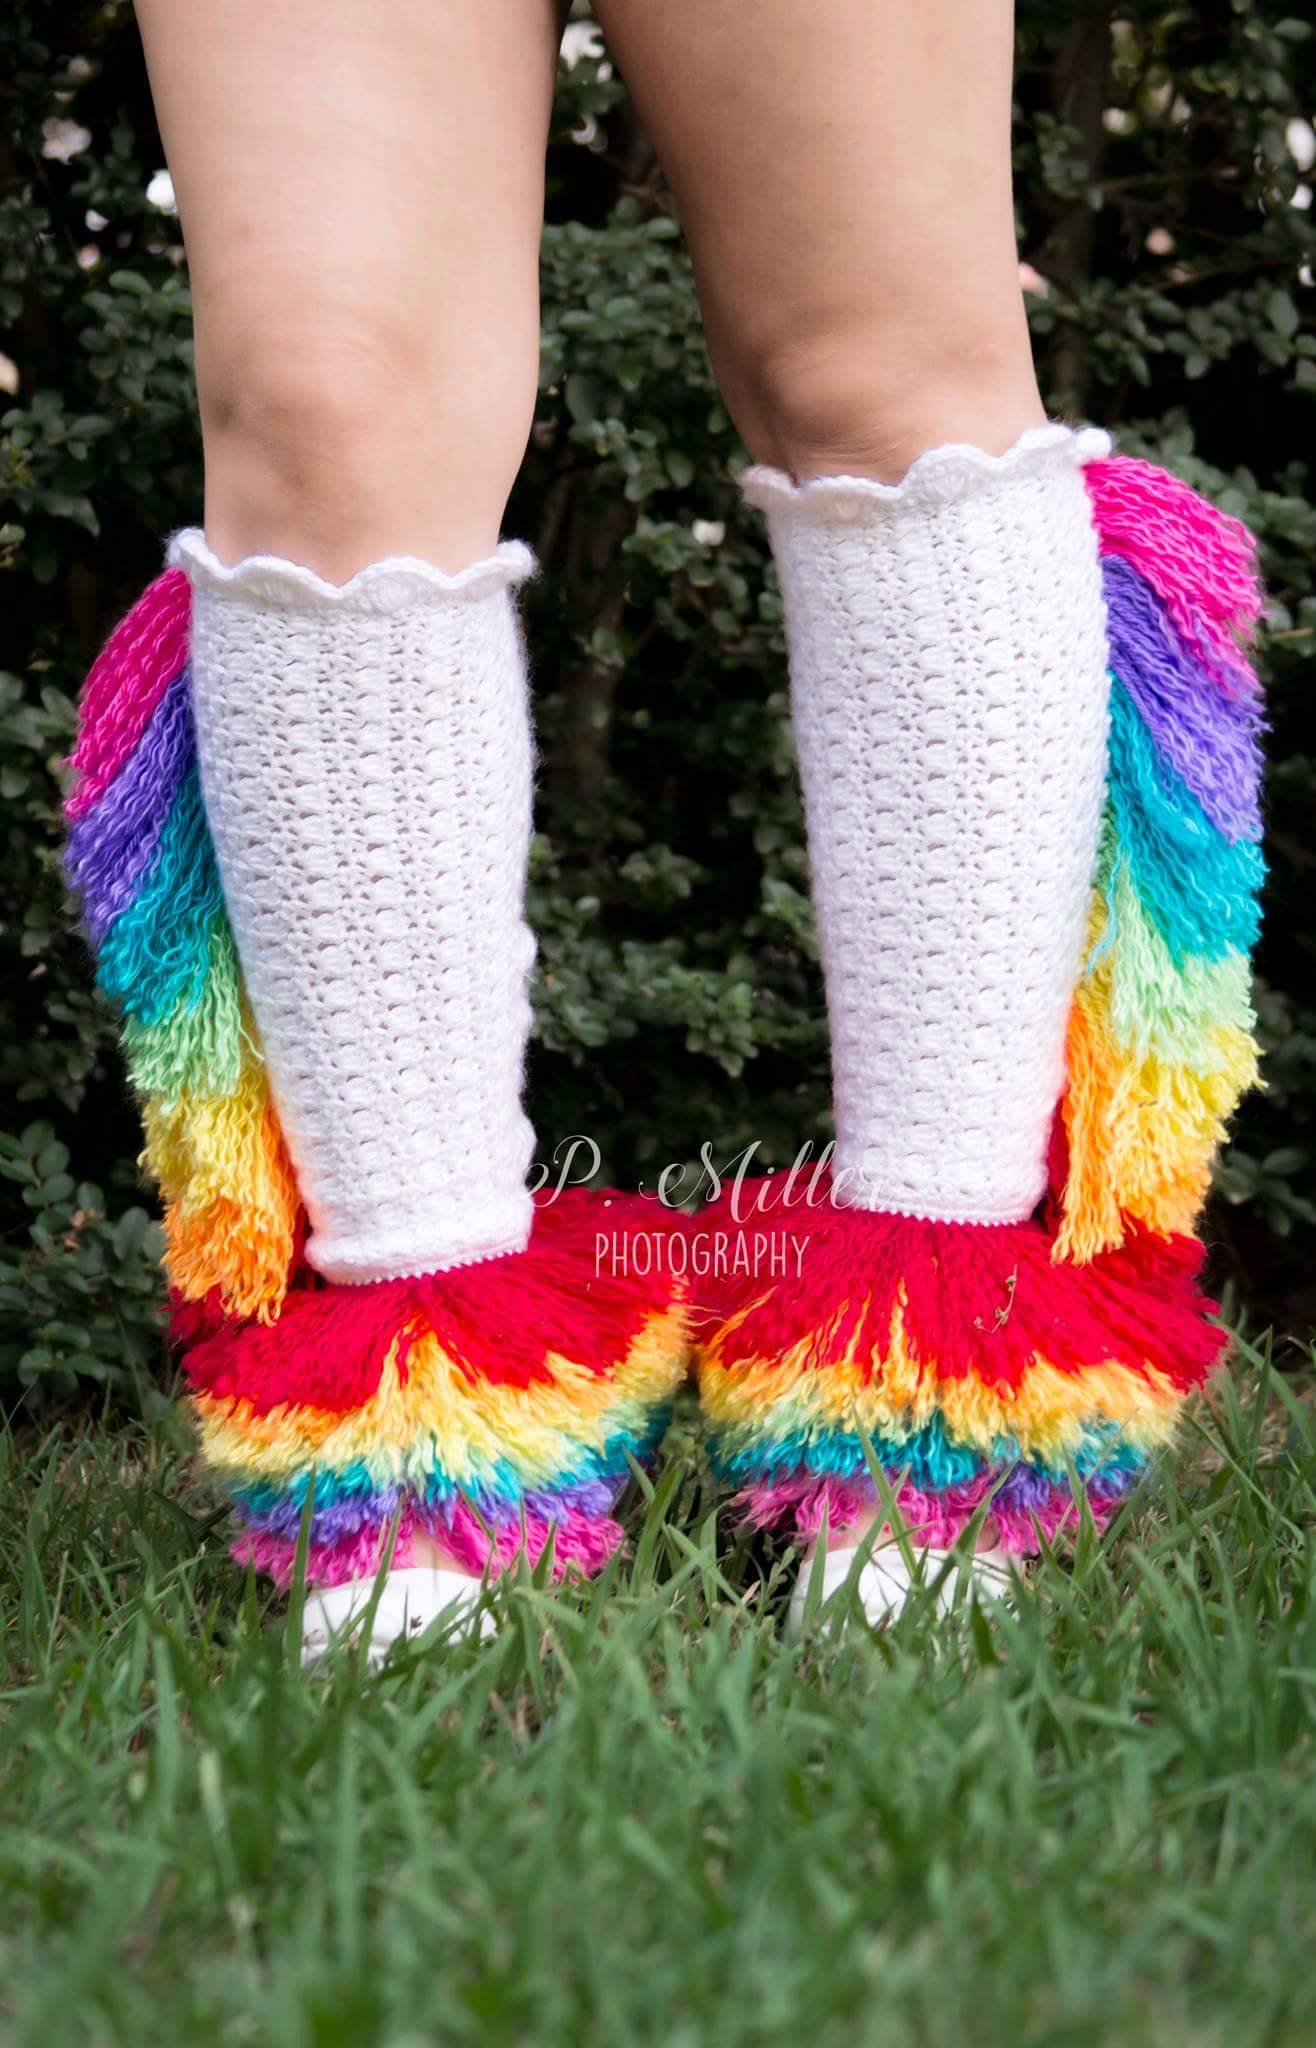
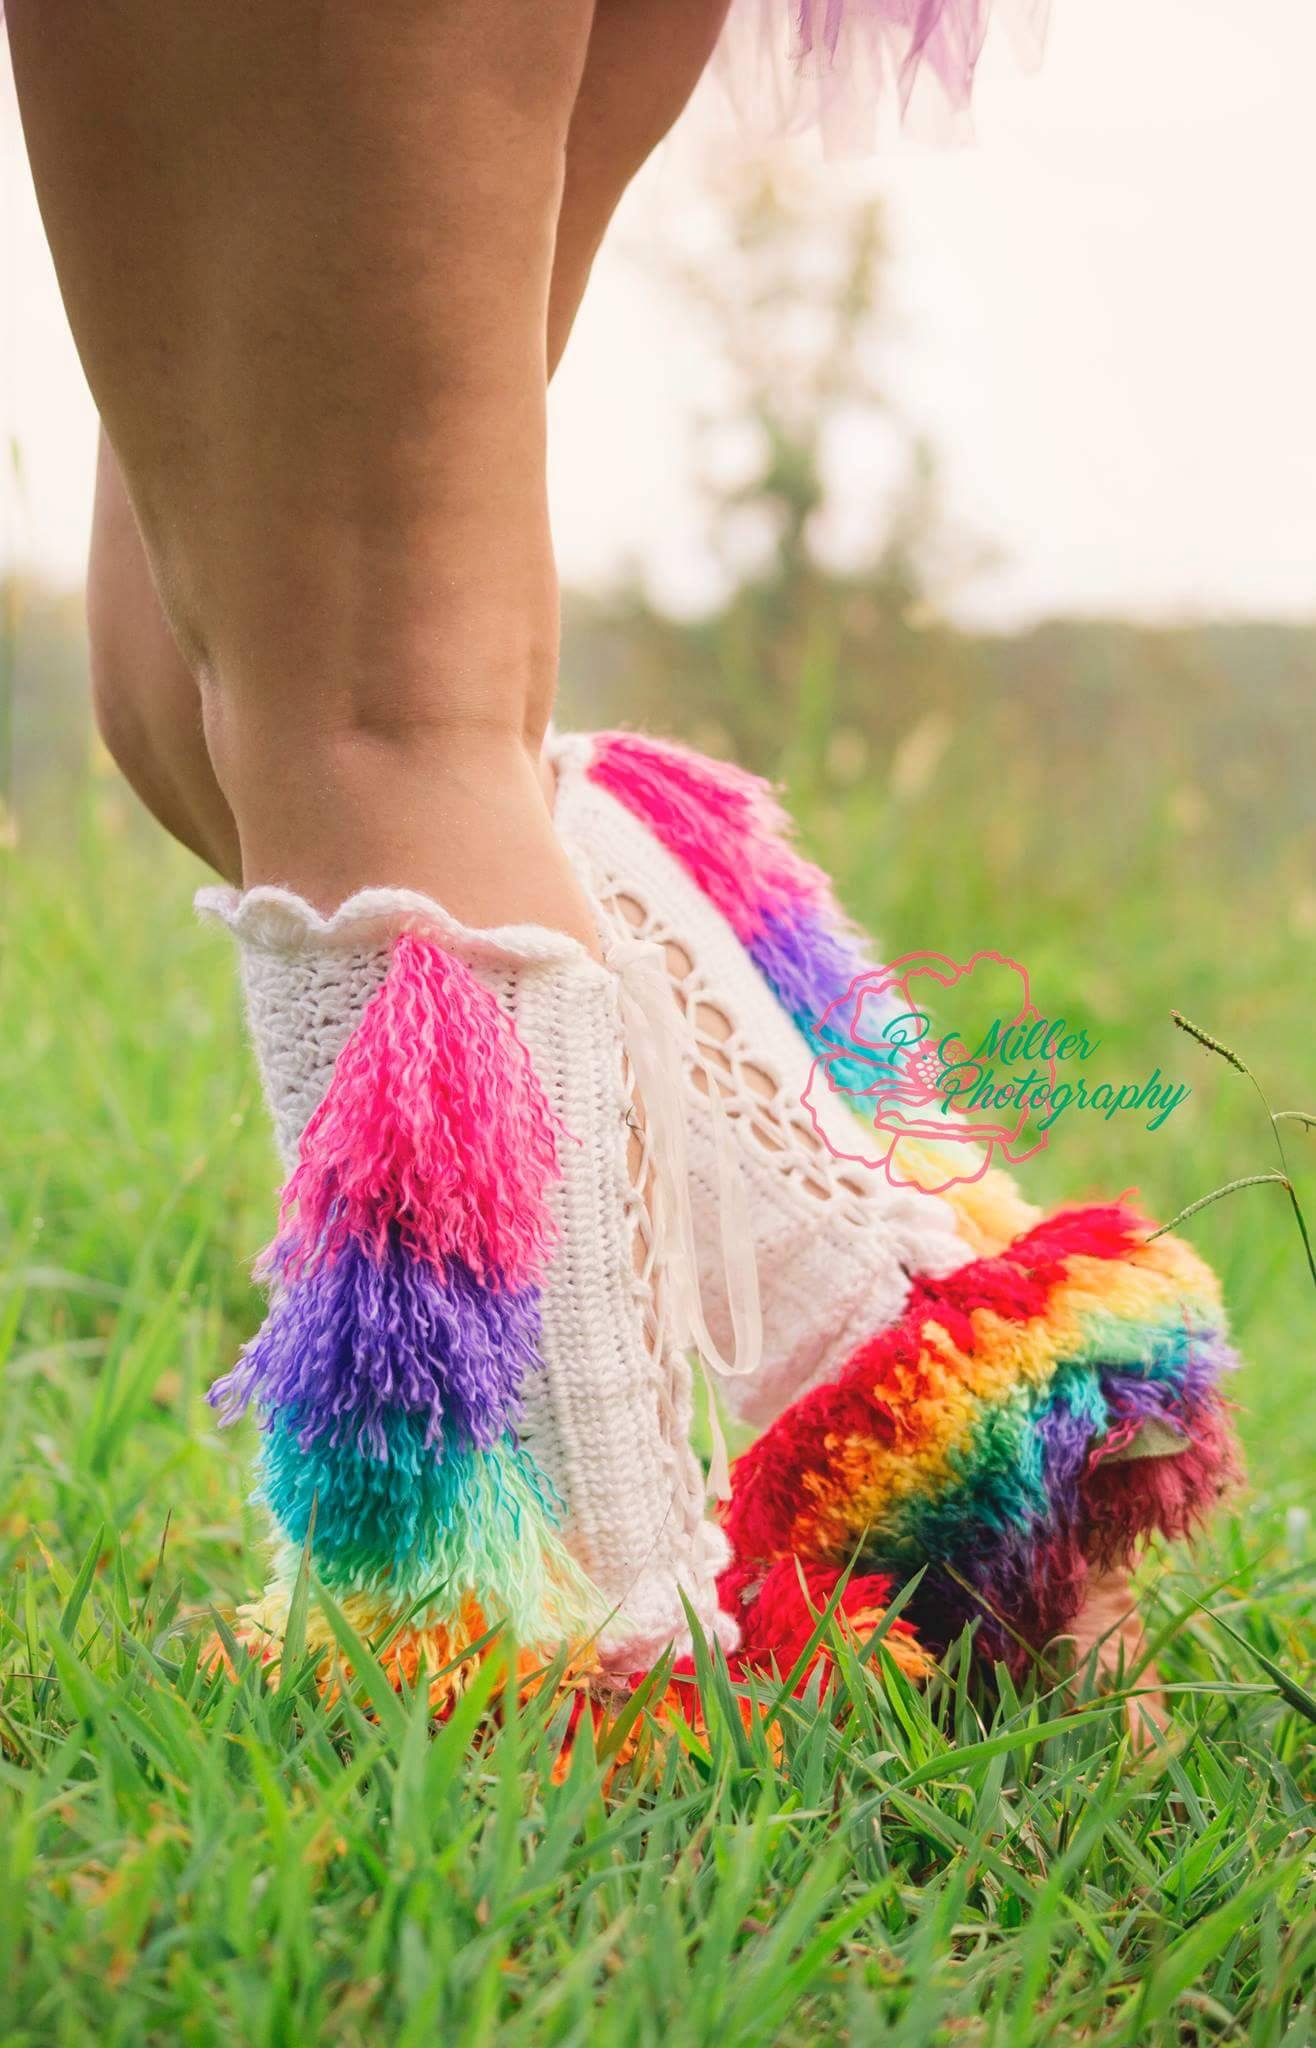
There are FIVE coordinating pieces available! Be all the unicorn you can be, check out all of the them!
This Ode to Artax Unicorn Hood and many other fun patterns (many free!), can be found here!
http://www.ravelry.com/designers/stephanie-pokorny
Want the matching Magical Unicorn Legwarmers & the Free Perizad the Unicorn Purse? Find them at:
http://www.ravelry.com/designers/clarissa-paige-dove
Want the matching Fingerless Gloves? Find them here:
http://www.ravelry.com/designers/nichole-chapel
 \
\
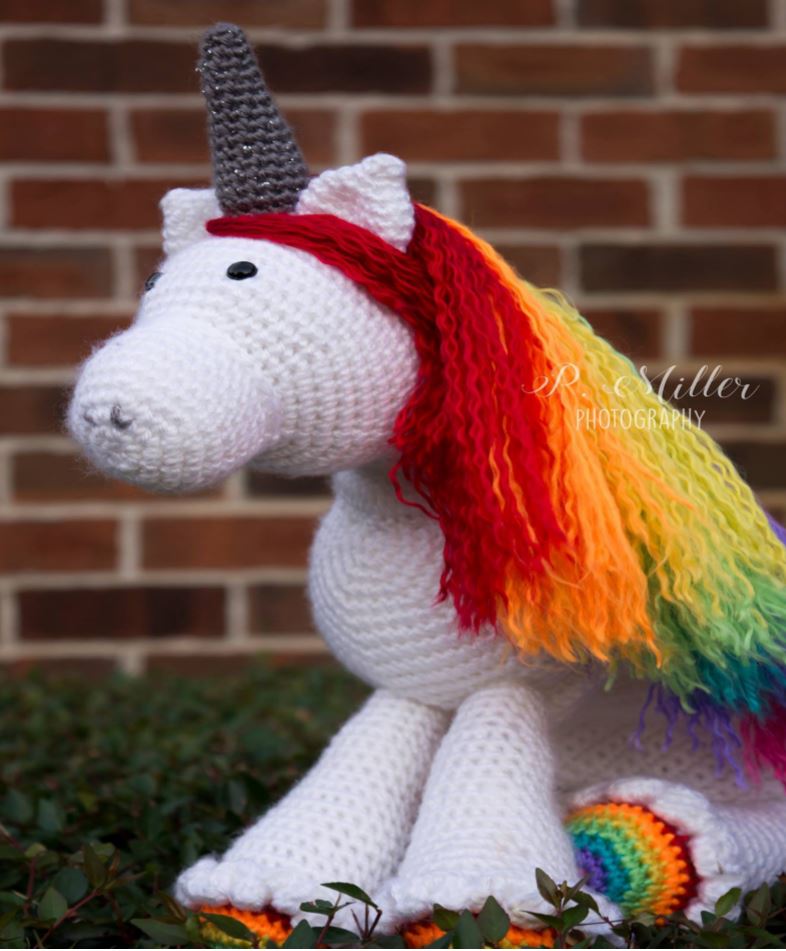
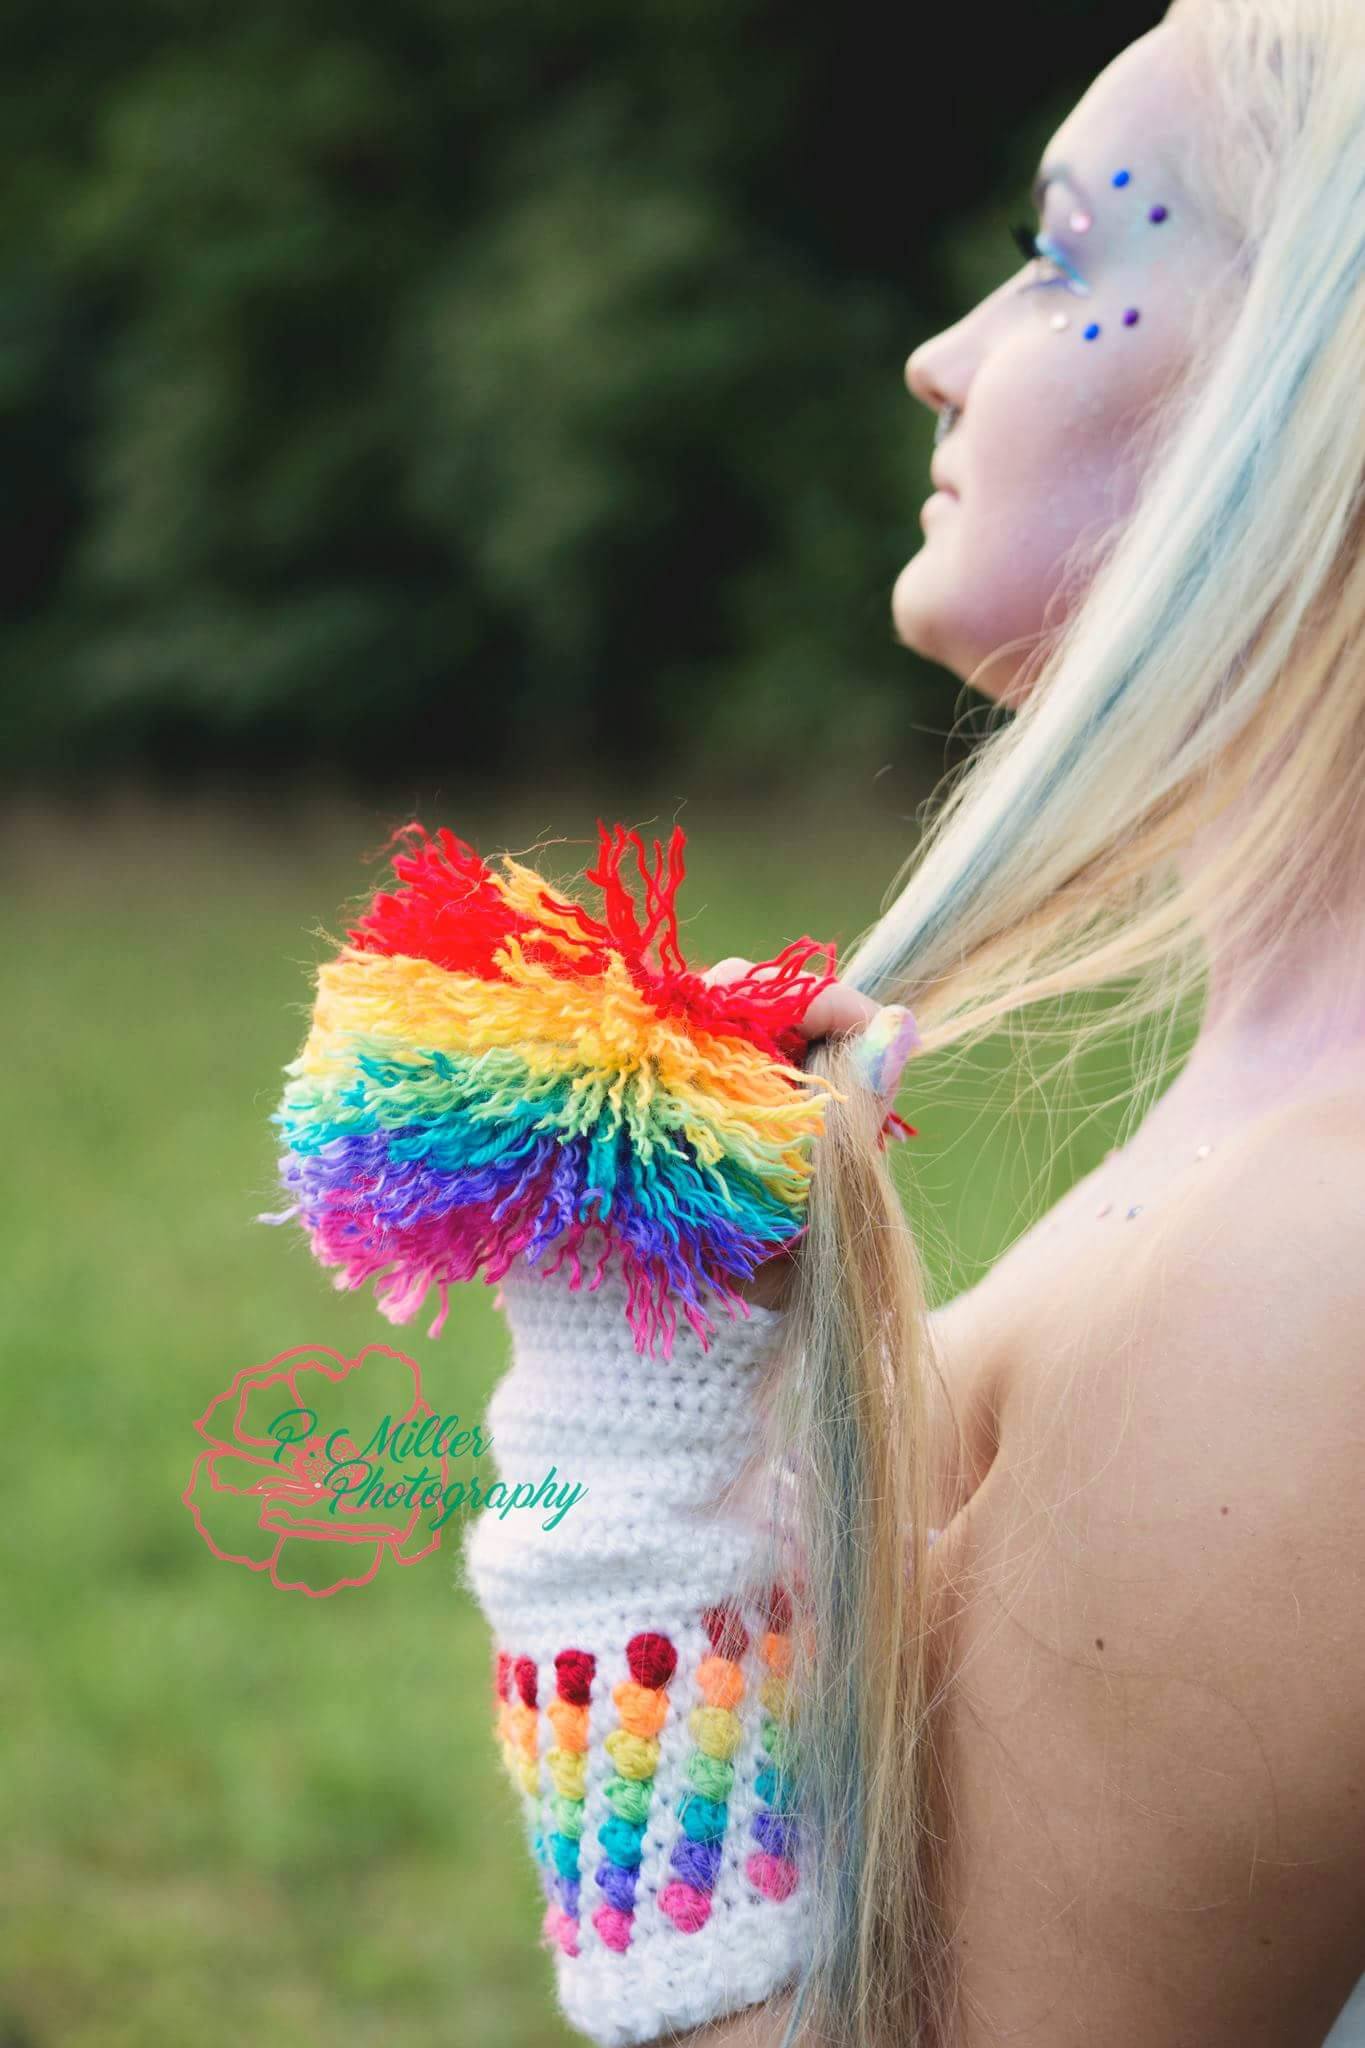
Want the matching Free Unicorn Tail Pattern? Find that right below now!
Look at this curly rainbow dream of a tail!
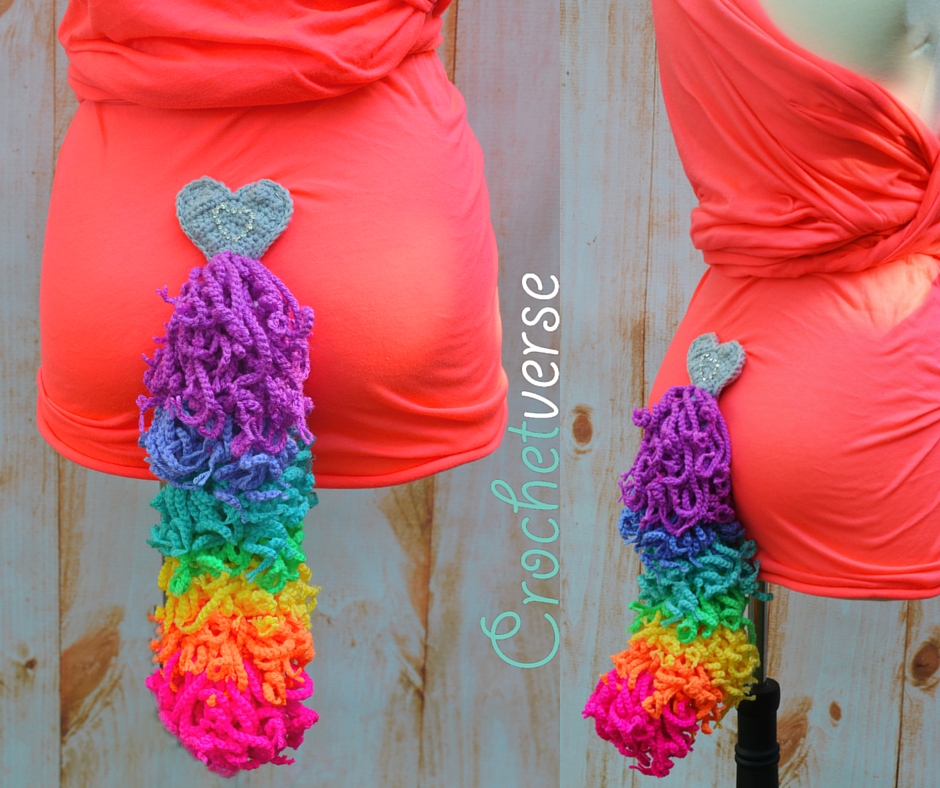
Here is how to make your own!
Materials:
– Size G (4.25mm) crochet hook or size needed to obtain gauge
– Size E (3.5mm) crochet hook
– scissors, tapestry needle
– (Optional) 20” section of wire to make the tail positionable (floral or craft wire will work well)
– (Optional) Needlenose pliers to bend and cut the wire
– (Optional) Flat back rhinestone crystals in your choice of size and quantity
– (Optional) E6000 glue to affix the rhinestones & toothpicks to apply it
– DK weight yarn in the following colors and amounts.
(YARN SUB: Caron Simply Soft, though marked worsted, is actually on the lighter side and will work with great results in the tail)
Shown in sample is Stylecraft Special DK:
Color A: White (100 yards) – (1) balls 1001 White
Color B: Hot Pink (100 yards) – (1) ball 1257 Fiesta
Color C: Hot Orange (100 yards) – (1) ball 1256 Jaffa
Color D: Yellow (100 yards) – (1) ball 1263 Citron
Color E: Hot Green (100 yards) – (1) ball 1259 Bright Green
Color F: Seafoam Green (100 yards) – (1) ball 1422 Aspen
Color G: Light Purple (100 yards) – (1) ball 1188 Lavender
Color H: Magenta (100 yards) – (1) ball 1084 Magenta
Color J: Light Gray (100 yards) – (1) ball Silver
The below link is an affiliate link, and I share it with you in full confidence in both product and customer support and service. Deramores is my chosen source each time I employ the Stylecraft DK, with a huge color range & fabulous pricing, I can promise you won’t be sorry, be sure to check it out!
I encourage you to make a color key chart that lists each color you choose and the color letter you choose to assign to it. It will help you eliminate mistakes and also keep you from looking back and forth a hundred times!*
Finished Size:
The base tube measures about 13” long.
Gauge:
Rounds 1-11 of the pattern = about 4” tall.
While gauge is not extremely important, you do need to be as close as possible so the finished tail is not too long or the stitches are not too loose.
Instructions: (*Do not turn rounds, rounds are joined)
Tail Base Tube:
**DESIGN NOTE: So as to keep the tail from stretching under the weight of all the fringe, we will work DOUBLE STRANDED throughout. Treat the 2 strands as one in regards to working back loop only.
You may either roll one ball into two smaller balls, or as I do, work from both the beginning end and tail end of the same ball simultaneously. Yes, it can get tangled a bit, but not enough to where I won’t do it
With Color A held DOUBLE STRANDED and G hook, make a magic ring:
HDCBLO: half double crochet as normal but in the BACK LOOP ONLY. Note, that there will actually be two strands of yarn in your back loops because we are working double stranded. TREAT THE TWO STRANDS AS ONE for the piece.
Rnd 1: ch 1 (does not count as a stitch here and throughout the piece), 8 hdc in ring, sl st to the BACK LOOP ONLY of 1st hdc made, pull end tail gently to close ring. (8)
Rnd 2: ch 1, hdcblo in each st around, sl st to the BACK LOOP ONLY of the 1st hdcblo made. (8)
Rnd 3: ch 1, 2 hdcblo in each st around, sl st to the BACK LOOP ONLY of the 1st hdcblo made. (16)
Rnd 4-35: ch 1 (do not count as a stitch), hdcblo in each st around, sl st to the 1st hdcblo made. After round 35, tie off, leaving a 12” tail. The image below shows the tail base complete:
Chain Fringe:
Each color will cover 3 rounds of 16 sts each, except the final color (tip of tail) color which will have 2 rounds of 16 and 2 rounds of 8 at the bottom tip. Therefore, cut 48 strands of each color. Each should measure about 1.5yards long each. I measured for a few until I got the feel for it, then eyeballed the rest! I cut only color at a time so I didn’t have to worry about stopping and coming back later to find my little humans had found them and played with them. Ha!
To chain fringe: (See chart below for the order/placement of fringe and colors)
Keep in mind that the colors on round 35 or the open end of the tail will be the furthest end of the tail, hanging the lowest. The colors on round 1 or the closed tip end will sit on the body and be the top end. I chose to do my rainbow in reverse, pink at the lowest, magenta at the top. If you do not want this, REVERSE your order.
Step 1: Insert your hook from above to below (from the open end down to the tip end) behind the remaining free loop that is unworked due to us working in the BACK loop only in our rounds.
Step 2: Fold a strand of the fringe in half, and lay the looped end over the end of the hook, then pull the loop through the stitch.
Step 3: Treating both tail ends of the strand as one, chain 20-25 (a little variance is ok!) as you normally would.
Step 4: Pull the tails that remain after the last chain very firmly to set and secure the chain in place. Then, trim the tails to a little over ¼”
| ROW # | COLOR/SKIP? | ROW # | COLOR/SKIP? |
| 1 (the closed tip) | H – Magenta | 20 | E – Hot Green |
| 2 | H – Magenta | 21 | Skip |
| 3 | H – Magenta | 22 | Skip |
| 4 | H – Magenta | 23 | D – Yellow |
| 5 | Skip | 24 | D – Yellow |
| 6 | Skip | 25 | D – Yellow |
| 7 | Skip | 26 | Skip |
| 8 | G – Light Purple | 27 | Skip |
| 9 | G – Light Purple | 28 | C- Hot Orange |
| 10 | G – Light Purple | 29 | C – Hot Orange |
| 11 | Skip | 30 | C – Hot Orange |
| 12 | Skip | 31 | Skip |
| 13 | F – Seafoam | 32 | Skip |
| 14 | F – Seafoam | 33 | B – Hot Pink |
| 15 | F – Seafoam | 34 | B – Hot Pink |
| 16 | Skip | 35 (open end) | B – Hot Pink |
| 17 | Skip | ||
| 18 | E – Hot Green | ||
| 19 | E – Hot Green |
HEART BASE: (Make 2)
With Gray and the yarn held DOUBLE STRANDED, using the E HOOK, ch 2:
Row 1: 2 hdc in 2nd ch from hook (skipped chain does not count as a st). (2)
Row 2: ch 1 (does not count as a st here, and throughout the piece), turn, 2 hdc in each hdc across. (4)
Row 3: ch 1, turn, hdc in 1st hdc, 2 hdc in each of nxt 2 hdc, hdc in last hdc. (6)
Row 4: ch 1, turn, hdc in each hdc across. (6)
Row 5: ch 1, turn, hdc in 1st hdc, 2 hdc in each of nxt 4 hdc, hdc in last hdc. (10)
Row 6: ch 1, turn, hdc in 1st hdc, 2 hdc in each of nxt 2 hdc, hdc in nxt 4 hdc, 2 hdc in each of nxt 2 hdc, hdc in last hdc. (14)
Row 7: ch 1, turn, hdc in each hdc across. (14)
Row 8: (Partial Row): ch 1, turn, hdc in 1st 7 hdc. (7)
Row 9: ch 1, turn, hdc in 1st hdc, hdc dec over nxt 2 hdc, hdc in nxt hdc, hdc dec over nxt 2 hdc, hdc in last hdc. (5)
Row 10: ch 1, turn, hdc dec over 1st 2 sts, hdc in nxt st, hdc dec over last 2 sts, tie off. (3)
Row 11: (Partial Row to for 2nd heart hump)
Rejoin gray yarn in the edge stitch as shown below using a sl st, ch 1, hdc same st and each of the next 7 sts. (7)
Row 12-14: Repeat as for Rows 9-11, tie off.
Join Hearts:
To make it an even more solid attachment point for the tail, we will now crochet the two hearts together so they are double thickness.
Step 1: Lay the hearts on top of each other, so that the wrong sides are touching and facing in, right sides are facing out.
Step 2: Treating both thicknesses as one, insert the hook anywhere around (through both hearts), ch 1, sc around the post of each stitch at the end of each row around the heart, sl st across the 2 sts at the center bottom dip of the two humps of the heart, make 3 sc in the same st at the bottom tip of the heart, sl st to the 1st sc made, tie off leaving an 18” tail to seam the tail to the heart.
Step 3: Using the tail from the heart, stitch the pointed end of the fringed tail (round 1 of the base tube) near the bottom tip point of the heart. I stitched in a circular fashion, catching each of the 8 stitches from round 1 of the base tube, securing them to the heart. See photo for placement guidance.
Now you can pin or stitch on velcro to attach to your unicorn outfit!
I would obviously LOVE to see your work, please show me on my Facebook page linked below and check out all the other designs too. And follow…cuz I try to do cool stuff ALL the time!
Much Love and Yarn,
Stephanie
The information and photos in this posting are the sole copyrighted property of Crochetverse©2016. Please do not copy and paste any of the information contained within either electronically, verbally, or written in part or in whole. Instead, please share the DIRECT LINK to this posting only, and if you do, I thank you for sharing. You of course may sell anything you make from this pattern that you have made with your own two hands, no contract labor or mass productions are permitted. If you credit Crochetverse as the designer, that is greatly appreciated!
FINISHING:
Wiring Option:
Should you choose to wire your tail so it can be positioned:
Step 1: Using a length of wire about 20” long, and a pair of needlenose pliers, bend one end around into a circle or loop 2-3 times, until the loops are about the size of a dime in diameter. This is so when the wire is inserted in the tail, it will not poke through.
Step 2: Insert that looped end up into the tail towards the tip now stitched to the heart base. Take the wire that is poking out from the bottom, and bend that into multiple circles in a similar fashion as before until it is short enough to fit inside the tail tube.
Step 3: Using the tail from round 35 of the tail tube, stitch the opening closed. Do this back and forth 3 times so that the wire is securely inside the tail and will not poke out.
Crystal Embellishment Option:
Using the E6000 glue, sparingly apply it to a toothpick end. Then, touch the toothpick to the back of a rhinestone (it should nicely pick it up for you). Place the rhinestone where you like on the heart base and roll the toothpick away, leaving the glue and rhinestone in place on the heart base. Repeat until you have applied as many or few crystals as you like.
Weave in any remaining ends.

[…] Unicorn Tail. […]
You know Artax was a horse, not a unicorn, right?
Yep. Sure do.
thank you for the pattern, gonna make a great unicorn for halloween. just wanted to point out that you reference a photo that isn’t attached in your directions.
If you tell me what spot it is at, I can review and be sure to add it. OR, if you are stuck at any point, email me at [email protected] for help!
Comments are closed.