

")
Hello! Welcome to the “ORCA WHALE CROCHET ALONG, WEEK ONE!”
So happy to have you join us!
My name is Stephanie Pokorny, the owner and designer behind Crochetverse! I love to create and share my patterns with all of you and cannot wait to begin working with everyone!
Here are your translation links:
FRENCH: https://crochetverse.com/orca-weekone-french/
GERMAN: https://crochetverse.com/orca-weekone-german/
SWEDISH: https://crochetverse.com/orca-weekone-swedish/
DUTCH: https://crochetverse.com/orca-weekone-dutch/
UK TERMS: https://crochetverse.com/orca-weekone-uk-terms/
If you missed the Info/Supply Post: https://crochetverse.com/orca-info-supply/
I have been blessed to have the amazing Facebook group, “CAL – Crochet A Long” group help me bring this to you. They have tested, tweaked, suggested, and translated for me in hopes that this will be a purely enjoyable experience! Hugest of thanks!
You will want to join that group, so that you can share and ask questions! Find that here:
https://www.facebook.com/groups/668646249929007/
We will work over a 2 week period to create this sweet little Kawaii style Orca whale! If you have never done amigurumi, now is the time! You will get the chance to work along with other crocheters and ask question as we go to “de-mystify” amigurumi! Learn tips, trick, and hints that will carry into your future pieces too!
When?
WEEK 1: (TODAY!) Create the Pieces
WEEK 2: (August 21st, 2017) Assemble the Pieces and Finish
Where?
The actual pattern will be posted on my blog at http://www.Crochetverse.com
The pattern will also be linked on Ravelry, so you may share projects and bookmark for the future! (This CAL will remain FREE even when the official crochet along ends!)
Find that here: http://www.ravelry.com/designers/stephanie-pokorny
The CAL – Crochet A Long group will be our gracious hosts, please be sure you join that group here: https://www.facebook.com/groups/668646249929007/
So, let’s begin! As stated above, this week we will make all the pieces! Start by gathering your materials listed here:
Materials:
– 75 yards each Light Worsted/Sport/DK black and white yarn
– 5 yards Light Worsted/Sport/DK peachy pink yarn -OR- (1) DMC embroidery floss
*Yarn note: Shown is Caron Simply Soft in Black, White, and DMC Floss in a peachy pink. Though Caron Simply Soft is marked 4/Worsted, it is much closer to a 3/DK weight yarn. If you use something such as Red Heart Super Saver, your item will be larger than stated. Another good choice is “Hobby Lobby I Love This Cotton.”
If you use regular yarn for the rosy cheeks, you will want to separate the 4 plies of the yarn and only use two of them. They need to be delicate so as not to overwhelm the face.
– Size E (3.5mm) crochet hook and Size C (2.75mm) crochet hook
– (2) 12mm or ½” black glass half dome buttons. Safety eyes should be used if this is for a child. (Please always use with supervision)
SAFETY NOTE: If this item is intended for a young child, please eliminate the button eyes and instead follow the instructions given to crochet them.
*Eye note: I have used ½” black glass buttons and painted the little white dots on using nail polish and a toothpick!
– Bobby pin (insert in one loop of the stitch only so as not to create a gap) to mark stitches, stitch marker or colored thread may also be used
– Small amount of stuffing or yarn scraps to fill the body
– Scissors, needle for sewing in ends, tape measure
– (Optional) pins to position the pieces in place before sewing on
Finished Size:
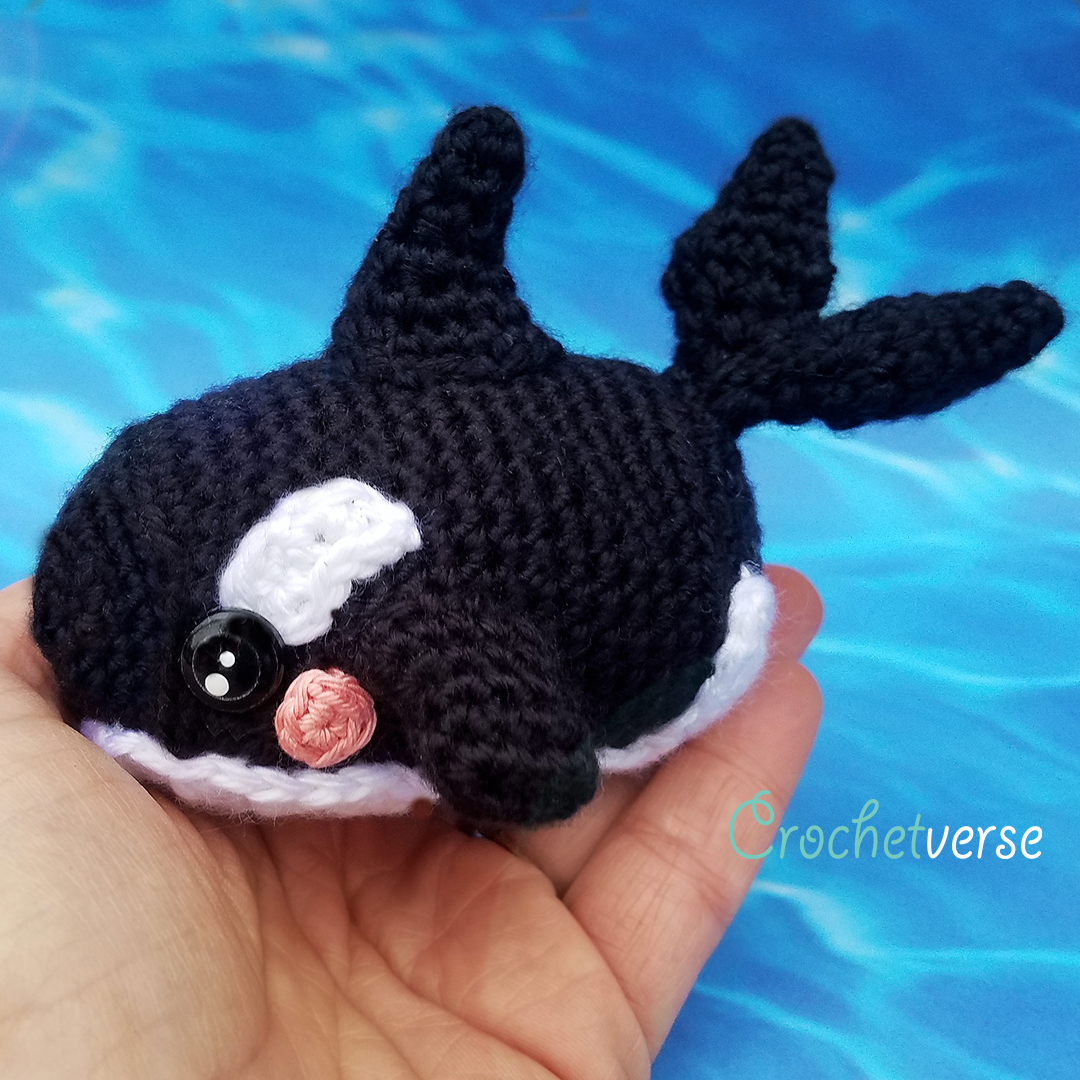
As written, measures 5” long by 4.5” wide by 3.5” high including all the tails and fins.
Gauge:
I like to make gauge part of the pattern. After Round 6 of the main body is completed, the circle should measure 2” in diameter. While it is not imperative you meet gauge, you DO want very tight stitches to avoid gaps in the work. Amigurumi needs to be TIGHT!
If your circle is LARGER, you have looser tension than I do: Go DOWN a hook size.
If your circle is SMALLER, you have tighter tension than I do: Go UP a hook size.
Abbreviations:
rnd(s) round(s) ch chain
sc single crochet rem remaining
scblo single crochet in the back loop only sl st slip stitch
hdc half double crochet sc dec sc2tog over next 2 scs
st(s) stitch(es)
Notes:
***E HOOK – 3.5mm IS USED FOR EVERTHING EXCEPT THE CHEEK CIRCLES***
*Do not turn or join rounds throughout, worked in a spiral
*Mark the 1st st of each round to keep count
Instructions:
Body
Using black, make a magic circle, ch 1:
(alternatively, you may chain 2 and work round 1 into the 2nd chain from the hook)
Rnd 1: 6 sc in the ring, pull tail to close ring. (6) (When weaving the starting tail in, go in many directions so it does not pull open later)
Rnd 2: 2 sc in each sc around. (12)
Rnd 3: (sc in the next sc, 2 sc in the next sc) six times total. (18)
Rnd 4: (sc in the next 2 sc, 2 sc in the next sc) six times total. (24)
Rnd 5: (sc in the next 3 sc, 2 sc in the next sc) six times total. (30)
Rnd 6: (sc in the next 4 sc, 2 sc in the next sc) six times total. (36)
*To ensure success, please refer to gauge at the beginning of the pattern after this round is complete!*
Rnd 7: scblo in each st around. (36)
Rnds: 8-22: sc in each st around. (36)
Rnd 23: scblo in each st around. (36)
If you are using safety eyes as opposed to buttons, you will want to attach them now.
Reference the photo of the completed Orca for positioning guidance.
Rnd 24: (sc in next 4 sc, sc dec over next 2 sc) six times total. (30)
*Note: Work decreases very tightly to minimize holes*
Rnd 25: (sc in next 3 sc, sc dec over next 2 sc) six times total. (24)
*Stuff the piece with stuffing or yarn scraps here. Stuff tightly and firmly, but not so much that you create gaps in the stitches. *
Rnd 26: (sc in next 2 sc, sc dec over next 2 sc) six times total. (18)
Rnd 27: (sc in next st, sc dec over next 2 sc) six times total. (12)
Before working final row add more stuffing.
Rnd 28: (sc dec over next 2 sc) six times total. (6)
Fasten off, leaving a tail to sew any remaining hole closed. Shape into a tube as needed.
Top Fin:
Using black, make a magic circle, ch 1:
Reminder:
*Do not turn or join rounds throughout, worked in a spiral
*Mark the 1st st of each round to keep count
Rnd 1: 4 sc in the ring, pull tail to close. (4)
*Be sure your work doesn’t flip to the wrong side during the 1st few rounds. If it does, work it back to right side with your finger.
Rnd 2: 2 sc in the next st, sc in the next 3 sts. (5)
Rnd 3: 2 sc in the next st, sc in the next 4 sts. (6)
Rnd 4: sc in the next st, hdc in the next 3 sts, sc in the next 2 sts. (6)
Rnd 5: 2 sc in the next st, 2 hdc in the next st, hdc in the next st, 2 hdc in the next st, sc in the next st, 2 sc in the next st. (10)
Rnd 6: (sc in the next st, 2 sc in the next st) five times total. (15)
Rnd 7: sc in each sc around, sl st to the 1st sc, fasten off leaving a long tail for assembly later. (15)
Side Fins (Make 2):
*Worked on both sides of beginning chains. If the piece tends to flip inside out, flip it to correct side out*
Using black, chain 4:
Rnd 1: sc in 2nd ch from hook and next ch, 3 sc in the last chain. Continue to work on opposite side of beginning chains in the rem unworked loops, sc in the next ch, 2 sc in the last ch. (8)
Rnds 2-3: sc in each sc around. (8)
Rnd 4: (sc in the next 3 sc, 2 sc in the next sc) two times total. (10)
Rnd 5: (sc in the next 4 sc, 2 sc in the next sc) two times total, sl st to the 1st sc, fasten off leaving along tail for assembly later. (12)
Tail Fin:
Tips (Make 2):
Using black, make magic circle, ch 1:
Rnd 1: 4 sc in the ring, pull tail to close. (4)
Rnd 2: sc in each sc around. (4)
Rnd 3: (sc in the next sc, 2 sc in the next sc) two times total. (6)
Rnd 4: sc in each sc around. (6)
Rnd 5: 2 sc in each sc around. (12)
Rnd 6: sc in each sc around. (12)
Rnd 7: (sc dec over next 2 sc) six times total. For first tip, sl st to the 1st sc and fasten off. For 2nd fin tip do NOT fasten off, but continue to the tail base join. (6)
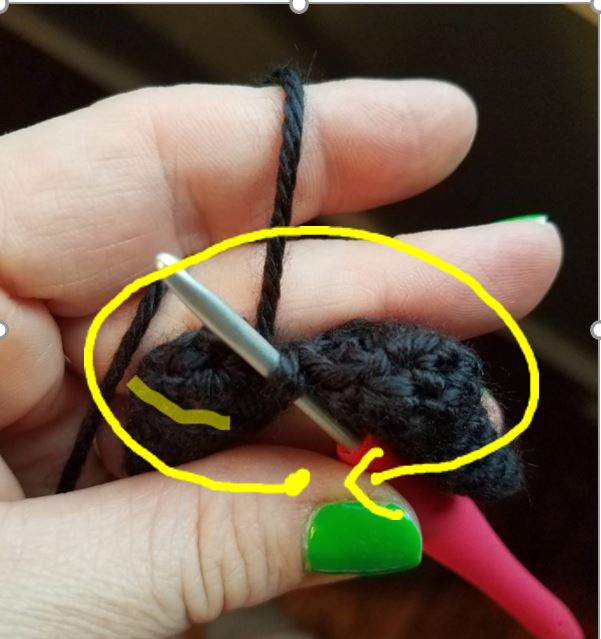
Tail Base Join: (See the photo at the end of this section to assist in the joining)
Tuck all the tails inside the tips so they are hidden. Do not stuff the tip pieces.
Position the 2 tip pieces next to each other with the final round 7 facing up with the 2nd tip (the one you have not fastened off) to the right and the fastened off tip to the left. You will be working the 12 sc that make up the tip pieces (6 from each) as ONE ROUND to join them.
Rnd 1: Continue with the yarn still attached to the 2nd tip that was not tied off and sc around the 6 sc on the left tip then sc in each st around the tip on the right. This is one continuous round that will connect the two pieces together. (12)
Rnd 2: (sc in the next 2 sc, sc dec over next 2 sc) three times total. Add a little stuffing or scrap yarn to the tail base. (9)
Rnd 3: (sc in next sc, sc dec over next 2 sc) three times total, sl st to the 1st sc, fasten off leaving a long tail for assembly. (6)
This image shows the two tips lined up and ready to join just before round 1 of join base. The arrow shows the direction to work the 12 sc around the two pieces.
White Eye Accents: (Make 2)
Both side of the beginning chain are worked on this piece.
Using white, chain 5:
Rnd 1: sc in 2nd ch from hook, 2 sc in next ch, sc in the next ch, 3 sc in last ch, continue around to the opposite side of the chains and sl st along the next 3 chain loops, sl st to the 1st st made, fasten off leaving tail for assembly.
Crochet Eye Option: (Make 2)
*Should you choose to replace the button eyes with crocheted eyes*
Using black, make a magic ring, ch 1:
Rnd 1: work 5 sc into the ring, sl st to the 1st sc made, fasten off leaving a long tail to sew to the face later.
Stitch on the white “eye sparkles”: Using a strand of white yarn and a needle, stitch 2 dots on each eye piece. One should be larger (two or three times around one stitch) and sit in about the 7 o’clock position. The second should be smaller (one or two stitches around one stitch) and be just below the center of the magic ring center The tails from the white eye sparkles can be knotted and trimmed behind the eye, as they will be stitched on the body and covered.
Cheek Accents: (Make 2)
Using C/2.75mm hook and DMC floss or 2 plies of the pink yarn, make a magic circle, ch 1:
Rnd 1: 6 sc into the ring, pull tail to close, sl st to 1st sc made, fasten off leaving a tail for assembly later.
White Tummy:
Using white, chain 6:
Row 1 (RS): sc in 2nd chain from hook and in each rem chain across. (5)
Row 2: ch 1, turn, 2 sc in 1st sc, sc in next 3 sc, 2 sc in last sc. (7)
Row 3: ch 1, turn, sc in each sc across. (7)
Row 4: ch 1, turn, 2 sc in the 1st sc, sc in next 5 sc, 2 sc in last sc. (9)
Rows 5-6: ch 1, turn, sc in each sc across, fasten off. (9)
Row 7: with the right side of row 6 facing up, rejoin yarn with a sl st in the 3rd sc from the right edge, ch 1, sc in same st and next 4 sts. (5)
Rows 8-13: ch 1, turn, sc in each sc across. (5)
Row 14: ch 5, turn, sc in 2nd ch from hook and next 3 chains, sc in each of the 5 sts across the center row, ch 5.
Row 15: turn, hdc in 2nd ch from hook and next 3 chains, sc in the next 5 sts across the center row, sl st
(LOOSELY) across the next 4 sc.
Row 16: ch 1, turn, hdc in next 4 sts, sl st loosely across the center 5 sts, hdc in the last 4 sts, DO NOT
FASTEN OFF, continue to the EDGE ROUND.
EDGE ROUND (ALL THE WAY AROUND THE TUMMY):
The right side of the piece should be facing up. If not, turn it so the right side is facing up.
Ch 1, sc in each st and end of rows around the piece to edge the tummy, work 2 sc in the corners as you round them to avoid warping, sl st to the 1st sc made, fasten off leaving a long tail for assembly.
Hooks down! That is it for this week! Be sure to join us next week to put it all together!
Please post projects and questions to any of the social media sites below, and/or email me at: info@crochetverse.com
Much Love and Yarn,
Stephanie
Follow on Facebook Here! http://www.facebook.com/crochetverse
Follow on Instagram Here! Handle Name: Crochetverse
Follow on Ravelry Here! Shop Name: Crochetverse
Follow on Pinterest Here! Handle Name: Crochetverse
Follow on YouTube Here! Channel Name: Crochetverse
Follow on Twitter Here! Handle Name: Crochetverse
Follow on Etsy Here! Shop Name: Crochetverse
The information and photos in this posting are the sole copyrighted property of Crochetverse©2016. Please do not copy and paste any of the information contained within either electronically, verbally, or written in part or in whole. Instead, please share the DIRECT LINK to this posting only, and if you do, I thank you for sharing. You of course may sell anything you make from this pattern that you have made with your own two hands; no contract labor or mass productions are permitted. If you credit Crochetverse as the designer, that is greatly appreciated!
