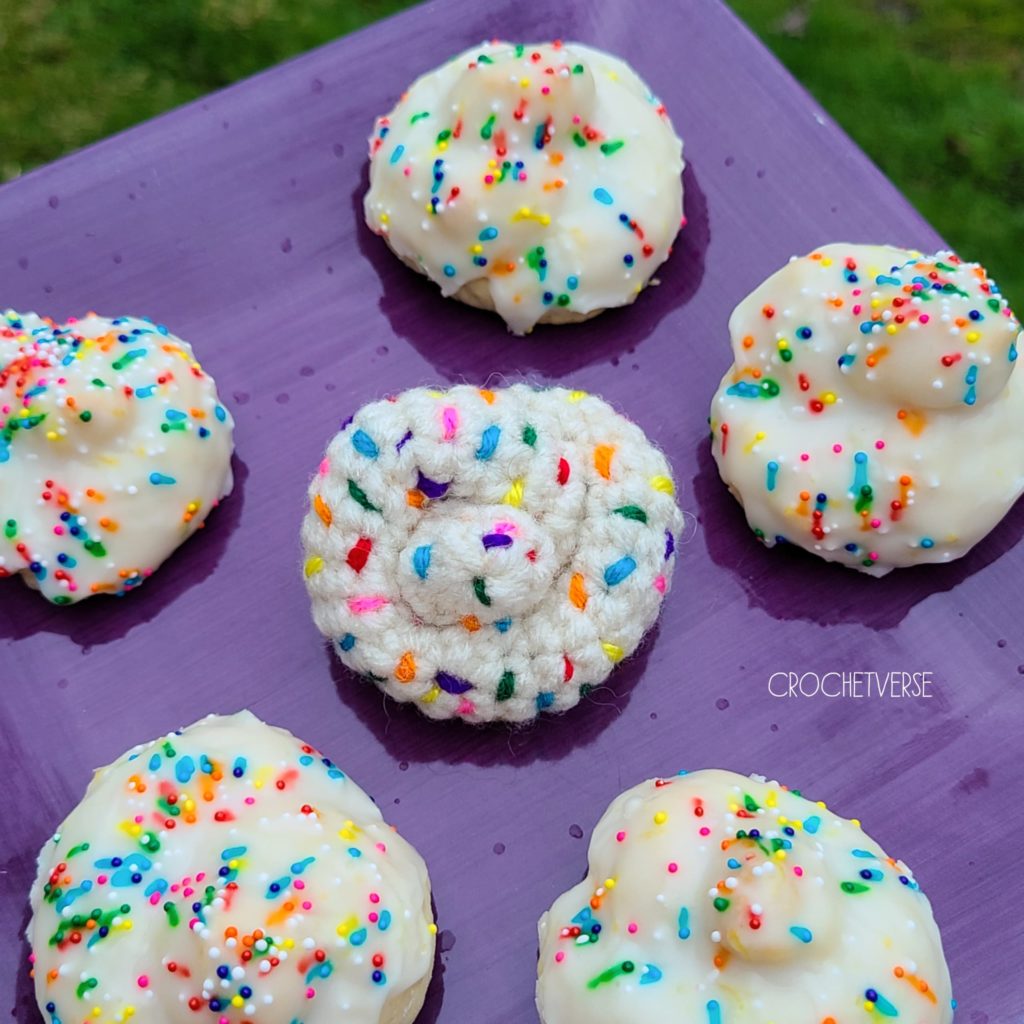
These traditional Itlian Easter cookies are lemony, colorful, and super easy to make! The best part about this cookie after eating them, is that the name TRANSLATES as the word CROCHET! UM HOW COOL IS THAT!? A namesake cookie for our art form!
I hope you have the happiest of Easter celebrations this beautiful day. I have for you both a recipe that I have personally made and can vouch for AND A FREE CROCHET PATTERN! So, sit back make the cookies and while they cool, whip up a crochet one too! I’m thinking a Christmas ornament is how I will use mine!
Firstly, here is the recipe I used from “An Italian in My Kitchen” Blog! https://bit.ly/3a1BYfZ
Secondly, I have a FREE SUPER easy crochet pattern to make one!
You’ll need:
25 yards off white/cream worsted weight yarn
24″ strand of each pink, red, orange, yellow, green, turquoise, and purple
G(4.25mm) crochet hook
tapestry needle, scissors, stitch marker
small amount stuffing
The Instructions: (US Terms)
With the cream yarn, make a magic ring:
Do not join or turn rounds, work in a spiral. Mark rounds if needed to keep track.
Rnd 1: ch 1, make 8 sc in ring. (8)
*Stuff gently as you go with stuffing to gently hold shape. *
Rnds 2-38: sc in each sc around
Rnd 39: (scdecrease over the next 2 sts) 4 times total, sl st to 1st st made and cut yarn leaving a long tail for sewing. (4)
The tube will be a bit over 6″ long. A little difference won’t matter.
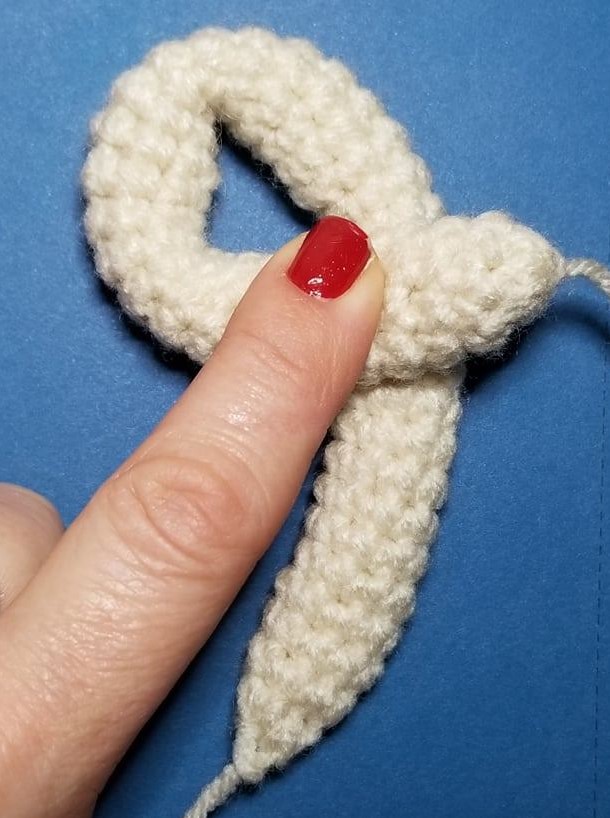
Knot it up: (Genuinely, this is just a basic knot.)
Make a “9” shape with the piece as shown in the photo, short end on top of long end. I have round 39 (4 sts) pointing down on the long end and round 1 (8sts) folded short.
2. Bring the tip of the long end up and dive it through the center hole.
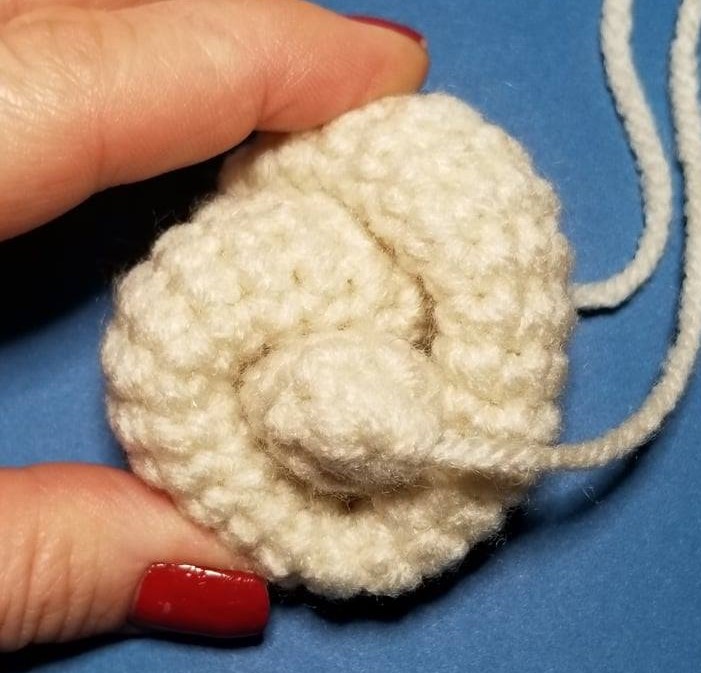
3. Pull that end through the hole to the other side and flip over. Once flipped, this is the right side of the cookie.
4. Using the long tail end, stitch around/up/down to secure and hold it into this shape permanently. Weave in the ends.
5. Using one of the 24″ strands of color, begin to sew “sprinkles” all over the surface 1 sc in length, moving the yarn by stitching through the tube inside so the outside looks nice and clean on the outside still. Once done with the color, weave the end inside to be hidden and cut the yarn. Repeat for all the sprinkle colors.
Here is my LinkTree which has EVERY link you could hope for and I hope you follow me on Insta, Twitter, and the others too!https://linktr.ee/Crochetverse
This pattern is provided free of charge by me, Stephanie Pokorny, of Crochetverse on this blog only. Copyright 2020. The pattern may not be shared in any manner, in part or in whole anywhere. The pattern may not be altered a little or a lot and claimed as your own for free or paid at any time. Please do not sell using my images. You may sell the items you make from the pattern on a small business basis. Thank you and much love!!
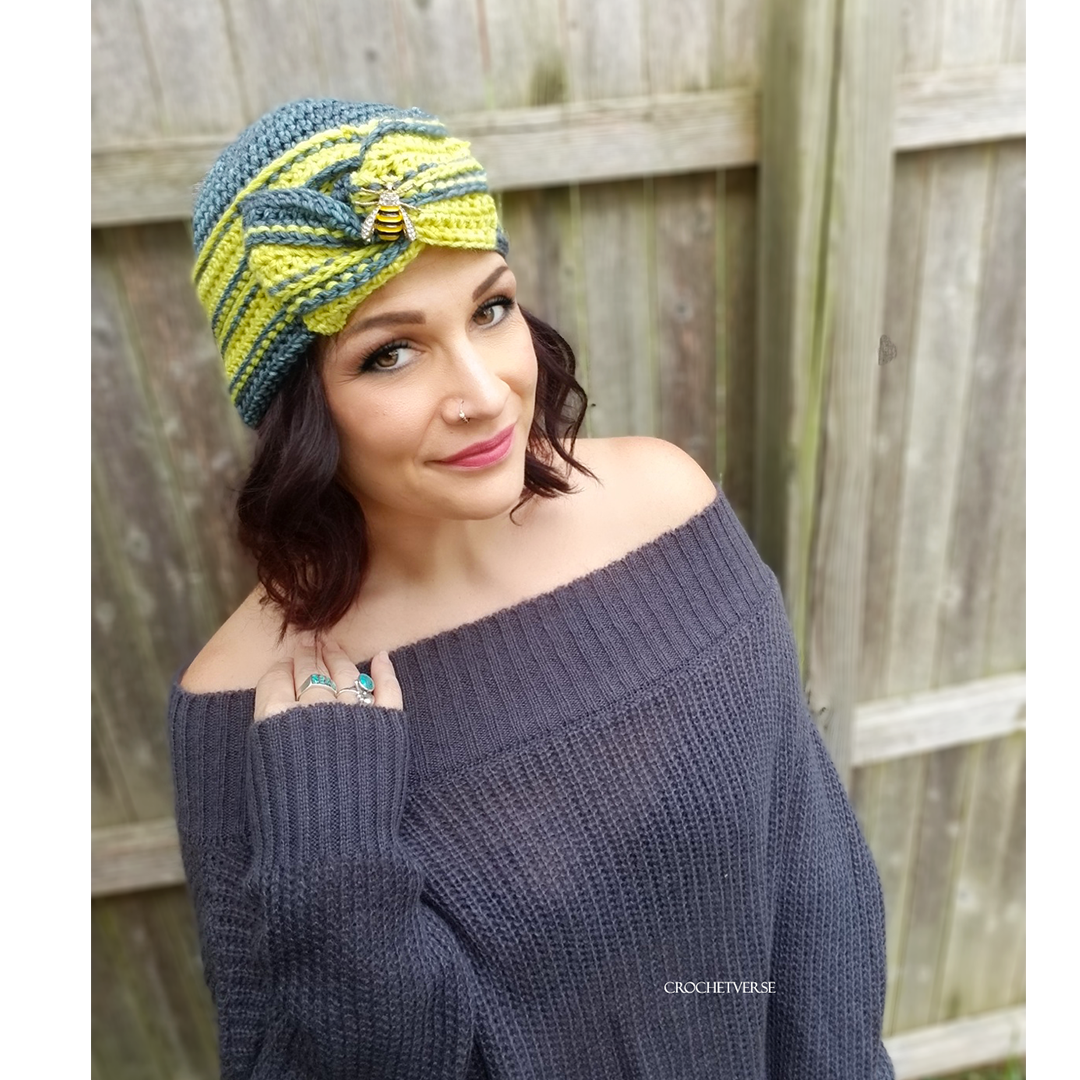
I saw someone wearing and oversized earwarmer, like a headwrap almost, and I fell in love. And being the holiday season, of COURSE I had to go Santa.
Red with white trim and black belt with a golden buckle is evoked in this headwrap! Enjoy the free pattern from me to you, I completed it in less than an hour!
Please note: I have created this free crochet pattern from myself to you. It is NOT to be copied and pasted and shared through documents or print. It is NOT to be saved and sold ever. It is NOT to be changed a little or a lot and claimed as your own for free or paid. Please and thank you so much! If there is any questions, please just shoot me a message via Facebook (link at bottom of page) Thank you so much!
Materials:
Size J crochet hook -OR- size needed to obtain gauge
scissors, tape measure, tapestry needle
75 yards worsted weight yarn in red
25 yards each in white, black, and yellow
Shown is Premier Everyday Worsted Anti-pilling, it is magical for projects that will get a lot of wear, soft and durable!
ENJOY 30% off ALL PURCHASES OF THE PREMIER YARN from their SITE with MY EXCLUSIVE CODE (through 12/31/19) Enter code: CV30 This CANNOT be combined with other offers or codes, but 30% is amazing! So enjoy the sale and rest assured you will have an heirloom project that will last a life time. Check the reviews on the anti-pilling line, over 500 5 STAR REVIEWS, that is saying something. You know NOONE filters when it comes to product review online <3 ORDER HERE AT PREMIER: https://www.premieryarns.com/pages/anti-pilling
#MemoriesMadeToLast #MakeItPremier #PremierYarns
Gauge: I tend to crochet somewhat tightly, you will want to check your gauge so it fits right. I also know headwear is a very personal preference. I prefer mine to start out snug, as crochet stretches a LOT and I hate when it stretches too big so I always start small. I have an average adult sized head of just under 22″.
1st four rows of pattern = about 1.25″ tall and about 18″ long, about 4 ” less than my head circumference, it stretches perfectly at this size.
Finished Size: UNSTRETCHED about 6″ tall and 18″ long before seaming
Instructions:
Row 1: With red, make a chainless half double crochet foundation row of 62 sts:
Note: If you do not start with the chainless foundation row, your 3rd loop will be BEHIND the st and not in front as the pictures below will show.
Here is a video link showing the chainless foundation, it is life changing, I recommend you learn it! Video done by Gleeful Things, a maker I admire! https://www.youtube.com/watch?v=7mEMPK4yuF8
Row 2-3: ch 1 (does not count as st), turn, hdc in the THIRD LOOP of each hdc across. (62) (see photos)
Note: If you do NOT start with a chainless foundation row, your 3rd loop will be behind the row, like this video shows by Heart Hook Home: https://www.youtube.com/watch?v=9dHzmZ03MQA
If you do start with chainless foundation row, it is the same loop but it presents itself from the front, which I HIGHLY prefer. this image shows the 3rd loop when you begin with chainless foundation row:
This image shows the 3rd loops marked with a line, note when starting with chainless foundation, they are across the front, super cool:
Row 4: ch 1, turn, hdc in each 3rd loop across, at final yarn over/pull through of final st, change to black and drop red. (62)
Row 5-6: ch 1, turn, hdc in each 3rd loop, at final st of row 6, pull red back up and change to red, cut black. (62)
Row 7-10: ch 1, turn, hdc in each 3rd loop, at end of row 10, drop red and change to white. (62)
Row 11-13: ch 1, turn, hdc in each 3rd loop across, at end of row 13, pull red back up and change to red, cut white. (62)
Row 14-19: ch 1, turn, hdc in each 3rd loop across, at end of row 19, cut yarn leaving long tail to seam shut. (62)
Weave in ends except long last tail of red. Choose which side you like better of the band, using the red tail sew the short ends together. It does not have to be perfect, it will be covered by the yellow band. It may look small to you, but I promise it is right once you stretch it on your head!
With yellow held DOUBLE STRAND, chain 18:
Row 1: sc in 2nd ch from hook and each ch across. (17)
Row 2: ch 1, turn, sc in each st across. (17)
Row 3: ch 1, turn, sc in 1st 2 sts, dc bobble in nxt st )by making 4 partial dc in the same st, then yarning over and drawing through all loops on the hook to close the bobble, then ch-1 to complete), *sc in nxt 2 sts, dc bobble in nxt st, repeat from three times more, sc in last 2 sts.
Row 4: ch 1, turn, sc in each sc and bobble across, be sure you do NOT work 2 sts in each bobble the ch-1 to close it does not count as a st. (17)
Row 5: ch 1, turn, sc in each st across, cut yarn leaving tail to seam to hat. (17)
Using the tail from the small yellow band, cinch up the main headband along the seam, wrap the small band around the seam of the main headband and sew the short ends together from behind. Sew through the band and main band a few times too so it does not slide left or right. That is it! Enjoy this Santa (headband, baby!
So much love, Stephanie Pokorny/Crochetverse
Follow me on any of my social media to stay in touch, I would love to have you! Much love and yarn, Stephanie Pokorny (Crochetverse)
I love the beauty and magic of Christmas, who doesn’t? But, I gotta stay true and keep a little kreepy in it too… I LOVE the folktale of Krapmus and so do my children. All in good fun <3
Be good or Krampus might send this little gingerbread down the chimney on his hook to lure you up and punish you for being naughty! Take a bite out of him… no you are REALLY in trouble. Hope you enjoy this kinda cute kinda creepy Krampusy little guy!
Please note: I have created this free crochet pattern from myself to you. It is NOT to be copied and pasted and shared through documents or print. It is NOT to be saved and sold ever. It is NOT to be changed a little or a lot and claimed as your own for free or paid. Please and thank you so much! If there is any questions, please just shoot me a message via Facebook (link at bottom of page) Thank you so much!
Finished Size: About 10.5” tail and 7” wide from
fingertip to fingertip.
Gauge: While not critical, you want your stitches to be tight and not gapped at all. The stuffing will show though if you work too loosely.
Materials:
100 yards golden yellow brown of a stiffer yarn such as Red Heart Super Saver
Less than 20 yards each of medium lilac purple, spring green, white, and red
Size H (5mm) crochet hook and Size D (3.25mm) crochet hook
small amount of stuffing
glue gun and sticks if you plan to adhere details this way
scissors, tape measure, tapestry needle
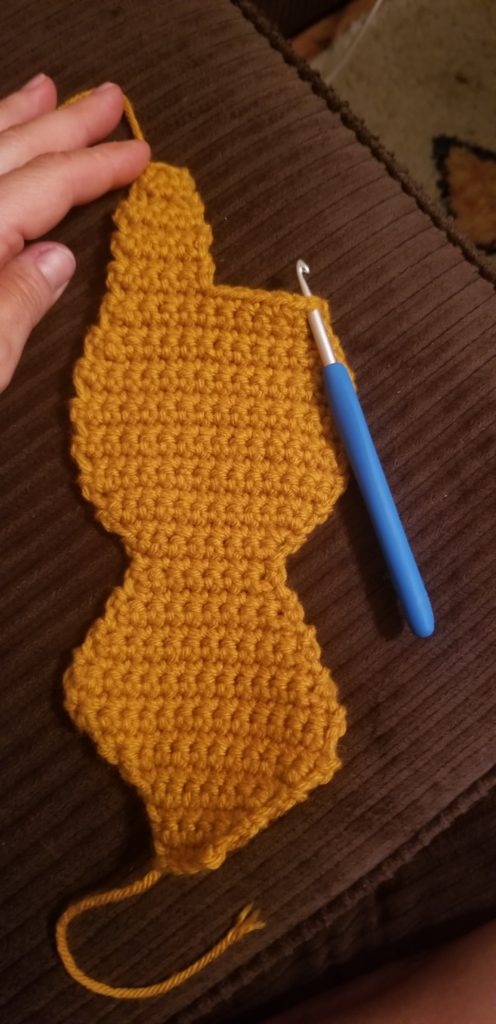
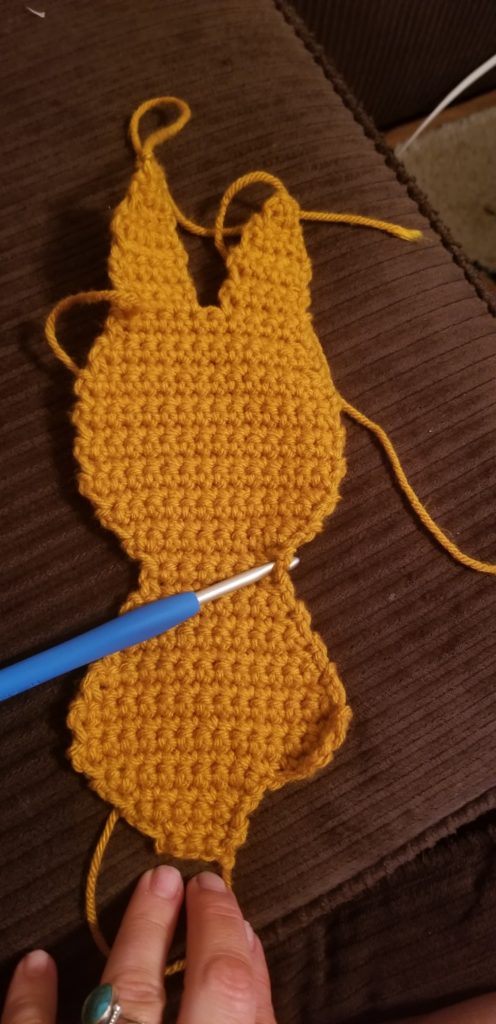
Body Half (Make 2):
With golden yellow and G hook, chain 5:
Row 1: sc in 2nd ch from hook and each rem ch
across. (4)
Row 2: ch 1, turn, sc in 1st 3 sts, 2 sc in last
st. (5)
Row 3: ch 1, turn, 2 sc in 1st st, sc in last 4
sts. (6)
Row 4: ch 1, turn, 2
sc in 1st st, sc in nxt 4 sts, 2 sc in last st. (8)
Row 5: ch 1, turn, 2 sc in 1st st, sc in nxt 6 sts, 2 sc in
last st, chain 4. (10 sts plus 4 chs)
Row 6: turn, sc in 2nd, 3rd, and 4th ch from hook, sc in nxt 9 sts, 2 sc in last st. (14)
Row 7: ch 1, turn, sc in 1st 13 sts, 2 sc in last
st. (15)
Row 8-9: ch 1, turn, sc in each st across. (15)
Row 10: ch 1, turn, scdec over 1st 2 sts, sc in nxt
11 sts, scdec over last 2 sts. (13)
Row 11: ch 1, turn, sc in each st across. (13)
Row 12: ch 1, turn, scdec over 1st 2 sts, sc in nxt
9 sts, scdec over last 2 sts. (11)
Row 13: ch 1, turn, sc in each st across. (11)
Row 14: ch 1, turn,
scdec over 1st 2 sts, sc in nxt 7 sts, scdec over last 2 sts. (9)
Row 15: ch 1, turn, sc
in each st across. (9)
Row 16: ch 1, turn,
scdec over 1st 2 sts, sc in nxt 5 sts, scdec over last 2 sts. (7)
Row 17: Marking the 1st
and last st of this row with a stitch marker for arm placement later, sc in
each st across. (7)
Row 18: ch 1, turn, 2
sc in 1st st, sc in nxt 5 sts, 2 sc in last st. (9)
Row 19: ch 1, turn, 2
sc in 1st st, sc in nxt 7 sts, 2 sc in last st. (11)
Row 20: ch 1, turn, 2
sc in 1st st, sc in nxt 9 sts, 2 sc in last st. (13)
Row 21: ch 1, turn, sc
in each st across. (13)
Row 22: ch 1, turn, 2
sc in 1st st, sc in nxt 11 sts, 2 sc in last st. (15)
Rows 23-29: ch 1, turn, sc
in each st across. (15)
Row 30: ch 1, turn,
scdec over 1st 2 sts, sc in nxt 11 sts, scdec over last 2 sts. (13)
Row 31: ch 1, turn, sc
in each st across. (13)
Row 32: ch 1, turn,
scdec over 1st 2 sts, sc in nxt 9 sts, scdec over last 2 sts. (11)
Row 33: ch 1, turn, sc
in each st across. (11)
Do not cut, but
we are now beginning 1st leg.
Row 34: ch 1, turn, sc
in 1st 5 sts. (5)
Rows 35-38: ch 1, turn, sc
in each st across. (5)
Row 39: ch 1, turn,
scdec over 1st 2 sts, sc in nxt st, scdec over last 2 sts. (3)
Row 40: ch 1, turn, sc
in each st across. (3)
Row 41: ch 1, turn,
scdec over 1st 2 sts, (sc, sl st) in last st, cut yarn.
Begin 2nd
leg:
With leg just completed to the left and the head end closer to you, rejoin the yarn with a sl st in the opposite end, see pic below:
Row 1: ch 1, sc in
same st and nxt 4 sts. (5)
Row 2-5: ch 1, turn, sc
in each st across. (5)
Row 6: ch 1, turn,
scdec over 1st 2 sts, sc in nxt st, scdec over last 2 sts. (3)
Row 7: ch 1, turn, sc
in each st across. (3)
Row 8: ch 1, turn,
scdec over 1st 2 sts, (sc, sl st) in last st, cut yarn.
Begin 1st
arm:
With bitemark on head to the right and the head closer to you, rejoin yarn in side of the st marked on the right from Row 17 above. You will be working towards the feet end 1st.
Row 1: ch 1, sc in row
end as ch-1 and nxt 3 row ends. (4)
Rows 2-7: ch 1, turn, sc
in each st across. (4)
Row 8: ch 1, turn, sc
in 1st st, scdec over nxt 2 sts, sc in last st. (3)
Row 9: ch 1, turn, sc
in each st across. (3)
Row 10: ch 1, turn,
scdec over 1st 2 sts, (sc, sl st) in last st, cut yarn.
Begin 2nd
arm:
With the
bitemark in the head to the right and the feet closer to you, rejoin the yarn
with a sl st in the remaining marked st on Row 17 from the side. You will be
working to the feet end 1st.
Rows 1-10: Repeat as for
right arm, but DO NOT CUT YARN. Instead continue to edge round.
Edge Round:
For one side
you will NOT TURN before the edge round.
For the other
side you WILL turn before the edge round.
It does not
matter which is which, is just matters so that each side will have the right
side of the edge round facing out when we sew them together.
Rnd 1: ch 1, (see
above for turning notes), sc in each end of row and st around the entire body
half, working 3 sts in the same st as you round corners and replacing the sc
with a sl st as needed to reduce bulk in areas such as armpits, neck, and
between legs, once around, sl st to 1st st made, cut yarn. Leave a
36” tail on one side to sew them together.
Whites of Eyes
(Make 2):
With E hook and
white yarn, make a magic ring:
Rnd 1: ch 1, 10 hdc in
the ring, sl st to 1st hdc made, cut yarn leaving tail for sewing.
(10)
Greens of Eyes
(Make 2):
With E hook and
green yarn, make a magic ring:
Rnd 1: ch 1, 7 sc in
the ring, sl st to 1st sc made, cut yarn leaving long tail for
sewing. (7)
Eyebrows (Make
2):
With yellow
gold yarn held double strand and G hook, chain 5, cut yarn leaving long tail
for sewing. (5)
Purple Cheeks
(Make 2):
With E hook and
purple yarn, make a magic ring:
Rnd 1: ch 1, 8 sc in
the ring, sl st to 1st sc made, cut yarn leaving long tail for
sewing. (8)
Mouth (Make 1):
With red yarn
and E hook, chain 16, cut yarn leaving long tail for sewing. (16)
Buttons (Make
3):
With white yarn
and E hook, make a magic ring:
Rnd 1: ch 1, 8 sc in
the ring, sl st to 1st st made, cut yarn leaving long tail for
sewing. (8)
Arm & Leg
Frosting (Make 4):
With E hook and
white yarn, chain 38, cut yarn leaving long tail for sewing.
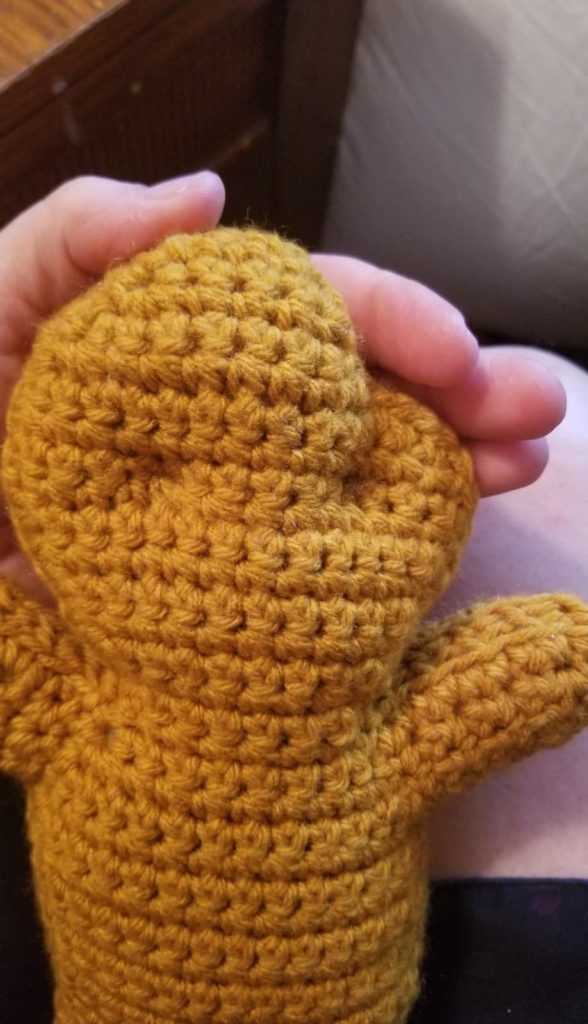
Assembly: Use
Main Photo as guide throughout for placement.
Stuffing as you
sew around, place the two body halves upon each other, making sure each
respective piece has the right side of the edge round facing out. Using the
long tail from one half, begin sewing the two halves together. I prefer to work
just through the inside loops of each piece as I sew (the two that are closest
to each other), but use whatever method you like.
Using a separate strand of golden yellow yarn, needle sculpt the eye sockets to be countersunk. I insert the needle in the back of the head opposite of where I want the eye to be and then bring the yarn out through the front where the eye will be. Then, bring the yarn a stitch over and back through the front to the back in the same place you inserted and firmly knot the two pieces together tugging the yarn firmly to pucker the eye socket in. Do the same for the 2nd eye. Weave in all ends to this point.
I MUCH prefer
hot glue to sewing on of details. I use Gorilla Glue brand glue sticks. It is
100% permanent, so use sparingly and pin in place the pieces as needed before
you glue. Once it is down, it is there forever.
If you do not
want to use glue, sew each of the pieces on.
Weave in all
the ends 1st if you plan to glue and after if you plan to sew.
Glue/Sew one
white eye in each countersunk eye socket.
Glue/Sew one
green eye on top of each white eye, they are placed low and both to the center,
in a cross eyed manner.
Glue/Sew an
eyebrow over each eye. They need to point downwards to the center so he looks
mad.
Glue/Sew one
purple cheek to either side of the face. They are nearly centered under each
eye.
Glue/Sew the
mouth into position. It is a kidney bean shape, rounded on the top edge and
dimpled on the bottom side.
Glue/Sew the
three buttons on.
Glue/Sew the
frosting on the end of each arm and leg a few rows up from the tips. I placed
the beginning and end of the chain 1st together in the back, then
pinned it into the wave form, then secured.
Weave in any
ends that remain.
Dust/Soot:
If you want him to look dirty like he just came down from the chimney, sent by Krampus himself, use fabric paint or eyeshadow in a gray or black shade and SPARINGLY dirty him up as desired.
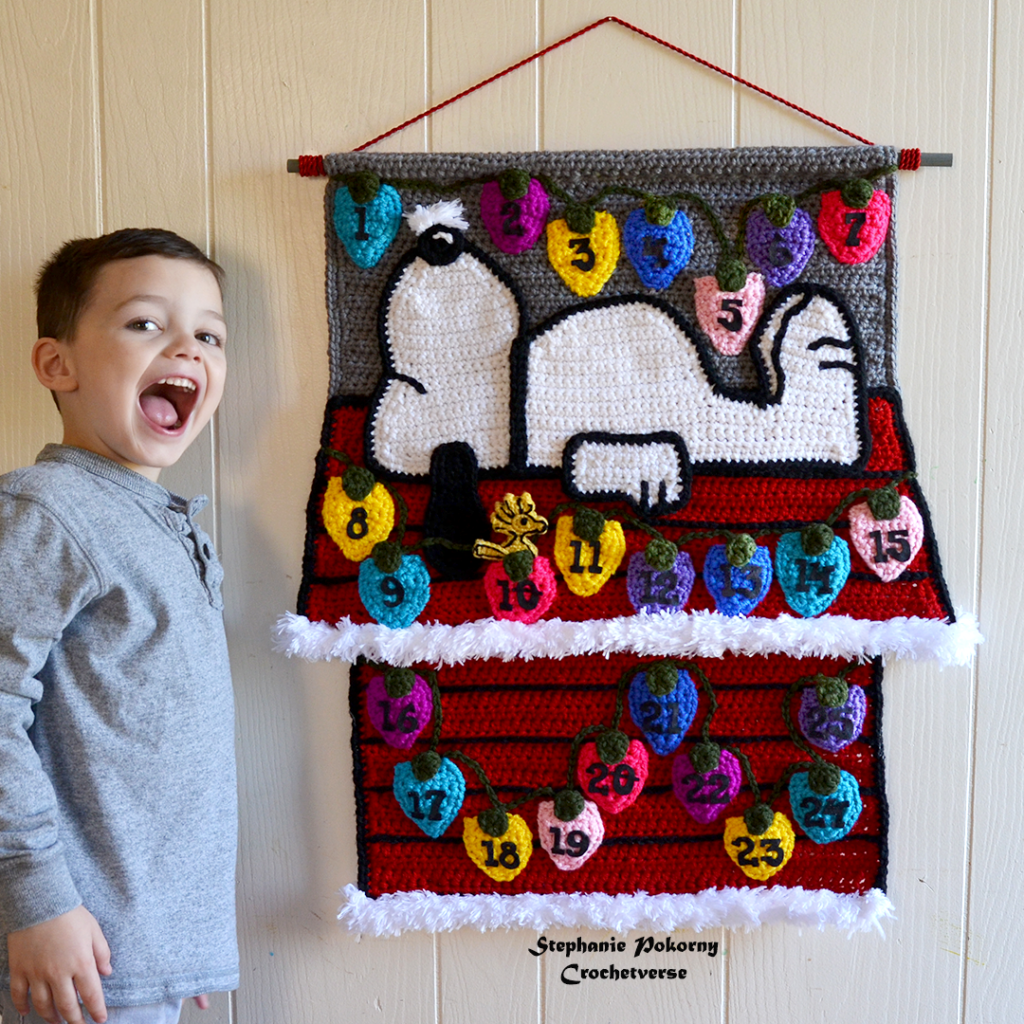
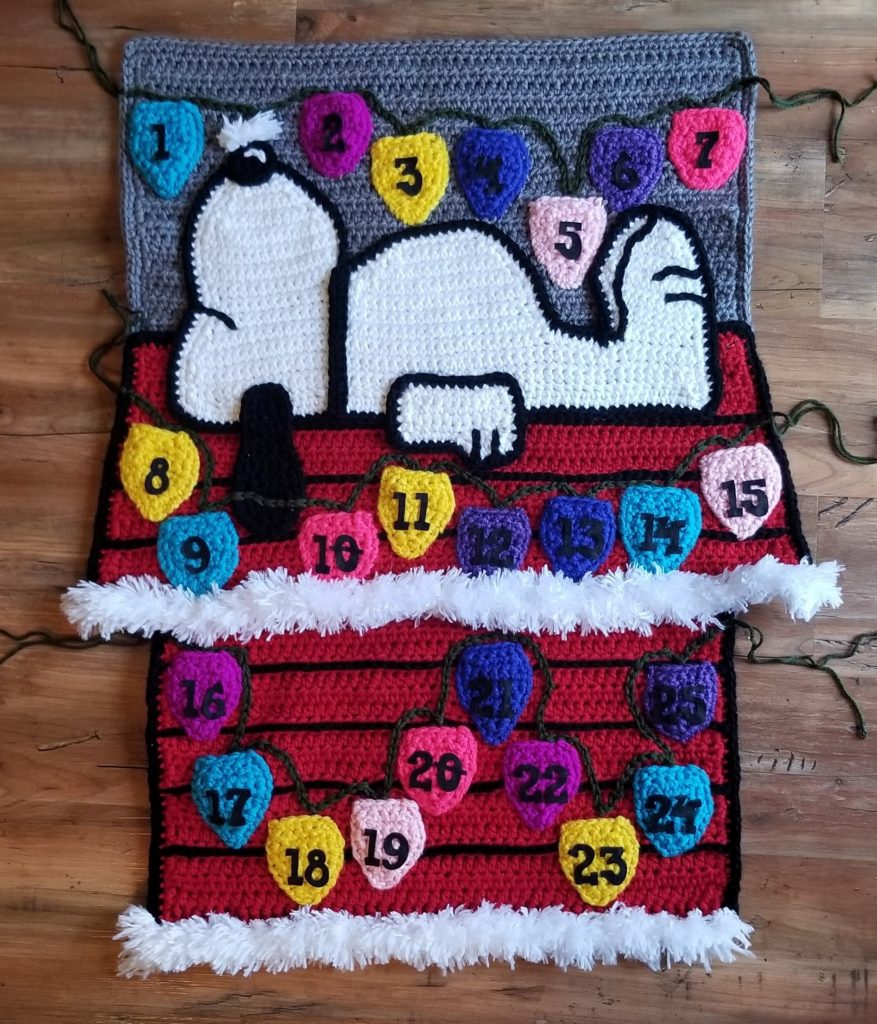
Merry early Christmas from me to you. Or happy whatever you celebrate or honor this time of year! I have been so blessed over the year and thank YOU for your support! Please enjoy this FREE pattern for this calendar!
ONLY available here on the blog, please share by linking directly to this page! Never copy or paste or share elsewhere. This allows me to keep bringing free patterns to you!
MUCH LOVE! Stephanie Pokorny/Crochetverse!
I had the pleasure to work with Premier Yarns for this project! Specifically, their anti-pilling. It is their own proprietary fiber and NOONE else has it. It is soft, durable, and a great weight for a worsted (not overly thin or thick!).
ENJOY 30% off ALL PURCHASES OF THE PREMIER YARN from their SITE with MY EXCLUSIVE CODE (through 12/31/19) Enter code: CV30 This CANNOT be combined with other offers or codes, but 30% is amazing! So enjoy the sale and rest assured you will have an heirloom project that will last a life time. Check the reviews on the anti-pilling line, over 500 5 STAR REVIEWS, that is saying something. You know NOONE filters when it comes to product review online <3 ORDER HERE AT PREMIER: https://www.premieryarns.com/pages/anti-pilling
– size J (6mm) crochet hook OR size needed to obtain gauge
(USED FOR ENTIRE PROJECT EXCEPT WOODSTOCK)
– size D (3.25mm) crochet hook for Woodstock ONLY
*THIS ENTIRE PROJECT UNLESS NOTED IS DONE HOLDING THE
YARN DOUBLE STRAND*
– 600 yards worsted weight red yarn (Shown Premier
Anti-Pilling Everyday Worsted in Really Red)
– 200 yards worsted weight white yarn (Shown Premier
Anti-Pilling Everyday Worsted in Snow White)
– 200 yards worsted weight black yarn (Shown Premier
Anti-Pilling Everyday Worsted in Black)
– 350 yards worsted weight dark gray yarn (Shown Premier
Anti-Pilling Everyday Worsted in Steel)
– 200 yards deep hunter green yarn (Shown Premier
Anti-Pilling Everyday Worsted in Pine Green)
– 30 yards yellow (Shown Premier Anti-Pilling Everyday
Worsted in Sunshine)
– 40 yards each of 7 colors worsted yarn (Shown Premier
Anti-Pilling Everyday Worsted in Azure, Violet, Baby Pink, Neon Pink, Lemon,
Bright Violet, and Royal Blue)
– 30 yards super bulky fur yarn in white (Shown Premier
Bunny in White)
– ½” dowel rod cut to 24”. You can leave this natural or
paint it as I have done with mine
– 2 yards braided trim or ribbon to hang the calendar
– (1) set felt numbers 1.25” tall I purchased them from
SunshineAnnieDieCuts on Etsy and used this set in black: https://etsy.me/32VUKCd
– I absolutely use hot glue (specifically Gorilla Glue
sticks) for my projects. It holds forever. I have torn yarn to shreds trying to
move something once applied, so firstly, use care when gluing and secondly it
WILL last forever. If you would like to sew all pieces, of course do this
instead.
– Aleene’s Fabric Fusion glue with the narrow tall tip. I
used this for my felt numbers only. They are small and the hot glue was just not
precise enough for my liking. I applied liberally and let dry 4 hours.
Row 1 and 2 of the doghouse bottom half should measure about
17” long and 1 1/8” tall.
You want to be as close to this as possible. If not, you
will use more yarn and it will be not as sturdy.
Note, I tend to crochet tightly.
ABBREVIATIONS:
Ch chain
dec decrease
Sl st slip stitch bb back bump on a chain
Sc single
crochet
st stitch
Hdc half double
crochet rnd round
Dc double
crochet
Nxt next
Rem remaining
INSTRUCTIONS:
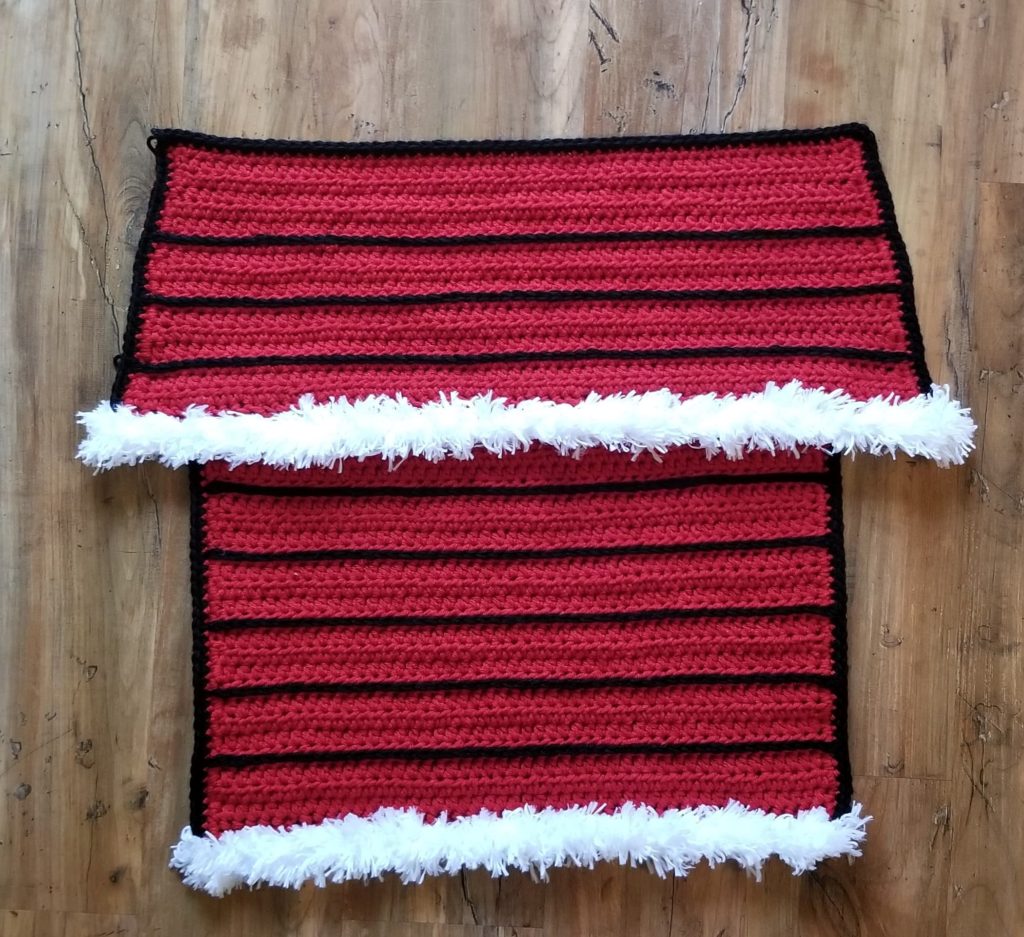
DOGHOUSE:
Doghouse Bottom Half:
Holding the red yarn double strand:
Row 1: Make a chainless single crochet foundation row
of 48 sts. (48)
Alternatively, chain 49, sc in 2nd ch from hook and each ch
across. (48)
Row 2-25: ch 1 (does not count as a st), turn, hdc in
same st as ch-1 and each st across, after row 25 do not cut yarn, move to edge
round below. (48)
Edge Round: Do not turn. Chain 1, make 3 sc in the
end of each of 2 rows of hdc down the 1st side, 3 sc in 1st
st along bottom edge, sc in each st across bottom until 1 st remains, 3 sc in
the last st, sc up the 2nd side again working 3 sc per 2 row ends,
make 3 sc in the 1st st along the top (row 25), sc in each st across
the top until 1 st remains, 3 sc in last st, sl st to 1st st made,
cut yarn.
Black Striping:
With the right side of the edge round facing up:
Holding black yarn double strand, surface crochet along the
top of rows 4, 8, 12, 16, and 20, making sure to begin on the same edge of the
house bottom for each row.
Join on one edge just inside the edge round, keep the
working yarn on the underside of the piece, insert the hook from front to back
in the spaces between the sts, pull up a loop and sl st across the row in the
spaces making sure not to pull tightly and pucker the work, end the row by sl
st across the edge.
Weave in these ends. When weaving in the joining side of the
ends, wrap the yarn around the edge st so the row goes completely from edge to
edge.
Black Edge Round:
Position the piece so the right side of the edge round is facing
up.
Join black yarn held double in any st around the piece with
the surface crochet rows right side up, ch 1, sc in same st and in each st
around working 3 sc in each corner st, once around, sl st to 1st st
made and cut yarn.
Weave in all ends to this point.
Snow Row:
Join the fur yarn single strand in the bottom corner st of
the black edging from the WRONG side, ch 1, sc in each st across the bottom
edge, cut yarn. Weave ends.
Doghouse Roof:
With red double strand:
Row 1: Make a chainless single crochet foundation row
of 64 sts. (64)
Alternatively, chain 65, sc in 2nd ch from hook and each ch
across to end. (64)
Row 2: ch 1, turn, hdc in each st across. (64)
Row 3: ch 1, turn, hdcdec over st ch-1 emerges from and
nxt st, hdc in each st until 2 sts remain, hdcdec over last 2 sts. (62)
Row 4-5: ch 1, turn, hdc in each st across. (62)
Row 6: rep row 3. (60)
Row 7-10: ch 1, turn, hdc in each st across. (60)
Row 11: rep row 3. (58)
Row 12-14: ch 1, turn, hdc in each st across. (58)
Row 15: rep row 3. (56)
Row 16-17: ch 1, turn, hdc in each st across, after
row 17, do not cut yarn, continue to edge round. (56)
Edge Round: Do
not turn. Chain 1, make 3 sc in the end of each of 2 rows of hdc down the 1st
side, 3 sc in 1st st along bottom edge, sc in each st across bottom
until 1 st remains, 3 sc in the last st, sc up the 2nd side again
working 3 sc per 2 row ends, make 3 sc in the 1st st along the top
(row 25), sc in each st across the top until 1 st remains, 3 sc in last st, sl
st to 1st st made, cut yarn.
Black Striping:
With the right side of the edge round facing up:
Holding black yarn double strand, surface crochet along the
top of rows 4, 8, and 12 making sure to begin on the same edge of the house bottom
for each row.
Join on one edge just inside the edge round, keep the
working yarn on the underside of the piece, insert the hook from front to back
in the spaces between the sts, pull up a loop and sl st across the row in the
spaces making sure not to pull tightly and pucker the work, end the row by sl
st across the edge.
Weave in these ends. When weaving in the joining side of the
ends, wrap the yarn around the edge st so the row goes completely from edge to
edge.
Black Edge Round:
Position the piece so the right side of the edge round is
facing up.
Join black yarn held double in any st around the piece with
the surface crochet rows right side up, ch 1, sc in same st and in each st
around working 3 sc in each corner st, once around, sl st to 1st st
made and cut yarn.
Weave in all ends to this point.
Snow Row:
Join the fur yarn single strand in the bottom corner st of
the black edging from the WRONG side, ch 1, sc in each st across the bottom
edge, cut yarn. Weave all ends.
With the right side of the surface crochet rows facing up on
both pieces, place the snow edge of the roof about halfway between the topmost
black surface crochet row and the top edge of the piece. Using a tapestry
needle and red yarn sew the whole roof in place securely.
Top Background for Behind Snoopy:
Hold gray double strand:
Row 1: Make a chainless foundation row of 56 single
crochet. (56)
Alternatively, chain 57, sc in 2nd
ch from hook and each rem ch across. (56)
Row 2-24: ch 1, turn, hdc
in each st across, after row 24, do not cut yarn, ch 1 and continue to edge
rounds. (56)
Edge Rounds:
Rnd 1: ch 1, do not turn, sc in each st and work 3 sc
in the end of each 2 rows of hdc down the side, work 3 sc in each corner, once
around, sl st to 1st st made.
Rnd 2: ch 1, do not turn, sc in each st around
working 3 sc in each corner, once around sl st to 1st st made, cut
yarn leaving a 30” long tail.
SNOOPY:
With white yarn held double strand:
Row 1: Make a chainless single crochet row of 52 sts.
(52)
(For the body features to start the right way, you really
need to do a chainless foundation for his body. If you absolutely cannot, you
will need to do your chained start row, then one additional row before
proceeding to row 2 of the pattern so the work faces the right way.)
Row 2: ch 1, turn, 2 sc in 1st st, sc in
each of nxt 51 sts. (53)
Row 3-4: ch 1, turn, sc in each st across. (53)
Row 5 (Begin Foot Extension): ch 1, turn, scdec over
the st the ch-1 emerges from and nxt st, sc in nxt 7 sts, mark the last st made
in this row. (8)
Row 6-8: ch 1, turn, sc in each st across. (8)
Row 9: ch 1, turn, sc in 1st 7 sts, 2 sc in last st. (9)
Row 10: ch 1, turn, 2 sc in 1st st, sc in
last 8. (10)
Row 11: ch 1, turn, sc in 1st 9 sts, 2 sc
in last st. (11)
Row 12-13: ch 1, turn, sc in each st across. (11)
Row 14: ch 1, turn, scdec over 1st 2 sts,
sc in nxt 7 sts, scdec over last 2 sts. (9)
Row 15: ch 1, turn, sc in each st across. (9)
Row 16: ch 1, turn, scdec over 1st 2 sts,
sc in nxt 5 sts, scdec over last 2 sts. (7)
Row 17: ch 1, turn, sc in each st across. (7)
Row 18: ch 1, turn, scdec over 1st 2 sts,
sc in nxt 3 sts, scdec over last 2 sts. (5)
Row 19: ch 1, turn, sk 1st st, sc in nxt 3
sts, sl st in last st, cut yarn.
*Position piece so the foot extension just made is to the
right. Rejoin double strand white yarn with a sl st in the 2nd
stitch counting left from the marked st in row 5.
Row 1: ch 1, sc in same st as ch-1 and nxt 42 sts.
(43)
Row 2: ch 1, turn, sc in the 1st 38 sts. (38)
Row 3: ch 1, turn, 2 sc in 1st st, sc in
nxt 37 sts. (39)
Row 4: ch 1, turn, scdec over 1st 2 sts,
sc in nxt 35 sts, scdec over last 2 sts. (37)
Row 5: ch 1, turn, scdec over 1st 2 sts,
sc in nxt 33 sts, scdec over last 2 sts. (35)
Row 6: ch 1, turn, scdec over 1st 2 st,
scdec over nxt 2 sts, sc in nxt 31. (33)
Row 7-8: ch 1, turn, sc in each st across. (33)
Row 9 (Begin Tummy Extension): ch 1, turn, sc in 1st
21 sts, mark last st made of this row. (21)
Row 10: ch 1, turn, scdec over 1st 2 sts,
sc in nxt 17 sts, scdec over last 2 sts. (19)
Row 11: ch 1, turn, scdec over 1st 2 sts,
sc in nxt 13 sts, (scdec over nxt 2 sts) twice. (16)
Row 12: ch 1, turn, scdec over 1st 2 sts,
sc in last 14 sts. (15)
Row 13: ch 1, turn, scdec over 1st 2 sts,
sc in nxt 11 sts, scdec over last 2 sts. (13)
Row 14: ch 1, turn, scdec over 1st 2 sts,
sc in nxt 9 sts, scdec over last 2 sts. (11)
Row 15: ch 1, turn, sk 1st st, sc in nxt 9
sts, sl st in last st, cut yarn.
*Position piece so the foot extension is to the right.
Rejoin double strand white yarn with a sl st in the 1st stitch left of the
marked st from row 9 of the tummy extension.
Row 1: ch 1, sc in same st and nxt 11 sts. (12)
Row 2: ch 1, turn, sc in 1st 11 sts, 2 sc
in last st. (13)
Row 3: ch 1, turn, 2 sc in 1st st, sc in
nxt 11 sts, 2 sc in last st. (15)
Row 4-7: ch 1, turn, sc in each st across. (15)
Row 8: ch 1, turn, scdec over 1st 2 sts,
sc in nxt 11 sts, scdec over last 2 sts. (13)
Row 9: ch 1, turn, scdec over 1st 2 sts,
sc in nxt 9 sts, scdec over last 2 sts. (11)
Row 10: ch 1, turn, scdec over 1st 2 sts,
sc in nxt 7 sts, scdec over last 2 sts. (9)
Row 11: ch 1, turn, sc in each st across. (9)
Row 12: ch 1, turn, scdec over 1st 2 sts,
sc in nxt 5 sts, scdec over last 2 sts. (7)
Row 13: ch 1, turn, scdec over 1st 2 sts,
sc in nxt 3 sts, scdec over last 2 sts. (5)
Row 14: ch 1, turn, sk 1st st, sc in nxt 3
sts, sl st in last st, do not cut yarn, continue to edge round.
Edge Round: Making sure the foot is right and head is
left (so the edge round is right side up when completed) ch 1, sc in each end
of row and st around, at corners work 3 sc in the same st to turn the corner,
at low points such as where chin and tummy meet closely, you can replace the sc
with sl st so as not to bulk the area, but do so loosely, once around, sl st to
1st st made and cut yarn. Note: I, Stephanie Pokorny of
Crochetverse, created this pattern for free for my followers as a Christmas
gift in 2019. If you paid for this or accessed anywhere else but my blog or
through Ravelry, then you got ripped off. Bad folks like to take free patterns
from designers and dupe you into paying. If this happened to you, I am sorry.
Email me at [email protected] and let me know!
Black Edge Round: Join double strand black in any st around
with the right side of the previous edge round facing up, in the same manner,
sc in each st around, work 3 sts in the corner sts to turn the corners and
replace sc with sl st in the low points as needed. Once around, sl st to 1st
st made and cut yarn.
Surface Crochet Feet
and Eye:
Using the photo as a
guide and double strand black yarn, surface crochet two toe separations, one
foot separation line, and one eye.
Nose:
With double strand
black yarn make a magic circle:
Rnd 1: ch 1, 8 sc in ring, do not join. (8)
Rnd 2: do not turn, 2 sc in each st around, sl st to
1st st made, cut yarn. (16)
Make the Nose
Highlight:
Using double strand
white yarn and main photo as a guide, surface crochet just between the two
rounds for a few stitches.
Optional: sl st from
the wrong side across 3 sts with the fur yarn single strand to put snow on his
nose.
Dog Collar:
With double strand
black yarn, make a chainless single crochet foundation row of 14 sts, cut yarn.
(14)
Alternatively, chain
15, hdc in 2nd ch from hook and each rem ch across. (Yes, hdc,
foundation rows are fatter) (14)
Ear:
With black double
strand yarn, chain 4:
Row 1: sc in 2nd ch from hook and rem 2
chs. (3)
Row 2-6: ch 1, turn, sc in each st across. (3)
Row 7: ch 1, turn, 2 sc in 1st st, sc in
nxt st, 2 sc in last st. (5)
Row 8-10: ch 1, turn, sc in each st across. (5)
Row 11: ch 1, turn, 2 sc in 1st st, sc in
nxt 3 sts, 2 sc in last st. (7)
Row 12: ch 1, turn, sc in each st across. (7)
Row 13: ch 1, turn, scdec over 1st 2 sts,
sc in nxt 3 sts, scdec over last 2 sts. (5)
Row 14: ch 1, turn, scdec over 1st 2 sts,
sc in nxt st, scdec over last 2 sts. (3)
Row 15: ch 1, turn, sk 1st st, sc in nxt
st, sl st in last st, do not cut yarn, continue to edge round.
Edge Round: ch 1, do not turn, sc in each end of row and
st around, make 3 sc in each corner or rounded edge st so as not to pucker the
work, when around sl st to 1st st made and cut yarn.
Arm:
With double strand
white, chain 11:
Row 1: sc in 2nd ch from hook and each
rem ch. (10)
Row 2-3: ch 1, turn, sc in each st across. (10)
Row 4: ch 1, turn, sc in 1st 7 sts, scdec
over nxt 2 sts, sc in last st. (9)
Row 5: ch 1, turn, sc in 1st 4 sts. (4)
Row 6: ch 1, turn, sk 1st st, sc in last
3 sts, do not cut yarn continue to edge round.
Edge Round: ch 1, do not turn, sc in each st and end of
row around working 3 sc in each corner or rounding a corner st so as to no
pucker the work, once around, sl st to 1st st made and cut yarn.
Black Edge Round: With the right side of the edge round just
made facing up join double strand black in any st, sc in each st around working
3 as needed in one st to round corners, when around, sl st to 1st st
made and cut yarn.
Surface Crochet
Fingers:
Using the main photo
as a guide and double strand black yarn, surface crochet two finger separations
on the hand.
Assembly:
Sew the nose to the
face, the ear to the head, the collar to the neck and the arm to the body. Use
the photo as a guide for placement. Then, sew the whole assembly to the roof
top of the doghouse, securing around the whole body.
CHRISTMAS LIGHT
POUCHES:
Make 3 each of five of
the colors, make 5 each of two of the colors to get to 25 pouches.
With yarn held
double strand, chain 2:
Row 1: sc in 2nd ch from hook. (1)
Row 2: ch 1, turn, 2 sc in st. (2)
Row 3: ch 1, turn, 2 sc in each st. (4)
Row 4: ch 1, turn, 2 sc in 1st st, sc in
nxt 2 sts, 2 sc in last st. (6)
Row-5-7: ch 1, turn, sc in each st across. (6)
Row 8: ch 1, turn, scdec over 1st 2 sts,
sc in nxt 2 sts, scdec over last 2 sts. (4)
Row 9: ch 1, turn, sc in each st, do not cut yarn continue to edge round.
Edge Round: ch 1, do not turn, sc in each end of row to
bottom tip, 3 sc in the bottom tip, sc in end of each row up the second side,
sl st to nxt st on last row made of ornament, cut yarn leaving tail to sew to
house.
Bulb Tops (Make 25)
With double dark
green yarn, make a magic ring, ch 1:
1. Sew on Christmas
light pouches: Using the above
photo as a guide and the ends tail and needle, sew all the ornament pouches in
place on ONLY the two sides, leave the TOP OPEN SO YOU CAN INSERT LITTLE TREATS
INSIDE.
2. Glue on numbers: I then fabric glued all the numbers in place.
The double strand is thick enough to where nothing seeped through to the
doghouse in the back.
3: Surface crochet
wire: Using double strand dark
green, surface crochet the wires to connect each row of bulbs. Work edge to
edge so it looks like the wire is really wrapping around the back of the house.
4. Glue or sew one
bulb top to each bulb with the edge
with the ch-1 sl st closure pointing down as it creates a slightly narrower
edge.
5. Sew the rod pouch
shut. Using a strand of dark gray
yarn, fold over the top edge of the background behind Snoopy about 4 rows and
sew it to create a long tunnel to slide the dowel rod through. Make sure it
fits before you sew it or sew around the dowel rod, your choice.
6. Attach ribbon or
trim to hang: Determine how long
you want the hanging rope to be. Tie around each exposed end of the dowel rod.
You can add some glue to secure if desired. I added some little ribbons I found
too.
7. Weave in any
remaining ends.
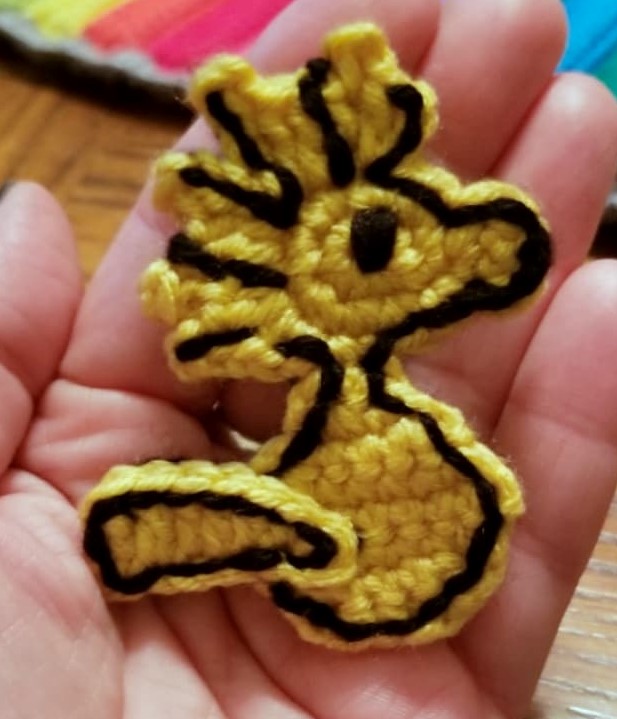
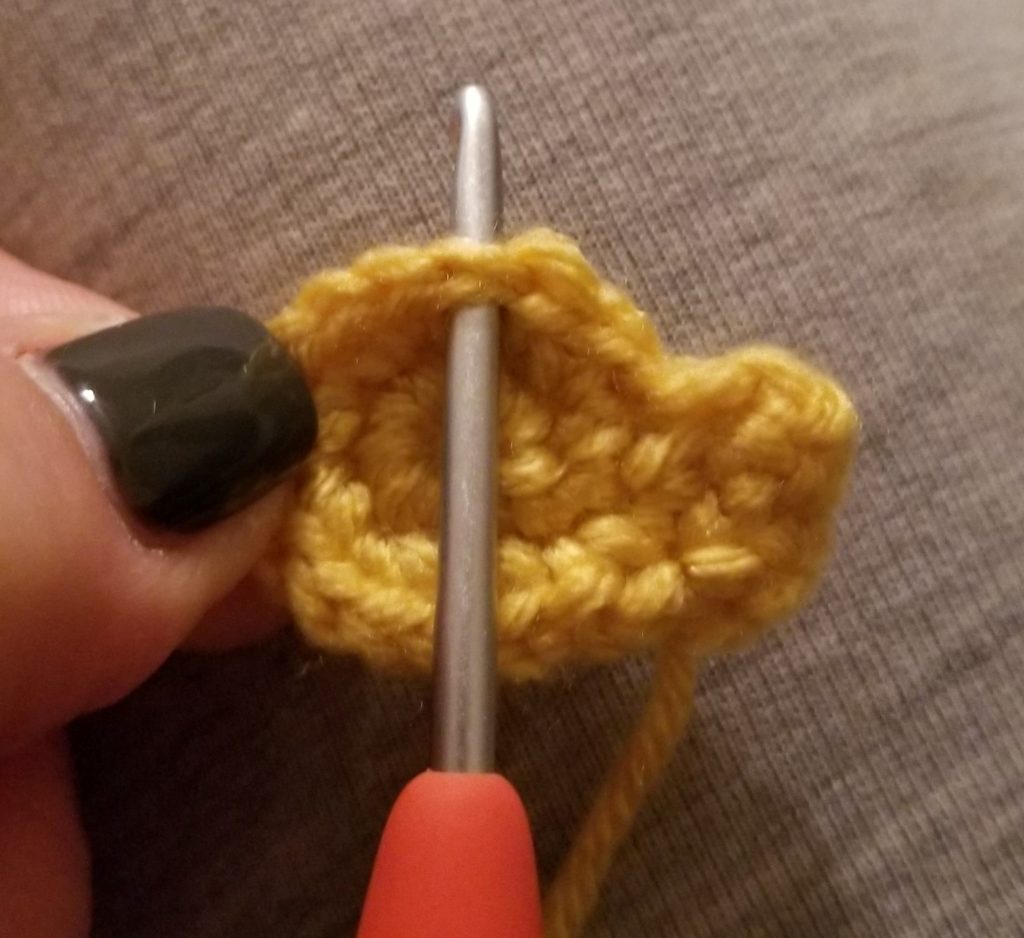
WOODSTOCK (Make 2):
Body:
With SINGLE strand
yellow yarn and D(3.25mm), make a magic ring:
Do not turn or join
except when specifically instructed.
Rnd 1: ch 1, make 8 sc in ring, pull tail tightly to
close. (8)
Rnd 2: 2 sc in each sc around, sl st to 1st
st made. (16)
Rnd 3: ch 1, sc in same st the ch-1 emerges from, 2
sc in nxt st, sc in nxt st. (4)
Rnd 4: ch 1, turn, sc in 1st 2 sc, sl st
in nxt sc, cut yarn.
With the right side of the sts facing up and nose to the
right, rejoin the yarn single strand in the 3rd st left from the
edge st of the nose with a sl st.
Rnd 4: ch 3, dc in same st the ch-3 emerges from, ch
2, sl st in 1st bb (back bump of the chain) and 2nd bb, 2
dc in nxt st, dc in nxt st, ch 2, sl st in 1st and 2nd
bb, ch 3, sl st in same st at base of last dc made, sl st in nxt st, ch 4, sl
st in 1st and 2nd bb from hook, dc in same st the ch-4
emerges from, dc in nxt st, ch 2, sl st in 1st and 2nd bb
from hook, 2 hdc in nxt st, ch 2, sl st in 1st and 2nd bb
from hook, (2 hdc, sl st) in nxt st, ch 1, sc in nxt 2 sts.
Row 5: ch 1, turn, sc in nxt 2 sc. (2)
Row 6: ch 1, turn, 2 sc in each sc across. (4)
Row 7: ch 1, turn, 2 sc in 1st st, sc in
nxt 2 sts, 2 sc in last st. (6)
Row 8: ch 1, turn, 2 sc in 1st st, sc in
nxt 4 sts, 2 sc in last st. (8)
Row 9: ch 1, turn, sc in each st across. (8)
Row 10: ch 1, turn, scdec over 1st 2 sts,
sc in nxt 4 sts, scdec over last 2 sts. (6)
Row 11: ch 1, turn, scdec over 1st 2 sts,
sc in nxt 2 sts, scdec over last 2 sts. (4)
Row 12: ch 1, turn, sc in 1st st, scdec
over nxt 2 sts, sl st in last st, cut yarn.
Tail:
With single strand
yellow yarn and D hook, chain 8:
Row 1: sc in 2nd ch from hook and nxt ch,
hdc in nxt ch, dc in last 4 chs, ch 1, sl st twice down the side of the dc just
made, sl st to nxt ch on bottom and cut yarn.
Outline:
This takes some
attention to detail so go slowly and take care. He is small so it won’t take too
long.
This is done on ONE side only. You are going to sew, using a straight back stitch, all the outline on
him using a single strand of black yarn and needle working JUST inside the
outer edge advancing a stitch at a time. Notice how it breaks into just lines
in his hair area. The eye was done with 4 times around to give it proper size.
It does NOT matter what the back looks like as long as it is not super bulky or
knotted as you will be sewing the two halves together once done and it will all
be covered. I did the tail outline while holding it against the body, so it got
its outline and was attached to the body at the same time. Sew the un-outlined
tail to the second half. Sew or glue the two halves together.
You can attach Woodstock to the calendar with a long ribbon making sure it reaches the furthest pouch from where you decide to attach him or leave him free. Move him from pocket to pocket as the countdown progresses. Fill the pouches with money or small treats.
Follow me on any of my social media to stay in touch, I would love to have you! Much love and yarn, Stephanie Pokorny (Crochetverse)
QUESTIONS? Message me on any of the social medias mentioned below!
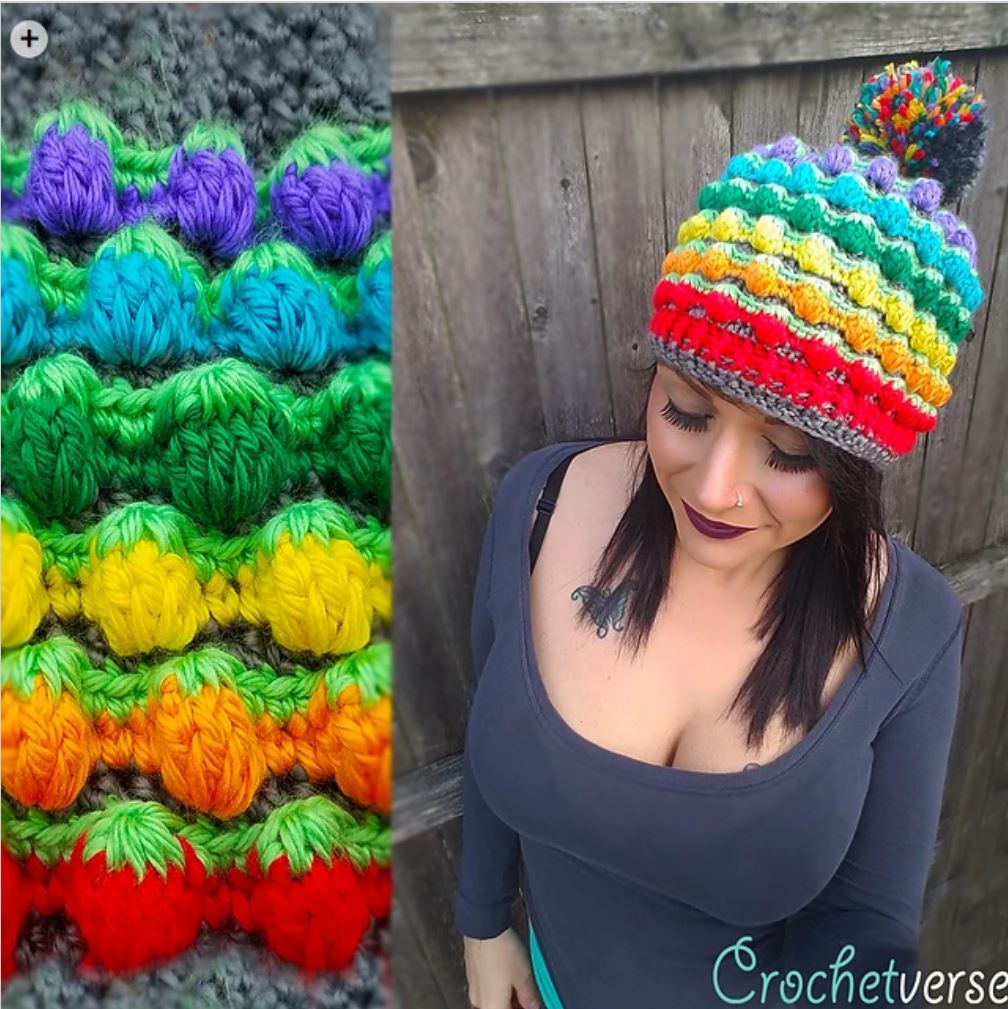
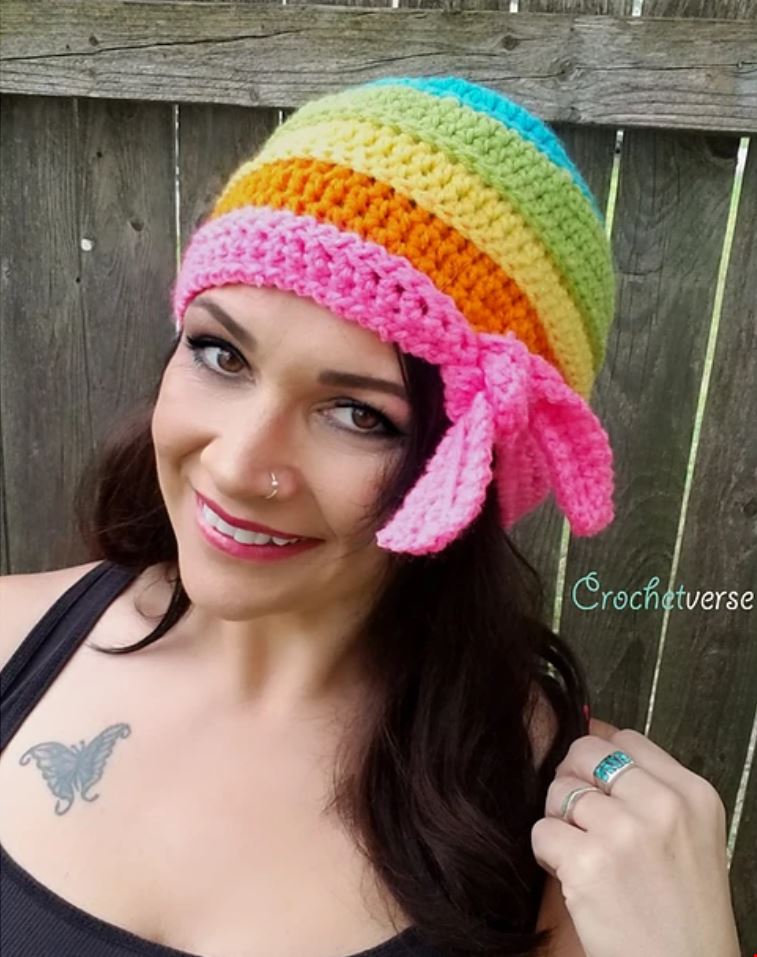
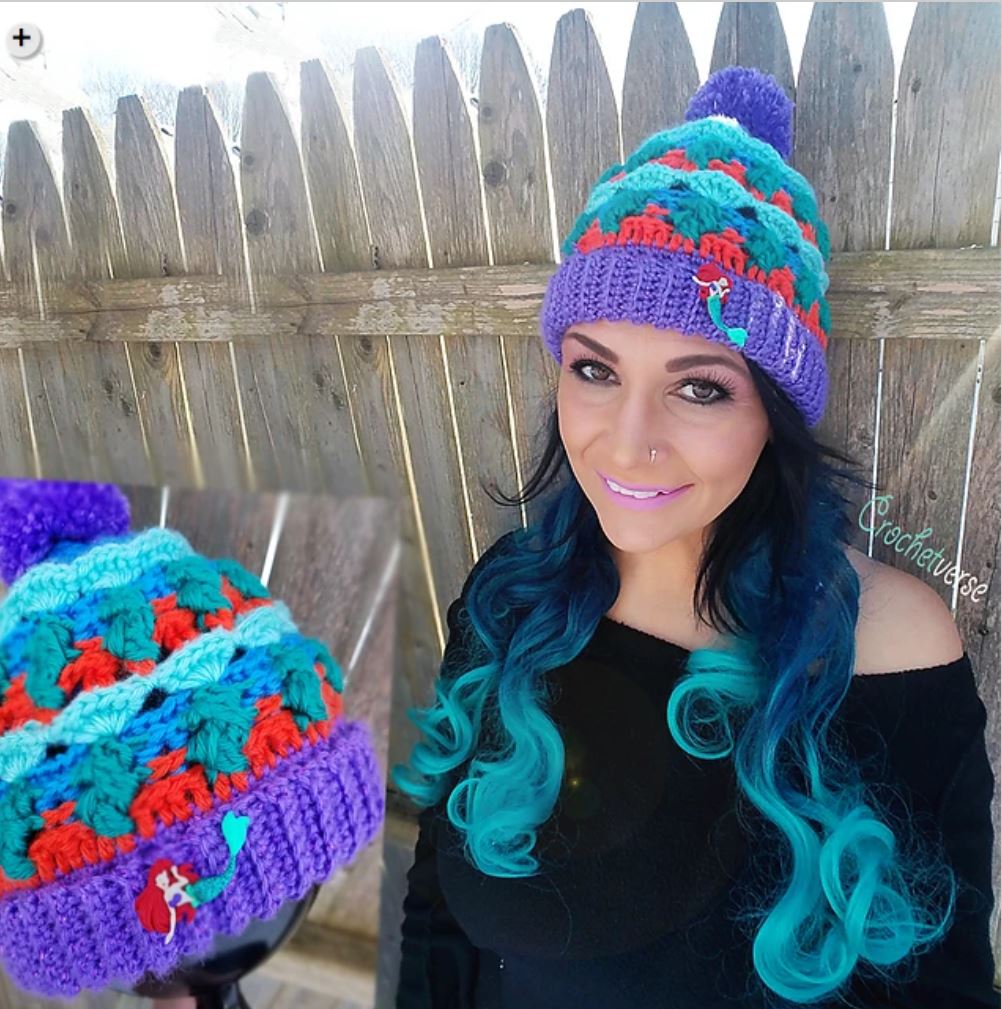
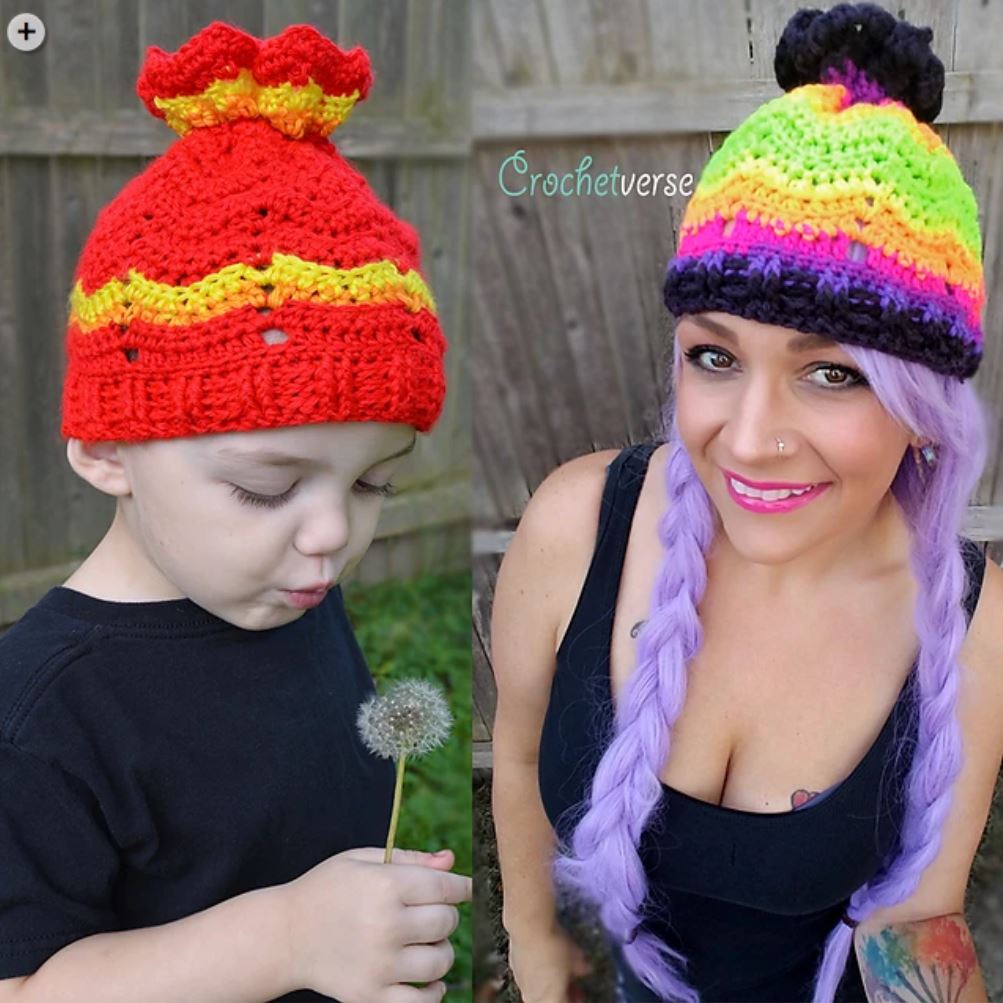
Join me for the 2019 #CrochetCancerChallenge ! Read more about this amazing challenge below and then follow the link BELOW EACH HAT IMAGE to my FREE patterns!UPDATE: ALL PAST CHALLENGE PATTERNS ARE INCLUDED! LINKS BELOW! CODE: CC2019
Long story short, each day in October 2019, an amazing designer will share with you a pattern for a hat for FREE! You will download that pattern and by doing so you PLEDGE to create and donate at least one of those hats to someone affected by cancer or a center that cares for those going through it.
Each hat features a color that coordinates with a ribbon color for a certain cancer. Mine is brain cancer. My husband’s grandmother is an absolutely amazing human being going through glioblastoma right now. Her strength as she does is honestly mind-blowing to me and I pray for her daily. Join me in that if you would! <3
It is hosted by Sweet Potato 3, read more by CLICKING THE IMAGE BELOW:
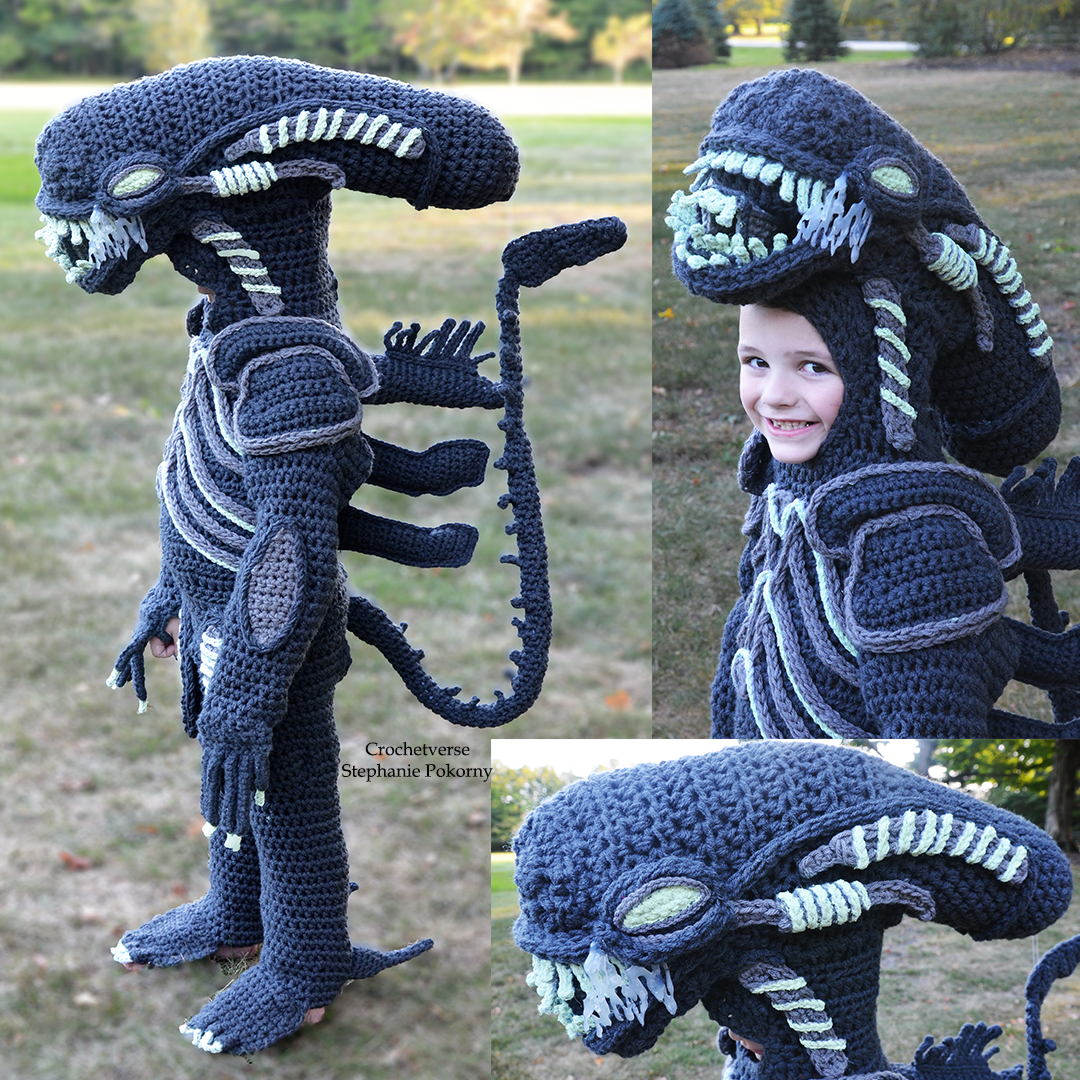
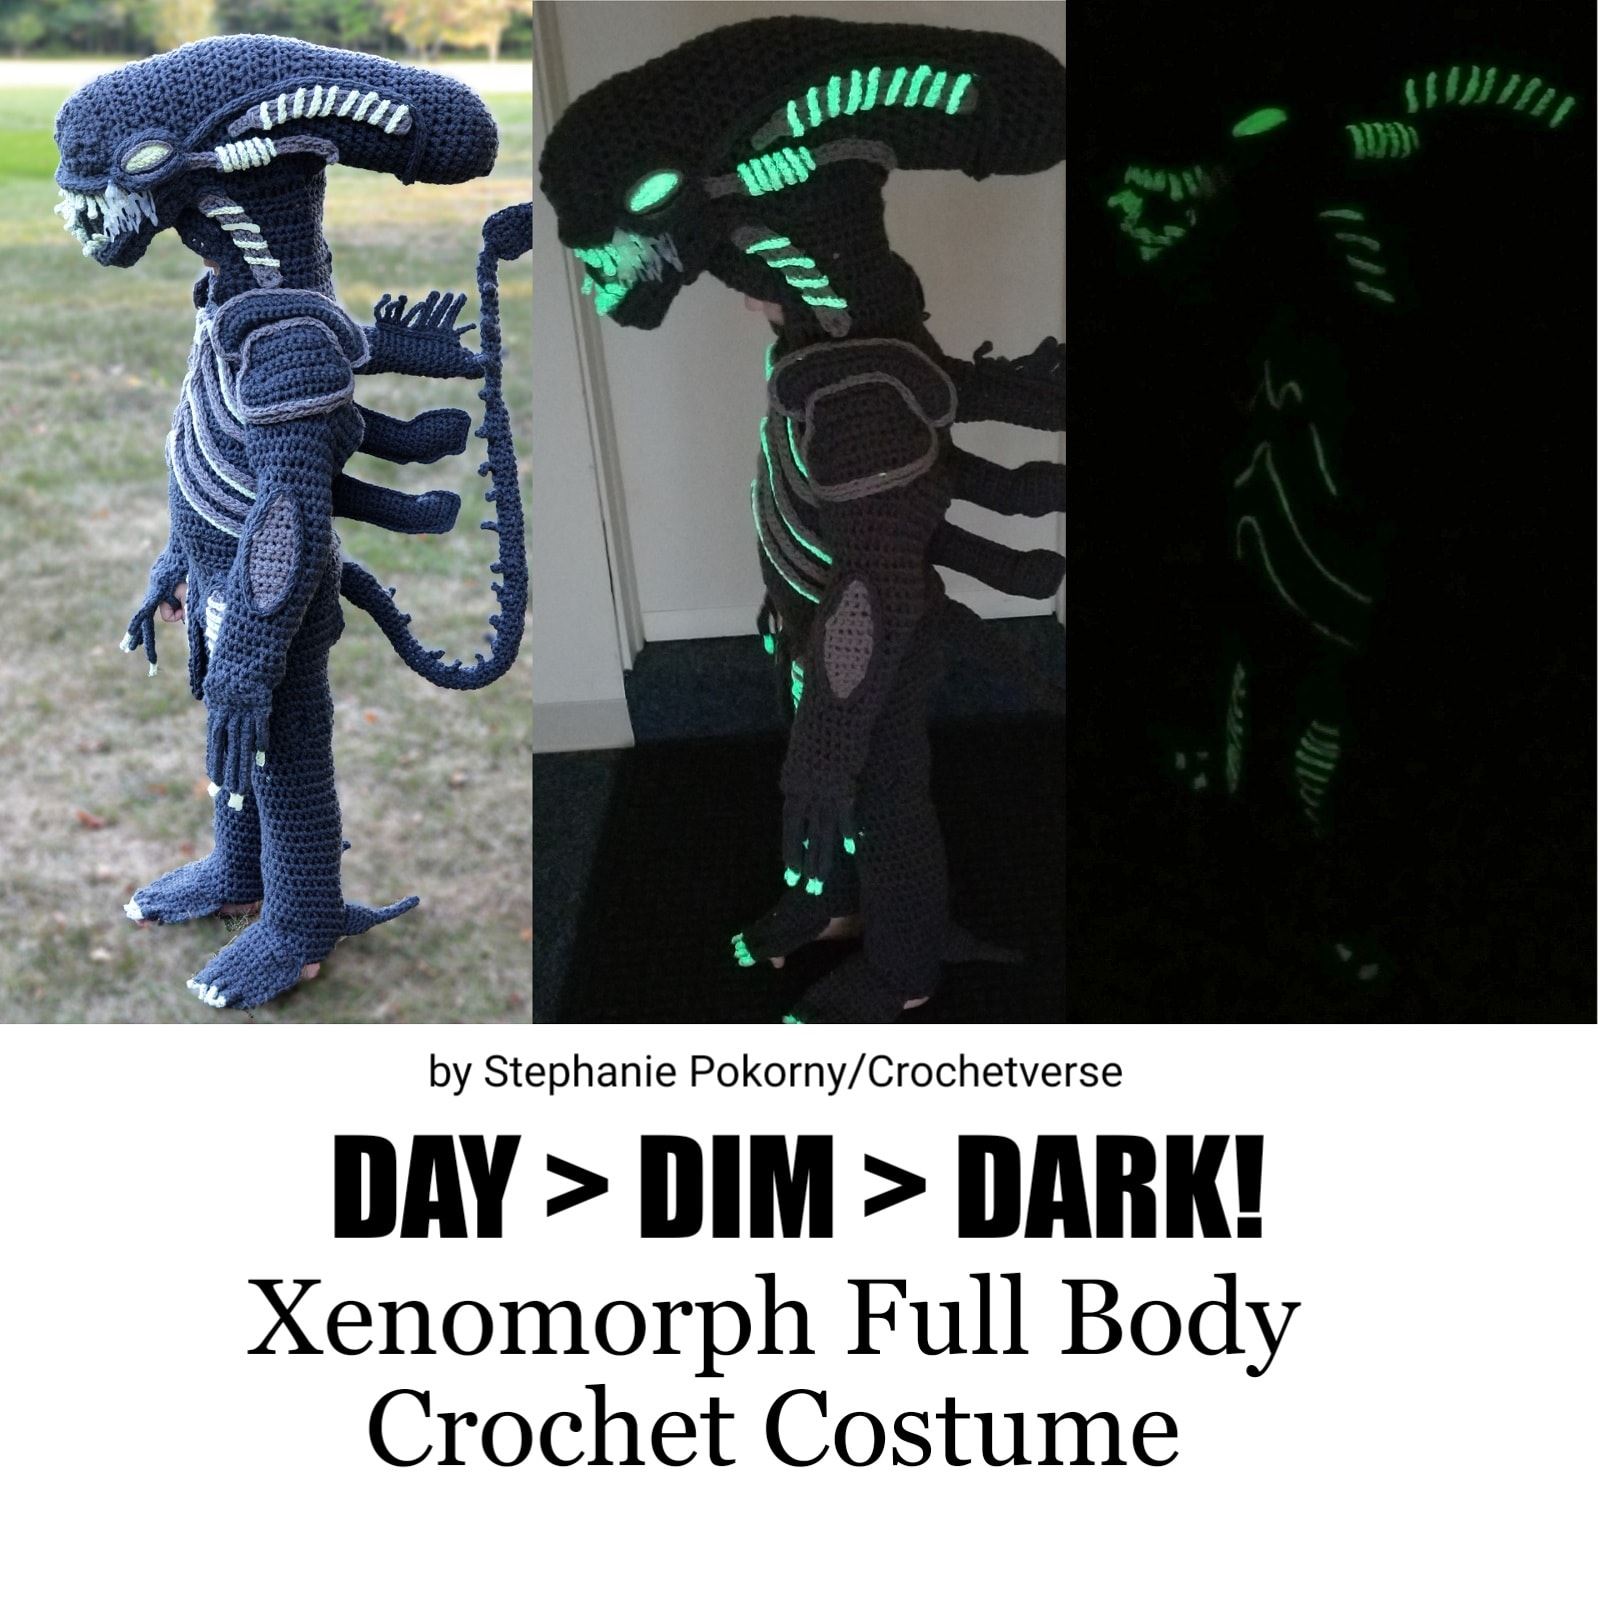
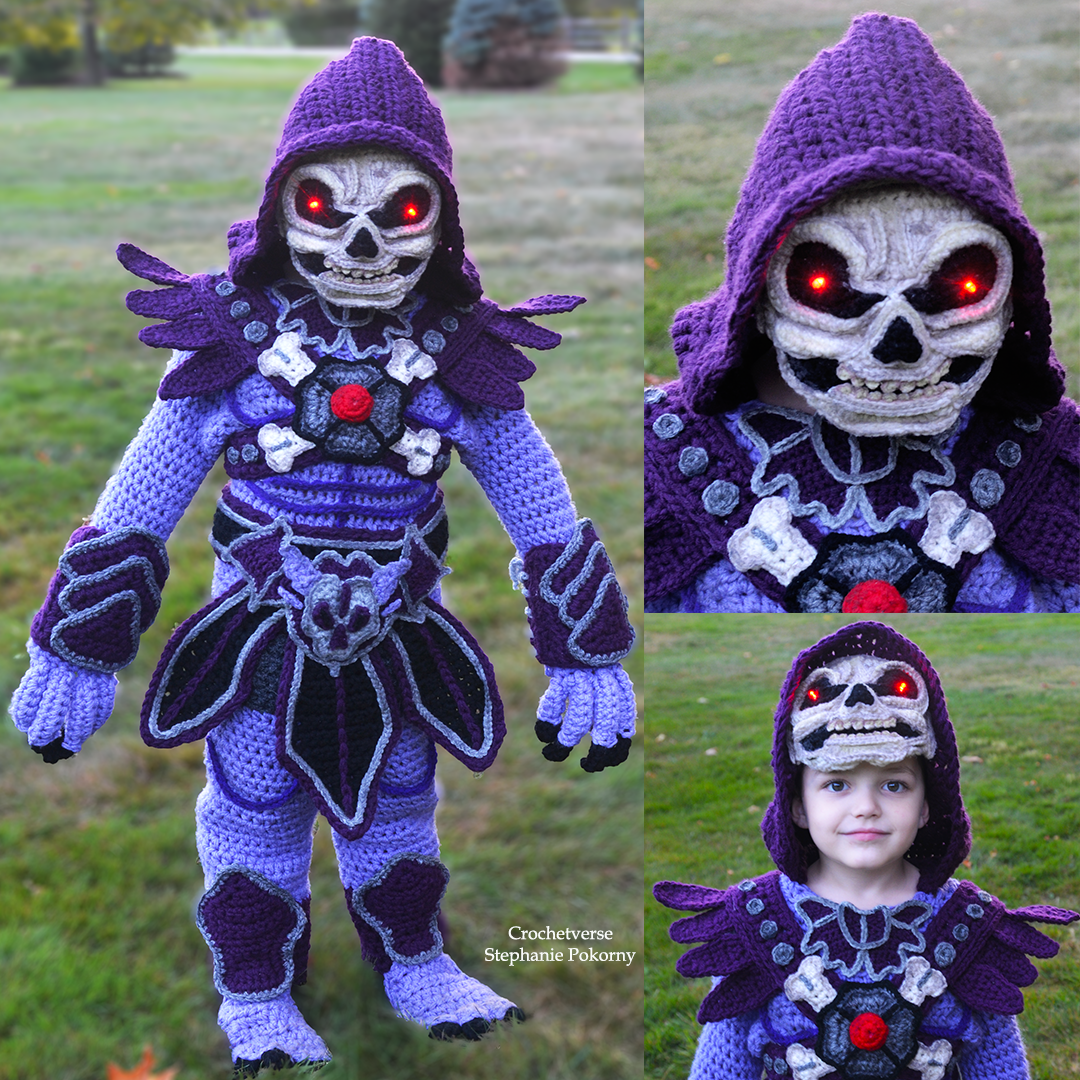
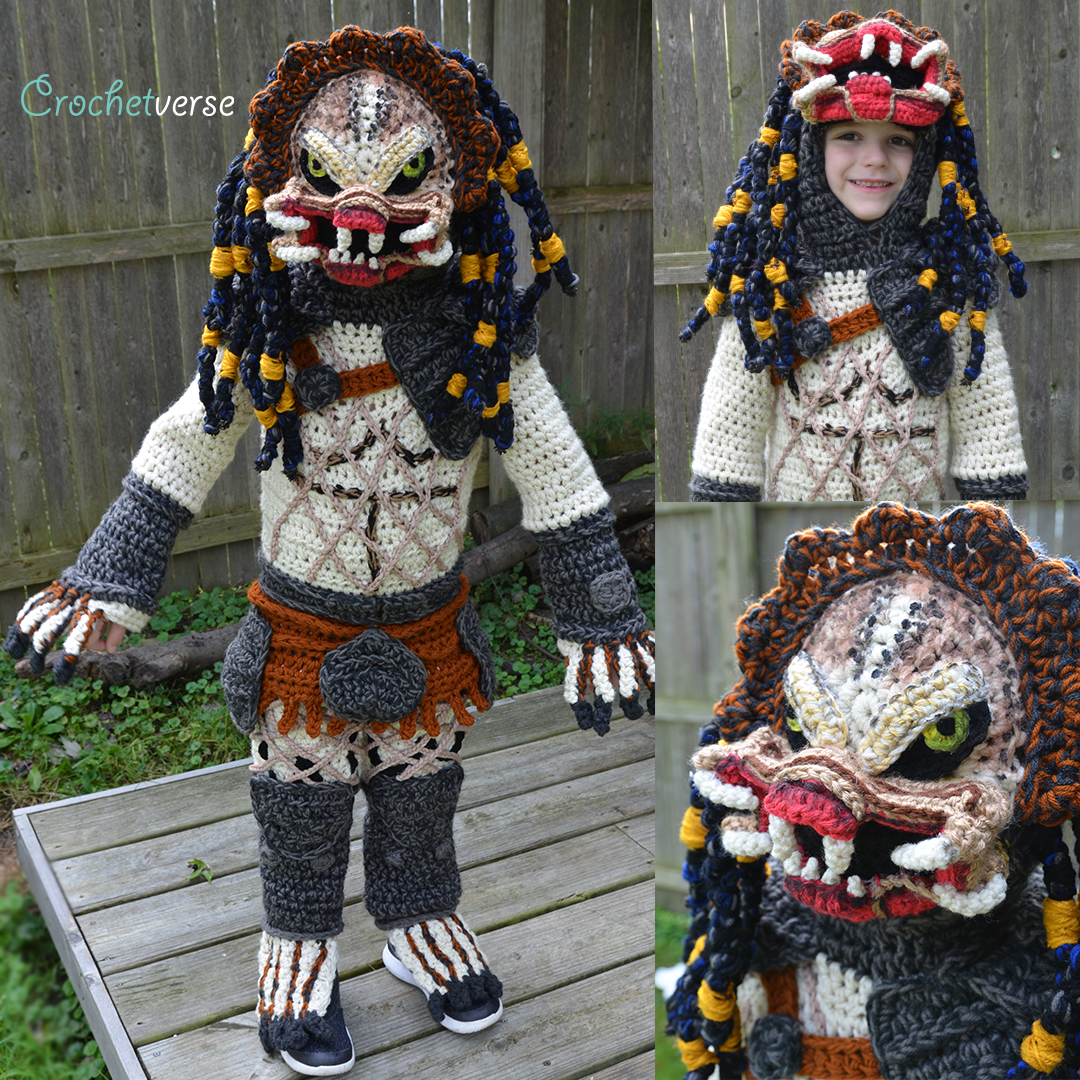
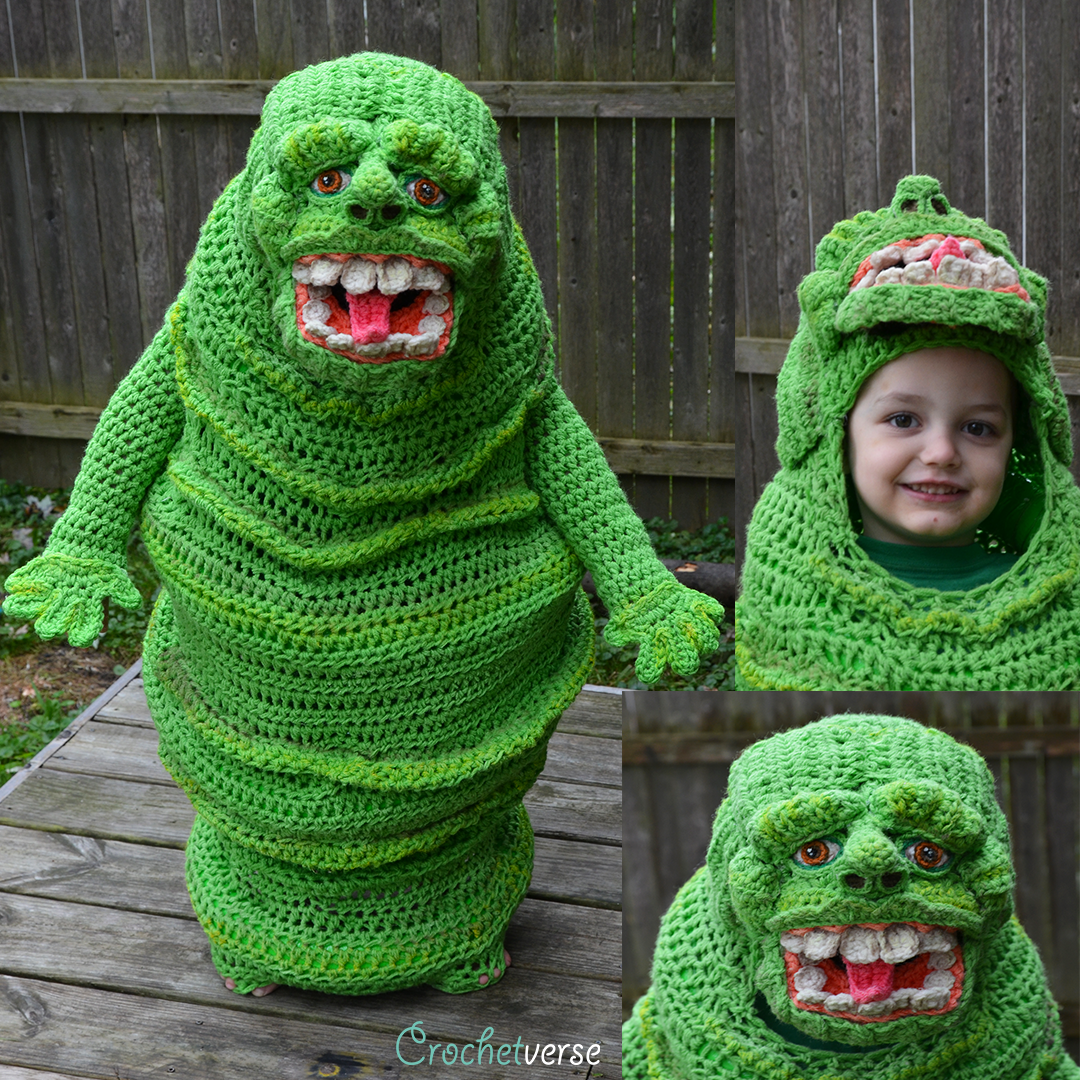
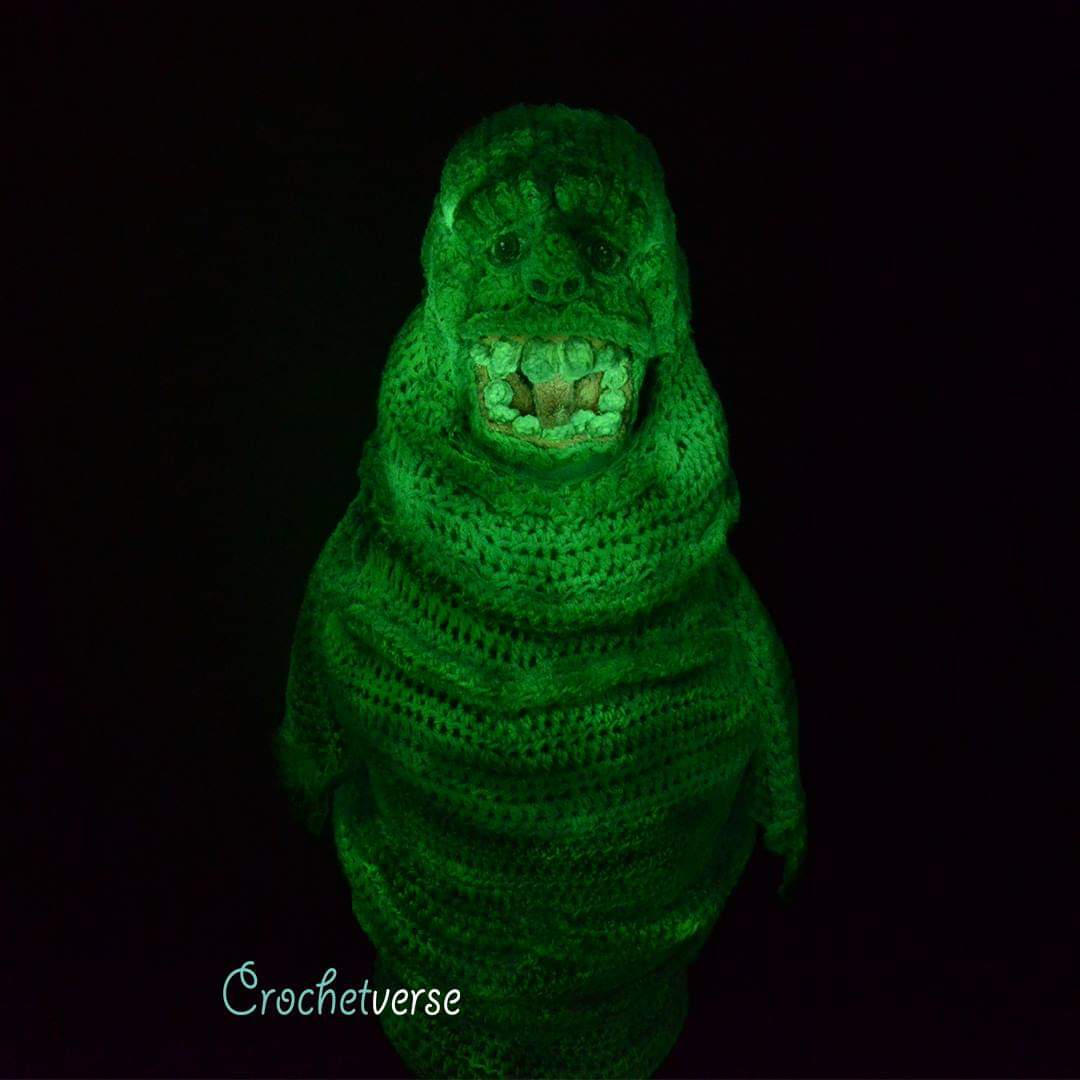
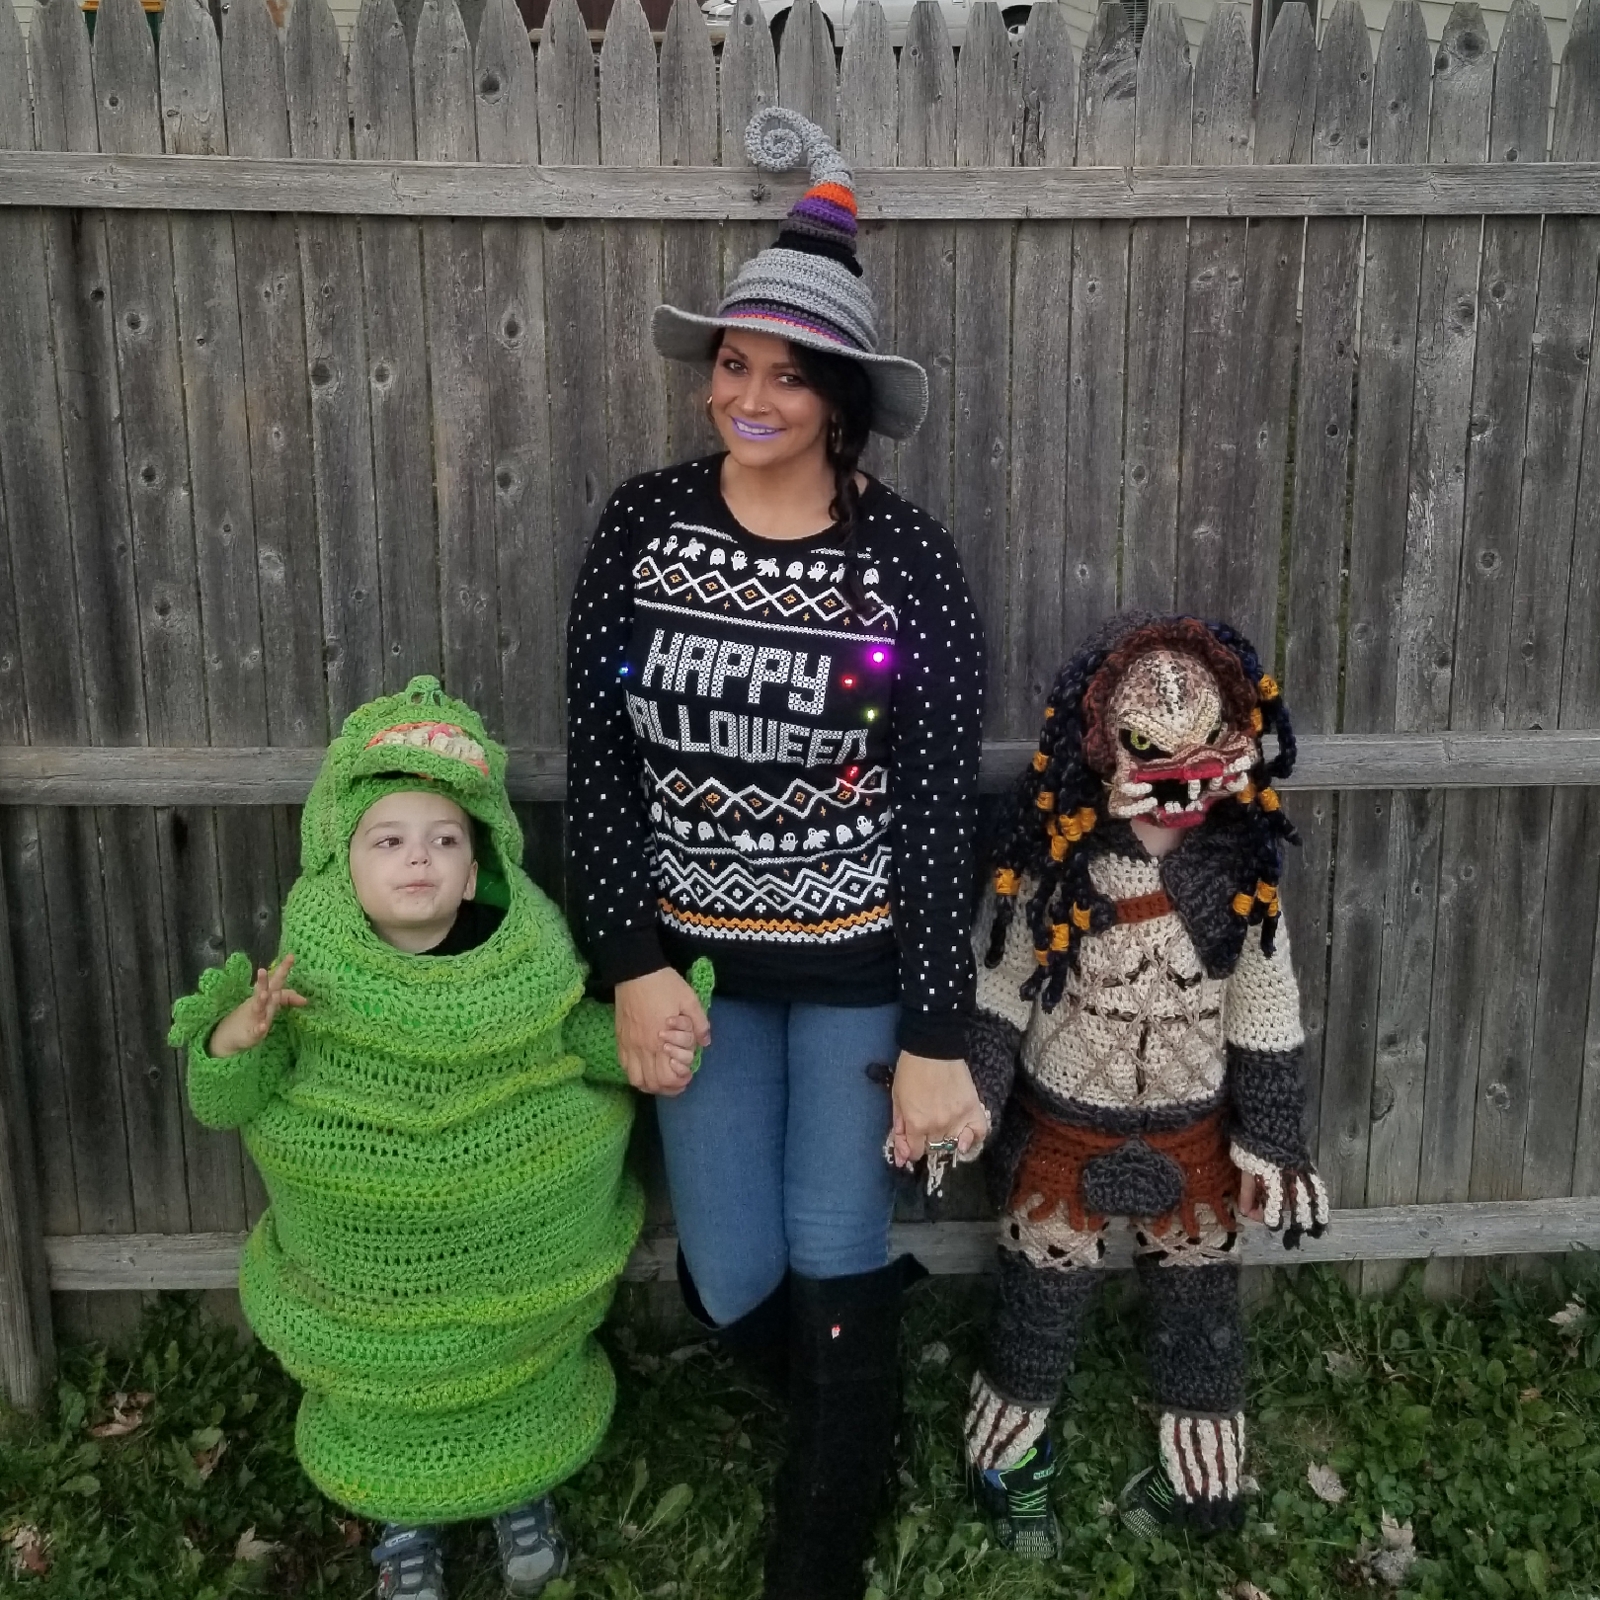
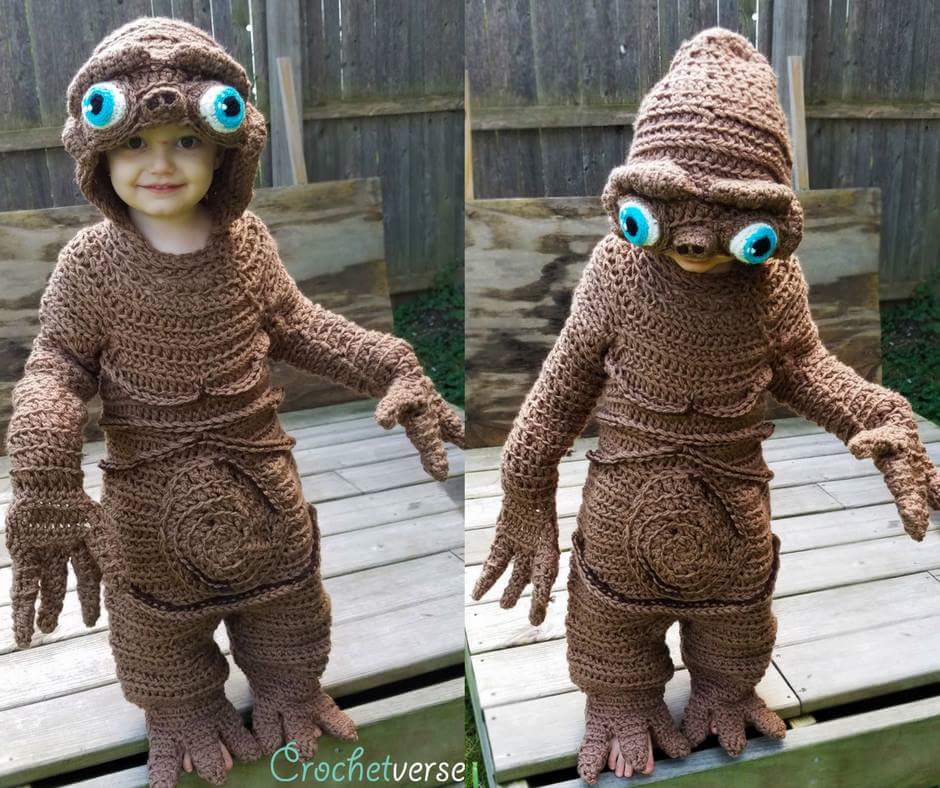
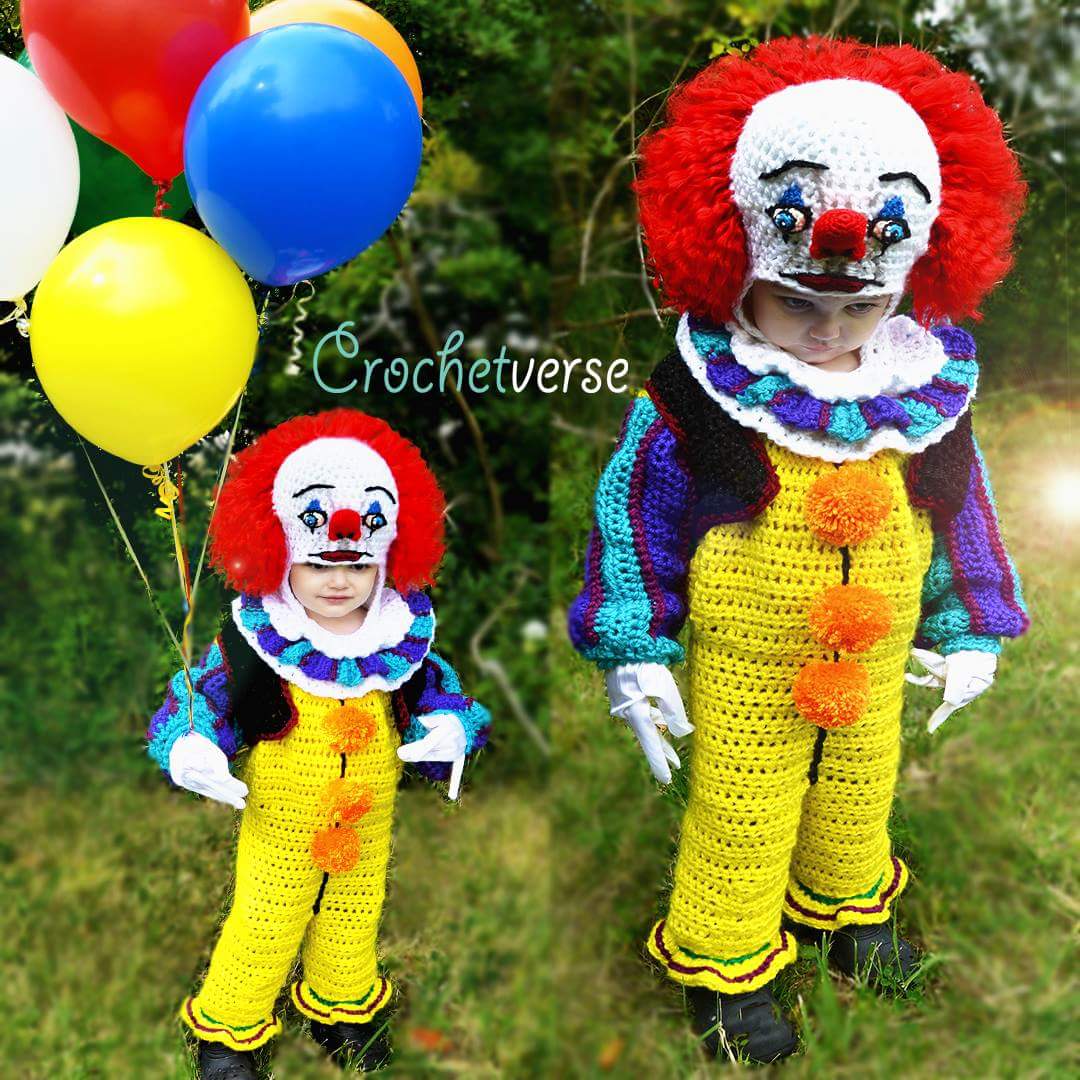
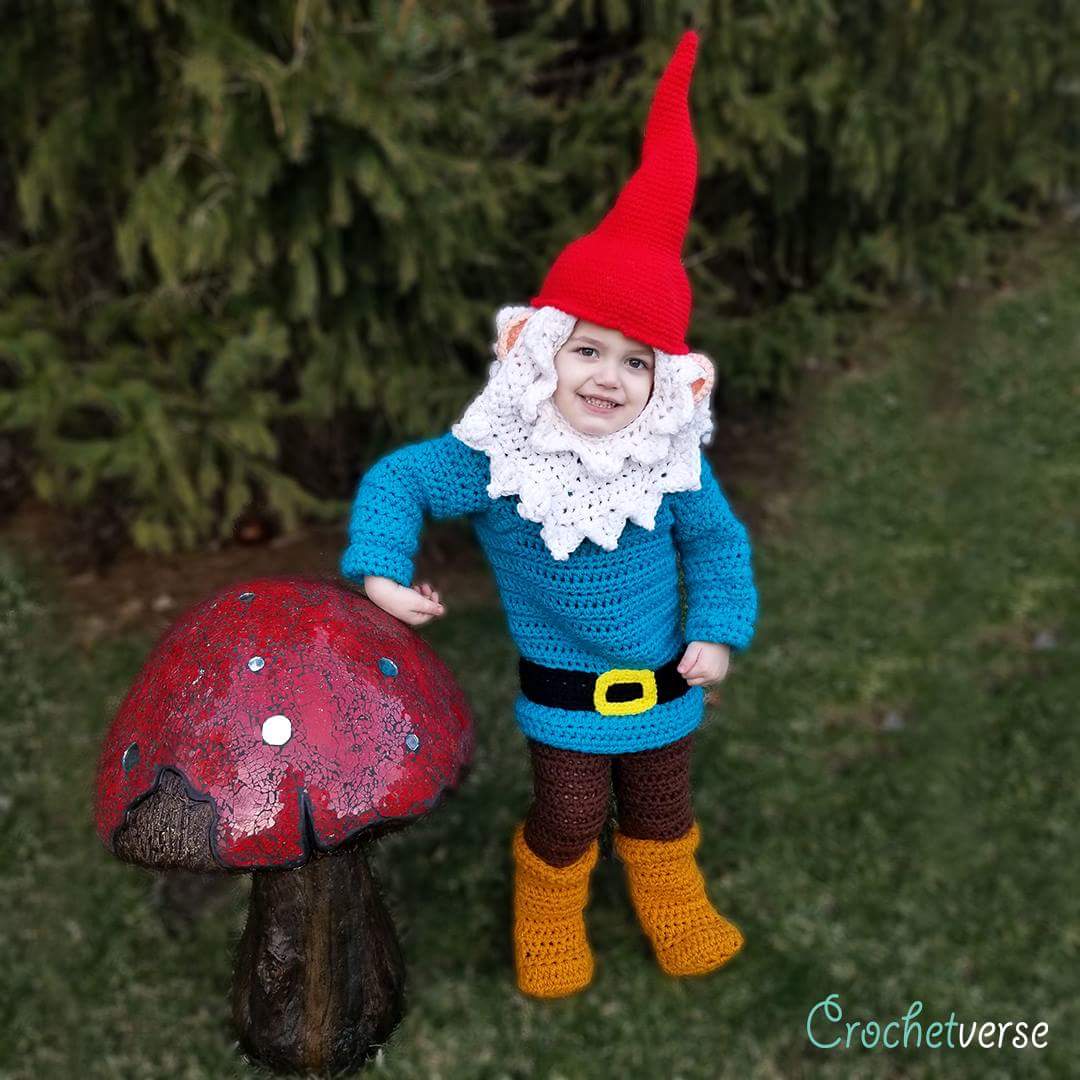
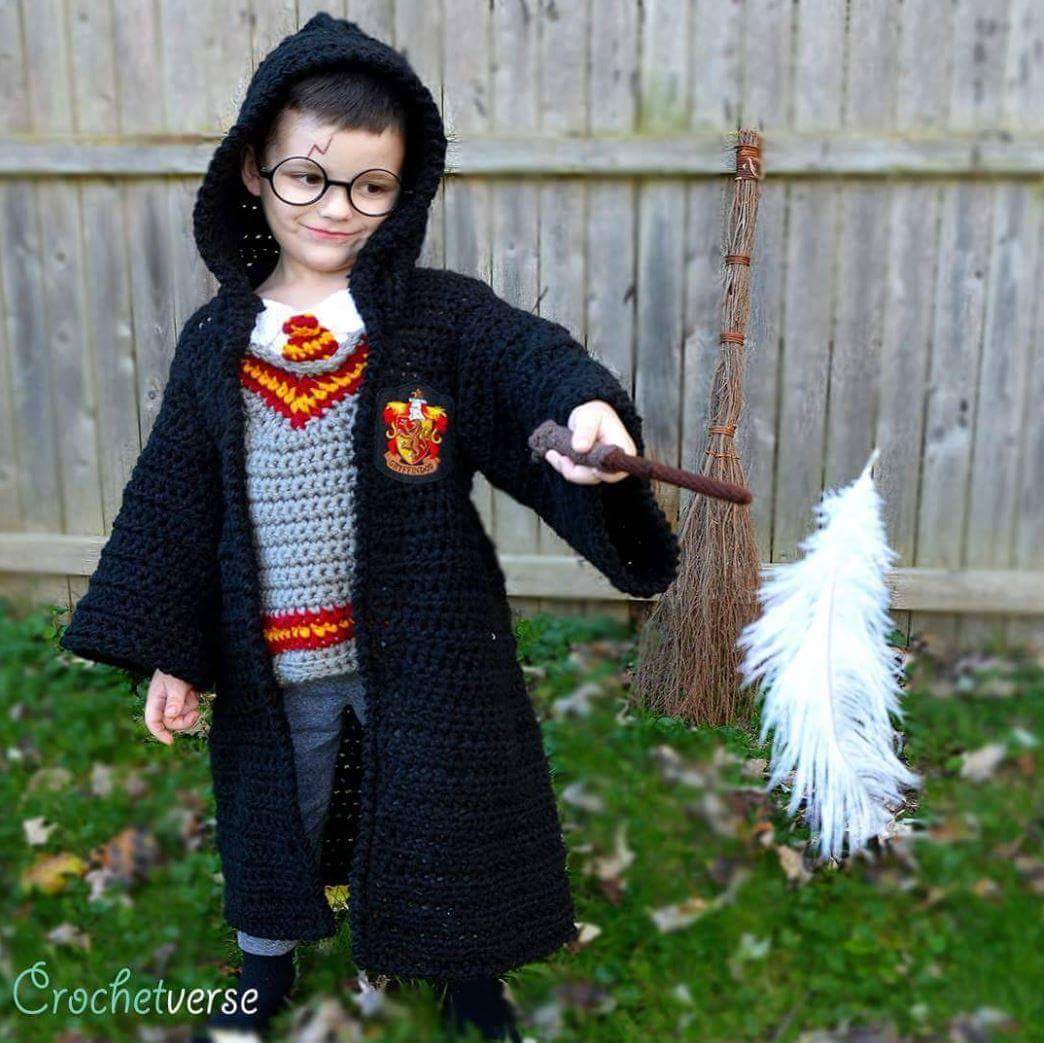
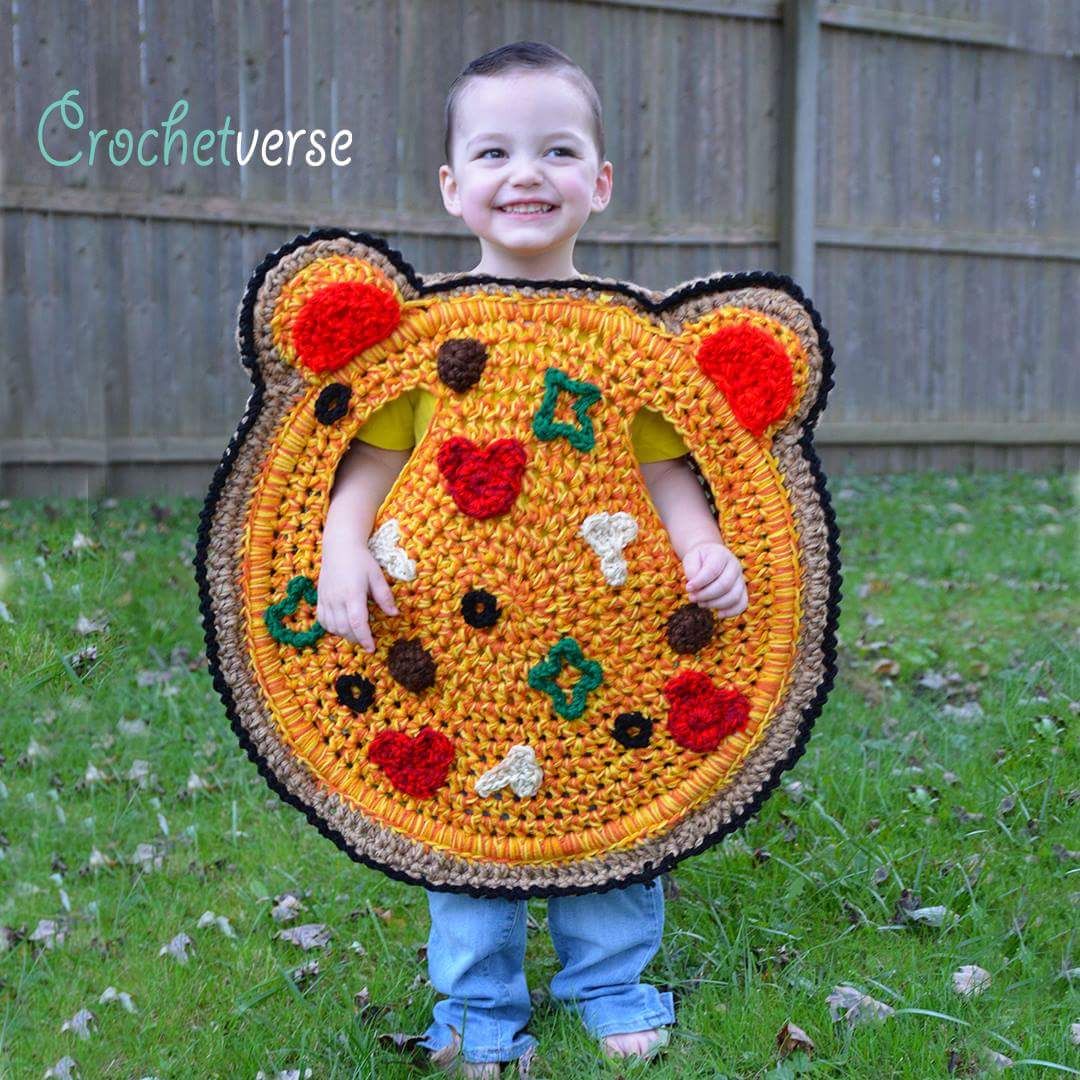
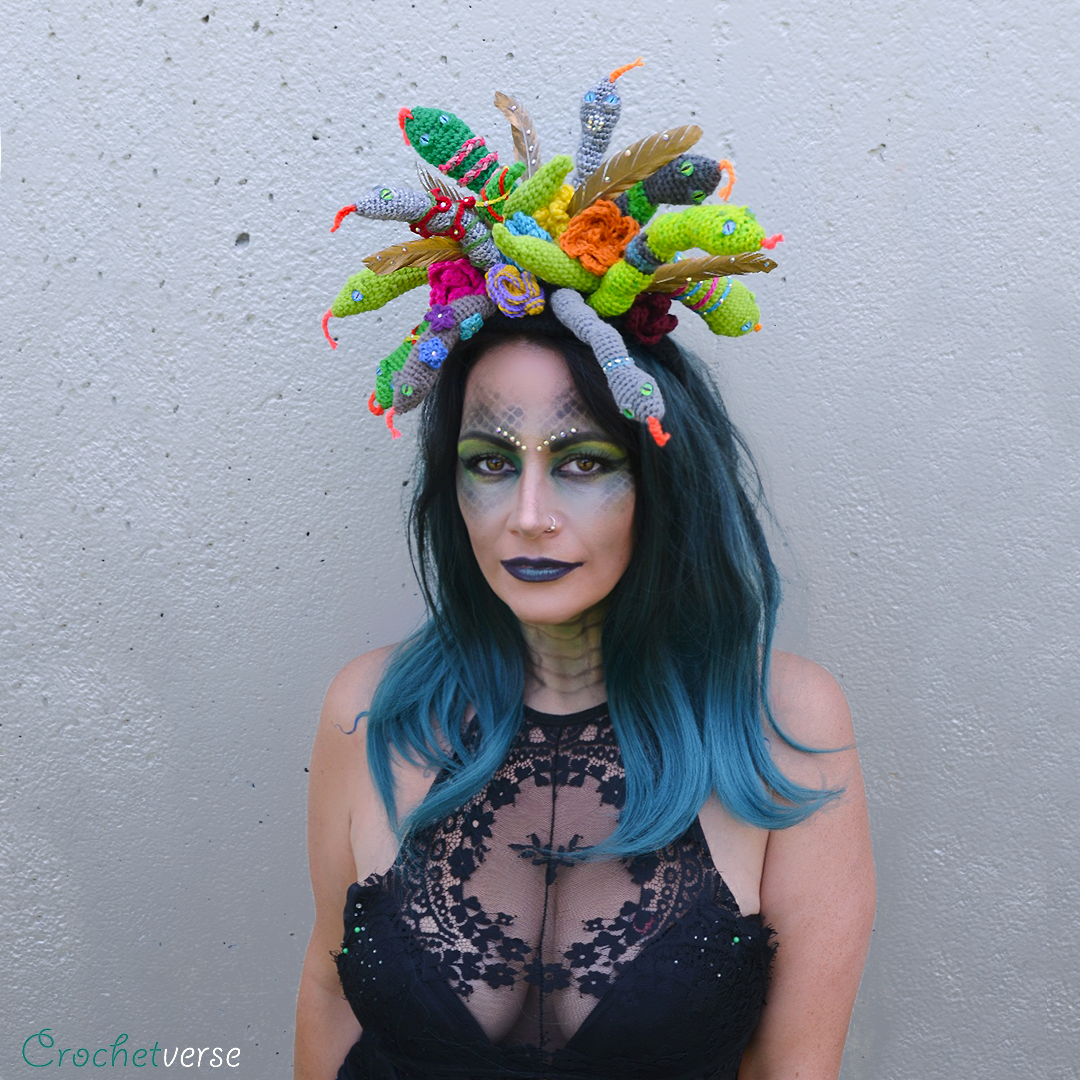
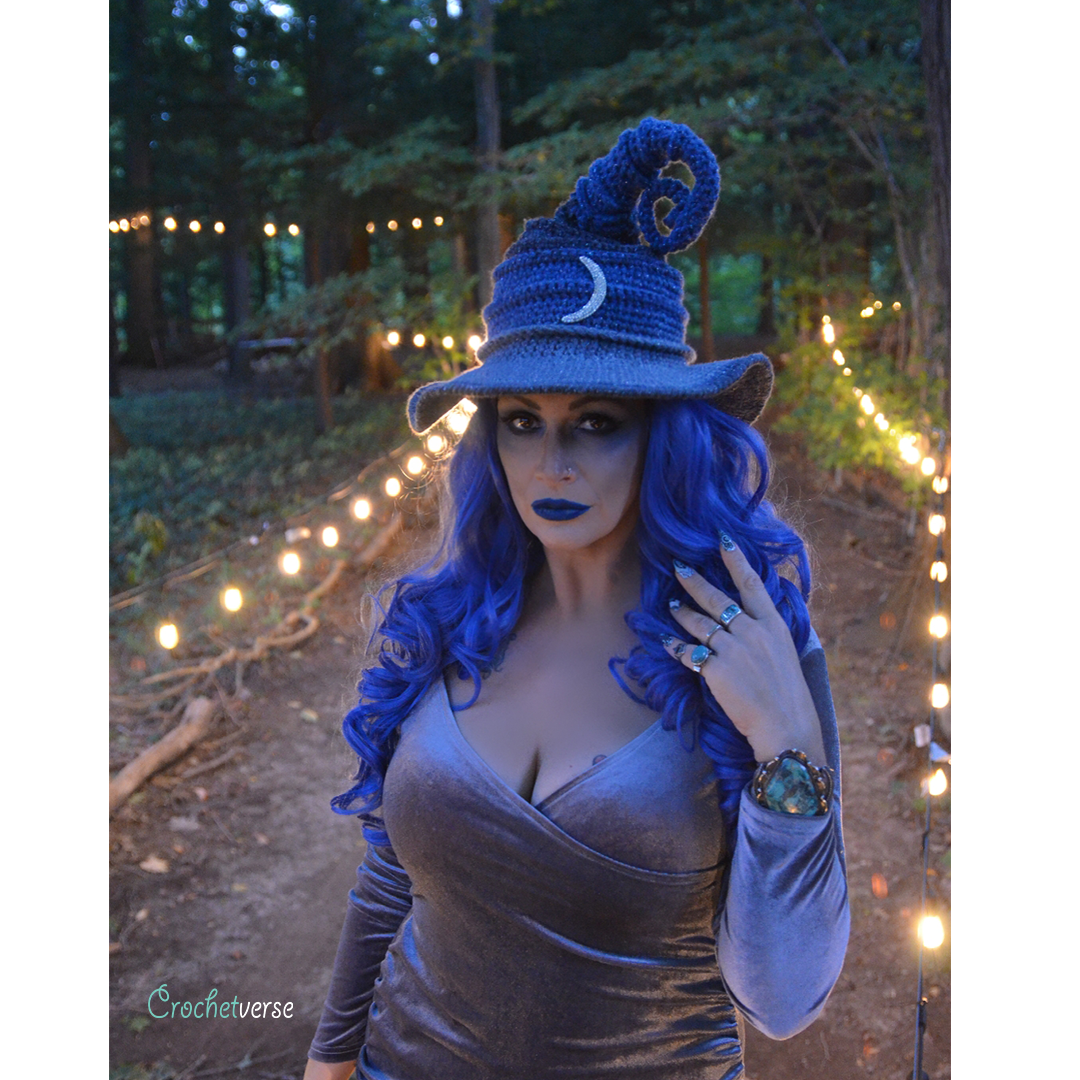
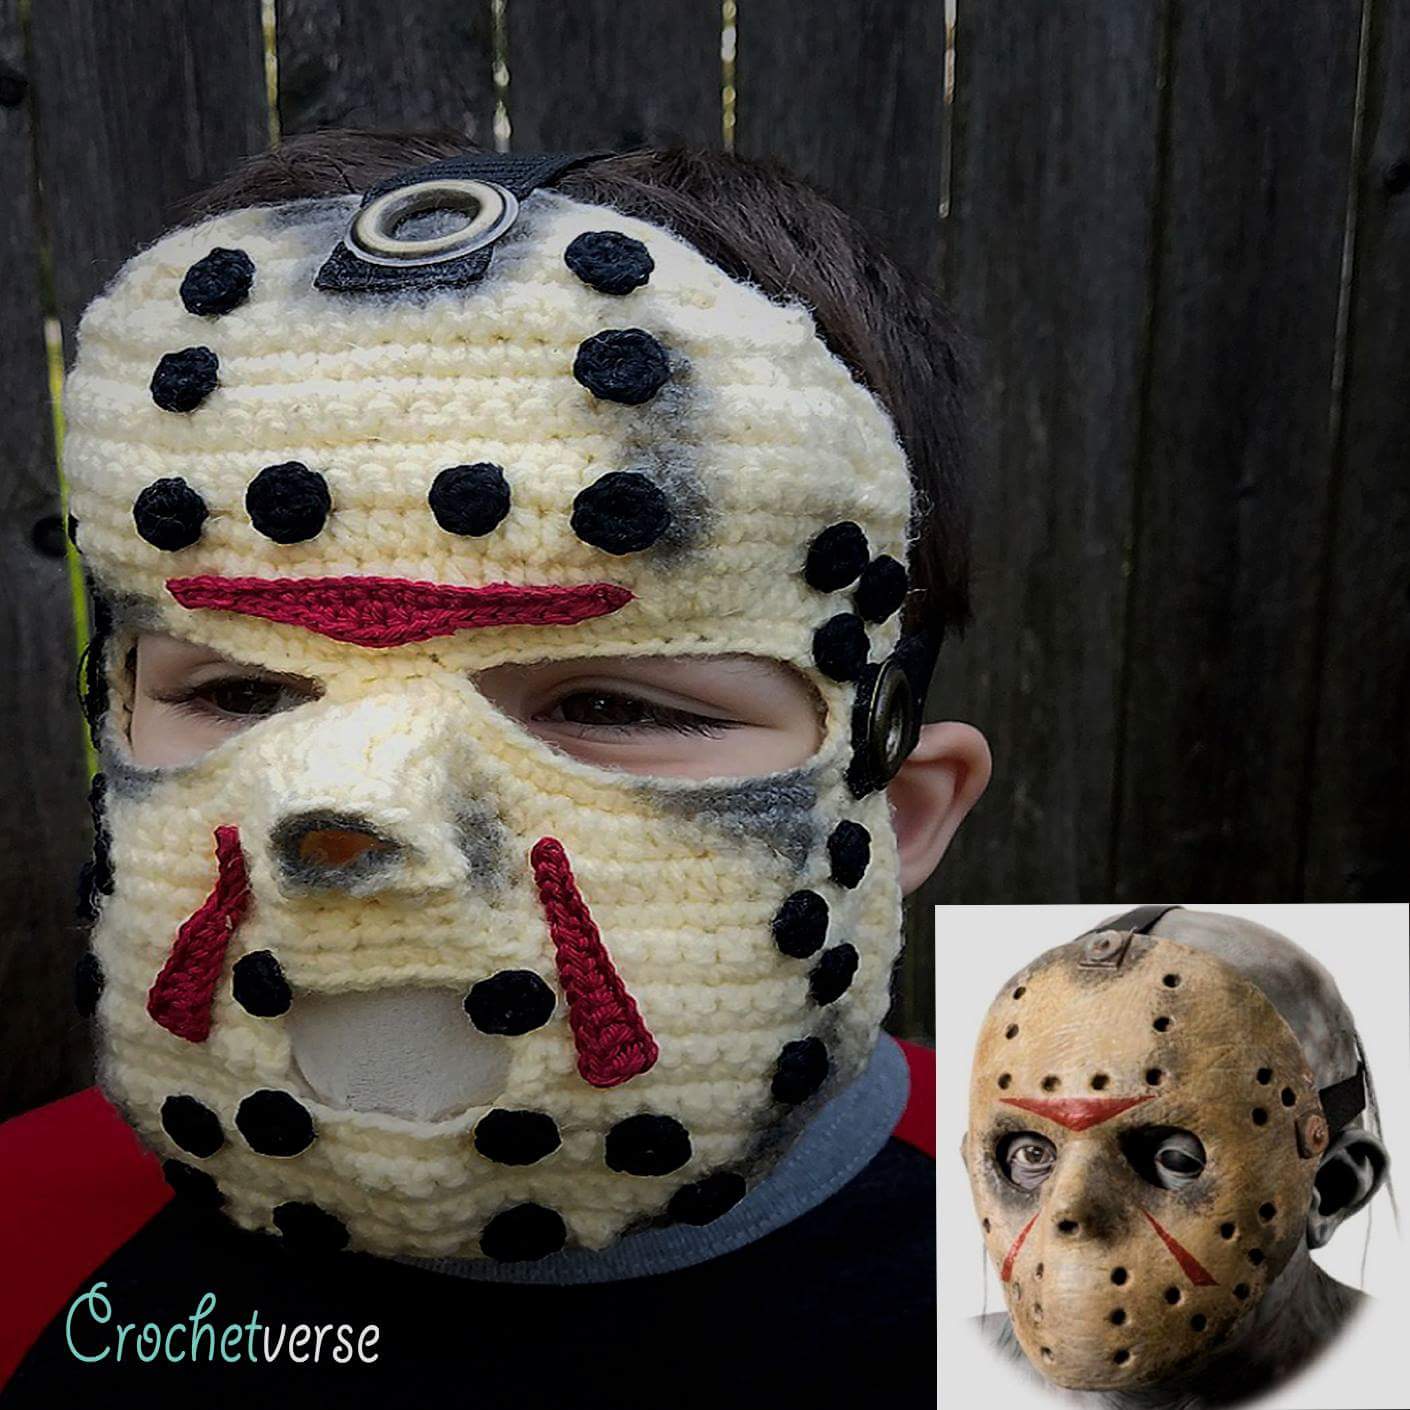
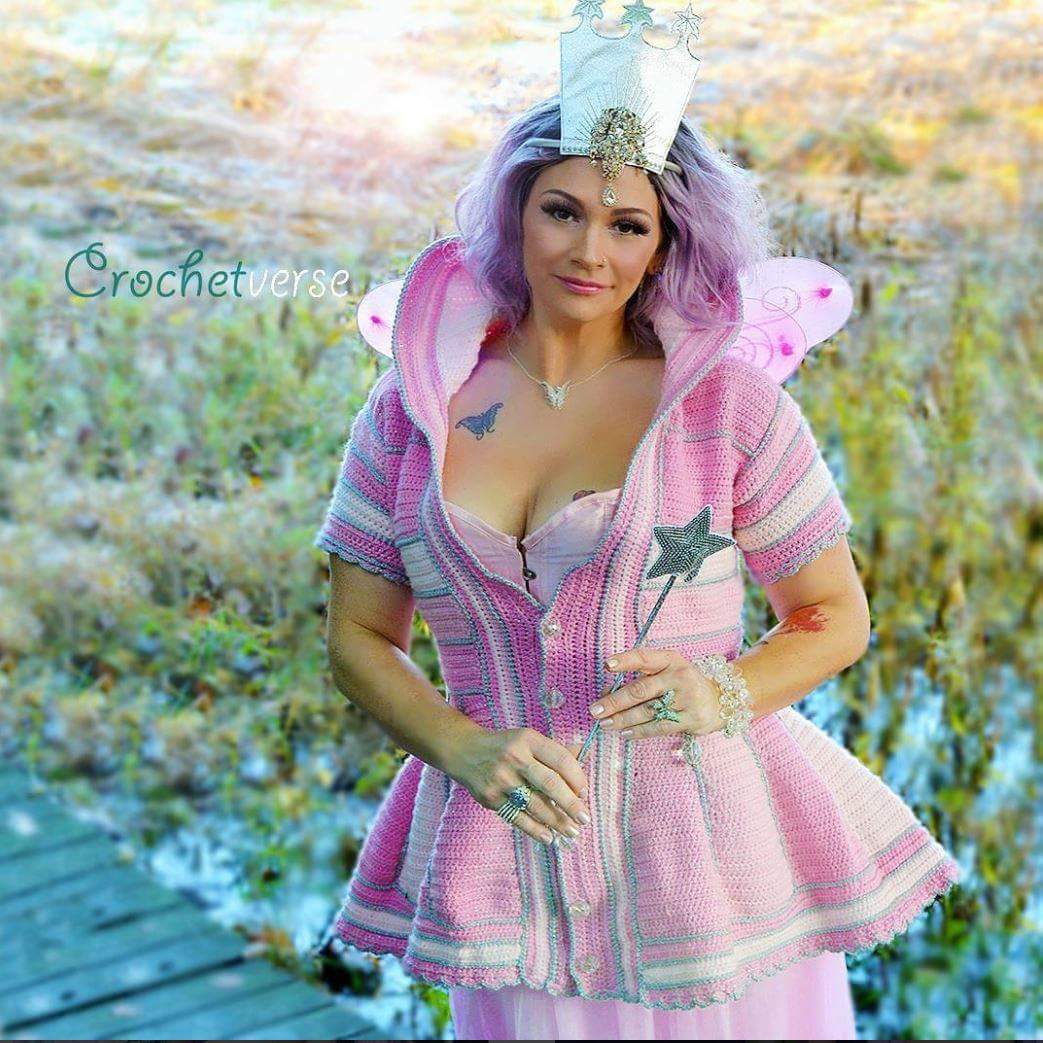
Welcome to the Crochetverse! I am Stephanie Pokorny, the designer behind it! I am so happy to have you stop by! Every year I allow my sweet littles to choose a costume that I then crochet for them! It makes me so happy to bring to life their ideas and watch them enjoy Halloween! I hope you enjoy this gallery of pieces I have done over the years! My mom did it for me as a child and I vividly recall being so excited to wear them!
Some quick facts:
– All are done freehand with no pattern. Most remain one of a kind. Selected ones become a pattern so others may create their own. Either myself or my sister does photos!
– They are fully crocheted. We live in an area where sometimes it snows on Halloween so their coziness is always appreciated by my babes!
– I work to put the details on the forehead and and top of head so from above the details are viewed but their view remains unobstructed!
Follow me on Twitter, Instagram, Reddit all as Crochetverse! (links at end of post!)
*Note: The PDF download is a Google placed ad and allowing these ads is what keeps me up and running here as everything on the site is free or inspiration. Thank you for visiting!*
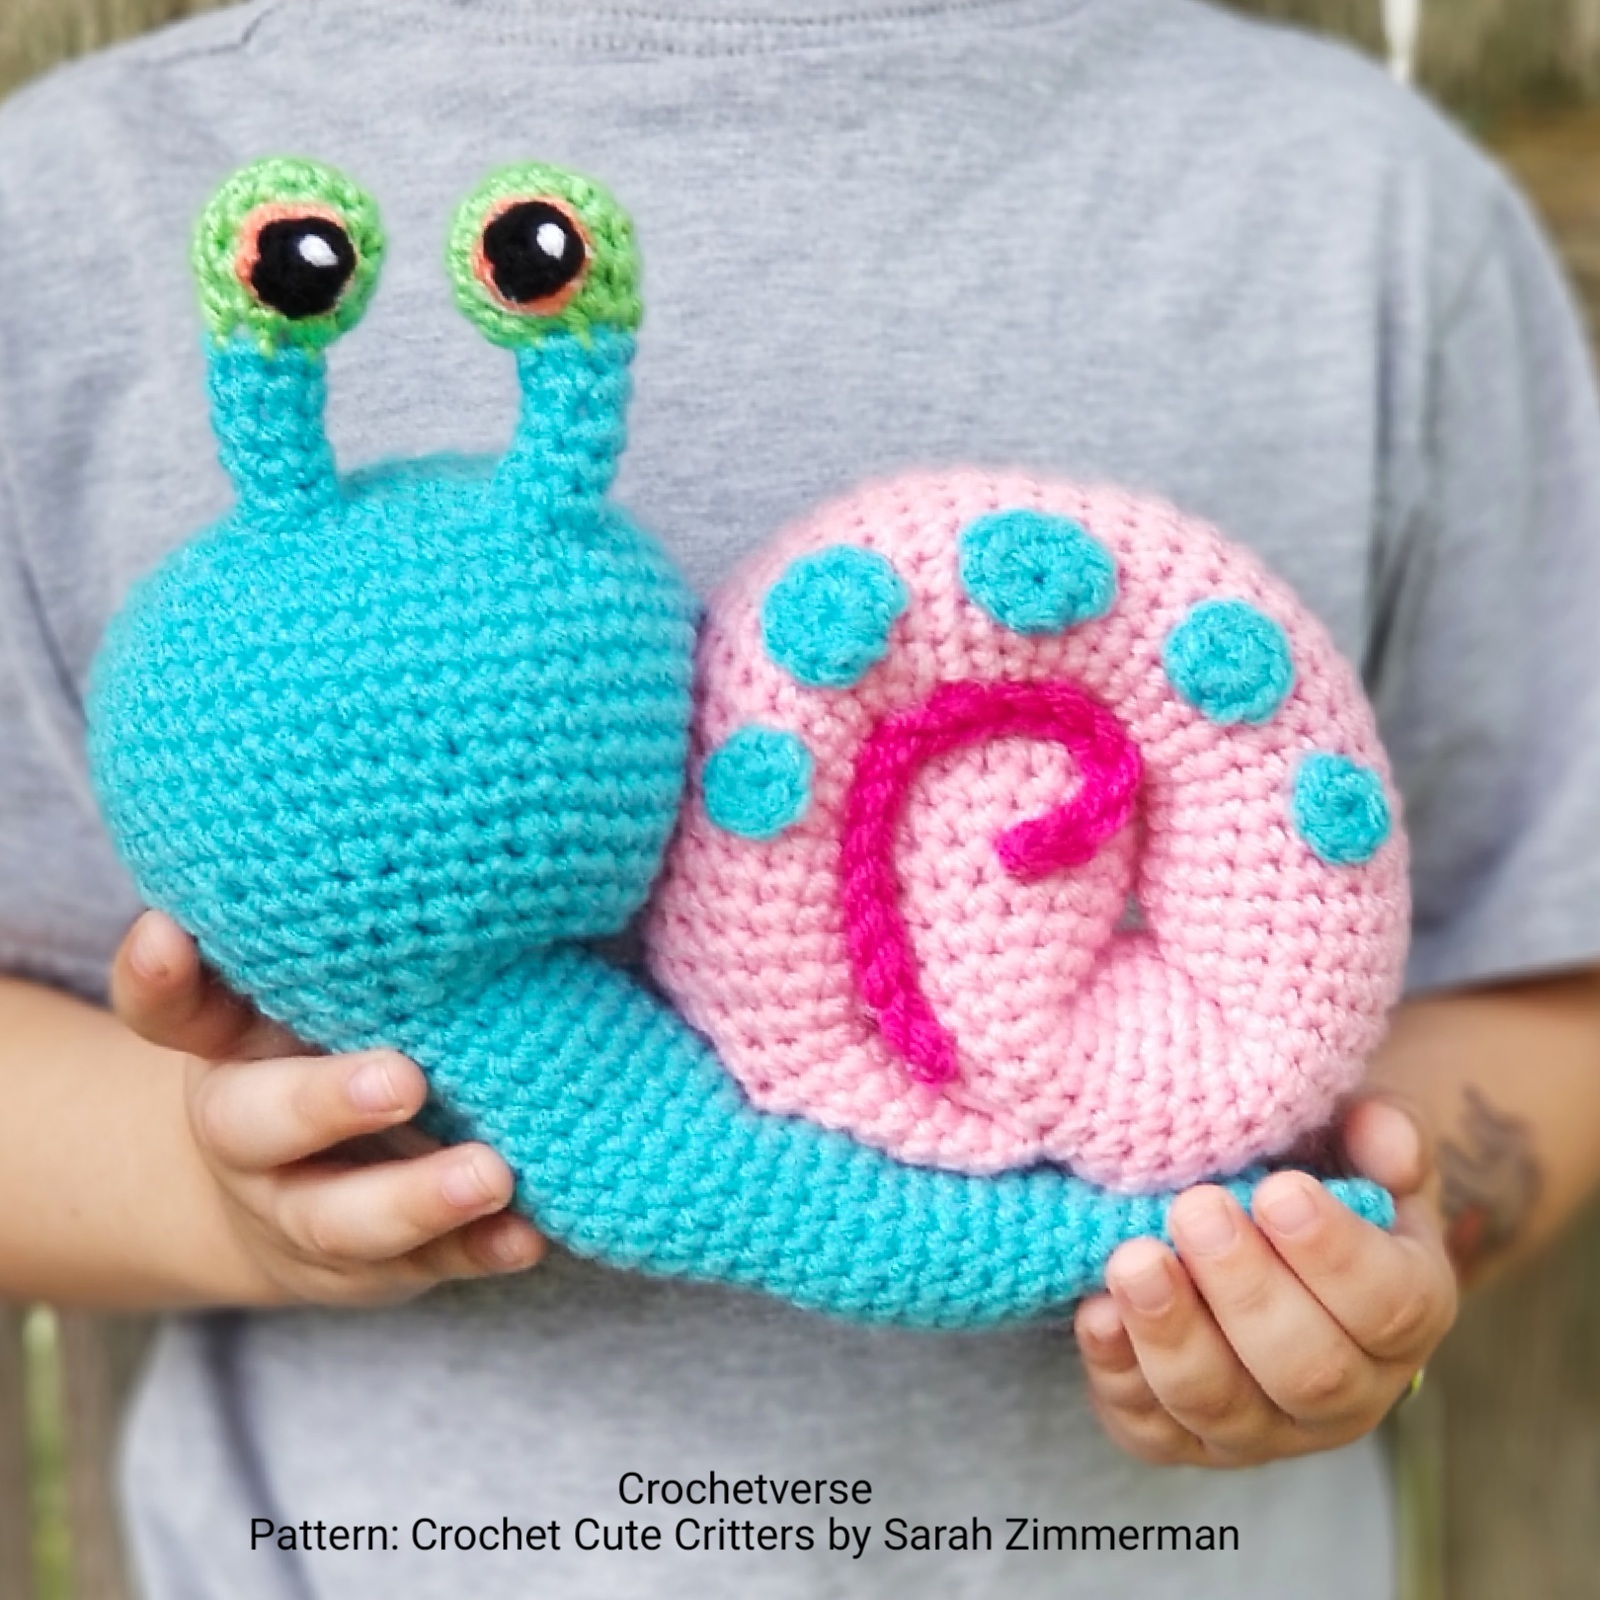
Not even gonna mess around with words first, let me get straight to the PROJECT. LOOK AT DIS! Baby Gary from Spongebob! Read below for how I did him! I had to promise my babies they could have it straight away after I took proper pictures! The begging was real ya’ll!
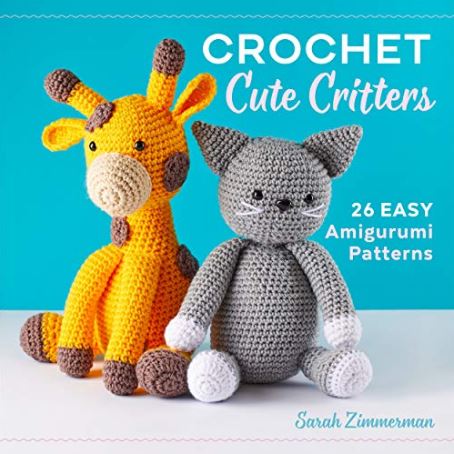
When your crochet idol asks you to review her latest book, you do a little jump for joy and then you get to work 🙂 RepeatCrafterMe aka Sarah Zimmerman recently released her new book Crochet Cute Critters
Unlike most amigurumi, these babies use an H(5mm) hook, which produces projects that hold their shape but are still the perfect amount of cuddly. I tend to crochet pretty tightly, so I found ZERO problems with gapping of stitches using worsted weight yarns, but if you are a loose crocheter, do not be afraid to drop a hook size to achieve the look you desire!
The details on Gary! HOW I MADE HIM!:
I made him EXACTLY as the pattern stated in the book and added just a few circles and a chain to transform him! H hook and worsted weight yarns.
I began with the pink shell and light turquoise body. After assembling those, I created the dots for his shell. Done in the light turquoise, I made (5) dots total using a magic ring and single crochet: (2) are 5 sts, (2) are 6 sts, and (1) is 8 sts. The shell swirl is a double strand darker pink and simply a chain of 18. Skipping the safety eye option, instead I turned his antennae into eye stalks! The top part is done in lime green and the bottom in the light turquoise. The eye details are again just basic circles magic ring single crochet circles. (2) 6 sts circles for the coral eyes and (2) 4 sts circles for the black pupils. After sewing all the pieces parts into place, I added a few straight stitches of white for the eye sparkle and he was done!
Math? 26 patterns, 15.29 for the book. That is just over .50 cents a pattern, come on!? That is amazing! To be honest, this book was so good, I actually feel inspired to create a crochet book of my own! I have always wanted to put together a crochet book filled with tips and tricks I have picked up along the way and I think this book might just have been enough to point me in the right direction. Although my book is still in the early stages, I have been doing a lot of research into amazon self publishing so if you have any book publishing tips I would love to hear them! Anyway, I hope you enjoyed this review! I would love to have you join and follow any of my Crochetverse pages on the web! I can promise you cool crochet <3
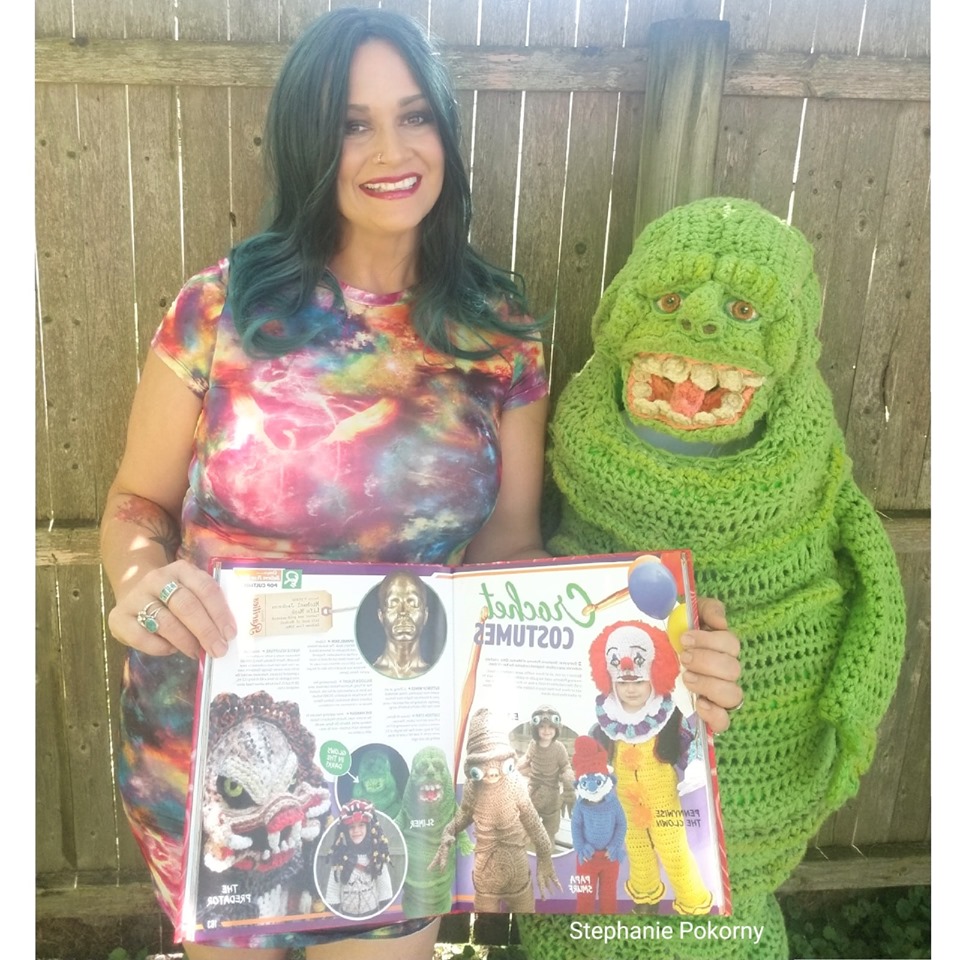
I am just dropping in for a quick post to share some news that has made me so happy! Believe it or not…. My children and my costumes made it into Ripley’s Believe it or Not!
In case you didn’t know, I am Stephanie Pokorny, the sole designer behind Crochetverse 🙂 Sometimes there is a disconnect between my name and my business name, so allow me to introduce myself to you!
Can I just tell you how much I LOVED this book as a kid!? Before cell phones, man I would read the heck out of this book!
I am honestly so honored to be able to show the world how cool crochet is and the thankfulness abounds! ALL OF YOU and your support is the ONLY reason I have been able to come this far and for that I THANK YOU!
It is in the 2019 Ripley’s Believe it or Not – Beyond the Bizzare
Man, did I get in the right issue hahah!
If you want to grab a copy of this amazing book, head to Amazon here:
I have a code for 25% off too! It is well under 20 bucks with it! Enter code 25Ripley in promo codes line when you check out! This code expires 8/31/2019 <3
Follow me on any of my social media to stay in touch, I would love to have you! Much love and yarn, Stephanie Pokorny (Crochetverse)
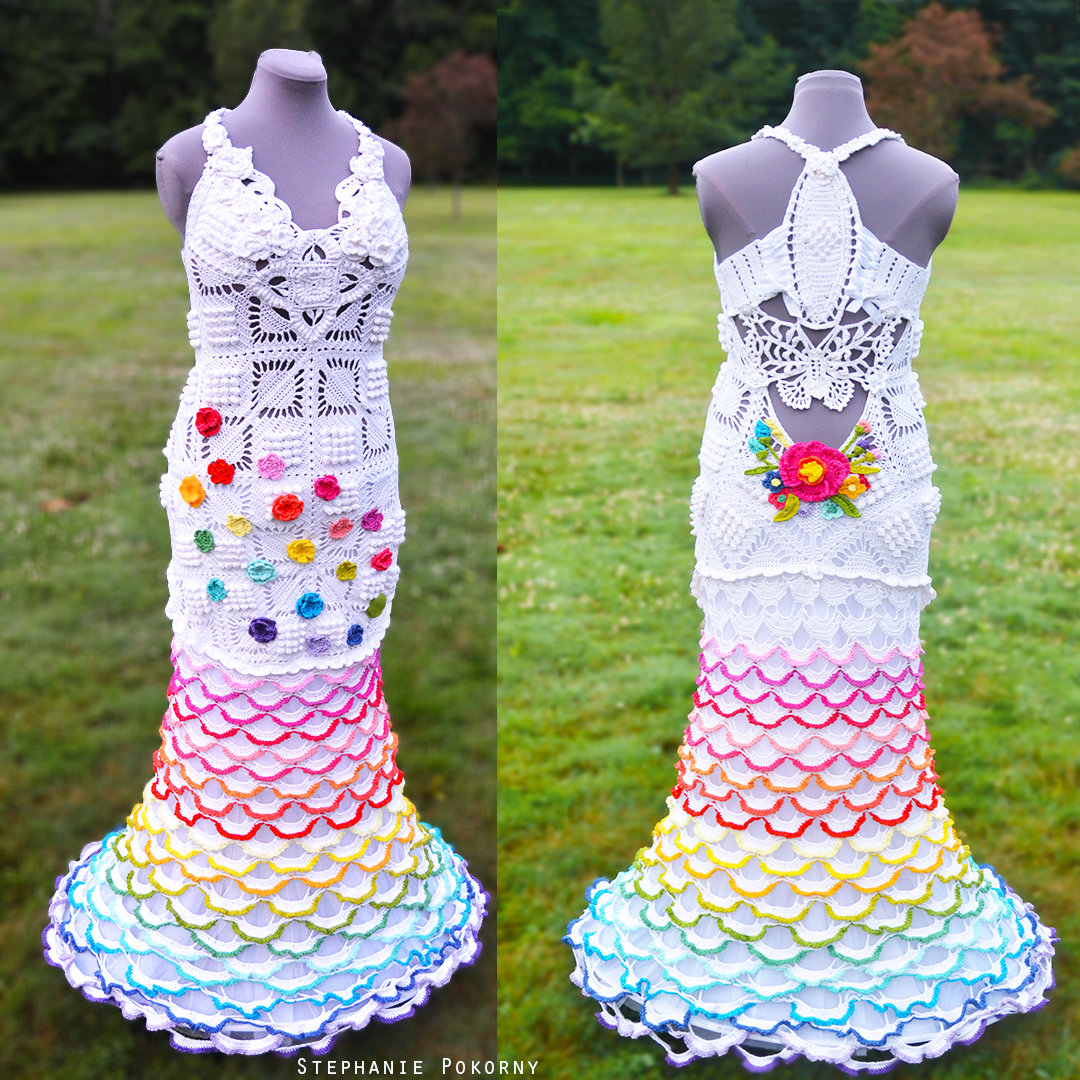
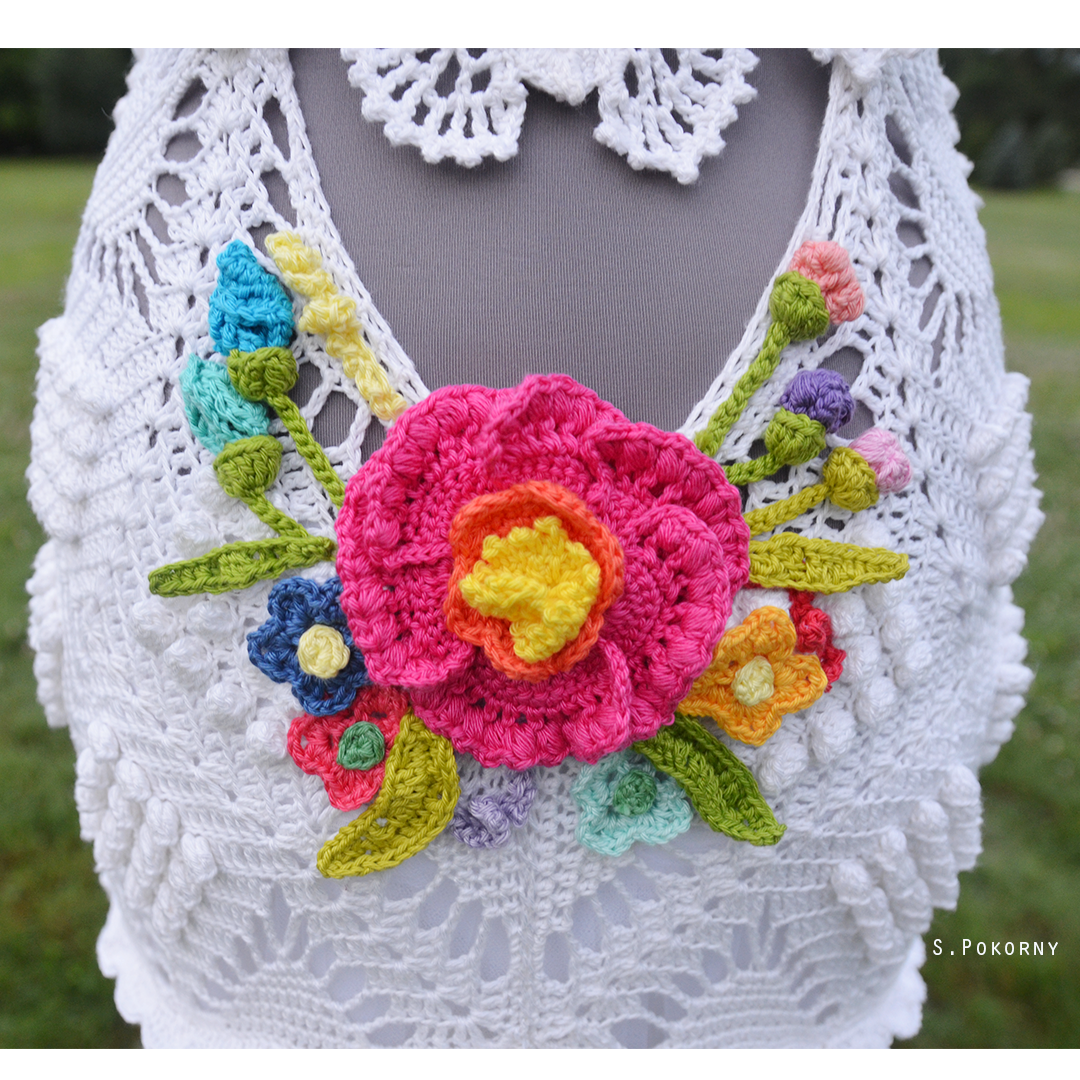
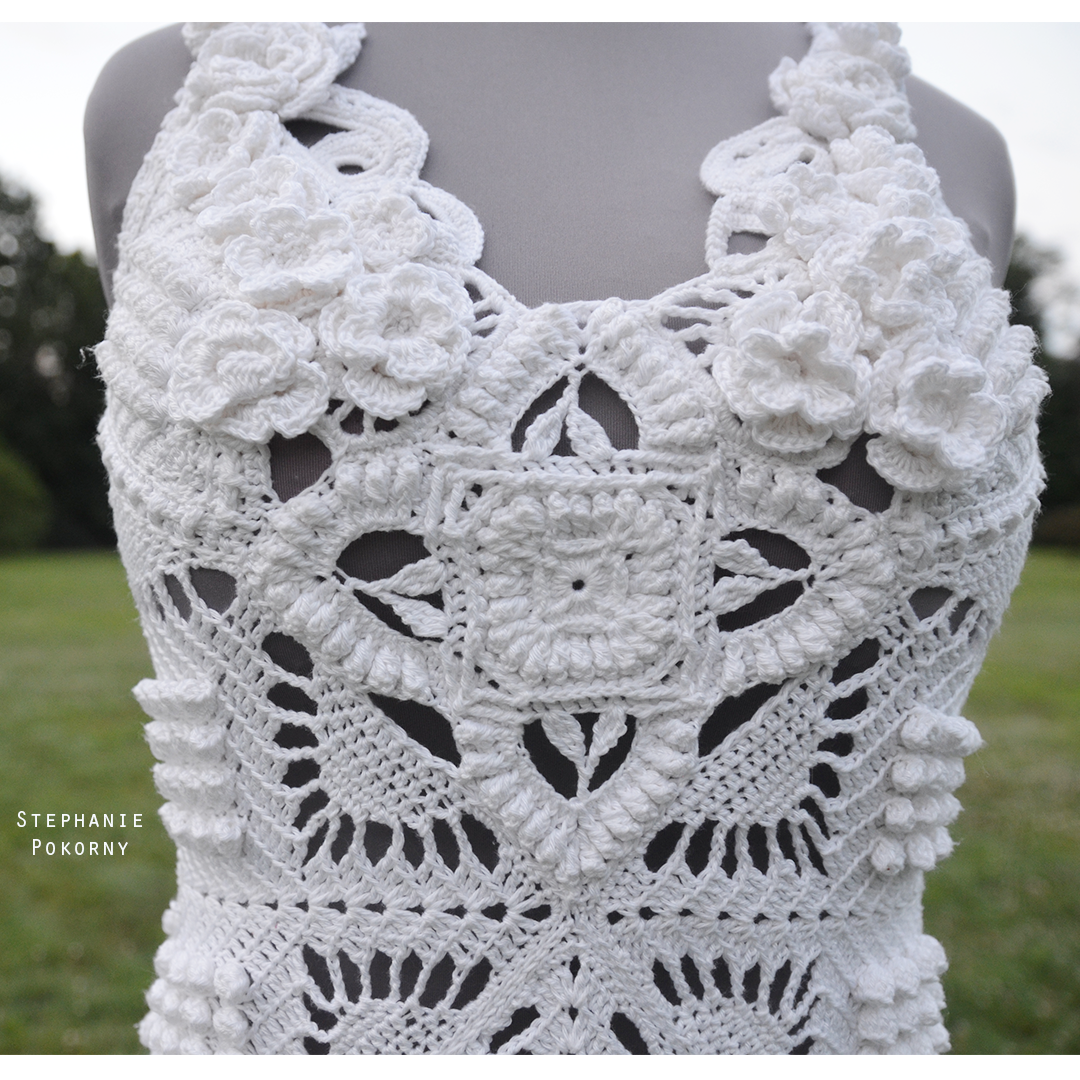
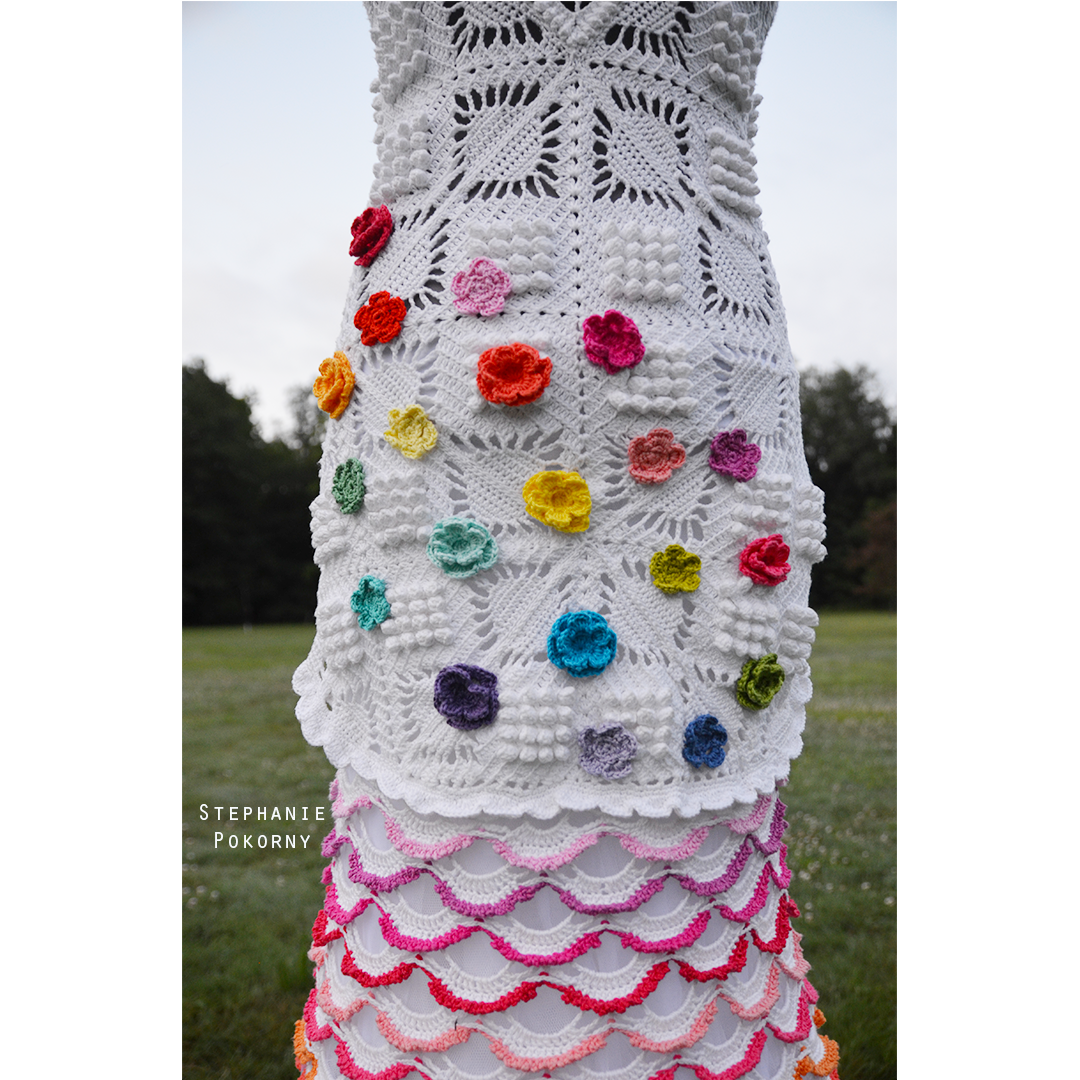
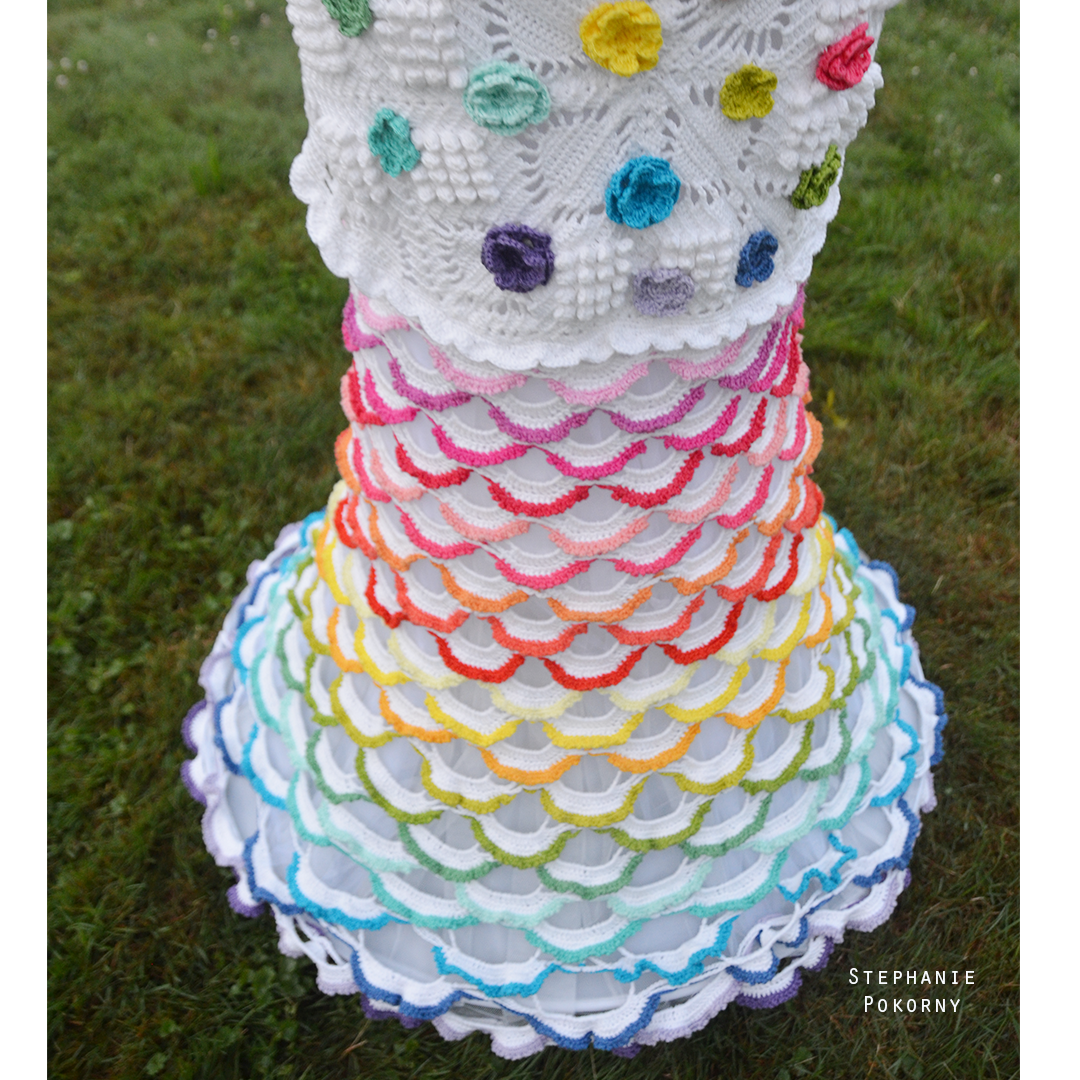
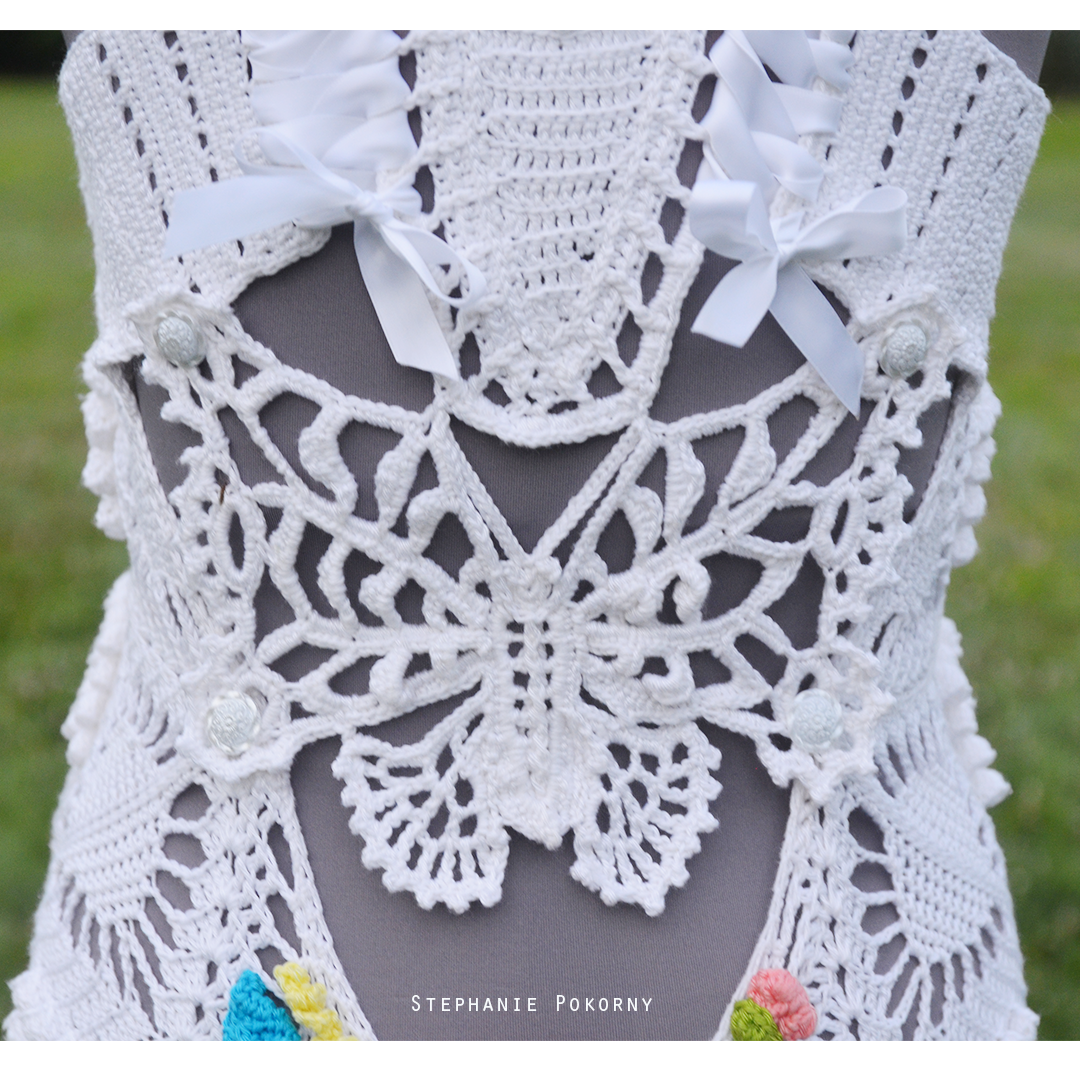
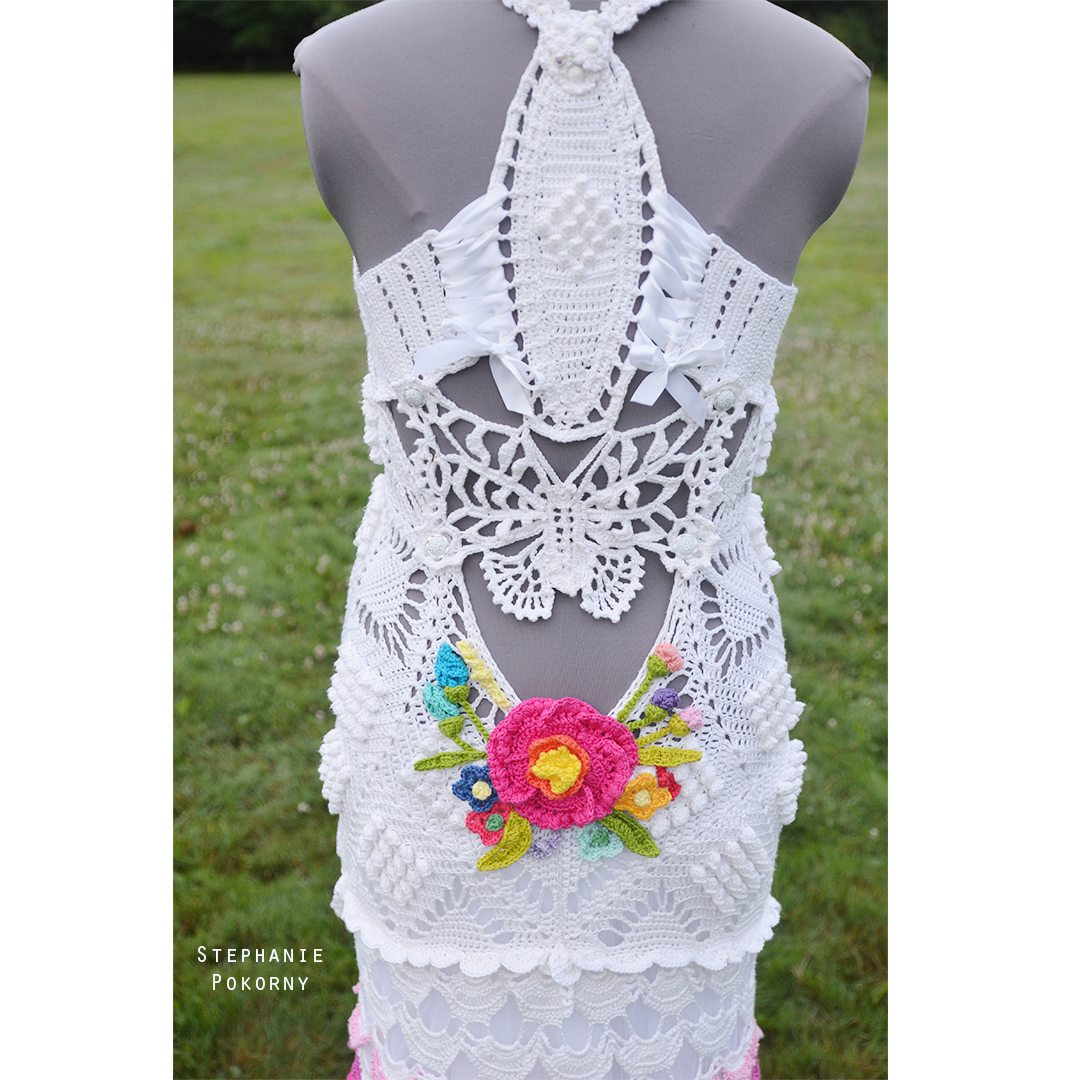
How many of you crochet so many things, but never for yourself? I KNOW I am one of these. So for my New Year’s resolution, 1/1/2019, I decided I was going to create a dream dress for me. No pattern. No other reason except to enjoy! This dress is the result!
It was created over the course of just under 8 months using fingering weight mercerized cotton (Scheepjes Catona) and a 2.75mm crochet hook. I estimate there are close to or just over a QUARTER OF A MILLION STITCHES!
When my husband and I decided to get married, he was just about to leave for a deployment to Afghanistan, so we did the ole’ quicky wedding in his parent’s living room. It was beautiful, Sam’s Club cake and all. And I mean that! BUT, we always wanted to do a renewal ceremony.
That is why I only photographed this on my dress form and not on myself. I want him to be the first to see me in it 🙂 Awww. soo sweet lol!
I am so happy with the dress and it is truly my DREAM dress and when we do the ceremony, I can PROMISE many photos. But, I just had to share now too!
Created without a pattern (some things were pulled from freebies online, such as the floral arrangement on the low back was from mypicot.com , the first few rounds of a doily I purchased!, and an antique Irish crochet butterfly!) I did however write the pattern for just the beautiful square and THAT I will share with you! I hope you enjoy the photos and the square. The body of the dress showcases the square. It features a bobble diamond and openwork that when you join the squares, creates a diamond shape!
SO MUCH LOVE, Stephanie Pokorny/Crochetverse
I used fingering weight cotton and a 2.75mm hook. You can use any size yarn and an appropriate hook size for that yarn as well!
Make magic ring:
Do not turn rounds throughout.
Rnd 1: ch 3
(counts as 1st dc here and throughout), 2 dc in ring, ch 2, *3 dc in
the ring, ch 2, repeat from * two times more, sl st to top of beg ch-3.
Rnd 2: ch 3,
dcblo in nxt 2 sts, (2 dc, ch 2, 2 dc) all in nxt ch-2 sp, *dcblo in nxt 3 sts,
(2 dc, ch 2, 2 dc) all in nxt ch-2 sp, repeat from * two times more, sl st to
top of beg ch-3.
Rnd 3: ch 3,
dcblo in nxt 4 sts, (2 dc, ch 2, 2 dc) all in nxt ch-2 sp, *dcblo in nxt 7 sts,
(2 dc, ch 2, 2 dc) all in nxt ch-2 sp, repeat from * two times more, dcblo in
last 2 sts, sl st to top of beg ch-3.
Rnd 4: ch 3,
7dcblopop (see special sts) in nxt st, dcblo in nxt 5 sts, (2 dc, ch 2, 2 dc)
all in nxt ch-2 sp, *dcblo in nxt 5 sts, 7dcblopop in nxt st, dcblo in nxt 5
sts, (2 dc, ch 2, 2 dc) all in nxt ch-2 sp, repeat from * two times more, dcblo
in last 4 sts, sl st to top of beg ch-3.
Rnd 5: ch 3,
dcblo in the top of the popcorn (see image at end below for spot to insert
hook), dcblo in nxt st, 7dcblopop in nxt st, dcblo in nxt 5 sts, (2 dc, ch 2, 2
dc) all in nxt ch-2 sp, *dcblo in nxt 5 sts, 7dcblopop in nxt st, dcblo in nxt
st, dcblo in nxt popcorn, dcblo in nxt st, 7dcblopop in nxt st, dcblo in nxt 5
sts, (2 dc, ch 2, 2 dc) all in nxt ch-2 sp, repeat from * two times more, dcblo
in nxt 5 sts, 7dcblopop in last st, sl st to top of beg ch-3.
Rnd 6: ch 3,
7dcblopop in nxt st, dcblo in nxt st, dcblo in nxt popcorn, dcblo in nxt st,
7dcblopop in nxt st, dcblo in nxt 5 sts, (2 dc, ch 2, 2 dc) all in nxt ch-2 sp,
*dcblo in nxt 5 sts, 7dcblopop in nxt st, dcblo in nxt st, dcblo in nxt popcorn#,
dcblo in nxt st, 7dcblopop in nxt st, dcblo in nxt st, dcblo in nxt popcorn,
dcblo in nxt st, 7dcblopop in nxt st, dcblo in nxt 5 sts, (2 dc, ch 2, 2 dc)
all in nxt ch-2 sp, repeat from * two times more, rep from * to # one time, sl
st to top of beg ch-3.
Rnd 7: ch 3,
dcblo in nxt popcorn, dcblo in nxt st, 7dcblopop in nxt st, dcblo in nxt st,
dcblo in nxt popcorn, dcblo in nxt st, 7dcblopop in nxt st, dcblo in nxt 5 sts,
(2 dc, ch 2, 2 dc) all in nxt ch-2 sp, *dcblo in nxt 5 sts, 7dcblopop in nxt
st, dcblo in nxt st, dcblo in nxt popcorn, dcblo in nxt st, 7dcblopop in nxt st#,
dcblo in nxt st, dcblo in nxt poporn, dcblo in nxt st, 7dcblopop in nxt st,
dcblo in nxt st, dcblo in nxt popcorn, dcblo in nxt st, 7dcblopop in nxt st,
dcblo in nxt 5 sts, (2 dc, ch 2, 2 dc) all in nxt ch-2 sp, repeat from * two
times more, rep from * to # once time, sl st to top of beg ch-3.
Rnd 8: ch 3,
7dcblopop in nxt st, dcblo in nxt st, dcblo in nxt popcorn, dcblo in nxt st,
7dcblopop in nxt st, dcblo in nxt st, dcblo in nxt popcorn, dcblo in nxt 5 sts,
ch 7, dcblo in nxt 2 sts, (2 dc, ch 2, 2 dc) all in nxt ch-2 sp, *dcblo in nxt
2 sts, ch 7, dcblo in nxt 5 sts, dcblo in nxt popcorn, dcblo in nxt st,
7dcblopop in nxt st, dcblo in nxt st, dcblo in nxt popcorn#, dcblo in nxt st,
7dcblopop in nxt st, dcblo in nxt st, dcblo in nxt popcorn, dcblo in nxt st,
7dcblopop in nxt st, dcblo in nxt st, dcblo in nxt popcorn, dcblo in nxt 5 sts,
ch 7, dcblo in nxt 2 sts, (2 dc, ch 2, 2 dc) all in nxt ch-2 sp, repeat from *
two times more, repeat from * to # once, sl st to top of beg ch-3.
Rnd 9: ch 3,
dcblo in nxt popcorn, dcblo in nxt st, 7dcblopop in nxt st, dcblo in nxt st,
dcblo in nxt popcorn, dcblo in nxt 5 sts, ch 4, sc in ch-7 loop, ch 4, sk nxt 2
dc, dcblo in nxt 2 st, (2 dc, ch 2, 2 dc) all in nxt ch-2 sp, *dcblo in nxt 2
sts, ch 4, sk nxt 2 dc, sc in nxt ch-7 loop, ch 4, sk nxt 2 dc, dcblo in nxt 5
sts, dcblo in nxt popcorn, dcblo in nxt st, 7dcblopop in nxt st#, dcblo in nxt
st, dcblo in nxt popcorn, dcblo in nxt st, 7dcblopop in nxt st, dcblo in nxt
st, dcblo in nxt popcorn, dcblo in nxt 5 sts, ch 4, sk nxt 2 dc, sc in nxt ch-7
loop, ch 4, sk nxt 2 dc, dcblo in nxt 2 sts, (2 dc, ch 2, 2 dc) all in nxt ch-2
sp, repeat from * two times more, repeat from * to # one time, sl st to top of
beg ch-3.
Rnd 10: ch 3,
7dcblopop in nxt st, dcblo in nxt st, dcblo in nxt popcorn, dcblo in nxt 5 sts,
ch 4, sk nxt 2 dc, 2 sc in nxt ch-4 sp, sc in nxt sc, 2 sc in nxt ch-2 sp, ch
4, sk nxt 2 dc, dcblo in nxt 2 sts, (2 dc, ch 2, 2 dc) all in nxt ch-2 sp,
*dcblo in nxt 2 sts, ch 4, sk nxt 2 dc, 2 sc in nxt ch-4 sp, sc in nxt sc, 2 sc
in nxt ch-4 sp, ch 4, sk nxt 2 dc, dcblo in nxt 5 sts, dcblo in nxt popcorn#,
dcblo in nxt st, 7dcblopop in nxt st, dcblo in nxt st, dcblo in nxt popcorn, dcblo
in nxt 5 sts, ch 4, sk nxt 2 sts, 2 sc in nxt ch-4 sp, sc in nxt sc, 2 sc in
nxt ch-4 sp, ch 4, sk nxt 2 dc, dcblo in nxt 2 sts, (2 dc, ch 2, 2 dc) all in
nxt ch-2 sp, repeat from * two times more, repeat from * to # once, sl st to
top of beg ch-3.
Rnd 11: ch 3,
dcblo in nxt popcorn, dcblo in nxt 5 sts, ch 4, sc in nxt ch-4 sp, sc in nxt 5
sc, sc in nxt ch-4 sp, ch 4, sk nxt 2 dc, dcblo in nxt 2 sts, (2 dc, ch 2, 2
dc) all in the nxt ch-2 sp, *dcblo in nxt 2 sts, ch 4, sk nxt 2 sts, sc in nxt
ch-4 sp, sc in nxt 5 sc, sc in nxt ch-4 sp, ch 4, sk nxt 2 dc#, dcblo in nxt 5
sts, dcblo in nxt popcorn, dcblo in nxt 5 sts, ch 4, sk nxt 2 dc, sc in nxt ch-4
sp, sc in nxt 5 sc, sc in nxt ch-4 sp, ch 4, sk nxt 2 dc, dcblo in nxt 2 sts,
(2 dc, ch 2, 2 dc) all in nxt ch-2 sp, repeat from * two times more and from *
to # one time more, dcblo in last 4 sts, sl st to top of beg ch-3.
Rnd 12: ch 3,
dcblo in nxt 4 sts, ch 4, hdc in nxt ch-4 sp, hdc in nxt 7 sc, hdc in nxt ch-4
sp, ch 4, sk nxt 2 dc, dcblo in nxt 2 sts, (2 dc, ch 2, 2 dc) all in nxt ch-2
sp, *dcblo in nxt 2 sts, ch 4, sk nxt 2 sts, hdc in nxt ch-4 sp, hdc in nxt 7
sc, hdc in nxt ch-4 sp, sk nxt 2 dc, ch 4#, dcblo in nxt 7 sts, sk nxt 2 dc, ch
4, hdc in nxt ch-4 sp, hdc in nxt 7 sc, hdc in nxt ch-4 sp, ch 4, sk nxt 2 dc,
dcblo in nxt 2 sts, (2 dc, ch 2, 2 dc) all in nxt ch-2 sp, repeat from * two
times more, repeat from * to # once more, dcblo in last 2 sts, sl st to top of
beg ch-3.
Rnd 13: ch 3,
dcblo in nxt 2 sts, ch 4, sk nxt 2 dc, hdc in nxt ch-4 sp, hdc in nxt 9 sts,
hdc in nxt ch-4 sp, ch 4, sk nxt 2 dc, dcblo in nxt 2 sts, (2 dc, ch 2, 2 dc)
all in nxt ch-2 sp, *dcblo in nxt 2 sts, ch 4, sk nxt 2 dc, hdc in nxt ch-4 sp,
hdc in nxt 9 sts, hdc in nxt ch-4 sp, ch 4, sk nxt 2 dc#, dcblo in nxt 3 sts,
ch 4, sk nxt 2 dc, hdc in nxt ch-4 sp, hdc in nxt 9 sts, hdc in nxt ch-4 sp, ch
4, sk nxt 2 dc, dcblo in nxt 2 dc, (2 dc, ch 2, 2 dc) all in nxt ch-2 sp, repeat
from * two times more, repeat from * to # one time, sl st to top of beg ch-3.
Rnd 14: ch 1, sc
in same st and nxt 2 sts, 3 sc in nxt ch-4 sp, hdc in nxt 11 sts, 3 sc in nxt
ch-4 sp, sc in nxt 4 sts, 3 sc in nxt ch-2 sp, *sc in nxt 4 sts, 3 sc in nxt
ch-4 sp, hdc in nxt 11 sts, 3 sc in nxt ch-4 sp#, sc in nxt 3 sts, 3 sc in nxt
ch-4 sp, hdc in nxt 11 sts, 3 sc in nxt ch-4 sp, sc in nxt 4 sts, 3 sc in nxt
ch-2 sp, repeat from * two times more, repeat from * to # once, sl st to top of
beg ch-3, cut yarn.
Follow me on any of my social media to stay in touch, I would love to have you! Much love and yarn, Stephanie Pokorny (Crochetverse)
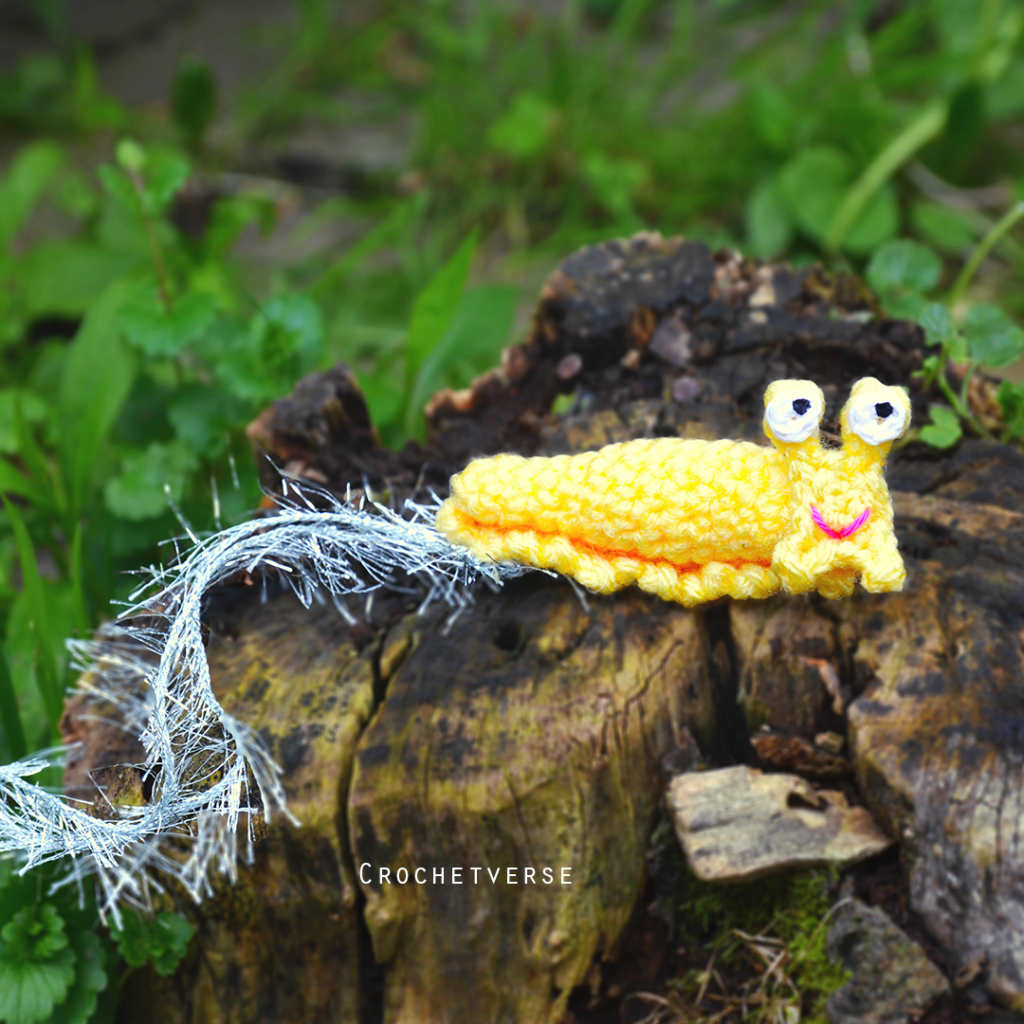
I don’t know. I felt like the world needed a crochet banana slug. He is just so cute I cannot. So here he is. Meet MERVIN, the Banana Slug. Complete with slime trail. Because duh. Haha. Enjoy!
Please always share the link only to this pattern and never the pattern itself. Your visits are critical to me being able to continue to bring you free patterns! Much Love! Stephanie Pokorny/Crochetverse
Materials:
40 yards light yellow worsted weight yarn
4 yards white and pink fingering weight cotton (Scheepjes Catona shown) OR worsted weight yarn with the plies split in half, using just two
yarn for the slime trail, shown is silver metallic fur yarn
sizes B, E, and F crochet hooks
black yarn or black paint for pupils
glue gun and glue sticks if you choose this method of assembly
tapestry needle, scissors, tape measure
Gauge:
While not critical, you do want very tight amigurumi style stitches. There should be no holes. I crochet tightly you may have to drop hook size to achieve this.
Finished Size:
About 3″ long from tip to tail (slime trail not included in this)
Instructions (US Terms):
Main Body:
With F hook and yellow yarn, make a magic ring, ch 1:
Worked in rounds with NO turning and NO joining.
Rnd 1: 6 sc in ring, pull tightly to close. (6)
Rnd 2-4: sc in each sc around. (6)
Rnd 5: (sc in nxt 2 sc, 2 sc in nxt sc) twice. (8)
Rnd 6: (sc in nxt 3 sc, 2 sc in nxt sc) twice. (10)
Rnd 7-13: sc in each sc around. (10)
Rnd 14: (sc in nxt 3 sc, sc dec over nxt 2 sc) twice. (8)
Rnd 15: (sc dec over nxt 2 sc) four times, cut yarn. (4)
Sew any remaining hole closed with yarn tail and weave in ends.
Underfoot:
With F hook and yellow yarn, chain 17:
Rnd 1: sl st in 3rd ch from hook, *ch 3, sl st in nxt ch until 1 ch remains, in last ch (ch 3, sl st, ch 3, sl st), working up the opposite side of the beginning chain in the remaining free loops, (sl st, ch 3) in each ch, st sl to base of 1st sl st made, cut yarn.
Weave in ends. Either use glue gun or sew the foot to the underside of the body. I positioned the end with the double “ch 3, sl st” end at the fat head side of the body.
Face:
With E hook and yellow, make magic ring, ch 1:
Rnd 1: (sc, ch 1) four times in the ring, sl st to 1st sc made.
Rnd 2: do not turn, sl st into nxt ch-1 sp, *ch 4 making the last ch loose, sl st in the 1st HUMP (located on the back of the chain) from the hook, make 3 sc in same hump, sl st nxt 3 chs, sl st in nxt sc, sl st into nxt ch-1 sp*, repeat *-* once more, ch 3 making last ch loose, sl st in hump on 1st ch from hook and nxt 2 chs, sl st in nxt sc, sl st in nxt ch-1 sp, ch 3, sl st in 1st ch from hook in the hump and nxt 2 chs, sl st in 1st sl st made and cut yarn.
Glue or sew the face on the fatter side of the body. The ch-4 sides are the top antennae and the ch-3 sides are the bottom. I positioned it slightly to the side and not directly on front so when I looked at him from the side his face was showing front.
Eyes (Make 2):
With B hook and fingering white yarn or 2 plies of split white worsted yarn, make magic ring, ch 1:
Rnd 1: 5 sc in ring, sl st to 1st sc made, cut yarn. (5)
Using glue or sewing, affix one eye to the top end of the ch-4 spikes.
Using black yarn you can sew pupils in the eyes. I used a toothpick and black acrylic paint and just dotted eyes on.
Mouth:
With pink fingering weight yarn or worsted pink yarn split into 2 plies, sew a small “V” shape mid-face for the smile.
Weave in any remaining ends.
Sew or glue a few strands of yarn of your choice to the narrow end for the slime trail.
ENJOY!
Follow me on any of my social media to stay in touch, I would love to have you! Much love and yarn, Stephanie Pokorny (Crochetverse)