

")
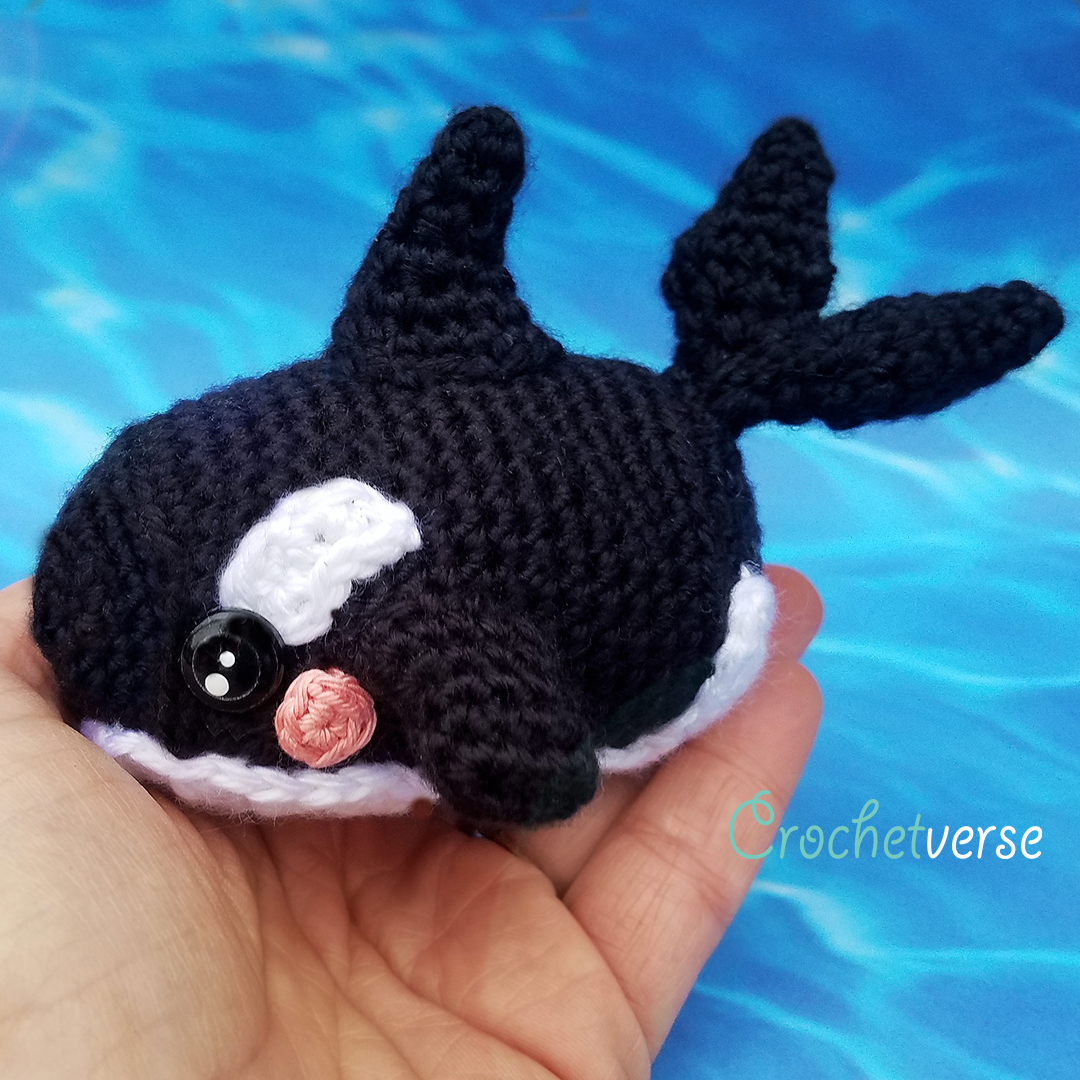
Hello again! Welcome to Week 2 of the Orca Whale Crochet Along! Up this week, we assemble our pieces and finish our little cutie!
If you missed Week 1, you can find that here: https://crochetverse.com/orca-whale-crochet-along-week-one/
Ravelry ❤: http://www.ravelry.com/patterns/library/orca-whale-amigurumi
Don’t forget to join the CAL- Crochet A Long group on Facebook, our hosts for the CAL! Find that here: https://www.facebook.com/groups/668646249929007/
In addition to the Crochetverse group for all things Crochetverse at: https://www.facebook.com/groups/251695645349035/
Please be sure to post photos, so we can all see the cuteness you create!
Here are your translations:
UK TERMS: https://crochetverse.com/orca-weektwo-uk-terms/
FRENCH: https://crochetverse.com/orca-weektwo-french/
SWEDISH: https://crochetverse.com/orca-weektwo-swedish/
DUTCH: https://crochetverse.com/orca-weektwo-dutch/
GERMAN: https://crochetverse.com/orca-weektwo-german/
(This part can make or break a good ami, take your time so your end piece is amazing!)
(Note: I feel that increases look better in ami than decreases, so I have chosen Rounds 1-6 of the main
body as the face/front of the piece and the final decrease rounds as the back/rear of the piece)
NOTE** You may pin your pieces in place before sewing them on. This will allow you to adjust before it is permanently attached, so that your final piece is exactly as you want it.
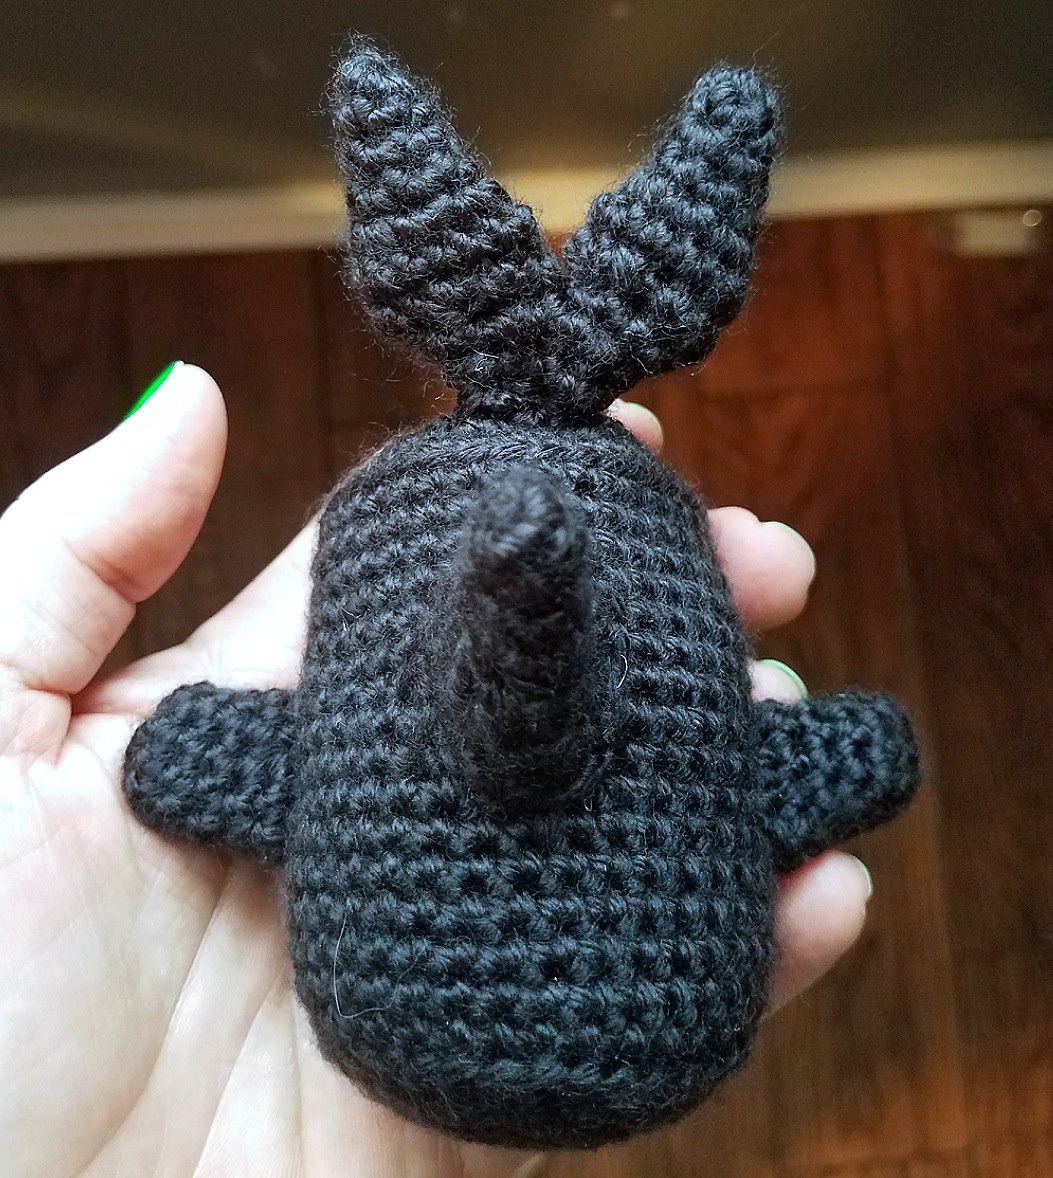
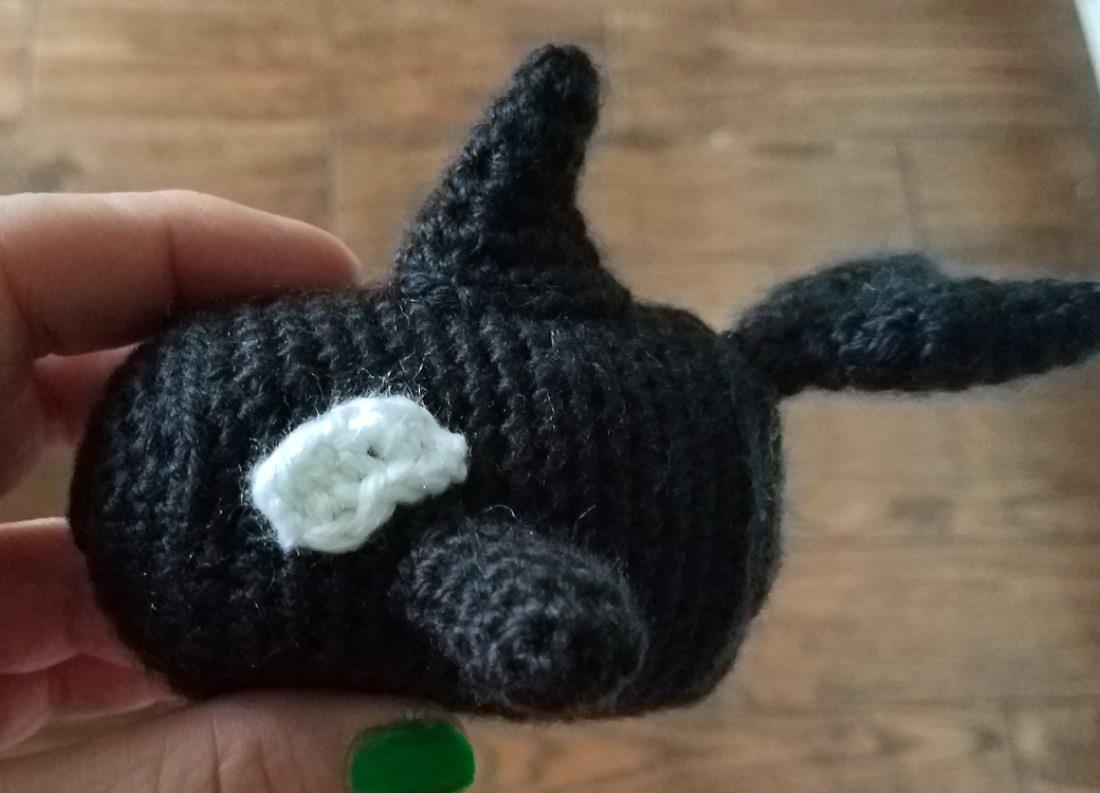
- Attach the TOP FIN: Position the top fin so that the slight curved edge is pointing towards the rear end of the piece. It should be placed so that the front sits at the 6th row after the back loop sc ridge and the back ends on the 13th row from the back ridge. It should span about 6 sts wide. Using a whip stitch, sew it to the body, adding a little stuffing before closing the last few stitches.
 2. Attach the SIDE FINS: By nature of the way the rounds have been worked, you will see that the fin will “slant”. Play into that and position it so that the natural slant has the fin pointing towards the rear of the body. You can pin these on to get proper spacing before stitching. View the piece from the sides, top, and bottom, so it is positioned correctly from all angles. They are positioned so they are a bit closer to the front/face than the top fin and are half way between the top and the bottom. Tuck the starting tail inside the piece, do not add any stuffing. Using a whip stitch, sew one fin to each side of the body.
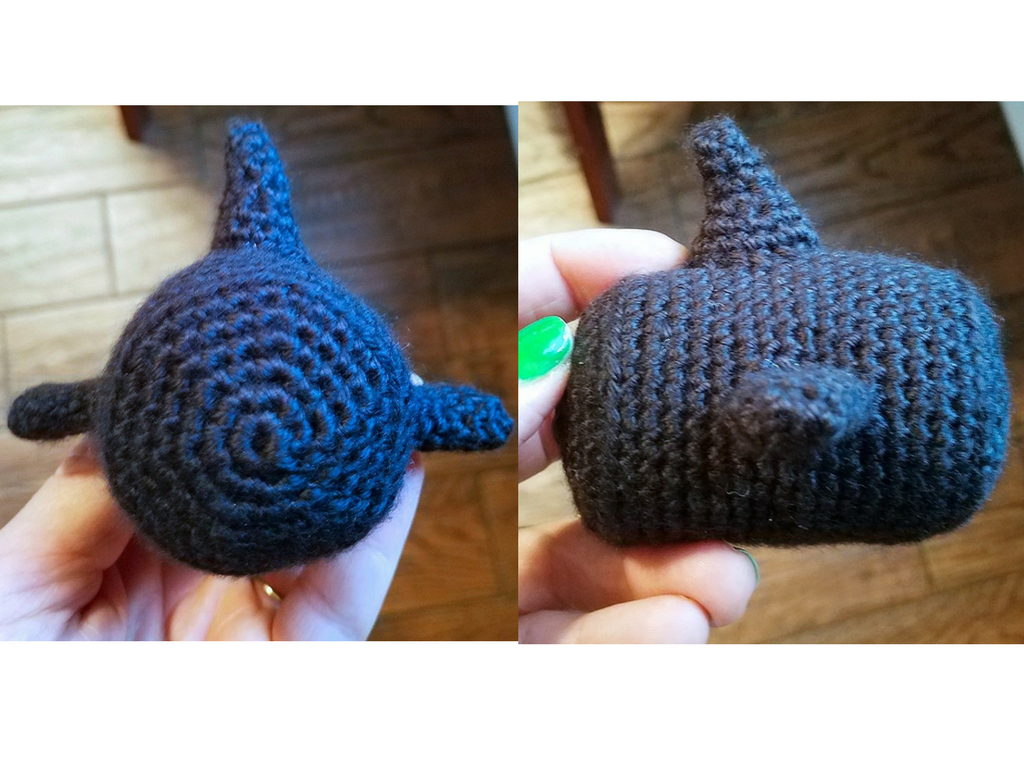 3. Attach the TAIL FIN: Position it so it is centered in line with the top fin and centered side to side. It should be seamed just below the scblo round on the rear as in the photo. Using a whip stitch, sew the tail to the rear of the body.
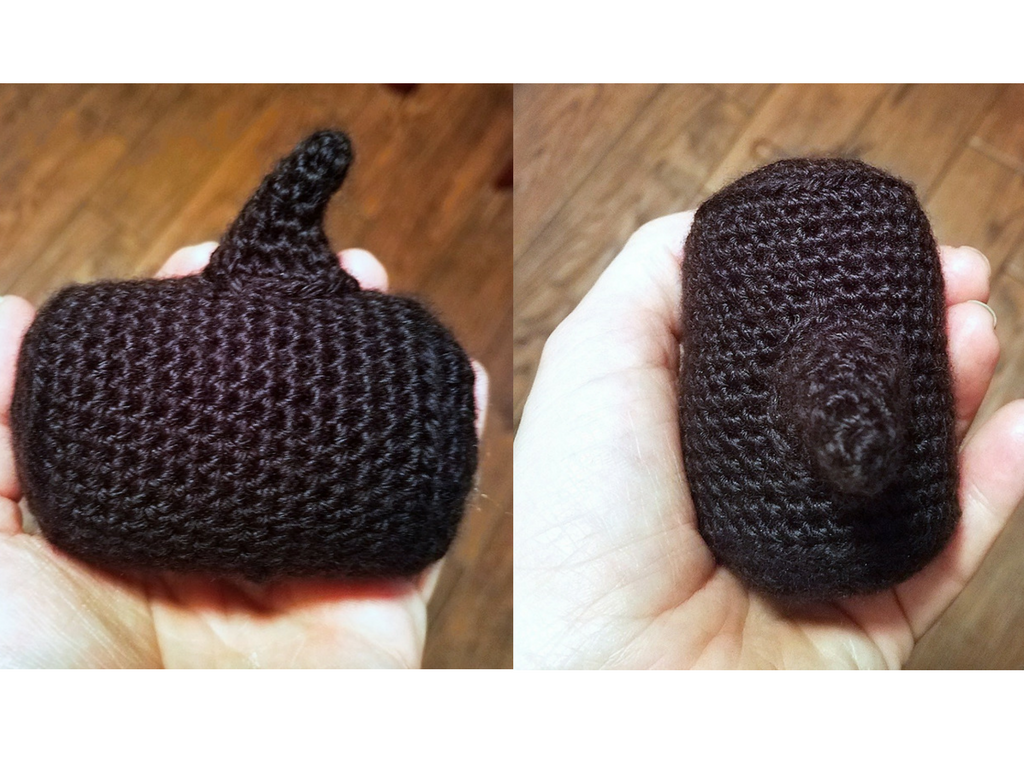
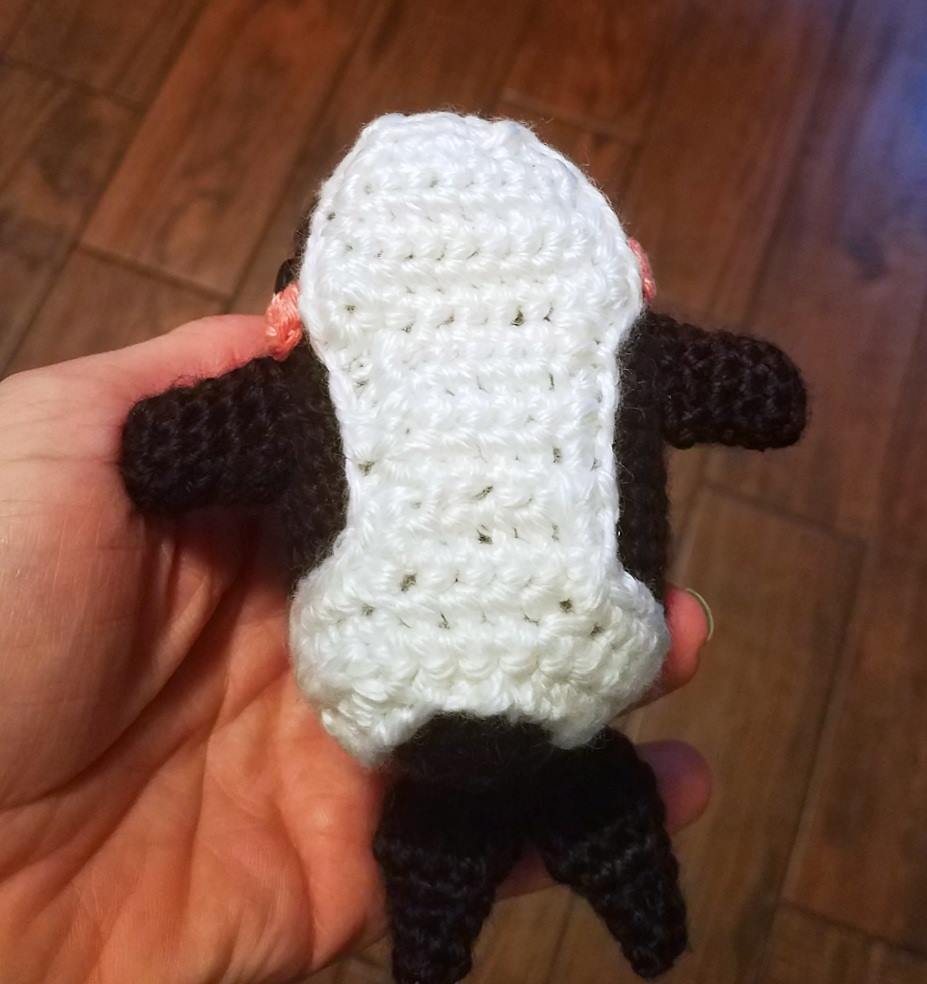
- Attach EYE ACCENTS: Notice the piece is “kidney bean” in shape. Position them on each side of the body so they are just above the side tail fins and the curve is down (like a rainbow) to the bottom of the main body. They should sit JUST a little ahead of the side fins. Using a whip stitch, sew them into place.
- Attach EYES: See main pattern image for placement assistance. They sit just below the center horizontal line of the body and are placed over rounds 8-10 or 11 based on what eyes you use.
BUTTON EYE OPTION: We will attach them now because you need a “counterpoint” to tug the yarn in and it will leave a small “divot” in the piece which is unavoidable. SO, we will attach the eyes, counter sinking them under the bottom belly. Then, we will seam the white tummy accent on over these divots later to hide them.
Take a strand of black yarn and thread it through the belly of the main body from the underside, exit the needle in the position you want the eye to sit, just towards the front and below the white eye accent. Thread the yarn through the eye, then insert the needle back into the body down and exit under the bottom of the main body just a stitch over from the original entry point. Knot the two tails firmly, tugging gently so the eye isn’t popping out from the body, rather just flush with it. Repeat for the other eye.
CROCHET EYE OPTION: Using the same positioning stated above, pin each crocheted eye on either side of the head with the larger white “eye sparkle” near the 7 o’clock position on both sides. Using a whip stitch, sew them in place.
- Attach CHEEK ACCENTS: See main pattern image for placement. Stitch one pink cheek accent just behind each eye and just below each side fin. I brought the tails of these under the body and tied them in a knot to be covered with the white tummy in the next step.
- Attach WHITE TUMMY: Using a whip stitch, (pin in place if needed), sew the white tummy to the underside of the main body. The rounded end should sit slightly up onto the face, reaching just below the pink cheek accents. The V shape tail end should wrap up to the sides of the body.
- Make sure all pins have been removed, if you used them. Weave in any remaining ends within the body and trim flush.
You are DONE! How cute is he!? Thank you so very much for working along with me!
Please post projects and questions to any of the social media sites below, and/or email me at
Much Love and Yarn,
Stephanie
Follow on Facebook Here! http://www.facebook.com/crochetverse
Follow on Instagram Here! Handle Name: Crochetverse
Follow on Ravelry Here! Shop Name: Crochetverse
Follow on Pinterest Here! Handle Name: Crochetverse
Follow on YouTube Here! Channel Name: Crochetverse
Follow on Twitter Here! Handle Name: Crochetverse
Follow on Etsy Here! Shop Name: Crochetverse
The information and photos in this posting are the sole copyrighted property of Crochetverse©2016. Please do not copy and paste any of the information contained within either electronically, verbally, or written in part or in whole. Instead, please share the DIRECT LINK to this posting only, and if you do, I thank you for sharing. You of course may sell anything you make from this pattern that you have made with your own two hands; no contract labor or mass productions are permitted. If you credit Crochetverse as the designer, that is greatly appreciated!
